在STM32中使用printf()和scanf
本文出处: https://shawnhymel.com/1873/how-to-use-printf-on-stm32/
作者:Shawn Hymel
内容来源于网络,本文只做翻译和学习,已获得原文作者许可转载,欢迎访问原文章。
一般来说,大多数微控制器没有控制台的概念。而在调试时将信息输出到某种控制台非常重要。一种方式是在STM32CubeIDE 中使用半主机。但是半主机可能会很慢。
另一个选择是通过串口 (UART) 输出调试信息。我们可以调用STM32的HAL函数(例如HAL_UART_Transmit)来使用串口。
但是,如果可以使用C标准库中的printf、scanf等会更方便。因此需要重新编写底层函数。
注意: 本文的代码摘自 Carmine Noviello 的Mastering STM32 书。我只是更新了如何在 STM32Cube 中重新配置的过程。所有功劳都归功于 Carmine Noviello 的代码。如果您愿意,欢迎您编写自己的 retarget.h 和 retarget.c 文件。
新建一个默认的 STM32 工程,配置启用 UART,保存并生成代码。
第一件事是禁用 syscalls.c。这个文件定义了许多函数名与我们将要创建的相同。编译时禁用它可以避免出现“多重定义”错误。例如:
multiple definition of `_isatty'
右键单击 syscalls.c文件并选择 Properties。在 C/C++ Build > Settings 下,选中 Exclude resource from build
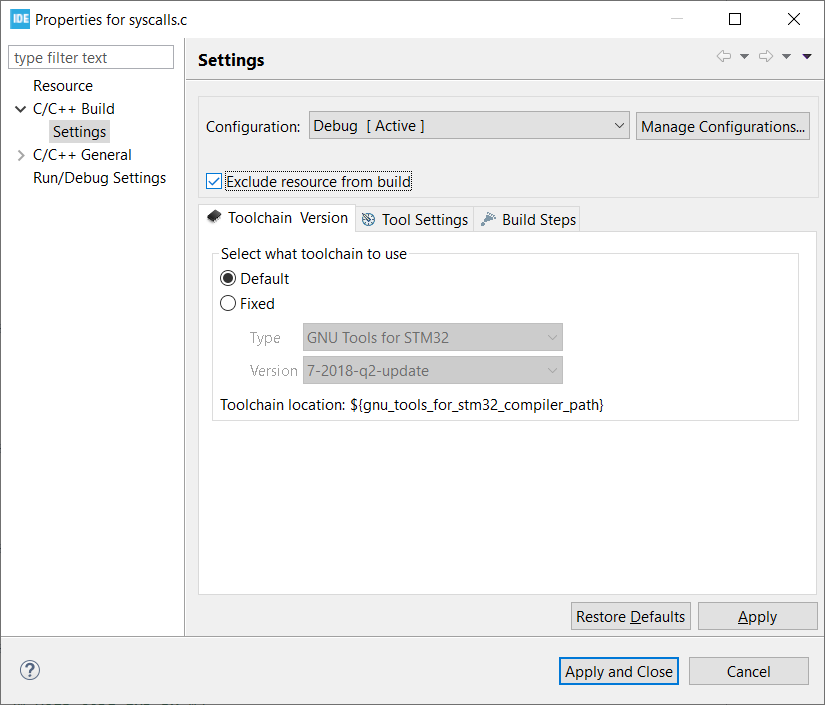
单击应用并关闭。工程文件资源管理器中的文件名现在应该是灰色的。

这样我们就可以在 STM32CubeIDE 中编译和链接时不包含文件(或文件夹)。该过程与大多数其他基于 Eclipse 的 IDE 相似。
在Inc目录中创建一个名为 retarget.h的新文件 。将以下代码复制到此文件中并保存:
// All credit to Carmine Noviello for this code
// https://github.com/cnoviello/mastering-stm32/blob/master/nucleo-f030R8/system/include/retarget/retarget.h

#ifndef _RETARGET_H__
#define _RETARGET_H__

#include "stm32l4xx_hal.h"
#include <sys/stat.h>

void RetargetInit(UART_HandleTypeDef *huart);
int _isatty(int fd);
int _write(int fd, char* ptr, int len);
int _close(int fd);
int _lseek(int fd, int ptr, int dir);
int _read(int fd, char* ptr, int len);
int _fstat(int fd, struct stat* st);

#endif //#ifndef _RETARGET_H__
在Src目录中创建一个名为 retarget.c的新文件 。将以下代码复制到此文件中并保存:
// All credit to Carmine Noviello for this code
// https://github.com/cnoviello/mastering-stm32/blob/master/nucleo-f030R8/system/src/retarget/retarget.c

#include <_ansi.h>
#include <_syslist.h>
#include <errno.h>
#include <sys/time.h>
#include <sys/times.h>
#include <limits.h>
#include <signal.h>
#include <../Inc/retarget.h>
#include <stdint.h>
#include <stdio.h>

#if !defined(OS_USE_SEMIHOSTING)

#define STDIN_FILENO  0
#define STDOUT_FILENO 1
#define STDERR_FILENO 2

UART_HandleTypeDef *gHuart;

void RetargetInit(UART_HandleTypeDef *huart) {


  gHuart = huart;

  /* Disable I/O buffering for STDOUT stream, so that
   * chars are sent out as soon as they are printed. */
     /* 禁用 STDOUT 流的 I/O 缓冲,以便
   * 字符在打印后立即发送出去。*/
  setvbuf(stdout, NULL, _IONBF, 0);
}

int _isatty(int fd) {


  if (fd >= STDIN_FILENO && fd <= STDERR_FILENO)
    return 1;

  errno = EBADF;
  return 0;
}

int _write(int fd, char* ptr, int len) {


  HAL_StatusTypeDef hstatus;

  if (fd == STDOUT_FILENO || fd == STDERR_FILENO) {


    hstatus = HAL_UART_Transmit(gHuart, (uint8_t *) ptr, len, HAL_MAX_DELAY);
    if (hstatus == HAL_OK)
      return len;
    else
      return EIO;
  }
  errno = EBADF;
  return -1;
}

int _close(int fd) {


  if (fd >= STDIN_FILENO && fd <= STDERR_FILENO)
    return 0;

  errno = EBADF;
  return -1;
}

int _lseek(int fd, int ptr, int dir) {


  (void) fd;
  (void) ptr;
  (void) dir;

  errno = EBADF;
  return -1;
}

int _read(int fd, char* ptr, int len) {


  HAL_StatusTypeDef hstatus;

  if (fd == STDIN_FILENO) {


    hstatus = HAL_UART_Receive(gHuart, (uint8_t *) ptr, 1, HAL_MAX_DELAY);
    if (hstatus == HAL_OK)
      return 1;
    else
      return EIO;
  }
  errno = EBADF;
  return -1;
}

int _fstat(int fd, struct stat* st) {


  if (fd >= STDIN_FILENO && fd <= STDERR_FILENO) {


    st->st_mode = S_IFCHR;
    return 0;
  }

  errno = EBADF;
  return 0;
}

#endif //#if !defined(OS_USE_SEMIHOSTING)
您的工程目录结构应如下所示:

注意,我们添加了 retarget.h和 retarget.c。并且不编译 syscalls.c 文件 ,但该文件仍然存在于我们的目录中。
在 main.c文件中包含 stdio.h和 retarget.h 头文件,就可以使用 printf 和 scanf了,如下所示:
/* Includes ------------------------------------------------------------------*/
#include "main.h"
/* Private includes ----------------------------------------------------------*/
/* USER CODE BEGIN Includes */
#include <stdio.h>
#include "retarget.h"
/* USER CODE END Includes */
/* Private typedef -----------------------------------------------------------*/
/* USER CODE BEGIN PTD */
/* USER CODE END PTD */
/* Private define ------------------------------------------------------------*/
/* USER CODE BEGIN PD */
/* USER CODE END PD */
/* Private macro -------------------------------------------------------------*/
/* USER CODE BEGIN PM */
/* USER CODE END PM */
/* Private variables ---------------------------------------------------------*/
UART_HandleTypeDef huart2;
/* USER CODE BEGIN PV */
/* USER CODE END PV */
/* Private function prototypes -----------------------------------------------*/
void SystemClock_Config(void);
static void MX_GPIO_Init(void);
static void MX_USART2_UART_Init(void);
/* USER CODE BEGIN PFP */
/* USER CODE END PFP */
/* Private user code ---------------------------------------------------------*/
/* USER CODE BEGIN 0 */
/* USER CODE END 0 */
/**
* @brief The application entry point.
* @retval int
*/
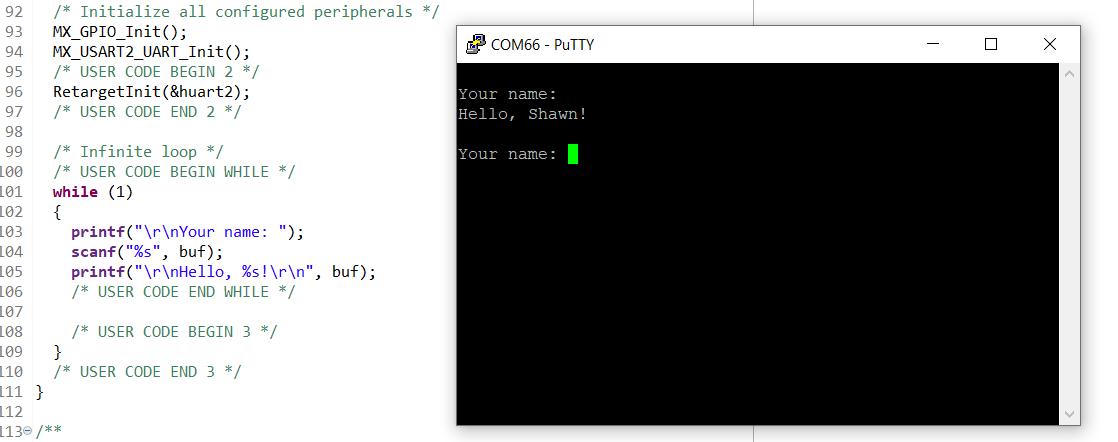
int main(void)
{
/* USER CODE BEGIN 1 */
char buf[100];
/* USER CODE END 1 */
/* MCU Configuration--------------------------------------------------------*/
/* Reset of all peripherals, Initializes the Flash interface and the Systick. */
HAL_Init();
/* USER CODE BEGIN Init */
/* USER CODE END Init */
/* Configure the system clock */
SystemClock_Config();
/* USER CODE BEGIN SysInit */
/* USER CODE END SysInit */
/* Initialize all configured peripherals */
MX_GPIO_Init();
MX_USART2_UART_Init();
/* USER CODE BEGIN 2 */
RetargetInit(&huart2);
/* USER CODE END 2 */
/* Infinite loop */
/* USER CODE BEGIN WHILE */
while (1)
{
printf("\r\nYour name: ");
scanf("%s", buf);
printf("\r\nHello, %s!\r\n", buf);
/* USER CODE END WHILE */
/* USER CODE BEGIN 3 */
}
/* USER CODE END 3 */
}
// ***REST OF INITIALIZATION CODE NOT SHOWN***
编译此项目并在 STM32CubeIDE 中打开调试窗口。打开串口调试软件,连接到单片机的 COM 口(波特率为 115200,8-N-1)。进入轮询后应该会对你表示欢迎。输入一些回复并按enter。
注意,你将无法看到自己输入的内容。但是,程序会把你输入的内容添加加到“Hello”字符串后并输出。

还有一点,尽量不要溢出分配的字符缓冲区,否则会发生一些莫名的错误。可以在代码中编写某种越界检查。无论如何,这只是一个开始,希望能帮助你调试 STM32 项目。