场景:客户要求把96服务器上的数据复制到86服务器上,但是要自动复制,不要人为干预,然后我就登录96服务器,使用ssh命令,登录到86服务器,发现需要输入密码,要想写shell脚本,使用scp命令复制数据的话,需要手动输入密码。
基于此场景,有两个方案。
方案一:96和86服务器配置免密登录
步骤:
1.生成无密码的密钥对
ssh-keygen -t rsa一路回车
2.将公钥添加到本地认证文件中
cat /root/.ssh/id_rsa.pub >> /root/.ssh/authorized_keys3.设置authorized_keys的访问权限
chmod 600 /root/.ssh/authorized_keys**以上步骤先在每个节点上先执行一遍,然后执行下面操作
4.将每个节点上生成的id_rsa.pub复制到其他所有节点并添加到它们的认证文件中
比如:96上生成的id_rsa.pub,复制到86上
scp /root/.ssh/id_rsa.pub 86:/root/(96上执行)

cat ~/id_rsa.pub >> ~/.ssh/authorized_keys(在86上执行)

scp /root/.ssh/id_rsa.pub 96:/root/(86上执行)

cat ~/id_rsa.pub >> ~/.ssh/authorized_keys(在96上执行)
我查看一下,96和86服务器上都有免密到其他服务器的公钥了,如果我再执行ssh-keygen -t rsa命令,会把之前配置的给覆盖。
我查看到目录:.ssh/下有id_rsa.pub。
第2步的目的其实就是id_rsa.pub内容添加到对方机器的authorized_keys,然后我把86服务器上的 id_rsa.pub内容添加到96机器的authorized_keys,就可以了。如果你按照方案一不能解决问题,那么可以使用方案二,我也是使用的方案二,因为免密配置,配置的次数太多了(我的这篇文章https://blog.csdn.net/Allenzyg/article/details/105762429也有免密配置步骤),也想换个方式。哈哈哈~~~
方案二:使用expect
expect就是用来做交互用的,基本任何交互登录的场合都能使用,但是需要安装expect包。
步骤:
1.在96服务器下载expect
yum -y install expect2.配置shell脚本
vim 1.sh填入如下内容:
#!/usr/bin/expect -f

set timeout 30

spawn scp 目录/文件 86:/opt/fanRuan/apache-tomcat-8.5.29/webapps/WebReport/yecai_tctp_income/BL/January/

expect "*password:"

send "123456\r"

expect eof
3.执行1.sh文件
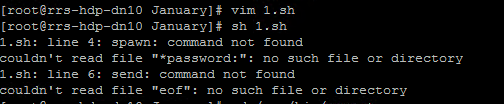
注意:expect跟bash类似,使用时要先登录到expect,所以首行要指定使用expect在运行脚本时候要expect file,不能sh file了,不然会报错:
1.sh: line 4: spawn: command not found
couldn't read file "*password:": no such file or directory
1.sh: line 6: send: command not found
couldn't read file "eof": no such file or directory
说明执行方式不正确,因为expect用的不是bash所以会报错。执行的时候直接./1.sh就可以了
如果执行./1.sh报错:-bash: ./1.sh: Permission denied
解决办法:chmod -R 777 1.sh


首行指定用来执行该脚本的命令程序,这里是/usr/bin/expect
上面语句第一句是设定超时时间为30s,spawn是expect的语句,执行命令前都要加这句
expect "password:"这句意思是交互获取是否返回password:关键字,因为在执行ssh时会返回输入password的提示:[email protected]'s password:
send就是将密码123456发送过去
expect eof 子进程已经结束的eof字符,expect脚本也就退出结束
interact代表执行完留在远程控制台,不加这句执行完后返回本地控制台
知识储备:linux下expect的使用
使用一:
| expect 使用 安装: yum -y install expect
1,首行声明 2,控制台输出 3,设置日期变量$date 4,设置ip变量$local_ip 127.0.0.1 5,设置默认等待时间: 3000 #!/usr/bin/expect -f set date [exec date "+%Y%m%d"] set ip1 123.57.219.236 set timeout 3000
6,简单交互 spawn send:用于向进程发送字符串 expect:从进程接收字符串 spawn:启动新的进程 interact:允许用户交互 等待输入"hi\n" ? 输出"hello word\n" ? expect "hi\n" send "you typed <$expect_out(buffer)>" send "but I only expected <$expect_out(0,string)>" |
使用二:
| 当在标准输入中输入 test hi 是,运行结果如下 you typed: test hi I only expect: hi
匹配到hi后,会输出"you said hi" expect "hi" {send "You said hi"}
匹配到hi,hello,bye任意一个字符串时,执行相应的输出 expect { "hi" { send "You said hi\n"} "hello" { send "Hello yourself\n"} "bye" { send "That was unexpected\n"} }
这段代码的作用是登录到ftp服务器ftp ftp.uu.net上,并以二进制的方式下载服务器上的文件test.tar.gz。程序中有详细的注释。 set timeout -1 spawn ftp ftp.test.com //打开新的进程,该进程用户连接远程ftp服务器.最后将控制权交给用户. expect "Name" //进程返回Name时 send "user\r" //向进程输入anonymous\r expect "Password:" //进程返回Password:时 send "123456\r" //向进程输入[email protected]\r expect "ftp> " //进程返回ftp>时 send "binary\r" //向进程输入binary\r expect "ftp> " //进程返回ftp>时 send "get test.tar.gz\r" //向进程输入get test.tar.gz\r interact |
使用三:
| ssh免密码登录:123.57.219.236,密码:123456: spawn ssh -p10022 [email protected] expect { "yes/no" {send "yes\r";exp_continue} "password:" {send "123456\n\r"} } interact
执行236上指定目录的脚本,可以适配第一次连接: spawn ssh -p 10022 rsync@$ip1 "expect /data/software/bak/rsync_2_48.sh" expect { "yes/no" { send "yes\r";exp_continue} "$ip1's password:" { send "pwd@123\n\r"} } expect eof |
使用四:
| 2,获取执行参数 执行的第一个参数 set nb1 [lindex $argv 0] # 执行第二个参数 set nb2 [lindex $argv 1] # 参数数量 puts "$argc" # 程序名字 puts "$argv0" 3,逻辑判断 switch 分支结构 set color [lindex $argv 0] switch $color { apple { puts "apple is blue" } banana { puts "banana is yellow " } } if 分支 #!/usr/bin/expect set test [lindex $argv 0] if { "$test" == "apple" } { puts "$test" } else { puts "not apple" } |
使用五:
| for 循环结构 第一种 foreach number { 1 2 3thread 4third } { puts "$number" } 第二种
for {set i 0} {$i<4} {incr i} { puts "$i" } while 循环结构 set i 1 while {$i<4} { puts "$i" incr i } 4 函数定义 proc test {} { puts "ok" } test 5. 结尾加 interact 执行完成后保持交互状态,把控制权交给控制台,这个时候就可以手工操作了。如果没有这一句登录完成后会退出,而不是留在远程终端上。如果你只是登录过去执行 |
使用六:
| 然后在shell脚本中调用即可:
#!/bin/bash expect /root/shell/login.exp agrv1 agrv2 |
最后的知识储备参考:https://blog.csdn.net/huoyuanshen/article/details/79473063