1.手动搭建 LNMP 环境
LNMP 是 Linux、Nginx、MariaDB 和 PHP 的缩写,这个组合是最常见的 Web 服务器的运行环境之一。
步骤1:登录 Linux 实例
使用购买服务器的平台进行登录 Linux 实例
使用远程登录软件winscp和putty 登录 Linux 实例
使用 SSH 登录 Linux 实例
步骤2:安装 Nginx
执行以下命令,安装 nginx。
yum install -y nginx
编辑/etc/nginx/nginx.conf文件。
找到server{...},并将 server 大括号中相应的配置信息替换为如下内容。用于取消对 IPv6 地址的监听,同时配置 Nginx,实现与 PHP 的联动。
server {


listen       80;
root   /usr/share/nginx/html;
server_name  localhost;
#charset koi8-r;
#access_log  /var/log/nginx/log/host.access.log  main;
#
location / {


   index index.php index.html index.htm;
}
#error_page  404              /404.html;
#redirect server error pages to the static page /50x.html
#
error_page   500 502 503 504  /50x.html;
location = /50x.html {


root   /usr/share/nginx/html;
}
#pass the PHP scripts to FastCGI server listening on 127.0.0.1:9000
#
location ~ .php$ {


fastcgi_pass   127.0.0.1:9000;
fastcgi_index  index.php;
fastcgi_param  SCRIPT_FILENAME  $document_root$fastcgi_script_name;
include        fastcgi_params;
}
}
执行以下命令启动 Nginx。
systemctl start nginx
执行以下命令,设置 Nginx 为开机自启动。
systemctl enable nginx
在浏览器中访问自己的网站地址(ip地址或者域名),查看 Nginx 服务是否正常运行。
步骤3:安装数据库
执行以下命令,查看系统中是否已安装 MariaDB。
rpm -qa | grep -i mariadb
应该默认都是有的,可能版本比较旧,我这边是5.多,所以就先卸载然后再安装。
sudo yum -y remove 包名
sudo yum install mariadb-server
执行以下命令,启动 MariaDB 服务。
systemctl start mariadb
执行以下命令,设置 MariaDB 为开机自启动。
systemctl enable mariadb
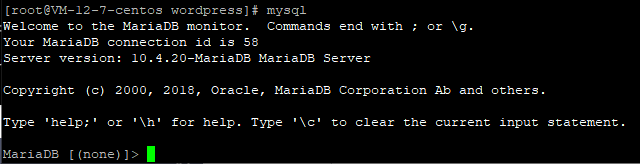
执行以下命令,验证 MariaDB 是否安装成功。
mysql
显示这样即为安装成功!
步骤4:安装配置 PHP
依次执行以下命令,更新 yum 中 PHP 的软件源。
rpm -Uvh https://mirrors.cloud.tencent.com/epel/epel-release-latest-7.noarch.rpm
rpm -Uvh https://mirror.webtatic.com/yum/el7/webtatic-release.rpm
执行以下命令,安装 PHP 7.2 所需要的包。
yum -y install mod_php72w.x86_64 php72w-cli.x86_64 php72w-common.x86_64 php72w-mysqlnd php72w-fpm.x86_64
执行以下命令,启动 PHP-FPM 服务。
systemctl start php-fpm
执行以下命令,设置 PHP-FPM 服务为开机自启动。
systemctl enable php-fpm
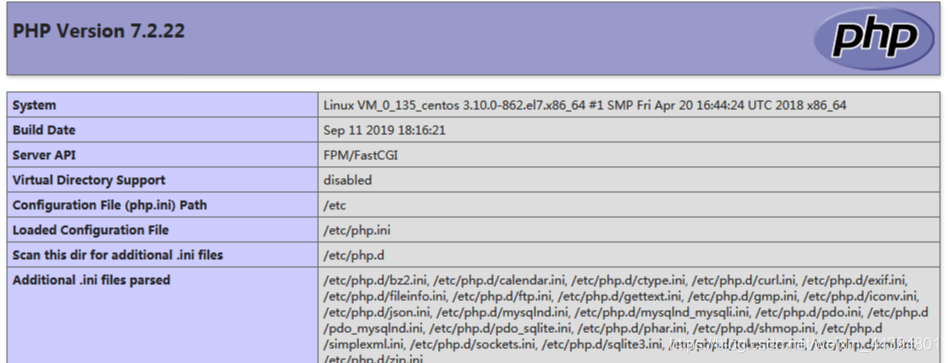
验证环境配置
当您完成环境配置后,可以通过以下验证 LNMP 环境是否搭建成功。
执行以下命令,创建测试文件。
echo "<?php phpinfo(); ?>" >> /usr/share/nginx/html/index.php
执行以下命令,重启 Nginx 服务。
systemctl restart nginx
在本地浏览器中访问如下地址,查看环境配置是否成功。
http://云服务器实例的公网 IP
2.配置数据库
执行以下命令,进入 MariaDB。
mysql
执行以下命令,创建 MariaDB 数据库。例如 “wordpress”。
CREATE DATABASE wordpress;
执行以下命令,创建一个新用户。例如 “user”,登录密码为 123456。
CREATE USER 'user'@'localhost' IDENTIFIED BY '123456';
执行以下命令,赋予用户对 “wordpress” 数据库的全部权限。
GRANT ALL PRIVILEGES ON wordpress.* TO 'user'@'localhost' IDENTIFIED BY '123456';
执行以下命令,使所有配置生效。
FLUSH PRIVILEGES;
3.安装和配置 WordPress
WordPress下载与解压
执行以下命令,删除网站根目录下用于测试 PHP-Nginx 配置的index.php文件。
rm -rf /usr/share/nginx/html/index.php
依次执行以下命令,进入/usr/share/nginx/html/目录,并下载与解压 WordPress。
cd /usr/share/nginx/html
下面这句下载会报错
wget https://cn.wordpress.org/latest-zh_CN.tar.gz
[root@VM-12-7-centos html]# wget https://cn.wordpress.org/latest-zh_CN.tar.gz

--2021-07-10 22:00:10--  https://cn.wordpress.org/latest-zh_CN.tar.gz
Resolving cn.wordpress.org (cn.wordpress.org)... 198.143.164.252
Connecting to cn.wordpress.org (cn.wordpress.org)|198.143.164.252|:443... connected.

Unable to establish SSL connection.
Unable to establish SSL connection.报错原因是有些网站不允许非浏览器方式获取文件,需要加参数:--no-check-certificate
下载命令
wget https://cn.wordpress.org/latest-zh_CN.tar.gz --no-check-certificate
解压命令
tar zxvf latest-zh_CN.tar.gz
WordPress配置
依次执行以下命令,进入 WordPress 安装目录,将wp-config-sample.php文件复制到wp-config.php文件中,并将原先的示例配置文件保留作为备份。
cd /usr/share/nginx/html/wordpress
cp wp-config-sample.php wp-config.php
编辑新创建的配置文件wp-config.php。
找到文件中 MySQL 的部分,并将相关配置信息修改为 配置 WordPress 数据库 中的内容。
 // ** MySQL settings - You can get this info from your web host ** //
 /** The name of the database for WordPress */
 define('DB_NAME', 'wordpress');

 /** MySQL database username */
 define('DB_USER', 'user');

 /** MySQL database password */
 define('DB_PASSWORD', '123456');

 /** MySQL hostname */
 define('DB_HOST', 'localhost');
4.验证 WordPress 安装
在浏览器地址栏输入http://域名或云服务器实例的公网IP/wordpress ,因为是解压在wordpress文件夹下的。
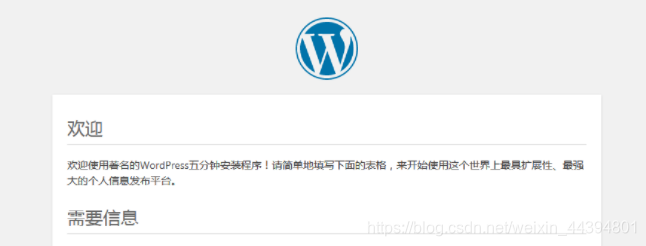
这样就基本配置好了,之后你可以进行修改主题等等操作。