实时刷新传感器数据
效果图

效果视频

Bootstrap flex布局
使用NPM安装Bootstrap
第一步、输入如下代码安装Bootstrap
npm install bootstrap@3
第二步、在main.js文件导入引用
import BootstrapVue from 'bootstrap-vue'

import 'bootstrap/dist/css/bootstrap.css'

import 'bootstrap-vue/dist/bootstrap-vue.css'

Vue.use(BootstrapVue)
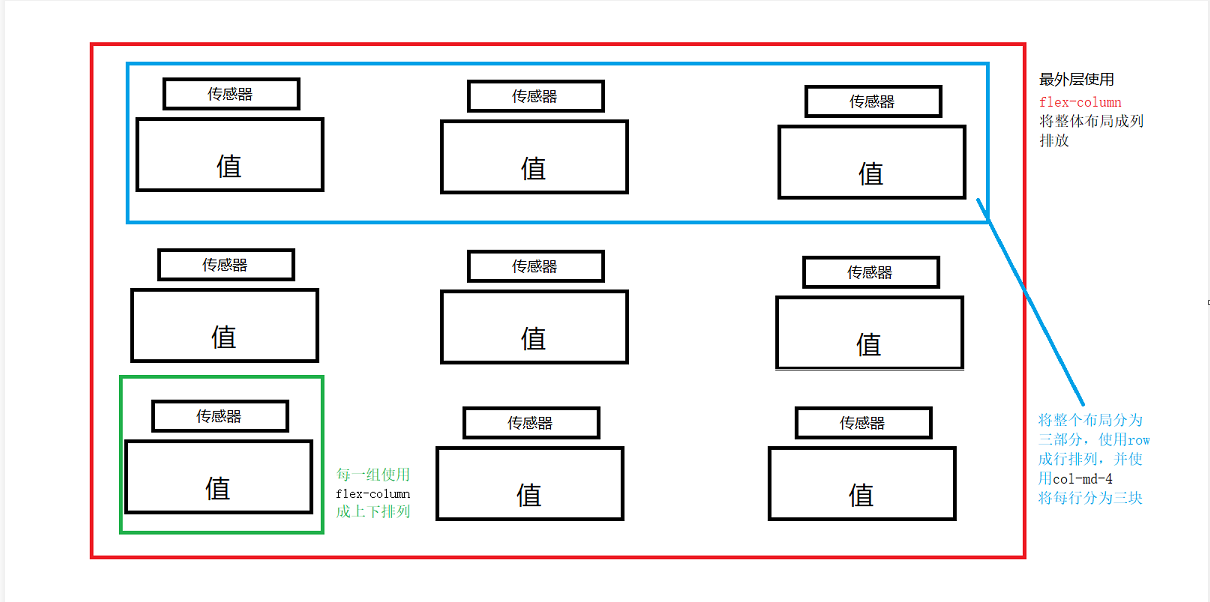
布局
逻辑图

布局分析
第一步、将整个页面得呈列排放(由上而下排列)
在最外层使用如下语句
<div class="d-flex flex-column" style="width: 100%;height: 100%">
第二步、呈行排列,分为三行
<div class="row p-3" style="flex-grow:1;width: 100%">
第三步、将每一行分为三部分
<div class="col-md-4">
实时刷新数据
定义字段
data(){
    return{
      timerFlag:true,
      tmpValue:0,
      humValue:0,
      smokeValue:0,
      lightValue:0,
      humanValue:0,
      pm2_5Value:0,
      co2Value:0,
      coValue:0,
      noiseValue:0,
    }
  }
绑定字段
<animate-number
          mode="auto"
          :from="0"
          :to="tmpValue"
          :key="tmpValue"
          duration="2000"
          from-color="#44CC00"
          to-color="#ec4949"
          :formatter="formatter"
          class=""
          style="font-size: 48px"
        ></animate-number>
设置心跳
开启心跳
使用一个标识符开启心跳
timer=setInterval(()=>{
      if (this.timerFlag){
      // do something
      }
   },1000)
设置钩子函数
 this.getTmpValue()
 this.getHumValue()
 this.getLightValue()
 this.getCOValue()
 this.getCO2Value()
 this.getPM25Value()
 this.getHumanValue()
 this.getNoiseValue()
this.getSmokeValue()
获取数据
getTmpValue(){
      const that = this
      window.nleApi.getSensorInfo(335463,"z_temperature").completed(function (tmpRes) {
        that.tmpValue = tmpRes.ResultObj.Value
        console.log(that.tmpValue)
      })
    }
结束心跳
destroyed() {
    clearInterval(timer)
  }
尾言
天行健,君子当自强不息