K8S的对Pod的调度策略,K8S的nodeSelector,K8S的pod的inter-pod Affinity和pod AntiAffinity,K8S的taint-and-toleration
K8S的调度策略
K8S的调度策略主要可以分为这5种:
- nodeSelector(节点选择器):主要通过手动定义节点标签,然后容器创建时绑定节点标签进行调度。
- nodeAffinity(节点亲和):主要通过设置节点标签,然后在pod文件指定requiredDuringSchedulingIgnoredDuringExecution(硬限制)和preferredDuringSchedulingIgnoredDuringExecution(软限制)这2种不同的规则,其中主要依靠节点标签,节点标签变动,pod文件的值也要变动,功能侧重于将新的pod分到不同的节点组。
- inter-pod Affinity(pod亲和):主要通过节点标签和pod标签,通过requiredDuringSchedulingIgnoredDuringExecution(硬限制)和preferredDuringSchedulingIgnoredDuringExecution(软限制)规则让新创建的pod和老的pod创建时在同一个节点区域下的同一个节点上,侧重于老的pod和新的pod之间的限制。
- pod AntiAffinity(pod反亲和):主要通过节点标签和pod标签,让新建的pod和老的pod不在同一个节点上创建。
- taint-and-toleration(污点和容忍度):主要通过节点污点化和pod的yml文件设置容忍度,根据匹配度进行创建pod。
1、通过手动增加节点标签进行调度(nodeSelector方式)
搭建K8S文档:yum安装K8S
ansible搭建K8S集群:ansible搭建K8S
准备至少3个机器搭建好K8S集群测试调度
| 节点名称 | IP |
|---|---|
| k8s-master | 192.168.116.134 |
| k8s-node1 | 192.168.116.135 |
| k8s-node2 | 192.168.116.136 |
官网nodeSelector文档:nodeSelector
在master操作
kubectl get nodes --show-labels   查看节点状态和标签
kubectl label nodes  k8s-node1 node-labels=nginx-test-1  对k8s-node1加多标签

k8s-node1  指的是节点的名称,也就是NAME这部分的名称
node-labels=nginx-test-1  标签需要以等号标记,容器创建时以键值对方式表现

kubectl get nodes --show-labels   可以看到标签已经标记上去


在master创建容器的yml文件,测试K8S的调度
vi nginx.yml

apiVersion: apps/v1
kind: Deployment
metadata:
  labels:
    app: nginx
  name: nginx-deployment
  namespace: default
spec:
  replicas: 1
  selector:
    matchLabels:
      app: nginx
  template:
    metadata:
      labels:
        app: nginx
    spec:
      containers:
      - name: nginx
        image: docker.io/library/nginx:1.18.0-alpine
      #下面这2句就是指定容器创建的节点
      nodeSelector:
        node-labels: nginx-test-1

kubectl apply -f nginx.yml   创建容器
kubectl get pod -n default -o wide   可以看到容器被创建到了node1节点上
kubectl delete -f nginx.yml  删除容器

2、通过节点亲和(node Affinity)调度容器的创建
官网亲和调度文档:K8S-nodeAffinity(亲和)
nodeAffinity(节点亲和):
特性:
- 如果你同时指定了 nodeSelector 和 nodeAffinity,两者必须都要满足,才能将 Pod 调度到候选节点上。
- 如果你指定了多个与 nodeAffinity 类型关联的 nodeSelectorTerms, 只要其中一个nodeSelectorTerms 满足的话,Pod 就可以被调度到节点上。
- 如果你指定了多个与同一 nodeSelectorTerms 关联的 matchExpressions, 则只有当所有matchExpressions 都满足时 Pod 才可以被调度到节点上。
字段表达方式:
- requiredDuringSchedulingIgnoredDuringExecution方式:
- 这种方式相当于硬限制,调度器只有在规则被满足的时候才能执行调度。此功能类似于 nodeSelector, 但其语法表达能力更强。
- preferredDuringSchedulingIgnoredDuringExecution方式:
- 这种方式相当于软限制,调度器会尝试寻找满足对应规则的节点。如果找不到匹配的节点,调度器仍然会调度该 Pod。
2.1 通过节点亲和(node Affinity)的强制性指定容器创建在某个节点
这个方式和上面的指定nodeSelector方式类似,都是只能固定节点创建。
在master操作

kubectl label nodes k8s-node1 node-labels-   删除上面创建的标签
kubectl label nodes  k8s-node1 qinhe=required-1 对k8s-node1加多标签
kubectl get nodes --show-labels   查看标签

在master创建容器的yml文件,测试K8S的调度
vi nginx.yml

apiVersion: apps/v1
kind: Deployment
metadata:
  labels:
    app: nginx
  name: nginx-deployment
  namespace: default
spec:
  replicas: 1
  selector:
    matchLabels:
      app: nginx
  template:
    metadata:
      labels:
        app: nginx
    spec:
      containers:
      - name: nginx
        image: docker.io/library/nginx:1.18.0-alpine
      #下面就是定义容器创建的节点标记
      affinity:
        nodeAffinity:
          requiredDuringSchedulingIgnoredDuringExecution:
            nodeSelectorTerms:
            - matchExpressions:
              - key: qinhe  #修改这里的键,也就是等于号左边的内容
                operator: In
                values:
                - required-1 #修改这里的值,也就是等于号右边的内容

kubectl apply -f nginx.yml   创建容器
kubectl get pod -n default -o wide   可以看到容器被创建到了node1节点上
kubectl delete -f nginx.yml  删除容器

2.2 通过节点亲和(node Affinity)的首选(权重)性进行调度
nodeAffinity.preferredDuringSchedulingIgnoredDuringExecution方式:
- weight字段,其取值范围是 1 到 100。 当调度器找到能够满足 Pod 的其他调度请求的节点时,调度器会遍历节点满足的所有的偏好性规则,并将对应表达式的 weight 值加和。
这个方式就是当有容器要创建时,优先创建在这些权重高的节点上面。
在master操作
kubectl label nodes k8s-node1 qinhe-   删除上面创建的标签

将k8s的2个节点分成2个组,一个键可以赋多个节点值
kubectl label nodes  k8s-node1 qinhe/1=preferred-1  对k8s-node1加多标签
kubectl label nodes  k8s-node2 qinhe/2=preferred-2 对k8s-node2加多标签
kubectl get nodes --show-labels   查看标签

在master创建容器的yml文件,测试K8S的调度
vi nginx.yml

apiVersion: apps/v1
kind: Deployment
metadata:
  labels:
    app: nginx
  name: nginx-deployment
  namespace: default
spec:
  replicas: 1
  selector:
    matchLabels:
      app: nginx
  template:
    metadata:
      labels:
        app: nginx
    spec:
      containers:
      - name: nginx
        image: docker.io/library/nginx:1.18.0-alpine
      affinity:
        nodeAffinity:
          preferredDuringSchedulingIgnoredDuringExecution:
          - weight: 1
            preference:
              matchExpressions:
              - key: qinhe
                operator: In
                values:
                - preferred-2

kubectl apply -f nginx.yml   创建容器
kubectl get pod -n default -o wide   可以看到容器被创建到了node2节点上
kubectl delete -f nginx.yml  删除容器

3、pod的亲和和反亲和
inter-pod-affinity和anti-affinity文档:inter-pod-affinity和pod-anti-affinity
特性:有2种定义类型
requiredDuringSchedulingIgnoredDuringExecution
preferredDuringSchedulingIgnoredDuringExecution
- 可以使用 requiredDuringSchedulingIgnoredDuringExecution 亲和性来告诉调度器,将两个服务的 Pod 放到同一个云提供商可用区内,因为它们彼此之间通信非常频繁。 类似地,你可以使用preferredDuringSchedulingIgnoredDuringExecution 反亲和性来将同一服务的多个 Pod分布到多个云提供商可用区中。
- 要使用 Pod 间亲和性,可以使用 Pod 规约中的 .affinity.podAffinity 字段。 对于 Pod间反亲和性,可以使用 Pod 规约中的 .affinity.podAntiAffinity 字段。
- 对于 Pod 亲和性而言,在 requiredDuringSchedulingIgnoredDuringExecution 和
preferredDuringSchedulingIgnoredDuringExecution 中,topologyKey 不允许为空 - 对于 requiredDuringSchedulingIgnoredDuringExecution 要求的 Pod 反亲和性, 准入控制器LimitPodHardAntiAffinityTopology 要求 topologyKey 只能是kubernetes.io/hostname。如果你希望使用其他定制拓扑逻辑, 你可以更改准入控制器或者禁用之。
3.1 通过pod亲和(inter-pod-Affinity)调度容器
实验目的:指定新的pod和老的pod都在同一个节点上。
工作方式:
- 一般会对节点进行分组标签,如不想打标签,可以使用系统默认对节点的标签,如kubernetes.io/hostname等,但是topology必须要有值。
- 如果把K8S的节点区分为几个分组打标签,创建时通过topology:节点键名,确定创建pod的节点区域,这个时候创建pod会在这个节点区域任一节点创建pod。
- 先创建一个容器,让其自动选择节点
- 添加matchExpressions.key和values确定老的pod的位置,让新的pod和老的pod都创建在同一个节点上。
在master操作
kubectl label nodes k8s-node2 qinhe-   删除上面创建的标签

将2个节点都设置同一个标签,表示2个节点是同一组
kubectl label nodes  k8s-node1 k8s/zone=pod-qinhe
kubectl label nodes  k8s-node2 k8s/zone=pod-qinhe

kubectl get nodes --show-labels   查看标签

创建一个任意pod,让pod自动选择生成的节点
vi nginx-lab.yml     创建老的pod

apiVersion: apps/v1
kind: Deployment
metadata:
  labels:
    qinhe: nginx-lab   #这里就是pod的标签键值对,下面要一致才行
  name: nginx-lab-deployment
  namespace: default
spec:
  replicas: 1
  selector:
    matchLabels:
      qinhe: nginx-lab
  template:
    metadata:
      labels:
        qinhe: nginx-lab
    spec:
      containers:
      - name: nginx-lab
        image: docker.io/library/nginx:1.18.0-alpine

kubectl apply -f nginx-lab.yml       创建容器
kubectl get pod -n default -o wide   查看pod创建的节点
kubectl get pod --show-labels        查看pod的标签

创建新的pod,指定老的pod的标签,这样新的pod就会创建在和老的pod同一个节点上
vi nginx-new.yml 创建新的pod
apiVersion: apps/v1
kind: Deployment
metadata:
labels:
app: nginx-new
name: nginx-deployment
namespace: default
spec:
replicas: 1
selector:
matchLabels:
app: nginx-new
template:
metadata:
labels:
app: nginx-new
spec:
containers:
- name: nginx-new
image: docker.io/library/nginx:1.18.0-alpine
affinity:
podAffinity: #这里是亲和,和下面的反亲和不一样
requiredDuringSchedulingIgnoredDuringExecution:
- labelSelector:
matchExpressions:
- key: qinhe #自定义pod的标签键
operator: In
values:
- nginx-lab #自定义pod的标签值
topologyKey: k8s/zone #写自定义的节点组标签,也可以写默认标签kubernetes.io/hostname
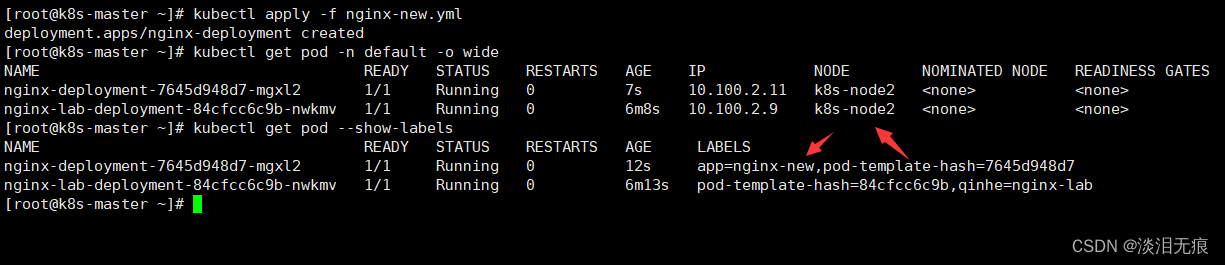
kubectl apply -f nginx-new.yml 创建新的pod
kubectl get pod -n default -o wide 查看节点位置
kubectl get pod --show-labels 查看标签
kubectl delete -f nginx-new.yml 删除容器
3.2 通过pod-anti-Affinity反亲和调度容器
反亲和注意:
- 对于 requiredDuringSchedulingIgnoredDuringExecution 要求的 Pod 反亲和性, 准入控制器LimitPodHardAntiAffinityTopology 要求 topologyKey 只能是kubernetes.io/hostname。如果你希望使用其他定制拓扑逻辑, 你可以更改准入控制器或者禁用之。
实验目的:让新创建的pod和指定的老的pod不能创建在同一个节点上。
创建一个任意pod,让pod自动选择生成的节点
vi nginx-lab.yml     创建老的pod

apiVersion: apps/v1
kind: Deployment
metadata:
  labels:
    qinhe: nginx-lab   #这里就是pod的标签键值对,下面要一致才行
  name: nginx-lab-deployment
  namespace: default
spec:
  replicas: 1
  selector:
    matchLabels:
      qinhe: nginx-lab
  template:
    metadata:
      labels:
        qinhe: nginx-lab
    spec:
      containers:
      - name: nginx-lab
        image: docker.io/library/nginx:1.18.0-alpine

kubectl apply -f nginx-lab.yml       创建容器
kubectl get pod -n default -o wide   查看pod创建的节点是k8s-node2
kubectl get pod --show-labels        查看pod的标签

创建新的pod,指定老的pod的标签,让2个pod不能创建在同一个节点上
删除上面定义的标签
kubectl label nodes  k8s-node1 k8s/zone-
kubectl label nodes  k8s-node2 k8s/zone-

确认2个节点都有这个系统默认标签kubernetes.io/hostname
kubectl get nodes --show-labels

vi nginx-antiaffinity.yml   创建反亲和容器

apiVersion: apps/v1
kind: Deployment
metadata:
  labels:
    app: nginx-antiaffinity
  name: nginx-antiaffinity
  namespace: default
spec:
  replicas: 1
  selector:
    matchLabels:
      app: nginx-antiaffinity
  template:
    metadata:
      labels:
        app: nginx-antiaffinity
    spec:
      containers:
      - name: nginx-antiaffinity
        image: docker.io/library/nginx:1.18.0-alpine
      affinity:
        podAntiAffinity:  #注意这里是podAntiAffinity,和上面的亲和不一样
          requiredDuringSchedulingIgnoredDuringExecution:
          - labelSelector:
               matchExpressions:
               - key: qinhe   #自定义老的pod的键
                 operator: In
                 values:
                 - nginx-lab  #自定义老的pod的值
            topologyKey: kubernetes.io/hostname  #注意:这个标签不能设置为其他标签,只能是系统默认的kubernetes.io/hostname

kubectl apply -f nginx-antiaffinity.yml   创建新的pod
kubectl get pod -n default -o wide        查看到新的pod生成在k8s-node1节点上
kubectl delete -f nginx-antiaffinity.yml  删除容器

4 通过K8S的taint-and-toleration调度容器
目的:为了加强集群管理,将K8S的集群划分一部分核心节点或者说隔离节点,使得新的pod尽量或者不要在这些节点下创建。比如在k8s集群中,master节点一般是不能创建pod,这就是污点化的作用。
工作方式:
- pod的yml文件没有设置tolerations(容忍度),根据节点污点化模式调度
- pod的yml文件有设置tolerations(容忍度),根据容忍度和污点化匹配进行调度
k8s的内置污点化:
当集群中某个条件被触发时,节点控制器会自动给节点添加一个污点。
- node.kubernetes.io/not-ready:节点未准备好。这相当于节点状态 Ready 的值为 “False”。
- node.kubernetes.io/unreachable:节点控制器访问不到节点. 这相当于节点状态 Ready 的值为"Unknown"。
- node.kubernetes.io/memory-pressure:节点存在内存压力。
- node.kubernetes.io/disk-pressure:节点存在磁盘压力。
- node.kubernetes.io/pid-pressure: 节点的 PID 压力。
- node.kubernetes.io/network-unavailable:节点网络不可用。
- node.kubernetes.io/unschedulable: 节点不可调度。
- node.cloudprovider.kubernetes.io/uninitialized:如果 kubelet 启动时指定了一个"外部" 云平台驱动, 它将给当前节点添加一个污点将其标志为不可用。在 cloud-controller-manager的一个控制器初始化这个节点后,kubelet 将删除这个污点。
在节点被驱逐时,节点控制器或者 kubelet 会添加带有 NoExecute 效应的相关污点。 如果异常状态恢复正常,kubelet 或节点控制器能够移除相关的污点。
4.2 当pod的yml没有设置tolerations(容忍度)且节点设置污点化模式时
节点污点化用法:kubectl taint nodes 节点名称 键=值:effect 值
effect 值有3种效果:
- 当effect值设置为NoSchedule,新创建的pod不能在这个节点创建,但是不影响已经创建在这个节点的pod。
- 当effect 值为PreferNoSchedule,新创建的pod会尽量不会在这个节点上创建,实际还是有可能创建在这个节点上。
- 当effect 值为 NoExecute ,新创建的pod不能在这个节点创建。而且假如已经有pod在这个节点上创建,那么这个pod会被驱逐,也就是去其他节点上重建pod。
4.1.1 节点污点化模式为NoSchedule时:
因为节点污点化模式为NoSchedule,新创建的pod不能在这个节点创建。
vi nginx-lab.yml       创建pod,不指定节点,随机创建

apiVersion: apps/v1
kind: Deployment
metadata:
  labels:
    qinhe: nginx-lab
  name: nginx-lab-deployment
  namespace: default
spec:
  replicas: 1
  selector:
    matchLabels:
      qinhe: nginx-lab
  template:
    metadata:
      labels:
        qinhe: nginx-lab
    spec:
      containers:
      - name: nginx-lab
        image: docker.io/library/nginx:1.18.0-alpine

对k8s-node1节点进行污点化
kubectl taint nodes k8s-node1 k8s/tain1=exists:NoSchedule

kubectl describe nodes k8s-node1 |grep Taints   查看节点的污点标签
kubectl apply -f nginx-lab.yml                  创建容器
kubectl get pod -o wide                         可以看到pod只会在k8s-node2这个没有污点的节点生成
kubectl delete -f nginx-lab.yml                 删除容器

当把k8s-node2也设置污点后,可以看到pod的状态一直是Pending状态
kubectl taint nodes k8s-node2 k8s/tain1=exists:NoSchedule 设置k8s-node2节点污点
kubectl apply -f nginx-lab.yml 创建容器
kubectl get pod -o wide 查看节点位置
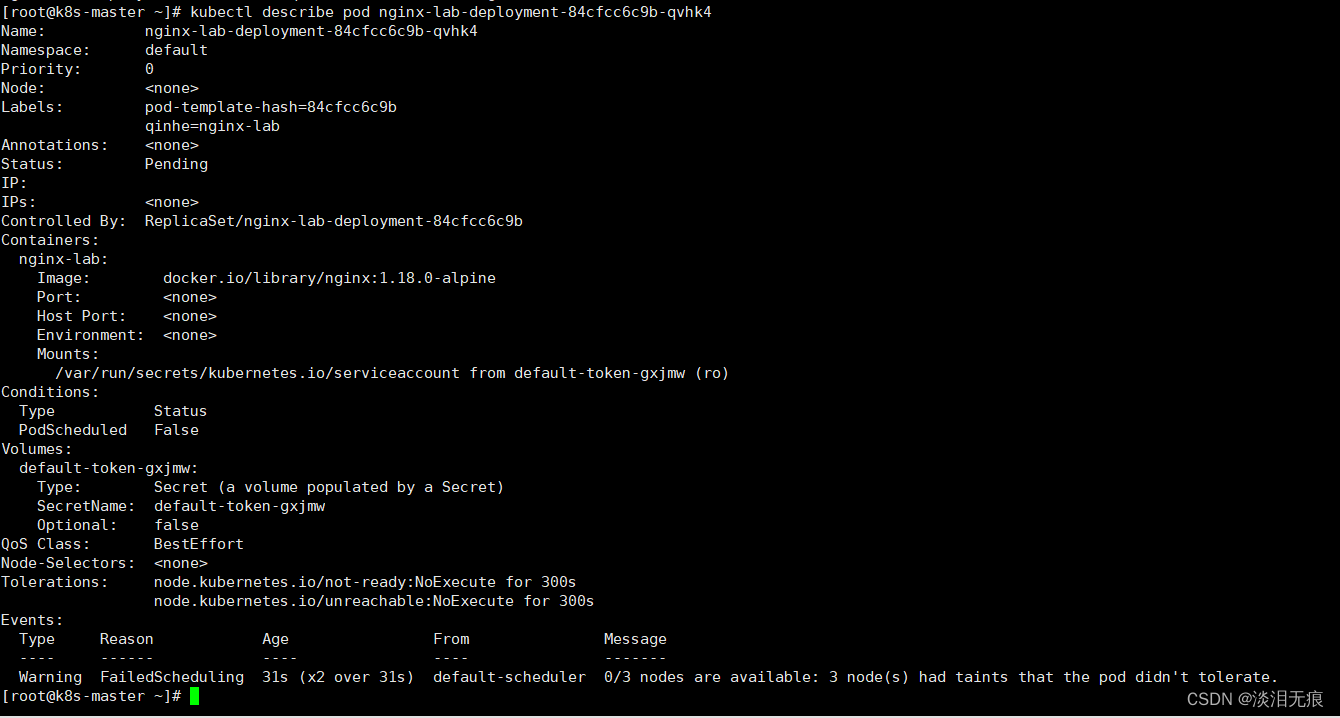
kubectl describe pod nginx-lab-deployment-84cfcc6c9b-qvhk4 查看pod日志
查看报错是这个,意思就是没有节点可以给pod生成,3个节点都被污点化了
Warning FailedScheduling 31s (x2 over 31s) default-scheduler 0/3 nodes are available: 3 node(s) had taints that the pod didn't tolerate.

4.1.2 节点污点化模式为PreferNoSchedule时:
因为节点污点化模式为PreferNoSchedule,所以当只有k8s-node1节点时,容器还是能创建在污点化的节点下。
将k8s-node2去除污点化标签,关机
kubectl taint nodes k8s-node1 k8s/tain1=exists:NoSchedule- 去除污点化
kubectl taint nodes k8s-node2 k8s/tain1=exists:NoSchedule- 去除污点化
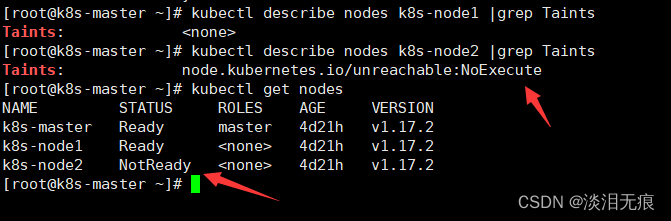
kubectl describe nodes k8s-node1 |grep Taints 查看污点化
kubectl describe nodes k8s-node2 |grep Taints 查看污点化
node.kubernetes.io/unreachable:NoExecute是内置污点化标签,表示这个节点不能调度
kubectl get nodes 因为关闭了k8s-node2节点,所以状态为NotReady
创建pod
vi nginx-lab.yml 创建pod
apiVersion: apps/v1
kind: Deployment
metadata:
labels:
qinhe: nginx-lab
name: nginx-lab-deployment
namespace: default
spec:
replicas: 1
selector:
matchLabels:
qinhe: nginx-lab
template:
metadata:
labels:
qinhe: nginx-lab
spec:
containers:
- name: nginx-lab
image: docker.io/library/nginx:1.18.0-alpine
将k8s-node1污点化
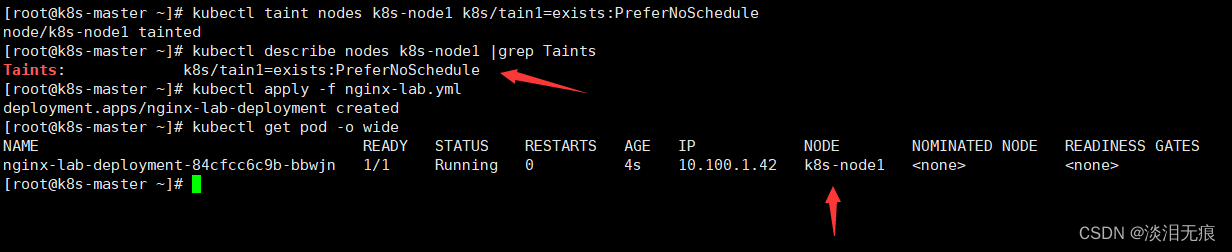
kubectl taint nodes k8s-node1 k8s/tain1=exists:PreferNoSchedule
kubectl describe nodes k8s-node1 |grep Taints 查看污点化
kubectl apply -f nginx-lab.yml 创建容器
kubectl get pod -o wide 查看pod被创建在了k8s-node1
4.1.3 节点污点化模式为NoExecute时:
因为节点污点化模式为NoExecute,所以当pod已经在k8s-node2存在时,还是会被驱逐到其他节点重建。
删除2个节点污点化标签,创建pod
vi nginx-lab.yml 创建容器
apiVersion: apps/v1
kind: Deployment
metadata:
labels:
qinhe: nginx-lab
name: nginx-lab-deployment
namespace: default
spec:
replicas: 1
selector:
matchLabels:
qinhe: nginx-lab
template:
metadata:
labels:
qinhe: nginx-lab
spec:
containers:
- name: nginx-lab
image: docker.io/library/nginx:1.18.0-alpine
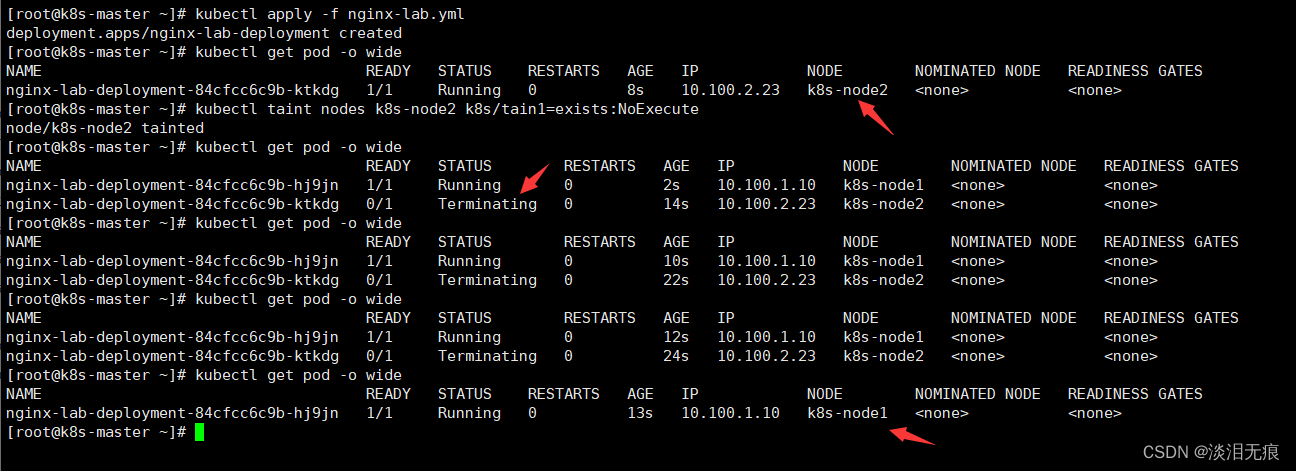
kubectl apply -f nginx-lab.yml 创建容器
kubectl get pod -o wide 可以看到pod在k8s-node2节点下生成
kubectl taint nodes k8s-node2 k8s/tain1=exists:NoExecute 将k8s-node2节点污点化
kubectl get pod -o wide 可以看到pod被重建到了k8s-node1
kubectl delete -f nginx-lab.yml 删除容器
4.2 pod的yml文件搭配容忍度使用
上面的节点污点化主要是让新的pod创建时,不要在污点化的节点创建。而容忍度则是为了在有污点化的节点上创建pod。
容忍度用法:
- 先将节点污点化
- 在tolerations定义operator,key,value,effect值
- 根据定义的容忍度进行调度
4.2.1 集群存在没有污点化节点时,pod容忍度调度优先创建在没有污点化的节点
因为污点化本来就是不想让pod创建在污点化过后的节点上,所以当存在没有进行过污点化的节点,pod会优先创建在那些没有污点化的节点上。
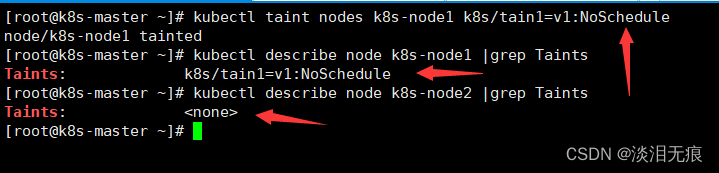
对k8s-node1进行污点化,k8s-node2不进行污点化
kubectl taint nodes k8s-node1 k8s/tain1=v1:NoSchedule

查看污点标签
kubectl describe node k8s-node1 |grep Taints
kubectl describe node k8s-node2 |grep Taints
创建pod
vi nginx-taint1.yml       创建pod

apiVersion: apps/v1
kind: Deployment
metadata:
  labels:
    app: nginx-antiaffinity
  name: nginx-antiaffinity
  namespace: default
spec:
  replicas: 1
  selector:
    matchLabels:
      app: nginx-antiaffinity
  template:
    metadata:
      labels:
        app: nginx-antiaffinity
    spec:
      containers:
      - name: nginx-antiaffinity
        image: docker.io/library/nginx:1.18.0-alpine
      tolerations:
        - key: "k8s/tain1"
          operator: "Equal"
          value: "v1"
          effect: "NoSchedule"

kubectl apply -f nginx-taint1.yml    创建pod
kubectl get pod -o wide              可以看到节点被创建在了k8s-node2

4.2.2 集群都是污点化节点时
effect值注意:
- 如果 Pod 不能忍受 effect 值为 NoExecute 的污点,那么 Pod 将马上被驱逐。
- 如果 Pod 能够忍受 effect 值为 NoExecute 的污点,但是在容忍度定义中没有指定 tolerationSeconds,则Pod 还会一直在这个节点上运行。
- 如果 Pod 能够忍受 effect 值为 NoExecute 的污点,而且指定了tolerationSeconds, 则 Pod还能在这个节点上继续运行这个指定的时间长度。
4.2.2-1 operator 为 Equal(相等)等值模式
等值模式1:operator 是 Equal (相等),如果pod文件key、value值、effect值存在但是不一致,那么就会根据key、value、effect值一一进行匹配,匹配度最高的污点化节点创建pod。
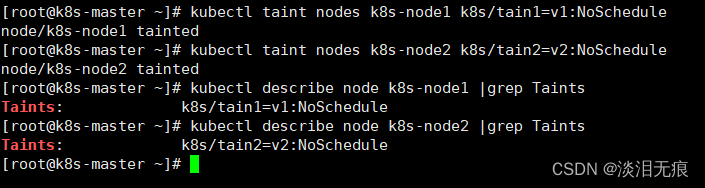
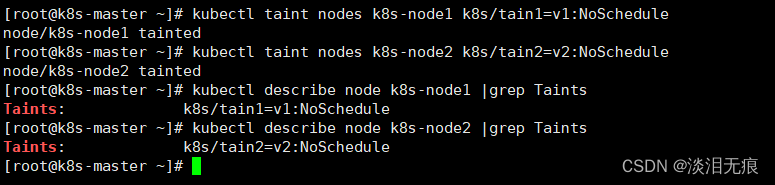
对节点1和节点2都进行污点化
对节点1和节点2都进行污点化
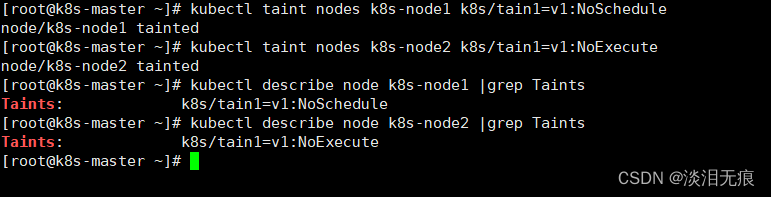
kubectl taint nodes k8s-node1 k8s/tain1=v1:NoSchedule
kubectl taint nodes k8s-node2 k8s/tain2=v2:NoSchedule
kubectl describe node k8s-node1 |grep Taints
kubectl describe node k8s-node2 |grep Taints
创建pod
vi nginx-taint1.yml

apiVersion: apps/v1
kind: Deployment
metadata:
  labels:
    app: nginx
  name: nginx
  namespace: default
spec:
  replicas: 1
  selector:
    matchLabels:
      app: nginx
  template:
    metadata:
      labels:
        app: nginx
    spec:
      containers:
      - name: nginx
        image: docker.io/library/nginx:1.18.0-alpine
      tolerations:
        - key: "k8s/tain1"
          operator: "Equal"   #等值模式下,key和value和effect的值一致
          value: "v1"
          effect: "NoSchedule"


kubectl apply -f nginx-taint1.yml    创建pod

因为operator指定了值必须相等,所以可以看到pod创建在了k8s-node1节点
kubectl get pod -o wide

等值模式2:operator 是 Equal (相等),如果pod文件effect值为空,污点化节点的key、value值存在但是不一致,那么key和value值匹配度越高的节点就会创建pod。
设置节点污点化
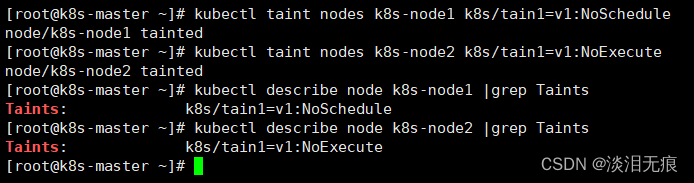
设置节点污点化
kubectl taint nodes k8s-node1 k8s/tain1=v1:NoSchedule
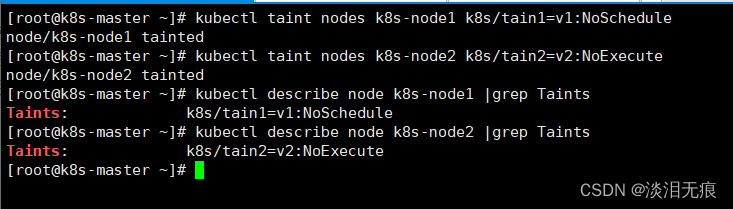
kubectl taint nodes k8s-node2 k8s/tain2=v2:NoExecute
查看污点化标签
kubectl describe node k8s-node1 |grep Taints
kubectl describe node k8s-node2 |grep Taints
创建pod
vi nginx-taint1.yml             创建pod

apiVersion: apps/v1
kind: Deployment
metadata:
  labels:
    app: nginx
  name: nginx
  namespace: default
spec:
  replicas: 1
  selector:
    matchLabels:
      app: nginx
  template:
    metadata:
      labels:
        app: nginx
    spec:
      containers:
      - name: nginx
        image: docker.io/library/nginx:1.18.0-alpine
      tolerations:
        - key: "k8s/tain1"   #必须设置key和污点化的key一致
          operator: "Equal"
          value: "v1"        #必须设置value和污点化的value一致
          effect: ""        #可以为空


kubectl apply -f nginx-taint1.yml   创建pod

可以看到指定了k8s-node1污点化的key和value时,不用指定effect就可以在node1创建pod
kubectl get pod -o wide
kubectl delete -f nginx-taint2.yml

修改文件的值为k8s-node2的key和value,effect还是为空,可以看到pod会创建在k8s-node2上
vi nginx-taint1.yml    创建pod
省略...
      tolerations:
        - key: "k8s/tain2"
          value: "v2"
          operator: "Equal"
          effect: ""

可以看到指定了k8s-node2污点化的key和value时,不用指定effect就可以在node2创建pod

kubectl apply -f nginx-taint1.yml
kubectl get pod -o wide
kubectl delete -f nginx-taint1.yml

等值模式3:operator 是 Equal (相等),如果pod文件effect值为空,有多个污点化节点的key、value值、effect值存在且一致时,pod会随机在这些节点上创建。
设置节点污点化,设置key和value和effect一致
设置节点污点化
kubectl taint nodes k8s-node1 k8s/tain1=v1:NoSchedule
kubectl taint nodes k8s-node2 k8s/tain1=v1:NoSchedule
查看污点化标签
kubectl describe node k8s-node1 |grep Taints
kubectl describe node k8s-node2 |grep Taints

创建pod
vi nginx-taint1.yml    创建pod

apiVersion: apps/v1
kind: Deployment
metadata:
  labels:
    app: nginx
  name: nginx
  namespace: default
spec:
  replicas: 1
  selector:
    matchLabels:
      app: nginx
  template:
    metadata:
      labels:
        app: nginx
    spec:
      containers:
      - name: nginx
        image: docker.io/library/nginx:1.18.0-alpine
      tolerations:
        - key: "k8s/tain1"
          operator: "Equal"
          value: "v1"
          effect: ""

kubectl apply -f nginx-taint1.yml
kubectl get pod -o wide
kubectl delete -f nginx-taint1.yml

等值模式4:operator 是 Equal (相等),如果pod文件effect值为空,有多个污点化节点的key、value值一致但是effect值不一致时,pod也是会随机在这些节点上创建。
设置节点污点化
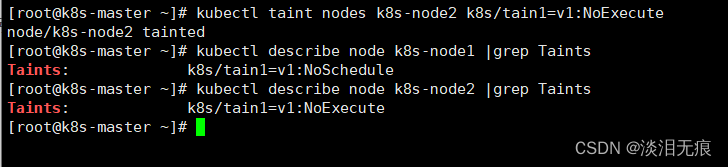
kubectl taint nodes k8s-node1 k8s/tain1=v1:NoSchedule
kubectl taint nodes k8s-node2 k8s/tain1=v1:NoExecute
查看污点化标签
kubectl describe node k8s-node1 |grep Taints
kubectl describe node k8s-node2 |grep Taints
创建pod
vi nginx-taint1.yml    创建pod

apiVersion: apps/v1
kind: Deployment
metadata:
  labels:
    app: nginx
  name: nginx
  namespace: default
spec:
  replicas: 1
  selector:
    matchLabels:
      app: nginx
  template:
    metadata:
      labels:
        app: nginx
    spec:
      containers:
      - name: nginx
        image: docker.io/library/nginx:1.18.0-alpine
      tolerations:
        - key: "k8s/tain1"
          operator: "Equal"
          value: "v1"
          effect: ""   #只要为空,key和value一致的节点都能创建pod

kubectl apply -f nginx-taint1.yml
kubectl get pod -o wide
kubectl delete -f nginx-taint1.yml

4.2.2-2 operator为Exists(存在模式)
存在模式1:如果 operator 是 Exists ,不能设置value值。
- 当污点化节点的key和effect值存在且都不一致时,pod文件会把自己的key和effect值一一匹配,匹配度最高的创建pod。
- 当污点化节点的key和effect值存在且都一致时,pod文件会把自己的key和effect值一一匹配,匹配度最高的创建pod。
将2个节点污点化,key和value和effect的值都设置不一样
kubectl taint nodes k8s-node1 k8s/tain1=v1:NoSchedule
kubectl taint nodes k8s-node2 k8s/tain2=v2:NoExecute

kubectl describe node k8s-node1 |grep Taints
kubectl describe node k8s-node2 |grep Taints

创建pod
vi nginx-taint.yml     创建pod

apiVersion: apps/v1
kind: Deployment
metadata:
  labels:
    app: nginx
  name: nginx
  namespace: default
spec:
  replicas: 1
  selector:
    matchLabels:
      app: nginx
  template:
    metadata:
      labels:
        app: nginx
    spec:
      containers:
      - name: nginx
        image: docker.io/library/nginx:1.18.0-alpine
      tolerations:
        - key: "k8s/tain1"     #设置和k8s-node1污点化标签一直
          operator: "Exists"
          effect: "NoSchedule" #设置和k8s-node1污点化标签一直


kubectl apply -f nginx-taint.yml   创建容器
kubectl get pod -o wide
kubectl delete -f nginx-taint.yml   删除容器

将2个节点污点化,key和value设置一致,effect的值都设置不一样
kubectl taint nodes k8s-node1 k8s/tain1=v1:NoSchedule
kubectl taint nodes k8s-node2 k8s/tain1=v1:NoExecute

kubectl describe node k8s-node1 |grep Taints
kubectl describe node k8s-node2 |grep Taints
创建pod
vi nginx-taint.yml     创建pod

apiVersion: apps/v1
kind: Deployment
metadata:
  labels:
    app: nginx
  name: nginx
  namespace: default
spec:
  replicas: 1
  selector:
    matchLabels:
      app: nginx
  template:
    metadata:
      labels:
        app: nginx
    spec:
      containers:
      - name: nginx
        image: docker.io/library/nginx:1.18.0-alpine
      tolerations:
        - key: "k8s/tain1"      #第1个匹配条件
          operator: "Exists"
          effect: "NoExecute"   #第2个匹配条件

可以看到k8s-node1和k8s-node2的key一样,但是effect不一致
pod创建在了k8s-node2上面
所以证明pod文件匹配了2次,当污点化节点的key一致,effect就会成为第2个匹配条件

kubectl apply -f nginx-taint.yml   创建容器
kubectl get pod -o wide
kubectl delete -f nginx-taint.yml   删除容器

存在模式2:如果 operator 是 Exists ,不能设置value值。
- 当pod文件的key为空时,假如有多个污点化节点key和value一致,只要effect的值一致,那么pod会被创建在effect一致的节点上。
- 当pod文件的key为空时,假如有多个污点化节点key和value不一致,key和value值不会影响调度,只要effect的值一致,pod会被创建在effect一致的节点上。
将2个节点污点化,key和value设置一致,effect值设置为不一样
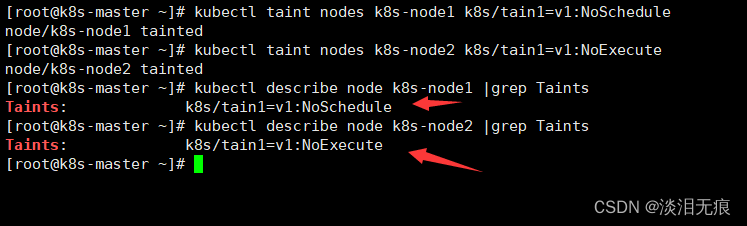
kubectl taint nodes k8s-node1 k8s/tain1=v1:NoSchedule
kubectl taint nodes k8s-node2 k8s/tain1=v1:NoExecute

查看污点化标签
kubectl describe node k8s-node1 |grep Taints
kubectl describe node k8s-node2 |grep Taints
创建pod
vi nginx-taint2.yml      创建pod

apiVersion: apps/v1
kind: Deployment
metadata:
  labels:
    app: nginx
  name: nginx
  namespace: default
spec:
  replicas: 1
  selector:
    matchLabels:
      app: nginx
  template:
    metadata:
      labels:
        app: nginx
    spec:
      containers:
      - name: nginx
        image: docker.io/library/nginx:1.18.0-alpine
      tolerations:
        - key: ""
          operator: "Exists"
          effect: "NoSchedule"  #污点化节点和这个值一致才会创建pod

kubectl apply -f nginx-taint2.yml    创建pod

可以看到因为文件的effect: "NoSchedule"
所以k8s-node1 设置污点化的effect值一致,所以节点被创建在k8s-node1上
kubectl get pod -o wide
kubectl delete -f nginx-taint2.yml   删除容器

将2个节点污点化,key和value设置不一致,effect值设置为一样
kubectl taint nodes k8s-node1 k8s/tain1=v1:NoSchedule
kubectl taint nodes k8s-node2 k8s/tain2=v2:NoSchedule

查看污点化标签
kubectl describe node k8s-node1 |grep Taints
kubectl describe node k8s-node2 |grep Taints
创建pod的文件不变,查看pod创建在了k8s-node2上,证明没有key的情况下,只要effect值一致,任意一个污点化节点都可以创建pod
kubectl apply -f nginx-taint2.yml
kubectl get pod -o wide

存在模式3:如果 operator 是 Exists ,不能设置value值。
- 当effect为空时,只要pod的文件的key和污点化节点的key不一致,key会成为匹配条件,key值一致的节点就会创建pod。
- 当effect为空时,只要pod的文件的key和污点化节点的key一致,不管effect是什么模式,都可以创建pod。
将2个节点污点化,key和value设置不一致,effect值设置为一样
kubectl taint nodes k8s-node1 k8s/tain1=v1:NoSchedule
kubectl taint nodes k8s-node2 k8s/tain2=v2:NoSchedule

查看污点化标签
kubectl describe node k8s-node1 |grep Taints
kubectl describe node k8s-node2 |grep Taints

创建pod
vi nginx-taint3.yml     创建pod

apiVersion: apps/v1
kind: Deployment
metadata:
  labels:
    app: nginx
  name: nginx
  namespace: default
spec:
  replicas: 1
  selector:
    matchLabels:
      app: nginx
  template:
    metadata:
      labels:
        app: nginx
    spec:
      containers:
      - name: nginx
        image: docker.io/library/nginx:1.18.0-alpine
      tolerations:
        - key: "k8s/tain1"
          operator: "Exists"
          effect: ""

因为文件设置了key: "k8s/tain1"
所以当污点化节点的key也是k8s/tain1时,节点被创建在k8s-node1上

kubectl apply -f nginx-taint3.yml    创建容器
kubectl get pod -o wide
kubectl delete -f nginx-taint3.yml    删除容器

将2个节点污点化,key和value设置一致,effect值设置为不一样
kubectl taint nodes k8s-node1 k8s/tain1=v1:NoSchedule
kubectl taint nodes k8s-node2 k8s/tain1=v1:NoExecute

查看污点化标签
kubectl describe node k8s-node1 |grep Taints
kubectl describe node k8s-node2 |grep Taints
创建pod的文件不变,查看pod创建在了k8s-node2上,证明没有effect的情况下,只要key值一致,任意一个污点化节点都可以创建pod
kubectl apply -f nginx-taint3.yml
kubectl get pod -o wide

4.2.2-3 pod的容忍度和tolerationSeconds延迟模式
tolerationSeconds注意:
- 启用tolerationSeconds延迟模式时,pod的ym文件的effect值必须为NoExecute。
- 修改污点化节点时,污点化的节点的key和value值必须和老的pod的yml文件的key和value值不一致,要不然有可能出现老的pod一直在同一个污点化节点一直重建。
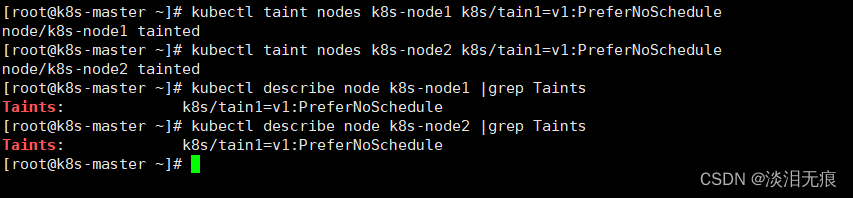
添加污点化节点
kubectl taint nodes k8s-node1 k8s/tain1=v1:PreferNoSchedule
kubectl taint nodes k8s-node2 k8s/tain1=v1:PreferNoSchedule

kubectl describe node k8s-node1 |grep Taints
kubectl describe node k8s-node2 |grep Taints
创建pod
vi nginx-toler.yml    创建pod

apiVersion: apps/v1
kind: Deployment
metadata:
  labels:
    app: nginx
  name: nginx
  namespace: default
spec:
  replicas: 1
  selector:
    matchLabels:
      app: nginx
  template:
    metadata:
      labels:
        app: nginx
    spec:
      containers:
      - name: nginx
        image: docker.io/library/nginx:1.18.0-alpine
      tolerations:
        - key: "k8s/tain1"
          operator: "Equal"
          value: "v1"
          effect: "NoExecute"
          tolerationSeconds: 15  #单位是秒

kubectl apply -f nginx-toler.yml        创建pod

可以看到pod被创建在了k8s-node2
可以看到存活时间和pod名字nginx-df4c8c5-gq9sk
kubectl get pod -o wide

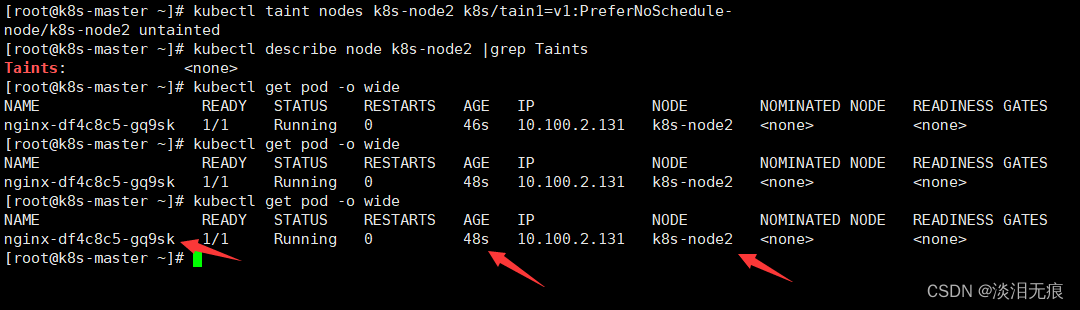
去除k8s-node2的标签,查看pod不会因为没有污点化而重建pod
kubectl taint nodes k8s-node2 k8s/tain1=v1:PreferNoSchedule-
kubectl describe node k8s-node2 |grep Taints
kubectl get pod -o wide
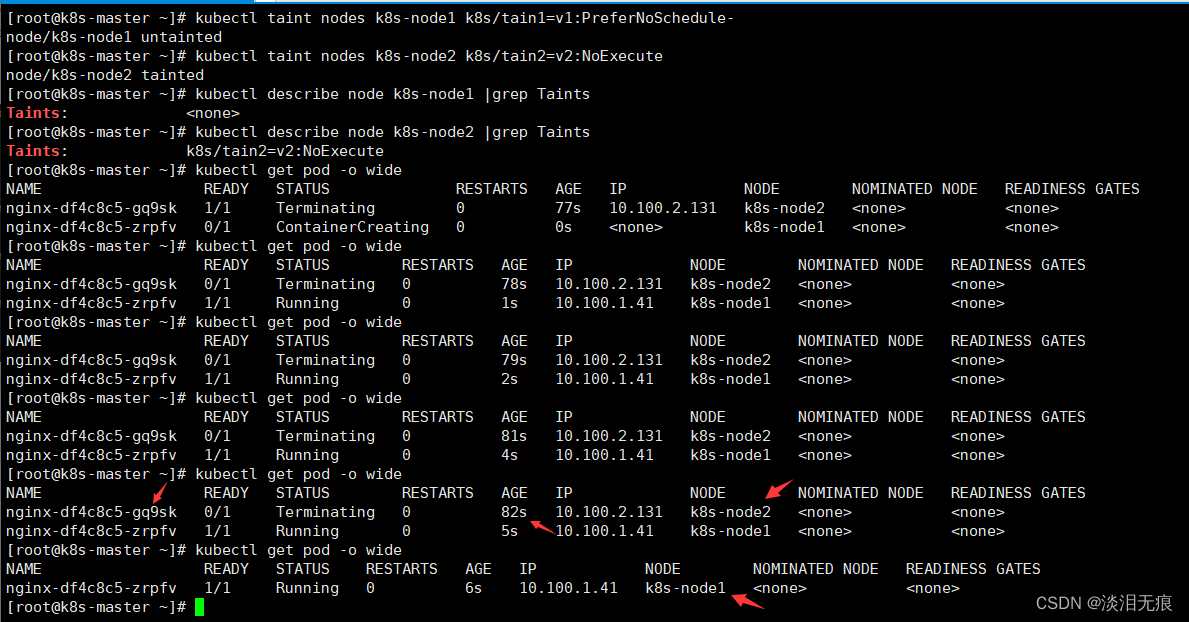
测试
将k8s-node1的污点化标签删除,这样新的pod会优先在k8s-node1创建
kubectl taint nodes k8s-node1 k8s/tain1=v1:PreferNoSchedule-

k8s-node2添加新的污点化的key和value,effect值改为NoExecute
因为污点化的key、value值和pod的yml文件的值不一致,原本在k8s-node2的pod会被重建到新的节点
kubectl taint nodes k8s-node2 k8s/tain2=v2:NoExecute

kubectl describe node k8s-node1 |grep Taints
kubectl describe node k8s-node2 |grep Taints

可以看到因为k8s-node1没有污点化,所以被优先选择在k8s-node1创建pod(nginx-df4c8c5-zrpfv)
而k8s-node2的老的pod(nginx-df4c8c5-gq9sk)因为设置了tolerationSeconds为15秒
所以k8s-node2老的pod还是会存活到限定的15秒后再删除

kubectl get pod -o wide