车辆信息管理系统
效果图:
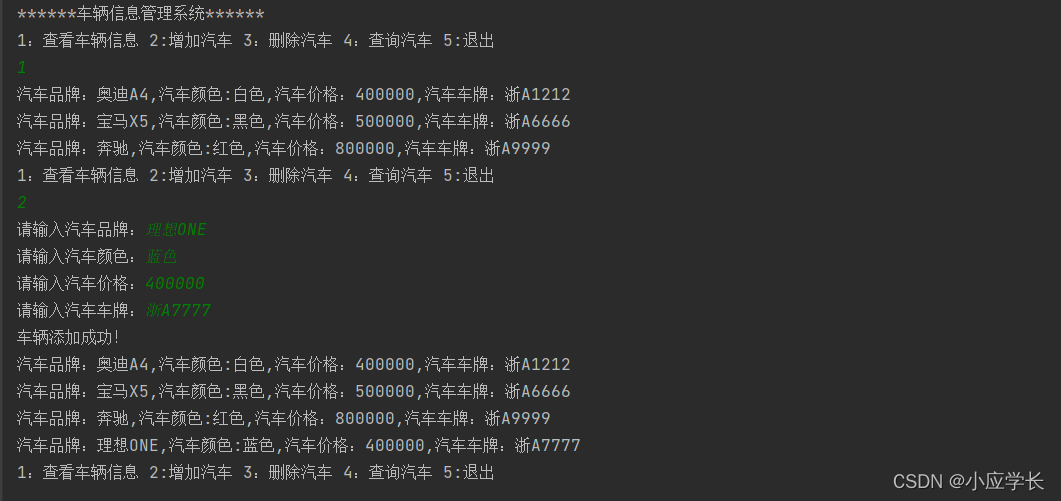
简介:
采用面对对象(OOP)的编程思维来写,包含查看车辆信息、增加汽车信息、删除汽车、查询汽车四个功能,需要建立三个类:
车辆类:
package OOPTest;

public class Car {


    private String brand;   //品牌
    private String color;   //颜色
    private int price;    // 价格
    private String carNumber;   //车牌号


    //构造方法:
    public Car(){

    }

	//有参构造
    public Car(String brand, String color, int price, String carNumber) {


        this.brand = brand;
        this.color = color;
        this.price = price;
        this.carNumber = carNumber;
    }

    //get/set
    public String getBrand(){


        return brand;
    }
    public void setBrand(){


        this.brand = brand;
    }

    public String getColor(){


        return color;
    }
    public void setColor(){


        this.color = color;
    }

    public int getPrice(){


        return price;
    }
    public void setPrice(){


        this.price = price;
    }

    public String getCarNumber(){


        return carNumber;
    }
    public void setCarNumber(){


        this.carNumber = carNumber;
    }

	//显示信息的方法
    public void showCaeInfo(){


        System.out.println("汽车品牌:"+this.brand+","+"汽车颜色:"+this.color+","+"汽车价格:"+this.price+","+"汽车车牌:"+this.carNumber+"\t");
    }
}
功能设计类:
package OOPTest;


/*
车辆管理类
 */

import java.util.Scanner;

public class CarManager {


    Scanner input = new Scanner(System.in);
    Car[] cars = new Car[10];   //对象数组,用来存放车辆信息

 	// 对车辆信息数组初始化
    public CarManager() {


        Car car1 = new Car("奥迪A4", "白色", 400000, "浙A1212");
        Car car2 = new Car("宝马X5", "黑色", 500000, "浙A6666");
        Car car3 = new Car("奔驰", "红色", 800000, "浙A9999");
        Car car4 = new Car("保时捷", "蓝色", 1500000, "浙A7777");

        cars[0] = car1;    //分别赋值到数组内
        cars[1] = car2;
        cars[2] = car3;
    }


    public void showMenu() {


        boolean start = true;
        System.out.println("******车辆信息管理系统******");
        do {


            start = true;
            System.out.println("1:查看车辆信息 2:增加汽车 3:删除汽车 4:查询汽车 5:退出");
            int choise = input.nextInt();

    //功能选择模块
            switch (choise) {


                case 1:
                    this.showInfo();
                    break;
                case 2:
                    addCar();
                    break;
                case 3:

                    this.delCar();
                    break;
                case 4:
                    this.findCar();
                    break;
                case 5:
                    start = false;
                    break;
                default:
                    System.out.println("选择错误,请重新输入!!!");
                    break;
            }
        } while (start);
        System.out.println("系统已经退出!!!");

    }

	//查找车辆的方法
    private void findCar() {


        System.out.println("请输入需要查找的车牌号:");
        String findNumber = input.next();
        Car car = this.getCarInfo(findNumber);
        if (car == null) {


            System.out.println("抱歉,没有该车辆的信息!");
        } else {


            car.showCaeInfo();
        }
    }

    //根据车牌号找到汽车对象
    private Car getCarInfo(String findNumber) {


        Car carInfo = null;
        for (Car car : cars) {


            if (car != null) {


                if (findNumber.equals(car.getCarNumber())) {


                    carInfo = car;  //若找到了 赋值给carInfo
                }
            }
        }

        return carInfo;
    }


	//删除车辆的方法
    private void delCar() {


        System.out.print("请输入需要删除的车牌号:");
        String delCarNumber = input.next();
        if (this.delCarInfo(delCarNumber)) {


            System.out.println("删除车辆信息成功!");
            this.showInfo();
        } else {


            System.out.println("删除失败");
        }
    }

    private boolean delCarInfo(String delCarNumber) {


        int index = -1;
        for (int i = 0; i < this.cars.length; i++) {


            if (cars[i].getCarNumber() != null && cars[i].getCarNumber().equals(delCarNumber)) {


                index = i;   //找到了需要删除的位置
                break;
            }
        }
        if (index == -1) {


            System.out.println("抱歉,没有找到该车辆!不能删除");
            return false;
        } else {


            for (int i = index; i < cars.length - 1; i++) {


                cars[i] = cars[i + 1]; // 从删除的值的后一位开始往前移动  比如2的位置被3替代

            }
            cars[cars.length - 1] = null;  //最后以为设置null
            return true;
        }
    }


    /*
    显示汽车信息
     */
    private void showInfo() {


        for (Car car : cars) {


            //判断对象不能为空,防止空指针异常NullPointerException
            if (car != null) {


                car.showCaeInfo();
            }
        }
    }

    /*
    增加汽车信息
     */
    private void addCar() {


        Scanner input = new Scanner(System.in);
        System.out.print("请输入汽车品牌:");
        String brand = input.next();
        System.out.print("请输入汽车颜色:");
        String color = input.next();
        System.out.print("请输入汽车价格:");
        int price = input.nextInt();
        System.out.print("请输入汽车车牌:");
        String carNumber = input.next();

        Car carInfo = new Car(brand, color, price, carNumber);
        if (this.addCarInfo(carInfo)) {


            System.out.println("车辆添加成功!");
            //重新调用查询方法,显示数组内的信息
            this.showInfo();
        } else {


            System.out.println("车辆添加失败!");
        }
    }

    //增加汽车信息:以对象作为方法的参数
    private boolean addCarInfo(Car carInfo) {


        boolean flag = true;
        //循环判断为空的地方,将对象放入
        for (int i = 0; i < cars.length; i++) {


            if (cars[i] == null) {


                cars[i] = carInfo;
                flag = true;
                break;
            }
        }
        return flag;
    }


}
测试类:
package OOPTest;

public class TestMain {


    public static void main(String[] args) {


		//建立对象运行
        CarManager ca = new CarManager();
        ca.showMenu();

    }
}
这样这个小开发就完成啦!!!