文章目录
Spring 框架学习(八)——AOP的认识与使用
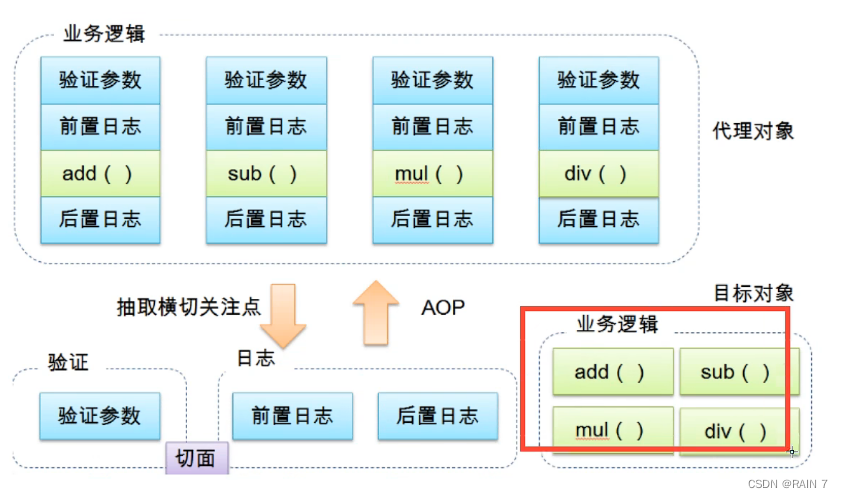
一、Spring AOP 常用概念及铺垫
先说几个常用的概念以及铺垫的知识
横切点:就是我们要给方法前加一个打印日志的功能,或者先校验等等,这些功能
切面(Aspect):将横切关注点进行模块化的一个类
通知(Adviser):就是切面里面具体的方法,用来切入到具体位置的方法里面
切入点(PointCut):一个业务类中的具体方法,就是把通知切入到这个方法里面
连接点(JoinPoint):通过连接点我们可以知道切入点方法对象的很多信息。
二、通知的介绍
通知类型就是想要加的代码(校验、日志等) 是在对象方法的前面还是后面执行的类型,这就是通知类型。
(1)before 前置通知
在方法执行前执行
如果方法出现了异常,不会影响前置通知的执行
应用:通常应用在执行方法前各种校验
(2)after 后置通知
在方法执行完毕之后执行
无论方法是否出现异常终止都会执行
应用:清理现场,关闭、释放资源
(3)around 环绕通知
方法执行前后分别执行
如果方法中出现异常终止,那么末尾的通知就不执行了
应用:各个方面,结合了前置和后置的优点,还可以拿到对象方法的各种参数及信息
(4)afterReturning 返回后通知
方法正常返回后执行
如果方法抛出异常,那么无法执行
应用:常规结果数据处理
(5)afterThrowing 抛出异常后通知
方法抛出异常后执行
如果方法没有抛出异常,无法执行
应用:抛出异常后对信息进行包装
三、切点表达式说明
(1)作用
用来匹配具体切入点(方法)的具体位置
(2)格式
execution(切点表达式)
execution([修饰符] 返回类型 包名.类名.方法名(参数类型))
方法访问修饰符可以进行省略,但是后面的东西必须得有
(3)通配符介绍
-
*(一个星号): 可以匹配任意 返回值、包名、类名、方法名、参数类型
-
…(两个点):表示任意多个层级、任意多个参数
具体使用
我们想要把切点定义到 com.bit.service 包下的 UserService 类中的 void add(int a) 方法
有很多种写法
1.每一部分都写的具体
execution("void com.bit.service.UserService.add(int)")
2.完全使用通配符
  execution("* *..service.*(..)")
  //* 任意返回类型
  //* 任意一个包
  // .. 包后面跟多层
  // * 类名
  // * 方法名
  //(..)任意多个任意参数
  execution("* *..*.*(..)")
  //* 任意返回类型
  //* 任意一个包
  // .. 包后面跟多层
  // * 类名
  // * 方法名
  //(..)任意多个任意参数
  execution("* *..*(..)")
  //* 任意返回类型
  //* 任意一个包
  // .. 包后面跟多层包+类名(接口名)
  // * 方法名
  //(..)任意多个任意参数
四、连接点及环绕方法参数使用
前置通知,写一个方法,在切入点之前执行通知即可
后置通知,写一个方法,在切入点之前执行通知即可
那么环绕通知的代码如何进行环绕呢?
这里就要用到 连接点(JoinPoint) 的一些使用了
(1) JoinPoint 作为环绕通知 的方法参数
JoinPoint对象封装了SpringAop中切面方法的信息,在切面方法中添加JoinPoint参数,就可以获取到封装了该方法信息的JoinPoint对象.
JoinPoint 只有获取切入点对象方法信息的一些功能,不能帮助我们进行环绕写代码
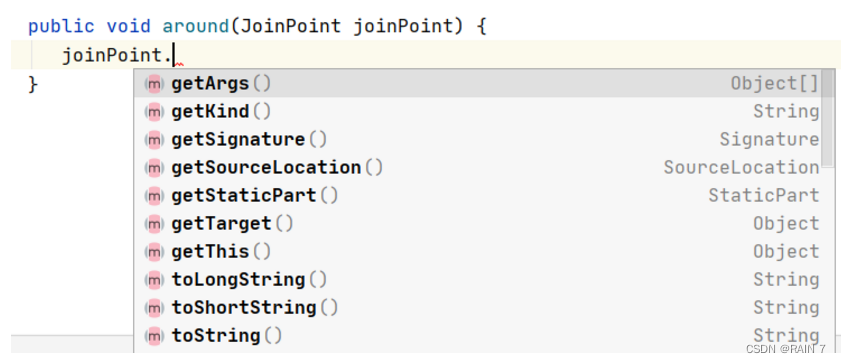
能够获取对象方法参数、方法签名等信息
(2) ProceedingJoinPoint 作为环绕通知 的方法参数
ProceedingJoinPoint对象是JoinPoint的子接口,该对象只用在@Around的切面方法中,
添加了
Object proceed() throws Throwable //执行目标方法
Object proceed(Object[] var1) throws Throwable //传入的新的参数去执行目标方法
两个方法.
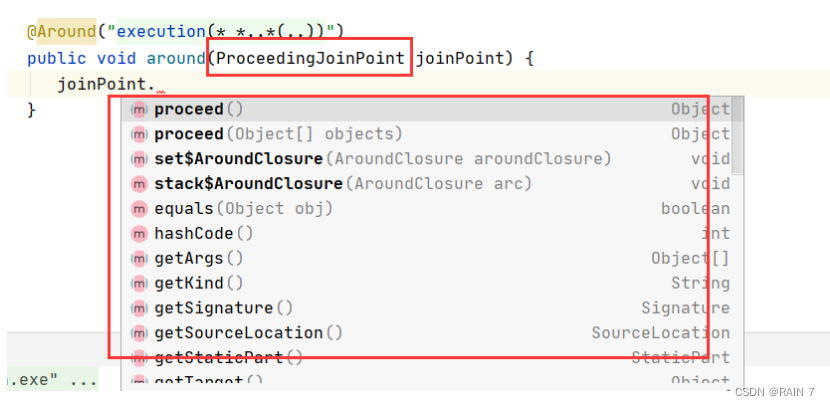
调用proceed方法,相当于执行切入点方法
(3) 环绕通知的写法
    public void around(ProceedingJoinPoint joinPoint) throws Throwable {


        System.out.println("Around=====方法环绕前====");
        joinPoint.proceed();  // 执行方法
        System.out.println("Around======方法环绕后=====");
    }
(4) 在执行方法的时候修改方法参数
1、使用 Object [] args 接收原方法传入的参数
Object[] args = joinPoint.getArgs();
2、对数组中的参数进行修改
  for (int i = 0; i <args.length ; i++) {


        args[i] = (Integer)args[i]+10;
  }
3、执行proceed带参数的方法,将修改过的object[] args进行传入
joinPoint.proceed(args); // 执行方法
五、Spring-AOP 准备工作
(1)加入aspect织入包
在编写SpringAOP面向切面编程时,需要导入一个aspectjweaver.jar的包,它的主要作用是负责解析切入点表达式。
    <!-- https://mvnrepository.com/artifact/org.aspectj/aspectjweaver -->
        <dependency>
            <groupId>org.aspectj</groupId>
            <artifactId>aspectjweaver</artifactId>
            <version>1.9.9.1</version>
        </dependency>
(2)加入aop约束以及开启aop注解支持
可以在xml使用<aop:config 回车自动生成,下面是aop约束已经加上了的
<?xml version="1.0" encoding="UTF-8"?>
<beans xmlns="http://www.springframework.org/schema/beans"
       xmlns:context="http://www.springframework.org/schema/context"
       xmlns:xsi="http://www.w3.org/2001/XMLSchema-instance"
       xmlns:aop="http://www.springframework.org/schema/aop"
       xsi:schemaLocation="http://www.springframework.org/schema/beans
        http://www.springframework.org/schema/beans/spring-beans.xsd
        http://www.springframework.org/schema/context
        https://www.springframework.org/schema/context/spring-context.xsd
        http://www.springframework.org/schema/aop
        https://www.springframework.org/schema/aop/spring-aop.xsd">

    <!--开启aop注解的支持 -->

    <aop:aspectj-autoproxy />

    <!--在aop:config 中配置切面、切点、以及各种通知 或者使用注解配置即可-->

    <context:annotation-config/>

    <context:component-scan base-package="com.*"/>
</beans>
六、Spring中如何使用AOP
(1)xml配置使用AOP
(1)先写一个业务的接口
package com.service;

public interface UserService {


    void add();
};
(2)给这个接口创建创建一个实现类,类中的方法作为切入点。
package com.service;
import org.springframework.stereotype.Service;

@Service
public class UserServiceImpl implements UserService {


    public void add() {


        System.out.println("执行了add方法");
    }
}
(3)自定义一个类作为切面,在里面实现一些方法作为具体的通知。
package com.config;
import org.aspectj.lang.ProceedingJoinPoint;

public class DiyAspect {


    // 该类作为切面,所有横切关注点的集合的一个模块

     public void before(){


         System.out.println("Before=====方法执行前====");
     }

    public void after(){


        System.out.println("After=====方法执行后====");
    }

    public void around(ProceedingJoinPoint pj) throws Throwable {


        System.out.println("Around=====方法环绕前====");
        pj.proceed();  // 执行方法
        System.out.println("Around======方法环绕后=====");
    }

}
(4)通过xml配置定义切点、切面、通知,以及使得切面里的通知绑定到切点上。
<?xml version="1.0" encoding="UTF-8"?>
<beans xmlns="http://www.springframework.org/schema/beans"
       xmlns:context="http://www.springframework.org/schema/context"
       xmlns:xsi="http://www.w3.org/2001/XMLSchema-instance"
       xmlns:aop="http://www.springframework.org/schema/aop"
       xsi:schemaLocation="http://www.springframework.org/schema/beans
        http://www.springframework.org/schema/beans/spring-beans.xsd
        http://www.springframework.org/schema/context
        https://www.springframework.org/schema/context/spring-context.xsd
        http://www.springframework.org/schema/aop
        https://www.springframework.org/schema/aop/spring-aop.xsd">

    <bean id="diyAspect" class="com.config.DiyAspect"/>

    <!--开启aop注解的支持 -->
    <aop:aspectj-autoproxy />

    <!--在aop:config 中配置切面、切点、以及各种通知 或者使用注解配置即可-->
    <aop:config >
        <aop:pointcut id="pointcut" expression="execution(* *..service.*.*(..))"/>
        <aop:aspect id="diy" ref="diyAspect">
            <aop:before method="before" pointcut-ref="pointcut"/>
            <aop:around method="around" pointcut-ref="pointcut"/>
            <aop:after method="after" pointcut-ref="pointcut"/>
        </aop:aspect>
    </aop:config>

<!--    开启组件的注解支持-->
    <context:annotation-config/>
<!--    开启包路径下的组件扫描-->
    <context:component-scan base-package="com.*"/>
</beans>
(5)进行测试,执行add方法,查看通知增强是否绑定切入点成功
package com.controller;

import com.service.UserService;
import org.springframework.context.ApplicationContext;
import org.springframework.context.support.ClassPathXmlApplicationContext;
import org.springframework.stereotype.Controller;

@Controller
public class UserController {


    public static void main(String[] args) {


        ApplicationContext context =new ClassPathXmlApplicationContext("spring-config.xml");
        UserService userService = context.getBean("userServiceImpl", UserService.class);
        userService.add();
    }
}
(6)我们可以确定,通过xml注解的方式,前置通知、后置通知、环绕通知的执行顺序
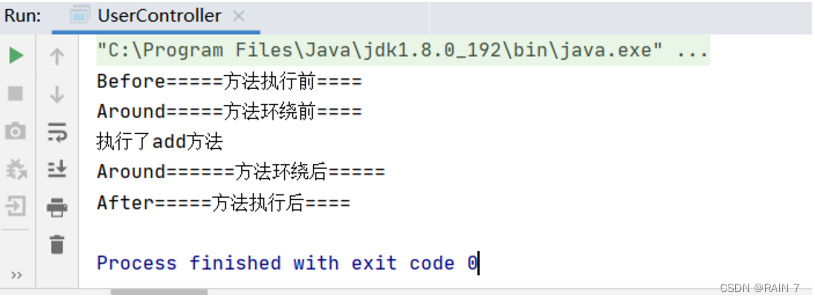
环绕前和环绕后被 before after包裹着
(2)注解开发使用AOP
(1)使用注解 @Aspect 将自定义类作为切面,@PointCut 定义切点的位置,@Before / @After 定义通知作用到切点上
package com.config;
import org.aspectj.lang.ProceedingJoinPoint;
import org.aspectj.lang.annotation.*;
import org.springframework.stereotype.Component;

@Aspect
@Component
public class DiyAspect {


    // 该类作为切面,所有横切关注点的集合的一个模块

    // 可以使用@PointCut 定义一个切点,在之后只需要调用这个方法即可,不需要重复的写切点表达式
    @Pointcut("execution( * com.service.UserServiceImpl.add(..))")
    public void pointCut(){


    }

    @Before("pointCut()")
     public void before(){


         System.out.println("Before=====方法执行前====");
     }

     @After("pointCut()")
    public void after(){


        System.out.println("After=====方法执行后====");
    }

    @Around("pointCut()")
    public void around(ProceedingJoinPoint joinPoint) throws Throwable {


        System.out.println("Around=====方法环绕前====");
        joinPoint.proceed();  // 执行方法
        System.out.println("Around======方法环绕后=====");
    }

}
(2)xml文件中可以完全不同写aop:config 的配置内容,但是必须加上aop约束和aop注解支持
<?xml version="1.0" encoding="UTF-8"?>
<beans xmlns="http://www.springframework.org/schema/beans"
       xmlns:context="http://www.springframework.org/schema/context"
       xmlns:xsi="http://www.w3.org/2001/XMLSchema-instance"
       xmlns:aop="http://www.springframework.org/schema/aop"
       xsi:schemaLocation="http://www.springframework.org/schema/beans
        http://www.springframework.org/schema/beans/spring-beans.xsd
        http://www.springframework.org/schema/context
        https://www.springframework.org/schema/context/spring-context.xsd
        http://www.springframework.org/schema/aop
        https://www.springframework.org/schema/aop/spring-aop.xsd">

    <!--开启aop注解的支持 -->
    <aop:aspectj-autoproxy />

<!--    开启组件的注解支持-->
    <context:annotation-config/>
<!--    开启包路径下的组件扫描-->
    <context:component-scan base-package="com.*"/>

</beans>
(3)进行测试,执行add方法,查看通知增强是否绑定切入点成功
package com.controller;

import com.service.UserService;
import org.springframework.context.ApplicationContext;
import org.springframework.context.support.ClassPathXmlApplicationContext;
import org.springframework.stereotype.Controller;

@Controller
public class UserController {


    public static void main(String[] args) {


        ApplicationContext context =new ClassPathXmlApplicationContext("spring-config.xml");
        UserService userService = context.getBean("userServiceImpl", UserService.class);
        userService.add();
    }
}
(4) 我们可以确定,通过注解开发的方式,前置通知、后置通知、环绕通知的执行顺序和之前xml配置就不一样了
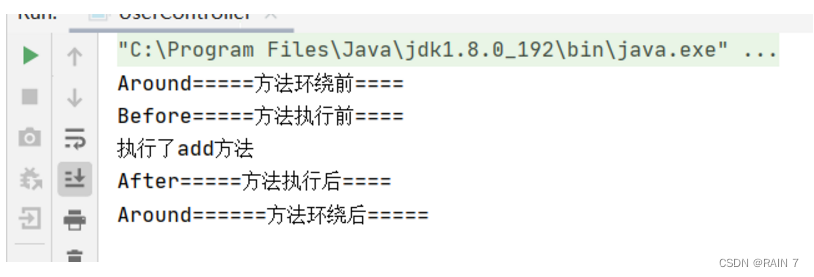
环绕通知在 before 和 after的外面包裹