一、问题描述
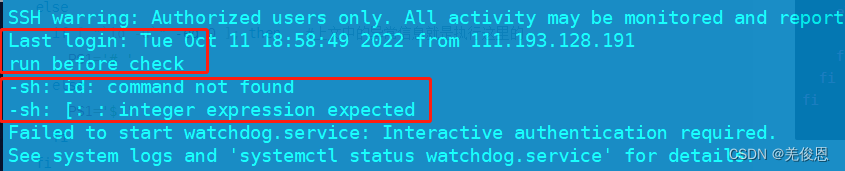
某次云主机ssh登录,主机为ubuntu 16.04.6 LTS,报出一些异常:-sh: id: command not found,如下所示:
-sh: id: command not found
-sh: [: : integer expression expected
Failed to start watchdog.service: Interactive authentication required.
See system logs and 'systemctl status watchdog.service' for details.

二、分析处理
1、首先回顾下ssh 登录linux主机加载文件的过程:
1)登录式shell加载配置文件过程:
/etc/profile --> /etc/profile.d/.sh --> ~/.bash_profile --> ~/.bashrc --> /etc/bashrc
其中,全局配置文件:/etc/profile、/etc/profile.d/.sh、/etc/bashrc
2)非登录式shell加载配置文件过程:
~/.bashrc --> /etc/bashrc --> /etc/profile.d/*.sh
ssh 远程执行命令时就采用bash的non-interactive + non-login shell模式。
其中:个人配置文件~/.bsah_profile ~/.bashrc
3)远程登陆加载文件顺序
ssh—服务器启动login—读取/etc/shadow , /etc/passwd 核对身份信息----按顺序加载环境变量文件----/etc/profile --> /etc/profile.d/*.sh --> ~/.bash_profile --> ~/.bashrc --> /etc/bashrc—切换到主目录–启动shell
2、检查用户的登录限制
cat /etc/passwd|grep ygcg  #输出如下,后面增加/bin/sh,也不管用
ygcg:x:1000:1000::/home/ygcg:
#检查用户家目录权限,权限修改为ygcg.ygcg
3、按照登录时加载文件的顺序测试验证,注意这里有一个好的测试思想
#编辑ygcg家目录下的.bashrc
vi ~.bashrc  #如下所示
# ~/.bashrc: executed by bash(1) for non-login shells.
# see /usr/share/doc/bash/examples/startup-files (in the package bash-doc)
# for examples

# If not running interactively, don't do anything
echo  run before check   #测试命令
case $- in
    *i*) ;;
      *) return;;
esac
echo  run after check    #测试验证命令
# don't put duplicate lines or lines starting with space in the history.
# See bash(1) for more options
……
#重新登录验证,报错信息在该文件执行之前
vi /etc/profile  #最前头嵌入测试语句echo  run before check
# /etc/profile: system-wide .profile file for the Bourne shell (sh(1))
# and Bourne compatible shells (bash(1), ksh(1), ash(1), ...).
echo run before check   #测试语句
if [ "$PS1" ]; then
  if [ "$BASH" ] && [ "$BASH" != "/bin/sh" ]; then
    # The file bash.bashrc already sets the default PS1.
    # PS1='\h:\w\$ '
    if [ -f /etc/bash.bashrc ]; then
      . /etc/bash.bashrc
    fi
  else
    if [ "`id -u`" -eq 0 ]; then   #上文中的异常信息就是执行这里的
      PS1='# '
    else
      PS1='$ '
    fi
  fi
fi
但检查文件并未有异常;故考虑应检查下报异常的相关命令的权限;
4、检查执行命令异常的权限:
ll /usr/bin/id
-rwxr-xr-x 1 root root 39760 Sep 10  2020 /usr/bin/id*
ll /usr/bin/sudo  #权限异常
-rwsr-x--- 1 root root 136808 Sep 10  2020 /usr/bin/sudo*
ll /bin/su
-rwsr-xr-x 1 root root 40128 Mar 27  2019 /bin/su*
#修改权限
chmod o+rx /usr/bin/sudo
ll -d /usr/bin
drwxr-x--- 2 root root 32768 Sep  5 16:51 /usr/bin/
#修改权限
chmod o+rx /usr/bin
ll -d /usr/bin
drwxr-xr-x 2 root root 32768 Sep  5 16:51 /usr/bin/
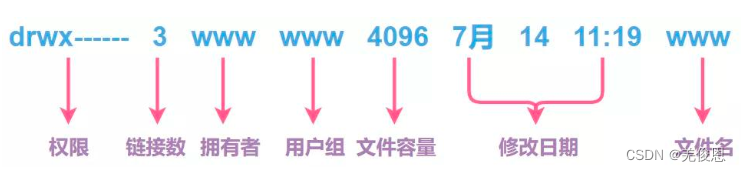
d代表的是目录(directroy)
-代表的是文件(regular file)
s代表的是套字文件(socket)
p代表的管道文件(pipe)或命名管道文件(named pipe)
l代表的是符号链接文件(symbolic link)
b代表的是该文件是面向块的设备文件(block-oriented device file)
c代表的是该文件是面向字符的设备文件(charcter-oriented device file)
特殊权限:
- rwt rwT rws rwS
rws: 其中s权限(setuid):该位是让普通用户可以以root用户的角色运行只有root帐号才能运行的程序或命令。s:文件属主和组设置SUID和GUID,文件在被设置了s权限后将以root身份执行。在设置s权限时文件属主、属组必须先设置相应的x权限,否则s权限并不能正真生效。
配置:chmod u+s
rwt:其中t表粘滞位(t),设置粘着位,一个文件可读写的用户并一定想让他有删除此文件的权限,如果文件设置了t权限则只用属主和root有删除文件的权限,通过chmod +t filename 来设置t权限。同样的,当没有x权限的时候,为大写T,设置粘滞位的文件,只能由root、属主删除 ;
i:不可修改权限;如:chattr u+i filename 则filename文件就不可修改,无论任何人,如果需要修改需要先删除i权限,用chattr -i filename就可以了。查看文件是否设置了i权限用lsattr filename。
a:只追加权限, 对于日志系统很好用,这个权限让目标文件只能追加,不能删除,而且不能通过编辑器追加。可以使用chattr +a设置追加权限;
5、重新登录验证,异常消失。
结论:本次异常信息为相关命令目录权限异常所致,并非配置文件有误;如果是非系统默认路径命令,需要将export PATH放到/etc/profile文件开始;