2.1 View控件
Android的所有UI元素都是通过View控件与ViewGroup容器构建的,ViewGroup作为一个容器装下所有界面中的控件
注:Android应用程序中的每一个界面有且只有一个ViewGroup容器
2.2 界面布局编写方式
XML中编写
多采用这种方式编写,有效的与Java代码相互隔离,使得整个程序的结构更加清晰
可在res/layout文件夹中编写相应的界面XML文件
<?xml version="1.0" encoding="utf-8"?>
<LinearLayout xmlns:android="http://schemas.android.com/apk/res/android"
    android:layout_width="match_parent"
    android:layout_height="match_parent"
    android:orientation="vertical">
    <Button
        android:id="@+id/btn_textview"
        android:layout_width="match_parent"
        android:layout_height="wrap_content"
        android:textAllCaps="false"
        android:text="TextView"/>
    <Button
        android:id="@+id/btn_button"
        android:layout_width="match_parent"
        android:layout_height="wrap_content"
        android:text="Button"
        android:textColor="@color/black"
        android:textAllCaps="false"

        />
    <Button
        android:id="@+id/btn_edittext1"
        android:layout_width="match_parent"
        android:layout_height="wrap_content"
        android:text="TextView"
        android:textAllCaps="false"
        />

</LinearLayout>
Java中编写
通过new关键字创键控件,将创键好的View控件添加到ViewGroup容器中,从而实现了在布局界面中显示View控件
        RelativeLayout ralativelayout = new RelativeLayout(this);//创键RelativeLayout对象
        RelativeLayout.LayoutParams params = new 				RelativeLayout.LayoutParams(RelativeLayout.LayoutParams.WRAP_CONTENT,RelativeLayout.LayoutParams.WRAP_CONTENT);
        params.addRule(RelativeLayout.CENTER_IN_PARENT);//设置居中显示,至此LayoutParams创键完成
        TextView textview = new TextView(this);
        textview.setText("text");
        ralativelayout.addView(textview,params);//将两个对象装进RelativeLayout中
        setContentView(ralativelayout);//设置在Activity中显示
2.3 界面布局的通用属性
Android 提供的四种常用布局继承自ViewGroup,具有ViewGroup中的一些属性
android:id="@+id/属性名称"	 设置布局标识
android:layout_width=""		设置布局宽度
android:layout_height=""	设置布局高度
android:background=""		设置布局背景
android:layout_margin=""	设置margin
android:padding=""			设置padding
android:id
该属性是当前布局的唯一标识,,XML中通过@+id/属性名称来定义,设置好属性后会在R.java中生成对应的int值,在Java代码中可以通过findViewById()方法传入该int值来获取该布局的对象
mBtnTextView = (Button) findViewById(R.id.btn_textview);
android:layout_width&&android:layout_height
设置布局的宽高
还可以选用系统定义的值:

- fill_parent:表示该布局的高度和父容器的高度相同
- match_parent:与前者相同,更推荐这种方式
- wrap_content:匹配所包含的内容
android:backgroud
设置布局背景,可以是颜色,可以是图片
android:layout_margin&&android:padding
与HTML类似
2.4 线性布局
<LinearLayout>内容</LinearLayout>
2.4.1 线性布局简介
-
android:orientation:设置布局内控件的排列顺序
属性值:vertical(垂直排列),horizontal(水平排列)
-
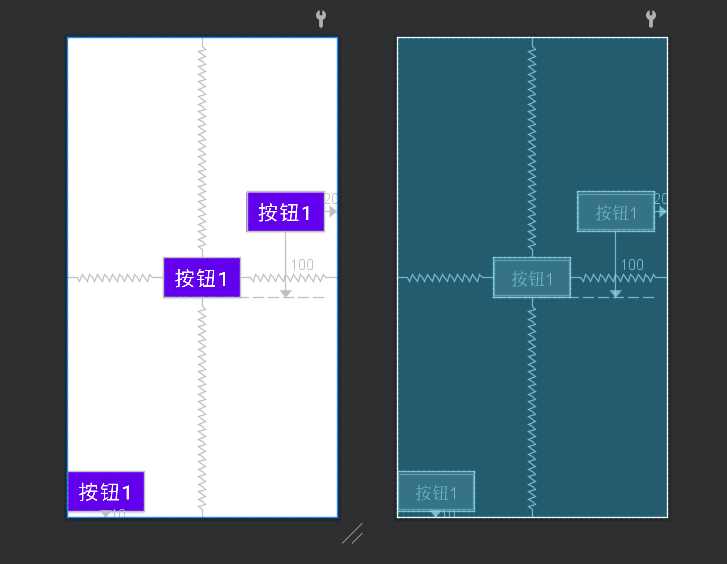
android:layout_weight:设置空间的权重,可以使布局内的控件按照权重比显示大小,对屏幕适配起关键作用
设置控件权重举例
    <LinearLayout
        android:layout_below="@id/Btn_4"
        android:layout_width="match_parent"
        android:layout_height="match_parent">
        <Button
            android:layout_width="0dp"
            android:text="按钮1"
            android:layout_weight="1"
            android:layout_height="wrap_content"/>
        <Button
            android:layout_width="0dp"
            android:layout_height="wrap_content"
            android:layout_weight="1"
            android:text="按钮2"/>
        <Button
            android:layout_width="0dp"
            android:layout_height="wrap_content"
            android:text="按钮3"
            android:layout_weight="2"/>
    </LinearLayout>
设置三个Button控件,宽度为0dp,设置权重分别为1,1,2,实际宽度之比为1:1:2

2.4.2 实战演练—仿动物连连看游戏界面
themes.xml
<style name="btnStyle">
    <item name="android:layout_weight">70</item>
    <item name="android:layout_height">70dp</item>
    <item name="android:layout_marginRight">15dp</item>
</style>
activity_main.xml
    <LinearLayout
        android:layout_width="wrap_content"
        android:layout_height="wrap_content"
        android:orientation="horizontal">
        <Button
            style="@style/btnStyle"
            android:background="@drawable/a"/>
        <Button
            style="@style/btnStyle"
            android:background="@drawable/b"/>
        <Button
            style="@style/btnStyle"
            android:background="@drawable/c"/>

    </LinearLayout>
此题主要是对图片进行排版
注意点:
- 图片必须以字母开头,不能有中文,不然会报错
- 图片放在drawable-hdpi文件夹中
2.5 相对布局
<RelativeLayout>内容</RelativeLayout>
2.5.1 相对布局RelativeLayout简介
RelativeLayout以父容器或者其他子控件作为参照物,指定布局中子控件的位置,相关属性如图

相对布局举例
<?xml version="1.0" encoding="utf-8"?>
<RelativeLayout xmlns:android="http://schemas.android.com/apk/res/android"
    xmlns:app="http://schemas.android.com/apk/res-auto"
    xmlns:tools="http://schemas.android.com/tools"
    android:layout_width="match_parent"
    android:layout_height="match_parent"
    tools:context=".MainActivity">
        android:layout_width="wrap_content"
        android:layout_height="wrap_content">
        <Button

            android:layout_width="wrap_content"
            android:layout_height="wrap_content"
            android:background="@color/white"
            android:text="按钮1"
            android:layout_alignParentBottom="true"
            android:layout_marginBottom="10dp"
            android:textSize="30sp"/>
        <Button
            android:id="@+id/bt_1"
            android:layout_width="wrap_content"
            android:layout_height="wrap_content"
            android:background="@color/white"
            android:layout_centerInParent="true"
            android:text="按钮1"
            android:textSize="30sp"/>
        <Button
            android:layout_width="wrap_content"
            android:layout_height="wrap_content"
            android:background="@color/white"
            android:layout_alignParentRight="true"
            android:layout_alignBottom="@+id/bt_1"
            android:text="按钮1"
            android:layout_marginRight="20dp"
            android:layout_marginBottom="100dp"
            android:textSize="30sp"/>
</RelativeLayout>
注:为了让Android有更好的屏幕适应能力,最好使用wrap_parent,match_parent,尽量避免长宽设置为一个固定的值
2.5.2 实战演练——音乐播放器界面
<?xml version="1.0" encoding="utf-8"?>
<RelativeLayout xmlns:android="http://schemas.android.com/apk/res/android"
    xmlns:app="http://schemas.android.com/apk/res-auto"
    xmlns:tools="http://schemas.android.com/tools"
    android:layout_width="match_parent"
    android:layout_height="match_parent"
    android:padding="10dp"
    tools:context=".MainActivity">
    <RelativeLayout
        android:id="@+id/head"
        android:layout_width="wrap_content"
        android:layout_height="wrap_content">

        <Button
            android:layout_width="20dp"
            android:layout_height="20dp"
            android:background="@drawable/q" />

            <Button
                android:layout_width="20dp"
                android:layout_height="20dp"
                android:background="@drawable/w"
                android:layout_alignParentRight="true" />
            <TextView
                android:layout_width="wrap_content"
                android:layout_height="wrap_content"
                android:layout_marginTop="30dp"
                android:textSize="20sp"
                android:layout_centerHorizontal="true"
                android:text="这里是音乐名"/>
    </RelativeLayout>

        <Button
            android:id="@+id/imga"
            android:layout_width="wrap_content"
            android:layout_height="wrap_content"
            android:layout_centerInParent="true"
            android:background="@drawable/s" />
    <RelativeLayout
        android:id="@+id/foot"
        android:layout_width="wrap_content"
        android:layout_height="wrap_content"
        android:layout_centerHorizontal="true"
        android:layout_marginBottom="80dp"
        android:layout_alignParentBottom="true">
            <Button
                android:id="@+id/bt11"
                android:background="@drawable/w"
                android:layout_width="40dp"
                android:layout_height="40dp"/>
            <Button
                android:id="@+id/bt22"
                android:layout_toRightOf="@id/bt11"
                android:background="@drawable/w"
                android:layout_marginRight="20dp"
                android:layout_marginLeft="20dp"
                android:layout_width="40dp"
                android:layout_height="40dp"/>
            <Button
                android:id="@+id/bt33"
                android:layout_toRightOf="@id/bt22"
                android:background="@drawable/w"
                android:layout_width="40dp"
                android:layout_height="40dp" />
    </RelativeLayout>

</RelativeLayout>
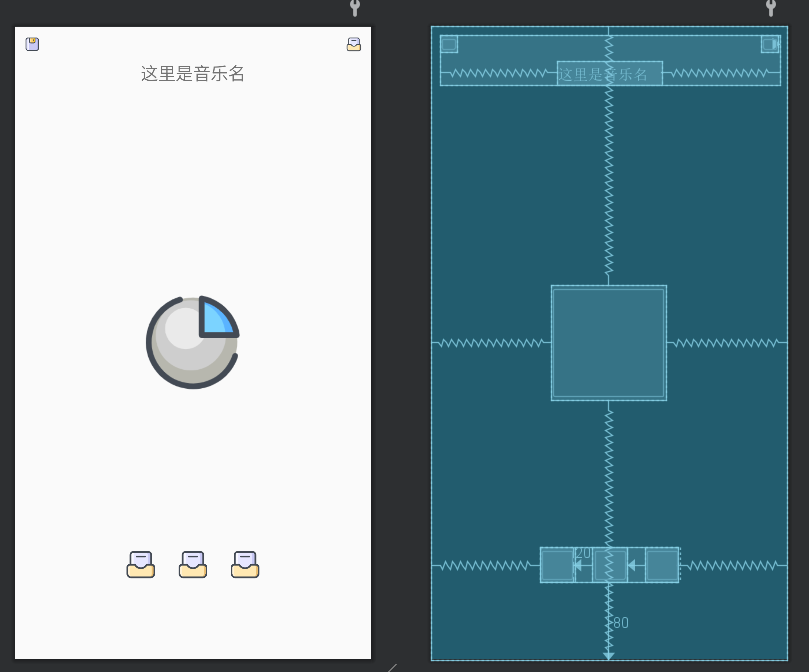
没有相应图片,就随便找了几个图片,弄了大概的样子(中间是专辑图,下边是播放下一曲上一曲)
注:Button颜色或者背景图无法改变的解决办法:
改themes.xml中的Style的属性parent="Theme.MaterialComponents.DayNight.Bridge"
2.6表格布局
<TableLayout>内容</TableLayout>
表格布局继承自线性布局类,完全支持线性布局的属性,其他属性如图

注意点:列的宽度由该列中最大的单元格决定,整个表格的宽度取决于父组件的宽度
表格布局举例
    <TableLayout
        android:layout_width="wrap_content"
        android:layout_height="wrap_content">
        <TableRow>
            <Button
                android:layout_width="wrap_content"
                android:layout_height="wrap_content"/>
            <Button
                android:layout_width="wrap_content"
                android:layout_height="wrap_content"/>
            <Button
                android:layout_width="wrap_content"
                android:layout_height="wrap_content"/>
        </TableRow>
        <TableRow>
            <Button
                android:layout_width="wrap_content"
                android:layout_height="wrap_content"
                android:layout_column="2"/>
            <Button
            android:layout_width="wrap_content"
            android:layout_height="wrap_content"/>
        </TableRow>
    </TableLayout>

2.6.2 实战演练-计算机界面
<?xml version="1.0" encoding="utf-8"?>
<RelativeLayout xmlns:android="http://schemas.android.com/apk/res/android"
    xmlns:app="http://schemas.android.com/apk/res-auto"
    xmlns:tools="http://schemas.android.com/tools"
    android:layout_width="match_parent"
    android:layout_height="match_parent"
    android:padding="10dp"
    tools:context=".MainActivity">


    <TableLayout
        android:layout_width="wrap_content"
        android:layout_height="wrap_content"
        android:layout_alignParentBottom="true"
        android:layout_centerHorizontal="true">
        <TableRow>
            <Button
                android:layout_width="wrap_content"
                android:layout_height="wrap_content"
                android:text="C"/>
            <Button
                android:layout_width="wrap_content"
                android:layout_height="wrap_content"
                android:text="<-">
            <Button
                android:layout_width="wrap_content"
                android:layout_height="wrap_content"/>
            <Button
                android:layout_width="wrap_content"
                android:layout_height="wrap_content"/>
        </TableRow>
        <TableRow>
            <Button
                android:layout_width="wrap_content"
                android:layout_height="wrap_content"/>
            <Button
                android:layout_width="wrap_content"
                android:layout_height="wrap_content"/>
            <Button
                android:layout_width="wrap_content"
                android:layout_height="wrap_content"/>
            <Button
                android:layout_width="wrap_content"
                android:layout_height="wrap_content"/>
        </TableRow>
        <TableRow>
            <Button
                android:layout_width="wrap_content"
                android:layout_height="wrap_content"
                android:layout_span="2"
                android:text="0"/>
            <Button
            android:layout_width="wrap_content"
            android:layout_height="wrap_content"
                android:layout_span="2"
                android:text="="/>
        </TableRow>
    </TableLayout>
</RelativeLayout>
2.7 帧布局
<FrameLayout></FrameLayout>
帧布局用于在屏幕上创建一块空白区域,添加到该区域中的每一个子控件占一帧,每一个帧都会覆盖在上一个帧的上面
俩属性
- android:foreground:设置FrameLayout容器的前景图像,始终显示在子控件上面
- android:foreground:设置前景图像显示的位置
帧布局举例
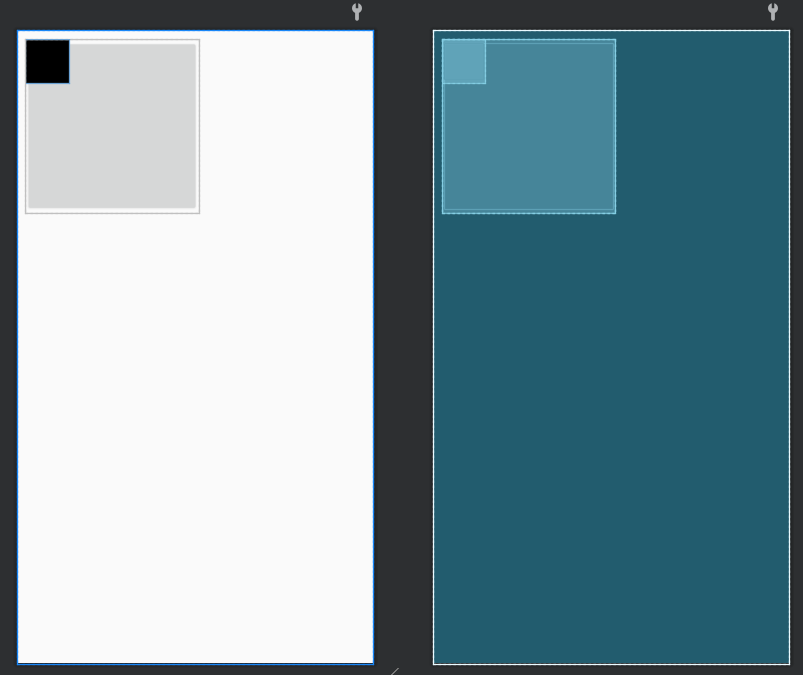
    <FrameLayout
        android:layout_width="wrap_content"
        android:layout_height="wrap_content">
        <Button
        android:layout_width="200dp"
        android:layout_height="200dp"/>
        <Button
            android:layout_width="50dp"
            android:layout_height="50dp"
            android:background="#000000" />
    </FrameLayout>
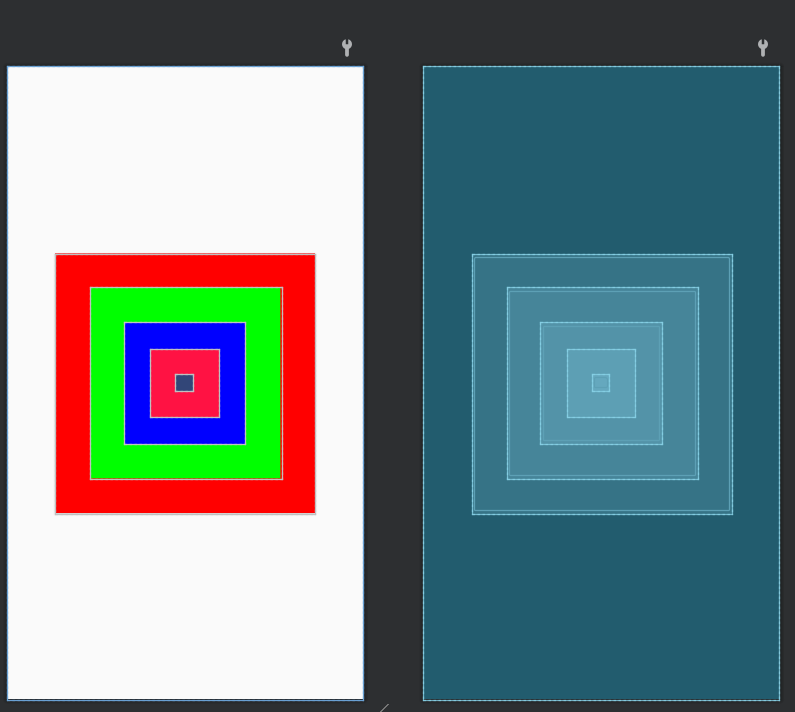
2.7.2 实战演练-霓虹灯界面
<FrameLayout xmlns:android="http://schemas.android.com/apk/res/android"
    android:layout_width="match_parent"
    android:layout_height="match_parent">
    <Button
        android:id="@+id/btn_one"
        android:layout_width="300dp"
        android:layout_height="300dp"
        android:layout_gravity="center"
        android:background="#ff0000" />
    <Button
        android:id="@+id/btn_two"
        android:layout_width="220dp"
        android:layout_height="220dp"
        android:layout_gravity="center"
        android:background="#00ff00" />
    <Button
        android:id="@+id/btn_three"
        android:layout_width="140dp"
        android:layout_height="140dp"
        android:layout_gravity="center"
        android:background="#0000ff" />
    <Button
        android:id="@+id/btn_four"
        android:layout_width="80dp"
        android:layout_height="80dp"
        android:layout_gravity="center"
        android:background="#ff1243" />
    <Button
        android:id="@+id/btn_five"
        android:layout_width="20dp"
        android:layout_height="20dp"
        android:layout_gravity="center"
        android:background="#324678" />
</FrameLayout>