简介. 整个功能是在Unity里面主摄像头旋转移动的过程中对目标的机器模型进行截取图片和数据集。(unity如果没有cinemachine组件,需要自己去package manager下载安装适合自己的版本。(供自学记录)
一. 通过Cinemachine提供的组件,我们实现让摄像头沿着自定义的轨道进行运动,整个功能的实现由三部分构成。
①. 虚拟摄像机(Virtual Camera)
②. 轨道路径 (Dolly Track)
③. 主摄像头 (Main Camera)
实现方式:将虚拟摄像机和主摄像头与轨道进行绑定,然后沿轨道自动运动。
(1) 点击 GameObject,选择创建空物体(命名 Dolly Track) 屏幕右侧Inspector 界面选择添加CinemachineSmoothPath组件(当设置路径弯曲时会自动平滑),如果选择CinemachinePath的话,路径弯曲可由自己进行调整。

参数介绍:
- Resolution,表示路径的精细度,值越大 路径间的分段就越多
- Looped,勾选表示头尾相互连接
- Waypoints,自定义设置的坐标路径点, Roll是翻转角度 有点类似过山车
(2)设置主摄像头(Main Camera),选择主摄像头Add Component 为主摄像头添加CinemachineDollyCart 组件和CinemachineBrain组件。
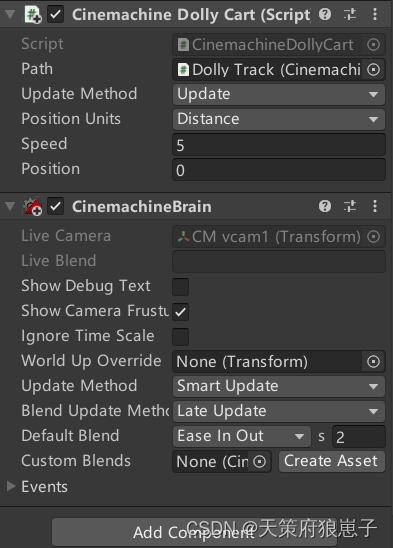
参数介绍:
- Path,表示选择的轨道路径,这里我们选择上面创建的Dolly Track
- Speed,小车沿轨道运动的路径
(3) 创建虚拟摄像头(Virtual Camera) 点击左上Component 选择Cinemachine的CinemachineVirtualCamera。
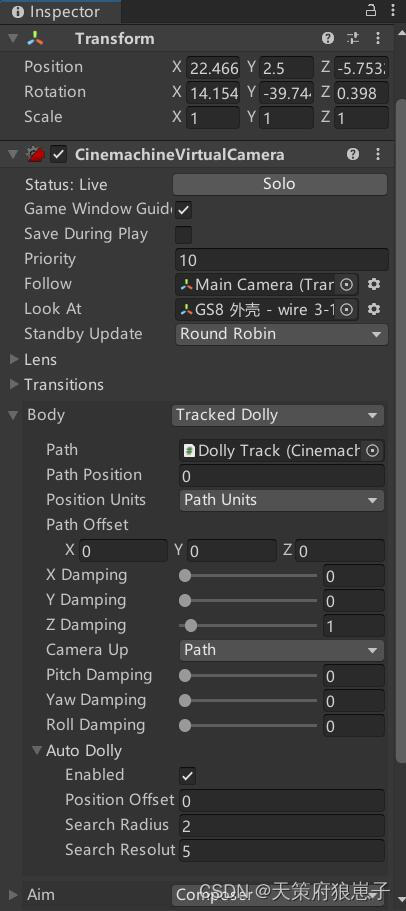
参数介绍:
- Follow,选择相机跟随的目标,这里选择刚创建的主摄像机(Main Camera)
- Look At,表示相机的朝向,这里选择要拍摄图片和采集数据的GS8机器,当机器由多部件构成时,可自由选择其中某一部件即可
- Camera Up,摄像机运动时的朝上坐标,可根据想要的效果选择
- Enabled,勾选表示开启该功能,一定要勾选 否则相机不会跟着主摄像头一起运动
到此,完成效果图如下:当 Play按钮时,相机会围绕着轨道做匀速运动。

二. 为主摄像机添加截取图片的cs文件,选择Add component 选择写好存放在Assets目录下的cs文件,代码如下:
using UnityEngine;
using System.Collections;

//截图
// Capture frames as a screenshot sequence. Images are
// stored as PNG files in a folder - these can be combined into
// a movie using image utility software (eg, QuickTime Pro).

public class Capture : MonoBehaviour
{
    // The folder to contain our screenshots.
    // If the folder exists we will append numbers to create an empty folder.
    public string folder = "ScreenshotFolder";
    public int frameRate = 30;
    private float videoTime = 0;
    void Start()
    {
        // Set the playback framerate (real time will not relate to game time after this).
        //Time.captureDeltaTime = 1.0f / 10;

        // Create the folder
        System.IO.Directory.CreateDirectory(folder);
    }

    void Update()
    {
        videoTime += Time.deltaTime;
        if (videoTime >= (1f / (float)frameRate))
        {

            // Append filename to folder name (format is '0005 shot.png"')
            string name = string.Format("{0}/{1}.png", folder, videoTime.ToString("0.00"));

            // Capture the screenshot to the specified file.
            ScreenCapture.CaptureScreenshot(name);
        }
    }
}
三. 选择要拍摄的机器,选择Add component 选择写好存放在Assets目录下的cs文件,代码如下:
using System.Collections;
using System.Collections.Generic;
using UnityEngine;
using System;

/*
说明:
    将改脚本挂在需要使用该功能物体上
    运行游戏之后,每次按下Space键就可以保存一次该物体在屏幕上的渲染范围的数据
    保存路径是:项目根目录下面的outdata.json文件
*/

public class ObjectMesh : MonoBehaviour
{
    //需要计算的mesh渲染范围
    private MeshRenderer meshRenderer;

    public int fps = 15;
    private float videoTime = 0;


    // Start is called before the first frame update

    private string fileName ="";
    void Awake(){
        fileName = Application.dataPath+"/Outdata.json";
        Debug.Log("像素数据保存路径:"+fileName);
        //初始创建保存数据文件
        if(!System.IO.File.Exists(fileName))
        {
            System.IO.File.Create(fileName);
        }
        //初始找到有效mesh
        this.SearchMeshRender();
    }

    void Update()
    {

        Vector3 screenPoint = Camera.main.WorldToViewportPoint(meshRenderer.transform.position);
        bool onScreen = screenPoint.z > 0 && screenPoint.x > 0 && screenPoint.x < 1 && screenPoint.y > 0 && screenPoint.y < 1;
        videoTime += Time.deltaTime;

        if ((videoTime >= (1f / (float)fps)) && (onScreen))
        {
            StartCoroutine(AppendScreenPixel());
        }


    }
    //查找到有效的meshrender组件
    private void SearchMeshRender(){
        meshRenderer = gameObject.transform.GetComponent<MeshRenderer>();
        if(meshRenderer==null)
        {
            meshRenderer = gameObject.GetComponentInChildren<MeshRenderer>();
        }
    }

    //计算物体的有效渲染像素范围
    private IEnumerator AppendScreenPixel(){

        yield return new WaitForEndOfFrame();


        //获取到该物体在屏幕的左下点
        Vector3 min = Camera.main.WorldToScreenPoint(meshRenderer.bounds.min);
        //获取到该物体在屏幕的右上点
        Vector3 max = Camera.main.WorldToScreenPoint(meshRenderer.bounds.max);

        /******************************保存数据格式*******************************/
        PixAreaClass pac = new PixAreaClass();
        pac.height =  (int)(max.y- min.y);
        pac.width =  (int)(max.x-min.x);
        pac.boxxes = new float[]{(int)min.x,(int)min.y, (int)(max.x), (int)max.y};
        pac.time = videoTime.ToString("F");
        //pac.time = System.DateTime.Now.ToString("yyyy-MM-dd_HH-mm-ss.ffff");
        /******************************保存数据格式*******************************/

        string data =  JsonUtility.ToJson(pac);
        //data = String.Format("{0:N2}", data);
        //data = data.ToString("0.00");

        Debug.Log(data);
            //添加数据到文件
        System.IO.File.AppendAllLines(fileName, new List<string> {data});


        /*  截图代码  暂时关闭 用于测试效果
        int width = (int)Mathf.Round(pac.width);

        int height = (int)Mathf.Round(pac.height);


        float beginx = (int)min.x;

        float beginy = (int)min.y;


        Texture2D texture = new Texture2D(width, height, TextureFormat.RGB24, false);

        //Read the pixels in the Rect starting at 0,0 and ending at the screen's width and height


        texture.ReadPixels (new Rect (beginx, beginy, width, height),0,0);

        texture.Apply();

        System.IO.File.WriteAllBytes(Application.dataPath+"/"+ videoTime + ".jpg",texture.EncodeToJPG());
        */
    }


}

//数据格式
public class PixAreaClass{
    public int height;
    public int width;
    public float[] boxxes;
    public string time;
}注意:cs文件的文件名一定要和里面的类名一致。