1 Container容器组件
1.1 属性说明
1.1.1 alignment
topCenter:顶部居中对齐
topLeft:顶部左对齐
topRight:顶部右对齐
center:水平垂直居中对齐
centerLeft:垂直居中水平居左对齐
centerRight:垂直居中水平居右对齐
bottomCenter底部居中对齐
bottomLeft:底部居左对齐
bottomRight:底部居右对齐
1.1.2 decoration
margin:属性是表示Container与外部其他组件的距离。 EdgeInsets.all(20.0),
padding:就是Container的内边距,指Container边缘与Child之间的距离 padding:EdgeInsets.all(10.0)
transform:让Container容易进行一些旋转之类的transform: Matrix4.rotationZ(0.2)
height:容器高度
width:容器宽度
child:容器子元素
示例代码01
import 'package:flutter/material.dart';

void main() {
  runApp(MaterialApp(
    home: Scaffold(
      appBar: AppBar(title: const Text("你好Flutter")),
      body: const MyApp(),
    ),
  ));
}


// 容器组件
class MyApp extends StatelessWidget {
  const MyApp({Key? key}) : super(key: key);

  @override
  Widget build(BuildContext context) {
    return Center(
      child: Container(
        alignment: Alignment.center,
        height: 200,
        width: 200,
        decoration: const BoxDecoration(
          color: Colors.yellow,
        ),
        child: const Text(
          "你好Flutter",
          style: TextStyle(fontSize: 20),
        ),
      ),
    );
  }
}
示例代码02
//代码块 importM
import 'package:flutter/material.dart';

void main() {
  runApp(MaterialApp(
    home: Scaffold(
      appBar: AppBar(title: const Text("你好Flutter")),
      body: const MyApp(),
    ),
  ));
}

// 代码块  statelessW
class MyApp extends StatelessWidget {
  const MyApp({Key? key}) : super(key: key);
  @override
  Widget build(BuildContext context) {
    return Center(
      child: Container(
        alignment: Alignment.center,
        height: 200,
        width: 200,
        decoration:  BoxDecoration(
            color: Colors.yellow,
            gradient: const LinearGradient(
              //LinearGradient 背景线性渐变   RadialGradient径向渐变
              colors: [Colors.red, Colors.orange],
            ),
            boxShadow:const [
              //卡片阴影
              BoxShadow(
                color: Colors.blue,
                offset: Offset(2.0, 2.0),
                blurRadius: 10.0,
              )
            ],
            border: Border.all(
                color: Colors.black,
                width: 1
            )
        ),
        transform:Matrix4.rotationZ(0.2),
        child: const Text(
          "你好Flutter",
          style: TextStyle(fontSize: 20),
        ),

      ),
    );
  }
}
示例代码03
//代码块 importM
import 'package:flutter/material.dart';

void main() {
  runApp(MaterialApp(
    home: Scaffold(
      appBar: AppBar(title: const Text("你好Flutter")),
      body: const MyApp(),
    ),
  ));
}

// 代码块  statelessW
class MyApp extends StatelessWidget {
  const MyApp({Key? key}) : super(key: key);
  @override
  Widget build(BuildContext context) {
    return Center(

      // child: Container(
      //   margin: EdgeInsets.all(20.0), //容器外补白
      //   color: Colors.orange,
      //   child: Text("Hello world !"),
      // ),
      // child: Container(
      //   padding: EdgeInsets.all(20.0), //容器内补白
      //   color: Colors.orange,
      //   child: Text("Hello world !"),
      // ),
      child: Container(
        alignment: Alignment.center,
        height: 40,
        width: 200,
        decoration:  BoxDecoration(
            color: Colors.blue,
            borderRadius: BorderRadius.circular(15)
        ),
        child: const Text(
          "按钮",
          style: TextStyle(fontSize: 20),
        ),
      ),
    );
  }
}
2 Text组件详解
2.1 属性说明
2.1.1 textAlign
文本对齐方式(center居中, left左对齐, right右对齐, justfy两端对齐)
2.1.2 textDirection
文本方向(ltr从左至右, rtl从右至左)
2.1.3 overflow
文字超出屏幕之后的处理方式(clip裁剪, fade渐隐, ellipsis省略号)
2.1.4 textScaleFactor
字体显示倍率
2.1.5 maxLines
文字显示最大行数
2.1.6 style
字体的样式设置
2.2 TextStyle 的参数
2.2.1 decoration
文字装饰线(none没有线, lineThrough删除线, overline上划线, underline下划线)
2.2.2 decorationColor
文字装饰线颜色
2.2.3 decorationStyle
文字装饰线风格([dashed,dotted]虚线, double两根线, solid一根实线, wavy波浪线)
2.2.4 wordSpacing
单词间隙(如果是负值,会让单词变得更紧凑
2.2.5 letterSpacing
字母间隙(如果是负值,会让字母变得更紧凑)
2.2.6 fontStyle
文字样式(italic斜体, normal正常体)
2.2.7 fontSize
文字大小
2.2.8 color
文字颜色
2.2.9 fontWeight
字体粗细(bold粗体, normal正常体)
2.2.10 更多参数
https://docs.flutter.io/flutter/painting/TextStyle-class.html
2.3 示例代码
//代码块 importM
import 'package:flutter/material.dart';

void main() {
  runApp(MaterialApp(
    home: Scaffold(
      appBar: AppBar(title: const Text("你好Flutter")),
      body: const MyApp(),
    ),
  ));
}

// 代码块  statelessW
class MyApp extends StatelessWidget {
  const MyApp({Key? key}) : super(key: key);

  @override
  Widget build(BuildContext context) {
    return Center(
      child: Container(
        alignment: Alignment.center,
        height: 200,
        width: 200,
        decoration: BoxDecoration(
            color: Colors.yellow,
            gradient: const LinearGradient(
              //LinearGradient 背景线性渐变   RadialGradient径向渐变
              colors: [Colors.red, Colors.orange],
            ),
            boxShadow: const [
              //卡片阴影
              BoxShadow(
                color: Colors.blue,
                offset: Offset(2.0, 2.0),
                blurRadius: 10.0,
              )
            ],
            border: Border.all(color: Colors.black, width: 1)),
        transform: Matrix4.rotationZ(.2),
        child: const Text('各位同学大家好',
            textAlign: TextAlign.left,
            overflow: TextOverflow.ellipsis,
            // overflow:TextOverflow.fade ,
            maxLines: 2,
            textScaleFactor: 1.8,
            style: TextStyle(
                fontSize: 16.0,
                color: Colors.black,
                // color:Color.fromARGB(a, r, g, b)
                fontWeight: FontWeight.w800,
                fontStyle: FontStyle.italic,
                decoration: TextDecoration.lineThrough,
                decorationColor: Colors.white,
                decorationStyle: TextDecorationStyle.dashed,
                letterSpacing: 5.0)),
      ),
    );
  }
}
3 图片组件详解
3.1 说明
Flutter 中,我们可以通过 Image组件来加载并显示图片 Image 的数据源可以是asset、文件、内存以 及网络 。
Image.asset 本地图片
Image.network 远程图片
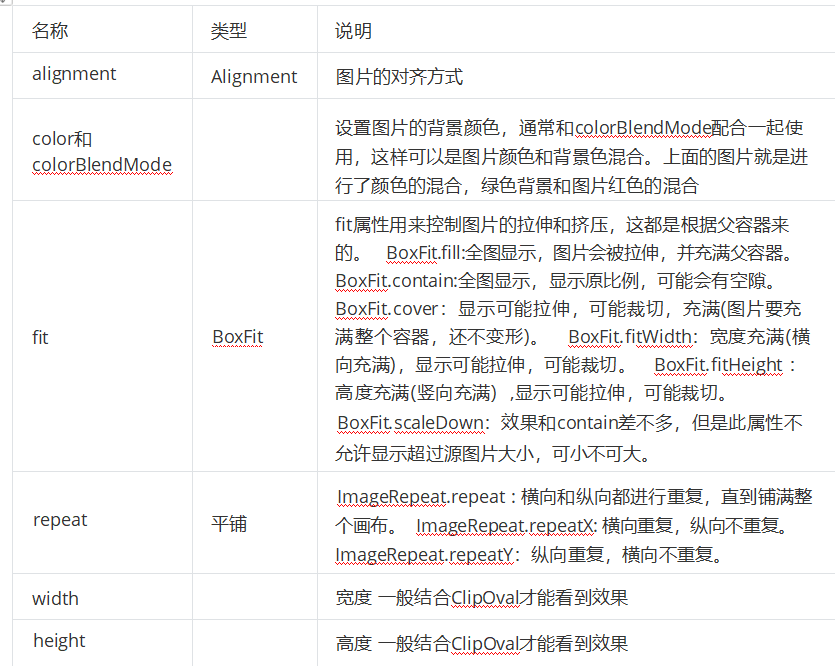
3.2 属性说明
更多属性参考https://api.flutter.dev/flutter/widgets/Image-class.html
3.3 加载本地图片
3.3.1 项目根目录新建images文件夹,images中新建2.x 3.x对应的文件

3.3.2 然后,打开pubspec.yaml 声明一下添加的图片文件, 注意: 空格
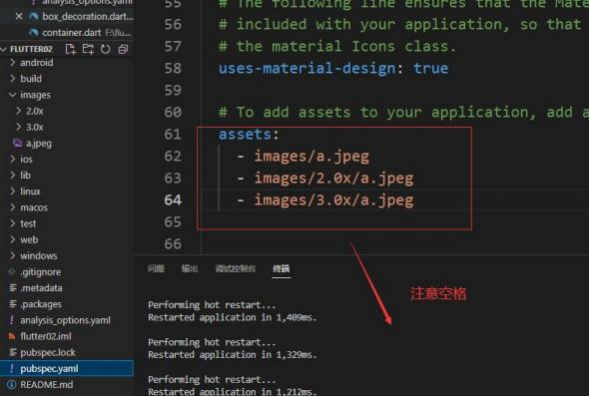
3.3.3 使用
import 'package:flutter/material.dart';

//本地图片
void main() {
  runApp(MaterialApp(
    home: Scaffold(
      appBar: AppBar(title: const Text("你好Flutter")),
      body: const MyApp(),
    ),
  ));
}

class MyApp extends StatelessWidget {
  const MyApp({Key? key}) : super(key: key);
  @override
  Widget build(BuildContext context) {
    return Center(
      child: Image.asset(
          "images/2.jpg",
          width: 150.0,
          height: 150.0,
          fit: BoxFit.cover),
    );
  }
}
3.4 加载远程图片
import 'package:flutter/material.dart';

//图片路径 https://pics6.baidu.com/feed/43a7d933c895d1431790def92fe644055baf0727.jpeg@f_auto?token=18bdda8ca14969d4351c53a482c2b2ca&s=5BB105C154B1499472A1215B03001013
//远程图片
void main(){
  runApp(
      MaterialApp(
        home: Scaffold(
            appBar: AppBar(title: const Text("你好Flutter")),
            body: const MyApp()
        ),
      )
  );
}
class MyApp extends StatelessWidget {
  const MyApp({Key? key}) : super(key: key);
  @override
  Widget build(BuildContext context) {
    return Center(
      child: Image.network(
          "https://pics2.baidu.com/feed/b7003af33a87e9502b64d86f4c2e9544fbf2b45b.jpeg@f_auto?token=8c6557279177a75d44029840f0db0daa&s=C8AA67D91C0090457095310903005057",
          // "https://pics6.baidu.com/feed/43a7d933c895d1431790def92fe644055baf0727.jpeg@f_auto?token=18bdda8ca14969d4351c53a482c2b2ca&s=5BB105C154B1499472A1215B03001013",
          width: 150.0,
          height: 150.0,
          fit: BoxFit.cover),
    );
  }
}
3.5 原型图片
3.5.1 Container实现圆形图片
3.5.2 ClipOval实现圆形图片
3.5.3 CircleAvatar实现圆形图片
3.5.4 示例
import 'package:flutter/material.dart';


void main() {

  runApp(MaterialApp(

    home: Scaffold(

        appBar: AppBar(title: const Text("你好Flutter")),

        // body: const MyApp()

        // body: const MyApp2()

        body: const MyApp3()

    ),

  ));

}


const String URL = "https://pics2.baidu.com/feed/b7003af33a87e9502b64d86f4c2e9544fbf2b45b.jpeg@f_auto?token=8c6557279177a75d44029840f0db0daa&s=C8AA67D91C0090457095310903005057";


//Container实现圆形图片

class MyApp extends StatelessWidget {

  const MyApp({Key? key}) : super(key: key);


  @override

  Widget build(BuildContext context) {

    return Center(

      child: Container(

        width: 150,

        height: 150,

        decoration: BoxDecoration(

            color: Colors.yellow,

            borderRadius: BorderRadius.circular(75),

            image: const DecorationImage(

                image: NetworkImage(URL),

                fit: BoxFit.cover)),

      ),

    );

  }

}


//ClipOval实现圆形图片

class MyApp2 extends StatelessWidget {

  const MyApp2({Key? key}) : super(key: key);

  @override

  Widget build(BuildContext context) {

    return Center(

      child: ClipOval(

        child: Image.network(

            URL,

            width: 150.0,

            height: 150.0,

            fit: BoxFit.cover),

      ),

    );

  }

}

//CircleAvatar实现圆形图片

class MyApp3 extends StatelessWidget {

  const MyApp3({Key? key}) : super(key: key);

  @override

  Widget build(BuildContext context) {

    return const CircleAvatar(

        radius: 110,

        backgroundColor: Color(0xffFDCF09),

        child: CircleAvatar(

          radius: 100,

          backgroundImage:

          NetworkImage(URL),

        )

    );

  }

}
4 图标组件
4.1 使用Flutter官方Icons图标
Material Design所有图标可以在其官网查看: https://material.io/tools/icons/
案例
import 'package:flutter/material.dart';

//使用Flutter官方Icons图标
//图标库:https://material.io/tools/icons/
void main() {
  runApp(MaterialApp(
    home: Scaffold(
      appBar: AppBar(title: const Text("你好Flutter")),
      body: const MyApp(),
    ),
  ));
}


class MyApp extends StatelessWidget {
  const MyApp({Key? key}) : super(key: key);
  @override
  Widget build(BuildContext context) {
    return Center(
        child: Column(
          children: const [
            Icon(Icons.search,color: Colors.red),
            Icon(Icons.home,color: Colors.cyan),
            Icon(Icons.category),
            Icon(Icons.shop),
          ]
        )
    );
  }
}
4.2 Flutter中借助阿里巴巴图标库自定义字体图标
4.2.1 使用自定义字体图标。
阿里巴巴图标库官网 iconfont.cn上有很多字体图标素材,我们可以 选择自己需要的图标打包下载后,会生成一些不同格式的字体文件,在Flutter中,我们使用ttf格式即可。
4.2.2 假设我们项目中需要使用一个书籍图标和微信图标,我们打包下载后导入:
1. 导入字体图标文件;这一步和导入字体文件相同,假设我们的字体图标文件保存在项目根目录下, 路径为"fonts/iconfont.ttf":
fonts:
- family: myIcon #指定一个字体名
fonts:
- asset: fonts/iconfont.ttf
4.2.3 也可以配置多个字体文件
fonts:
- family: myIcon #指定一个字体名
fonts:
- asset: fonts/iconfont.ttf
- family: myIcon #指定一个字体名
fonts:
- asset: fonts/iconfont.ttf
- family: myIcon #指定一个字体名
fonts:
- asset: fonts/iconfont.ttf
4.2.4 定义一个 MyIcons类
功能和 Icons类一样:将字体文件中的所有图标都定义 成静态变量:
import 'package:flutter/material.dart';
class MyIcons{
    // 设置图标
    static const IconData set = IconData(0xe601,fontFamily: 'myIcon', matchTextDirection: true);
}
示例
import 'package:flutter/material.dart';

import 'package:flutter_chaper_01/src/asset/font.dart';


//使用阿里图标库支持

//图标库:https://material.io/tools/icons/

void main() {

  runApp(MaterialApp(

    home: Scaffold(

      appBar: AppBar(title: const Text("你好Flutter")),

      body: const MyApp(),

    ),

  ));

}


class MyApp extends StatelessWidget {

  const MyApp({Key? key}) : super(key: key);

  @override

  Widget build(BuildContext context) {

    return Center(

        child: Column(

          children: const [

            Icon(MyIcons.set,color: Colors.red),

            Icon(Icons.home,color: Colors.cyan),

            Icon(Icons.category),

            Icon(Icons.shop),

          ]

        )

    );

  }

}
5 Flutter 列表组件
5.1 列表布局是我们项目开发中最常用的一种布局方式
Flutter中我们可以通过ListView来定义列表项,支 持垂直和水平方向展示。通过一个属性就可以控制列表的显示方向。
5.2 列表有以下分类
5.2.1 垂直列表
5.2.2 垂直图文列表
5.2.3 水平列表
5.2.4 动态列表
5.3 列表组件常用参数
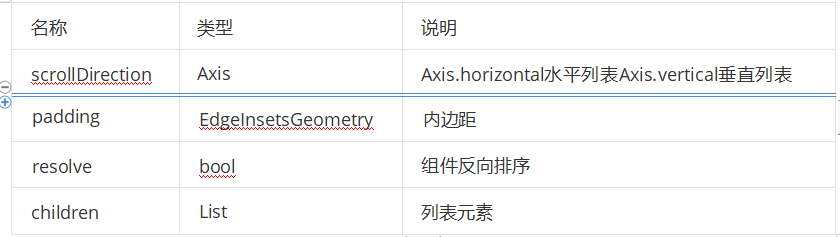
5.4 示例
5.4.1 垂直列表
import 'package:flutter/material.dart';

void main() {
  runApp(MaterialApp(
    home: Scaffold(
      appBar: AppBar(title: const Text("你好Flutter")),
// body: const VerticalList(),
// body: const VerticalIconList(),
      body: const VerticalPicList(),
    ),
  ));
}

//垂直列表
class VerticalList extends StatelessWidget {
  const VerticalList({Key? key}) : super(key: key);

  @override
  Widget build(BuildContext context) {
    return ListView(
      children: const <Widget>[
        ListTile(
          title: Text("我是一个标题"),
        ),
        ListTile(
          title: Text("我是一个标题"),
        ),
        ListTile(
          title: Text("我是一个标题"),
        ),
        ListTile(
          title: Text("我是一个标题"),
        ),
        ListTile(
          title: Text("我是一个标题"),
        ),
        ListTile(
          title: Text("我是一个标题"),
        ),
        ListTile(
          title: Text("我是一个标题"),
        ),
      ],
    );
  }
}

//垂直图标列表
class VerticalIconList extends StatelessWidget {
  const VerticalIconList({Key? key}) : super(key: key);

  @override
  Widget build(BuildContext context) {
    return ListView(
      children: const <Widget>[
        ListTile(
          leading: Icon(Icons.assignment, color: Colors.red),
          title: Text("全部订单"),
        ),
        Divider(),
        ListTile(
          leading: Icon(Icons.payment, color: Colors.green),
          title: Text("待付款"),
        ),
        Divider(),
        ListTile(
          leading: Icon(Icons.local_car_wash, color: Colors.orange),
          title: Text("待收货"),
        ),
        ListTile(
          leading: Icon(Icons.favorite, color: Colors.lightGreen),
          title: Text("我的收藏"),
        ),
        Divider(),
        ListTile(
          leading: Icon(Icons.people, color: Colors.black54),
          title: Text("在线客服"),
        ),
        Divider(),
      ],
    );
  }
}

//垂直图文列表
class VerticalPicList extends StatelessWidget {
  const VerticalPicList({Key? key}) : super(key: key);

  @override
  Widget build(BuildContext context) {
    return ListView(
      children: <Widget>[
        ListTile(
          leading: Image.asset("images/1.png"),
          title: const Text('华北黄淮高温雨今起强势登场'),
          subtitle: const Text("中国天气网讯 21日开始,华北黄淮高温雨今起强势登场"),
        ),
        const Divider(),
        ListTile(
          leading: Image.asset("images/2.png"),
          title: const Text('保监局50天开32罚单 “断供”违规资金为房市降温'),
          subtitle: const Text(
            "中国天气网讯 保监局50天开32罚单 “断供”违规资金为房市降",
          ),
        ),
        const Divider(),
        ListTile(
            title: const Text('华北黄淮高温雨今起强势登场'),
            subtitle: const Text("中国天气网讯 21日开始,华北黄淮高温雨今起强势登场"),
            trailing: Image.asset("images/3.png")),
        const Divider(),
        ListTile(
          leading: Image.asset("images/4.png"),
          title: const Text('普京现身俄海军节阅兵:乘艇检阅军舰'),
        ),
        const Divider(),
        ListTile(
          leading: Image.asset("images/5.png"),
          title: const Text('鸿星尔克捐1个亿帮助困难残疾群体 网友:企业有担当'),
        ),
        const Divider(),
        ListTile(
          leading: Image.asset("images/6.png"),
          title: const Text('行业冥灯?老罗最好祈祷苹果的AR能成'),
        ),
      ],
    );
  }
}
5.4.2 水平列表 可以左右滑动
import 'package:flutter/material.dart';

void main() {
  runApp(MaterialApp(
    home: Scaffold(
      appBar: AppBar(title: const Text("你好Flutter")),
      body: const HorizontalList(),
    ),
  ));
}

class HorizontalList extends StatelessWidget {
  const HorizontalList({Key? key}) : super(key: key);

  @override
  Widget build(BuildContext context) {
    return SizedBox(
      height: 180,
      child: ListView(
        scrollDirection: Axis.horizontal,
        children: <Widget>[
          Container(
            width: 180.0,
            color: Colors.red,
          ),
          Container(
            width: 180.0,
            color: Colors.orange,
            child: Column(
              children: <Widget>[
                Image.asset("images/1.png"),
                const Text('我是一个文本')
              ],
            ),
          ),
          Container(
            width: 180.0,
            color: Colors.blue,
          ),
          Container(
            width: 180.0,
            color: Colors.deepOrange,
          ),
          Container(
            width: 180.0,
            color: Colors.deepPurpleAccent,
          ),
        ],
      ),
    );
  }
}
5.4.3 ListView动态列表组件 以及循环动态数据
import 'package:flutter/material.dart';

//列表数据动态化
void main() {
  runApp(const MyApp());
}

class MyApp extends StatelessWidget {
  const MyApp({Key? key}) : super(key: key);

  // This widget is the root of your application.
  @override
  Widget build(BuildContext context) {
    return MaterialApp(
      theme: ThemeData(
        primarySwatch: Colors.yellow,
      ),
      home: Scaffold(
        appBar: AppBar(title: const Text("Flutter ICON")),
        body: const MyHomePage(),
      ),
    );
  }
}

class MyHomePage extends StatelessWidget {
  const MyHomePage({Key? key}) : super(key: key);

  List<Widget> _initListView() {
    List<Widget> list = [];
    for (var i = 0; i < 100; i++) {
      list.add(const ListTile(
        title: Text("我是一个列表"),
      ));
    }
    return list;
  }

  @override
  Widget build(BuildContext context) {
    return ListView(
      children: _initListView(),
    );
  }
}

class MyHomePage2 extends StatelessWidget {
  List list = [];

  MyHomePage2({Key? key}) : super(key: key) {
    for (var i = 0; i < 10; i++) {
      list.add("我是一个列表--$i");
    }
  }

  @override
  Widget build(BuildContext context) {
    return ListView.builder(
        itemCount: list.length,
        itemBuilder: (context, index) {
          return ListTile(
            title: Text("${list[index]}"),
          );
        });
  }
}