一、难点和原理
- 对一个文件进行加密或者解密其实有很多种方法,难点主要在于,得到加密文件之后,如何在程序运行时进行解密,而不是先解密再运行程序,这相当于没加密。(脱裤子放屁的感觉。。。)
- 对于pytorch框架,我们进入torch.load里面查看代码,如下图所示:
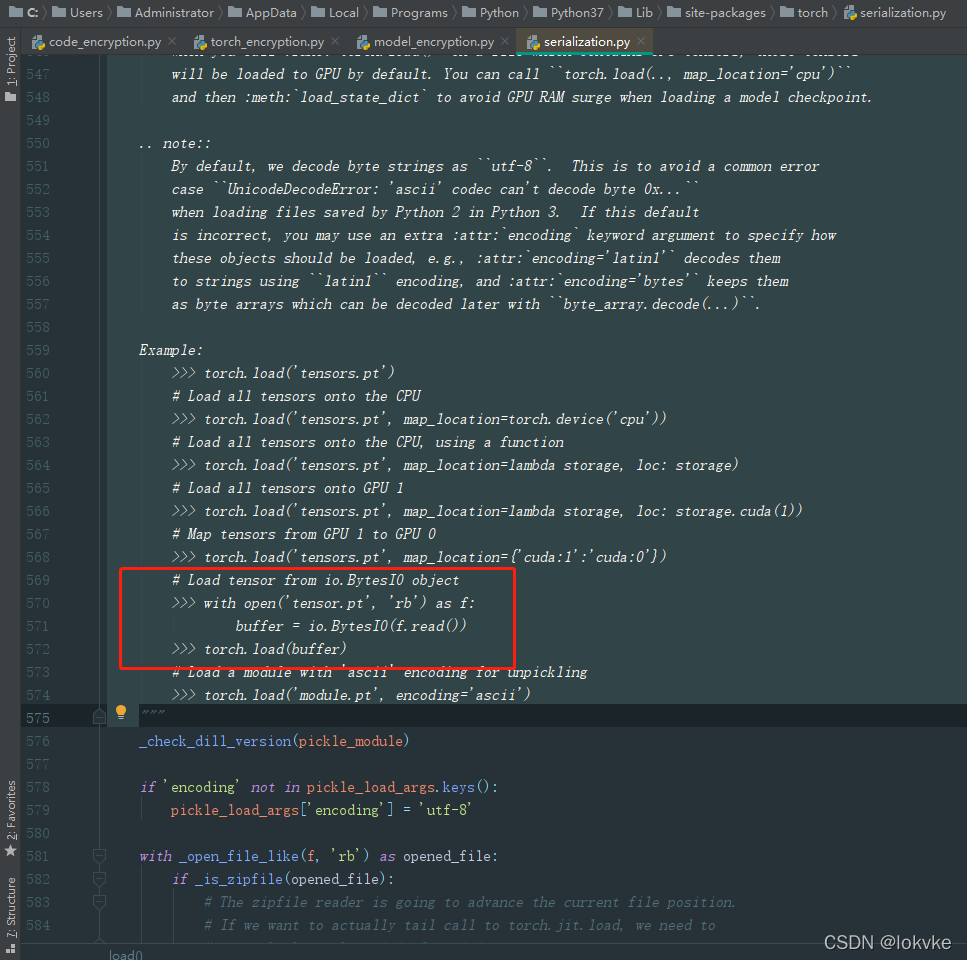
pytorch是可以读取 io.BytesIO 类型的数据的,因此,可以有如下的加密和解密过程:
- 加密过程
- 我们可以将读取的模型先保存成 io.BytesIO的格式;
- 再把io.BytesIO格式的数据保存成 bytes格式的数据;
- 再对bytes数据进行加密;
- 然后保存成加密文件。
- 解密过程
- 读取加密文件(用open去读取),得到加密的bytes格式数据;
- 解密,得到解密后的bytes格式数据;
- 将解密后的bytes格式数据,转换成io.Bytes格式数据;
- 使用torch.load直接读取io.Bytes格式数据,得到pytorch模型。
二、代码
- 对于加密算法,我们这里引入 cryptography库,利用其中的Fernet算法进行加密(Fernet具体是啥就不做介绍了),首先安装cryptography库
pip install cryptography
- 首先生成一串密钥,可以借助cryptography.fernet.Fernet库生成,也可以根据硬件信息的mac地址、硬件序列号啥的生成,这里以用cryptography.fernet.Fernet生成密钥为例,代码如下:
from cryptography.fernet import Fernet

key = Fernet.generate_key()
print(key)  # b'RtqikMWYdz45HAuXx-dguw6lmNXgOyT0XIMV8r0TtvU='
会随机生成一串bytes类型的字符串,我们将这串密钥保存到一个文件license当中,
with open('license', 'wb') as fw:
    fw.write(key)
加密过程,假设现在有pytorch的模型文件xxx.pth,则加密过程如下:
import io
import torch
# step1: 读取pytorch模型,并转成io.Bytes
model = torch.load(pth_file)
b = io.BytesIO()
torch.save(model, b)
b.seek(0)  # 这一句不能漏掉

# step2:io.Bytes格式数据转成bytes格式数据
pth_bytes = b.read()

# step3:读取加密license获取密钥,进行加密
 with open('license', 'rb') as fr:
     key = fr.read()
encrypted_data = Fernet(key).encrypt(pth_bytes)

# step4:保存加密文件
with open('encrypt.pth', 'wb') as fw:
    fw.write(encrypted_data)
- 解密过程
# step1:读取加密文件,得到加密的bytes格式数据
with open('encrypt.pth', 'rb') as fr:
    encrypted_data = fr.read()

# step2:解密,得到解密后的bytes格式数据
with open('license', 'rb') as fr:
    key = fr.read()
decrypted_data = Fernet(key).decrypt(encrypted_data)

# step3:解密后的bytes数据转成io.Bytes格式数据
b = io.BytesIO(decrypted_data)
b.seek(0)

# step4:torch.load读取解密后的io.Bytes格式数据
model = torch.load(b)
三、整体代码
将上述代码进行封装,整体代码如下所示:
import io
import torch
from cryptography.fernet import Fernet

key = b'vlu3T4bs2WWK5lc2QB-yKvGc_20P4gh6TqD7nhuh7pU='


def write_license(license_file, key):
    with open(license_file, 'wb') as fw:
        fw.write(key)


def read_license(license_file):
    with open(license_file, 'rb') as fr:
        key = fr.read()
    return key


def model_encryption(pth_file, encryp_file, license):
    model = torch.load(pth_file)
    b = io.BytesIO()
    torch.save(model, b)
    b.seek(0)
    pth_bytes = b.read()
    key = read_license(license)
    encrypted_data = Fernet(key).encrypt(pth_bytes)
    with open(encryp_file, 'wb') as fw:
        fw.write(encrypted_data)


def model_decryption(encryt_file, license):
    with open(encryt_file, 'rb') as fr:
        encrypted_data = fr.read()
    key = read_license(license)
    decrypted_data = Fernet(key).decrypt(encrypted_data)
    b = io.BytesIO(decrypted_data)
    b.seek(0)
    model = torch.load(b)
    return model
四、硬件绑定
-
一般可以利用硬件信息生成密钥,如获取机器的mac地址、ip、hostname,把这些信息编码成密钥。每次运行程序时,获取这串密钥,与license中的密钥比较,若不一致,则令程序无法正常进行。
-
python中可以利用socket、uuid库获取mac地址、ip地址、hostname的代码如下所示:
import uuid
import socket
mac = uuid.UUID(int=uuid.getnode()).hex[-12:]
mac = ':'.join([mac[e:e + 2] for e in range(0, 11, 2)])

hostname = socket.gethostname()

address = socket.gethostbyname(hostname)
ps:有的同学可能想到获取硬件的序列号,如CPU的序列号、硬盘的序列号等,在windows系统比较好获取,但是例如在ubuntu想获取序列号需要root权限,在代码中不好实现,所以其实通过mac地址就足够了,因为mac地址也是唯一的。
结束。