注意:整合基于spring boot 2.2.1.RELEASE 版本,如果版本不一致出现问题可以自行解决,问题应该都不是太大。
因为代码太多如果需要源码的可以加我的微信号获取代码,如果有问题也可以相互交流学习呀。
一、数据库表
首先创建用户表和security用于记住登陆的表
CREATE TABLE `persistent_logins` (
  `username` varchar(64) NOT NULL,
  `series` varchar(64) NOT NULL,
  `token` varchar(64) NOT NULL,
  `last_used` timestamp NOT NULL DEFAULT CURRENT_TIMESTAMP ON UPDATE CURRENT_TIMESTAMP,
  PRIMARY KEY (`series`)
) ENGINE=InnoDB DEFAULT CHARSET=utf8

CREATE TABLE `sys_user` (
  `id` bigint(10) NOT NULL AUTO_INCREMENT,
  `user_name` varchar(30) DEFAULT NULL COMMENT '用户名',
  `password` varchar(100) DEFAULT NULL COMMENT '密码',
  PRIMARY KEY (`id`)
) ENGINE=InnoDB AUTO_INCREMENT=3 DEFAULT CHARSET=utf8
二、pom文件
<?xml version="1.0" encoding="UTF-8"?>
<project xmlns="http://maven.apache.org/POM/4.0.0" xmlns:xsi="http://www.w3.org/2001/XMLSchema-instance"
         xsi:schemaLocation="http://maven.apache.org/POM/4.0.0 https://maven.apache.org/xsd/maven-4.0.0.xsd">
    <modelVersion>4.0.0</modelVersion>
    <parent>
        <groupId>org.springframework.boot</groupId>
        <artifactId>spring-boot-starter-parent</artifactId>
        <version>2.2.1.RELEASE</version>
        <relativePath/> <!-- lookup parent from repository -->
    </parent>
    <groupId>com.llx</groupId>
    <artifactId>spring-security</artifactId>
    <version>0.0.1-SNAPSHOT</version>
    <name>spring-security</name>
    <description>spring-security学习</description>
    <properties>
        <java.version>1.8</java.version>
    </properties>
    <dependencies>
        <!--starter-web-->
        <dependency>
            <groupId>org.springframework.boot</groupId>
            <artifactId>spring-boot-starter-web</artifactId>
        </dependency>
        <!--thymeleaf-->
        <dependency>
            <groupId>org.springframework.boot</groupId>
            <artifactId>spring-boot-starter-thymeleaf</artifactId>
        </dependency>
        <!--spring-security-->
        <dependency>
            <groupId>org.springframework.boot</groupId>
            <artifactId>spring-boot-starter-security</artifactId>
        </dependency>
        <dependency>
            <groupId>org.springframework.security</groupId>
            <artifactId>spring-security-test</artifactId>
            <scope>test</scope>
        </dependency>
        <!--lombok-->
        <dependency>
            <groupId>org.projectlombok</groupId>
            <artifactId>lombok</artifactId>
            <optional>true</optional>
        </dependency>
        <!--druid数据库连接池-->
        <dependency>
            <groupId>com.alibaba</groupId>
            <artifactId>druid-spring-boot-starter</artifactId>
            <version>1.1.10</version>
        </dependency>
        <!--mySQL连接驱动-->
        <dependency>
            <groupId>mysql</groupId>
            <artifactId>mysql-connector-java</artifactId>
        </dependency>
        <!-- mybatisPlus 核心库 -->
        <dependency>
            <groupId>com.baomidou</groupId>
            <artifactId>mybatis-plus-boot-starter</artifactId>
            <version>3.1.0</version>
        </dependency>
        <!--starter-test-->
        <dependency>
            <groupId>org.springframework.boot</groupId>
            <artifactId>spring-boot-starter-test</artifactId>
            <scope>test</scope>
        </dependency>
    </dependencies>

    <build>
        <plugins>
            <plugin>
                <groupId>org.springframework.boot</groupId>
                <artifactId>spring-boot-maven-plugin</artifactId>
            </plugin>
        </plugins>
    </build>

</project>
三、yml配置文件
server:
  port: 8080   #  配置启动端口号

mybatis:
  mapper-locations:
    - classpath:mapper/*.xml


spring:
  datasource:
    url: jdbc:mysql://127.0.0.1:3306/test?serverTimezone=GMT%2B8&useSSL=FALSE
    username: root  #数据库用户名,root为管理员
    password: 123456 #该数据库用户的密码
    # 使用druid数据源
    type: com.alibaba.druid.pool.DruidDataSource

  thymeleaf:
    cache: false

# mybatis-plus相关配置
mybatis-plus:
  # xml扫描,多个目录用逗号或者分号分隔(告诉 Mapper 所对应的 XML 文件位置)
  mapper-locations: classpath:mapper/*.xml
  # 以下配置均有默认值,可以不设置
  global-config:
    db-config:
      #主键类型 AUTO:"数据库ID自增" INPUT:"用户输入ID",ID_WORKER:"全局唯一ID (数字类型唯一ID)", UUID:"全局唯一ID UUID";
      id-type: auto
      #字段策略 IGNORED:"忽略判断"  NOT_NULL:"非 NULL 判断")  NOT_EMPTY:"非空判断"
      field-strategy: NOT_EMPTY
      #数据库类型
      db-type: MYSQL
  configuration:
    # 是否开启自动驼峰命名规则映射:从数据库列名到Java属性驼峰命名的类似映射
    map-underscore-to-camel-case: true
    # 如果查询结果中包含空值的列,则 MyBatis 在映射的时候,不会映射这个字段
    call-setters-on-nulls: true
    # 这个配置会将执行的sql打印出来,在开发或测试的时候可以用
    log-impl: org.apache.ibatis.logging.stdout.StdOutImpl
四、增加mybatis-plus配置类
package com.llx.springsecurity.config;

import com.baomidou.mybatisplus.extension.plugins.PaginationInterceptor;
import com.baomidou.mybatisplus.extension.plugins.PerformanceInterceptor;
import org.springframework.context.annotation.Bean;
import org.springframework.stereotype.Component;

/**
 * @description: MybatisPlusConfig <br>
 * @date: 2022/7/17 17:30 <br>
 * @author: William <br>
 * @version: 1.0 <br>
 */
@Component
public class MybatisPlusConfig {

    /**
     * mybatis-plus SQL执行效率插件【生产环境可以关闭】
     */
    @Bean
    public PerformanceInterceptor performanceInterceptor() {
        return new PerformanceInterceptor();
    }
    /**
     * 分页插件
     */
    @Bean
    public PaginationInterceptor paginationInterceptor() {
        return new PaginationInterceptor();
    }

}
五、创建用户相关实体类、mapper、service以及登录成功页面
类的创建如果不清楚的可以参照下面这个博客进行创建,我这里就不再叙述了。springboot整合mybatis-plus+durid数据库连接池_极速小乌龟的博客-CSDN博客_mybatisplus配置连接池在idea中新建项目,选择springbootinitializr,点击next创建项目即可。【项目】创建时记得勾选lombok,springweb。项目能够正常启动并访问,说明第一步项目创建没有问题。在src下创建TestController进行测试。创建test数据库并创建user表。在启动类上添加mapper扫描.成功执行,并且配置插件生效。.........https://blog.csdn.net/qq_35771266/article/details/125834909?spm=1001.2014.3001.5502在templates下面创建相关的页面。除了登陆页面每个页面写一句话进行区分即可。

登陆页面代码(主要测试功能,各位就别在意样式了)
<!DOCTYPE html>
<html lang="en">
<head>
    <meta charset="UTF-8">
    <title>登录页面</title>
</head>
<body>
<div style="width:300px;margin: 0 auto;text-align: center">
    <form action="/userLogin" method="post">
        <input type="text" name="userName"/><br/>
        <input type="text" name="password"/><br/>
        <input type="submit" value="登录">
    </form>
</div>

</body>
</html>
index页面代码
<!DOCTYPE html>
<html lang="en">
<head>
<meta charset="UTF-8">
<title>主页面</title>
</head>
<body>
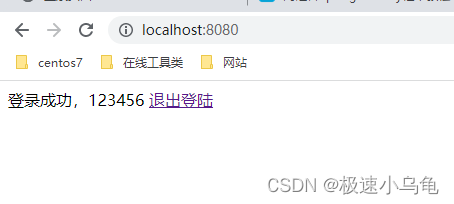
登录成功,123456
<!--配置了登出功能才能使用-->
<a href="/logout">退出登陆</a>
</body>
</html>创建跳转页面的controller和测试的controller
package com.llx.springsecurity.controller;

import org.springframework.stereotype.Controller;
import org.springframework.web.bind.annotation.RequestMapping;

/**
 * description: RouteController <br>
 *
 * @date: 2022/7/23 0023 下午 3:05 <br>
 * @author: William <br>
 * version: 1.0 <br>
 */
@Controller
public class RouteController {

    @RequestMapping({"/","/index"})
    public String index(){
        return "index";
    }

    @RequestMapping("/login")
    public String login(){
        return "login";
    }

    @RequestMapping("/errorPage")
    public String errorPage(){
        return "errorPage";
    }


    @RequestMapping("/403")
    public String forbidenPage(){
        return "403";
    }
}
package com.llx.springsecurity.controller;

import org.springframework.web.bind.annotation.GetMapping;
import org.springframework.web.bind.annotation.RequestMapping;
import org.springframework.web.bind.annotation.RestController;


/**
 * description: TestController <br>
 *
 * @date: 2022/7/23 0023 下午 1:20 <br>
 * @author: William <br>
 * version: 1.0 <br>
 */
@RestController
@RequestMapping("/test")
public class TestController {

    @GetMapping({"/hello",})
    public String index(){
        return "hello word";
    }


    @GetMapping("/123")
    public String number(){
        return "123";
    }


    @GetMapping("role")
    public String testRole(){
        return "OK";
    }

    @GetMapping("role2")
    public String testRole2(){
        return "OK";
    }
}
五、启动测试
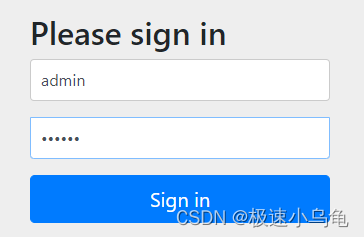
如果我们没有进行任何配置情况下,启动后,会在后台打印出自动生成的密码

访问项目,输入用户名“user” 和上面系统自动生成的密码即可进行登陆
正常登陆成功。
其实除了系统自动生成密码,我们也可以在yml文件配置用户和密码,或者在配置类创建用户名和密码,因为这几种都不是开发中使用的方式,所以只要作为了解即可。
我就用配置文件配置来说明一下:
首先在yml文件配置好用户名和密码,然后再次启动就会发现之前我们系统自动生成的密码,已经不在了,我们此时可以使用自己配置的用户名和密码进行登陆了。
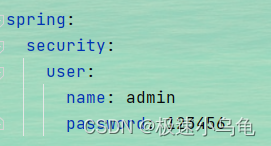
启动后输入我们配置的用户名和密码进行登陆,能够正常登陆。但是这几种方法除非是我们系统只有一个用户,那这个系统开发了还能有什么用?所以这几种讲真是鸡肋。后面会讲到使用数据库用户进行登陆。
六、使用数据库用户进行登陆
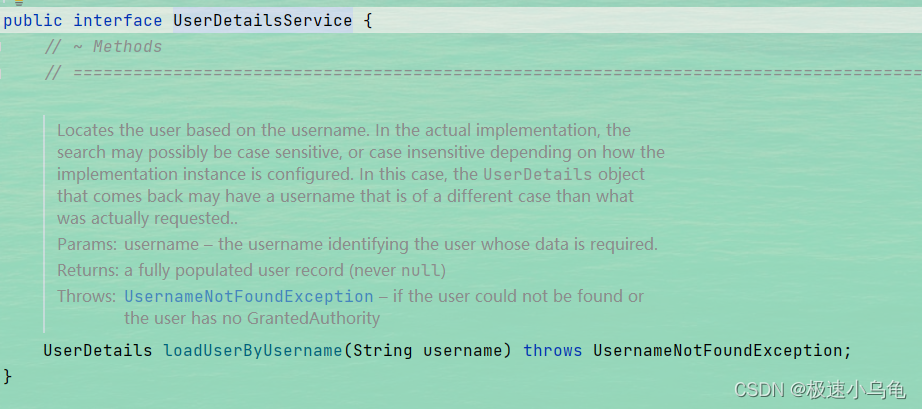
spring security给我们提供了自定义用户登录接口UserDetailsService,我们只要实现它下面的loadUserByUsername方法即可实现自定义登录功能
1.首先创建我们自定义的SecurityConfig配置类
package com.llx.springsecurity.config;

import org.springframework.beans.factory.annotation.Autowired;
import org.springframework.beans.factory.annotation.Qualifier;
import org.springframework.context.annotation.Bean;
import org.springframework.context.annotation.Configuration;
import org.springframework.security.config.annotation.authentication.builders.AuthenticationManagerBuilder;
import org.springframework.security.config.annotation.method.configuration.EnableGlobalMethodSecurity;
import org.springframework.security.config.annotation.web.builders.HttpSecurity;
import org.springframework.security.config.annotation.web.configuration.WebSecurityConfigurerAdapter;
import org.springframework.security.core.userdetails.UserDetailsService;
import org.springframework.security.crypto.bcrypt.BCryptPasswordEncoder;
import org.springframework.security.web.authentication.rememberme.JdbcTokenRepositoryImpl;
import org.springframework.security.web.authentication.rememberme.PersistentTokenRepository;

import javax.sql.DataSource;


/**
 * description: SecurityConfig <br>
 *
 * @date: 2022/7/23 0023 下午 2:08 <br>
 * @author: William <br>
 * version: 1.0 <br>
 */
@Configuration
public class SecurityConfig extends WebSecurityConfigurerAdapter {


    @Autowired
    UserDetailsService userDetailsService;

    @Override
    protected void configure(AuthenticationManagerBuilder auth) throws Exception {
        /**
         * 注意:此处必须要使用passwordEncoder ,不然会报错,这个密码加密方式可以自己定义也可使用已有的加密方式,
         * 这里就使用BCryptPasswordEncoder()加密方式
         */
        auth.userDetailsService(userDetailsService).passwordEncoder(new BCryptPasswordEncoder());
    }

}
2.编写UserDetailService实现类
package com.llx.springsecurity.service.imple;

import com.baomidou.mybatisplus.core.conditions.query.QueryWrapper;
import com.llx.springsecurity.pojo.SysUser;
import com.llx.springsecurity.service.SysUserService;
import org.springframework.beans.factory.annotation.Autowired;
import org.springframework.security.core.GrantedAuthority;
import org.springframework.security.core.authority.AuthorityUtils;
import org.springframework.security.core.authority.SimpleGrantedAuthority;
import org.springframework.security.core.userdetails.User;
import org.springframework.security.core.userdetails.UserDetails;
import org.springframework.security.core.userdetails.UserDetailsService;
import org.springframework.security.core.userdetails.UsernameNotFoundException;
import org.springframework.security.crypto.bcrypt.BCryptPasswordEncoder;
import org.springframework.stereotype.Service;
import org.springframework.util.StringUtils;

import java.util.ArrayList;
import java.util.List;

/**
 * description: UserDetailServiceImpl <br>
 *
 * @date: 2022/7/23 0023 下午 2:20 <br>
 * @author: William <br>
 * version: 1.0 <br>
 */
@Service
public class UserDetailServiceImpl implements UserDetailsService {


    @Autowired
    private SysUserService sysUserService;

    @Override
    public UserDetails loadUserByUsername(String userName) throws UsernameNotFoundException {
        if(StringUtils.isEmpty(userName)){
            throw new UsernameNotFoundException("用户名不能为空");
        }
        QueryWrapper<SysUser> wrapper = new QueryWrapper<>();
        wrapper.eq("user_name",userName);
        SysUser sysUser = sysUserService.getOne(wrapper);
        if(sysUser == null){
            throw new UsernameNotFoundException("用户名不存在");
        }
        List<GrantedAuthority> grantedAuthorities = AuthorityUtils.createAuthorityList("admin");
        return new User(sysUser.getUserName(),sysUser.getPassword(),grantedAuthorities);
    }

}
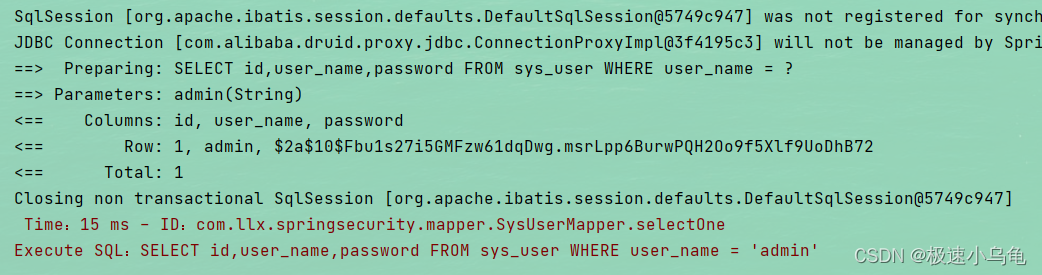
3.测试使用数据库用户登陆
启动项目进行登陆,我们可以看到已经成功查询数据库用户能够成功登陆。
七、自定义登陆页面
1.在SecurityConfig配置类增加登陆及跳转配置
@Override
protected void configure(HttpSecurity http) throws Exception{
//登陆配置
http.formLogin()
//登陆页面的路由
.loginPage("/login")
//登陆表单提交对应的方法
.loginProcessingUrl("/userLogin")
//表单用户名对应方法,如果不进行自定义就是默认username
.usernameParameter("userName")
//表单密码对应方法,如果不进行自定义就是默认password,其实这里不配置也行,因为默认就是password
.passwordParameter("password")
//登陆成功后跳转页面
.successForwardUrl("/index").permitAll()
//登陆失败后跳转页面,这里失败后继续跳转到登陆页面
.failureForwardUrl("/login");
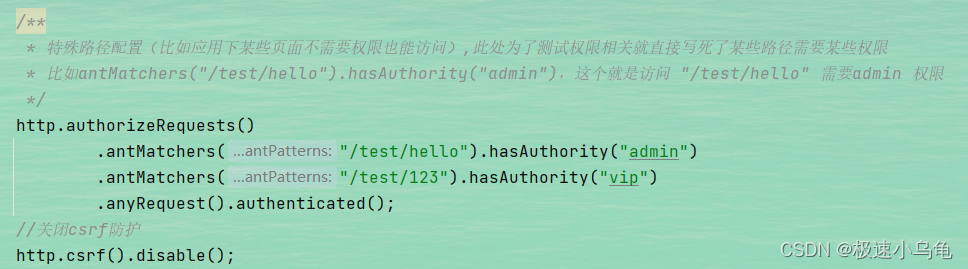
/**
* 特殊路径配置(比如应用下某些页面不需要权限也能访问),此处为了测试权限相关就直接写死了某些路径需要某些权限
* 比如antMatchers("/test/hello").hasAuthority("admin"),这个就是访问 "/test/hello" 需要admin 权限
*/
http.authorizeRequests()
.antMatchers("/test/hello").hasAuthority("admin")
.antMatchers("/test/123").hasAuthority("vip")
.anyRequest().authenticated();
//关闭csrf防护
http.csrf().disable();
}2.启动测试
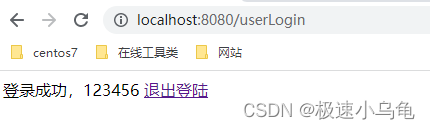
输入路径进行访问,可以看到已经跳转到我们自己定义的登陆页面。接下来我们可以进行登陆测试。
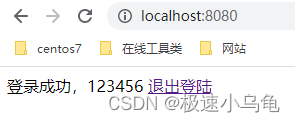
输入用户名和密码成功登陆,页面如下。
八、权限测试
接下来就是我们最重要的部分------权限测试了。
我们上面在用户的登陆(UserDetailServiceImpl)的时候先写死了用户当前的权限为admin

然后在上面SecurityConfig配置类中配置了两个简单的权限:一个是访问hello方法需要admin权限,另一个是123方法需要vip权限。
然后我们来测试访问,结果如下:访问hello正常,但是123报权限不足。

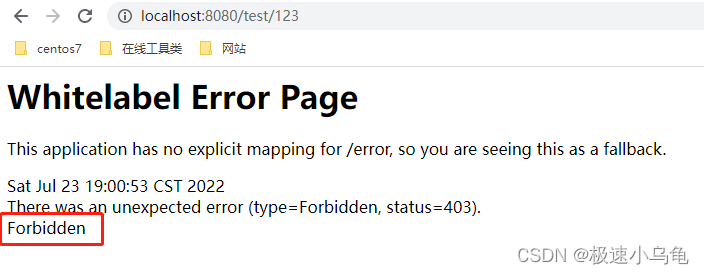
到这里我们的权限控制就简单实现了。但是我们的权限不足页面太不友好了,接下来我们可以先定义下自己的403页面。
九、在SecurityConfig配置类配置403权限不足页面
//403配置
http.exceptionHandling().accessDeniedPage("/403"); 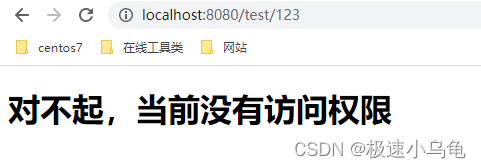
启动后进行测试我们可以发现已经能成功跳转到我们自定义的权限不足页面。
十、添加登出功能
在SecurityConfig配置类中添加登出配置
//登出配置
http.logout().logoutUrl("/logout").logoutSuccessUrl("/login").permitAll();
配置成功后进行测试

十一、使用数据库实现“自动登陆”功能
1.在第一步我们已经创建了自动登陆需要的数据表。
2.在SecurityConfig配置类中添加记住我功能
// 注入数据源
@Autowired
private DataSource dataSource;


//配置记住我功能使用的查询方式,这里使用数据库查询方式来实现
@Bean
public PersistentTokenRepository persistenTokenRepository() {
        JdbcTokenRepositoryImpl jdbcTokenRepository = new JdbcTokenRepositoryImpl();
        jdbcTokenRepository.setDataSource(dataSource);
        return jdbcTokenRepository;
}

//记住登陆
http.rememberMe()
           //前端页面表单记住我name名称
           .rememberMeParameter("rememberMe")
           //token存储配置
           .tokenRepository(persistenTokenRepository())
           //token过期时间
           .tokenValiditySeconds(30*60)
           //根据token查询用户方法
           .userDetailsService(userDetailsService);
3.修改前端登陆页面新增记住我复选框
修改后登陆页面如下:
<!DOCTYPE html>
<html lang="en">
<head>
    <meta charset="UTF-8">
    <title>登录页面</title>
</head>
<body>
<div style="width:300px;margin: 0 auto;text-align: center">
    <form action="/userLogin" method="post">
        <input type="text" name="userName"/><br/>
        <input type="text" name="password"/><br/>
        <input type="checkbox" name="rememberMe"/>自动登陆<br/>
        <input type="submit" value="登录">
    </form>
</div>

</body>
</html>
4.登陆测试

可以看到登陆成功,然后我们看一下数据库,可以看到当前登陆用户的token已经被缓存

再来看一下前端页面cookie,发现token也已经正常生成。

然后我们关闭浏览器,重新输入路径访问,也是能正常登陆的。说明我们记住我功能也正常了。
十二、权限注解开启及使用
1.开始security注解
我们可以在启动类或者SecurityConfig类上面添加@EnableGlobalMethodSecurity注解
@EnableGlobalMethodSecurity中可以填写以下参数prePostEnabled = true 和securedEnabled = true
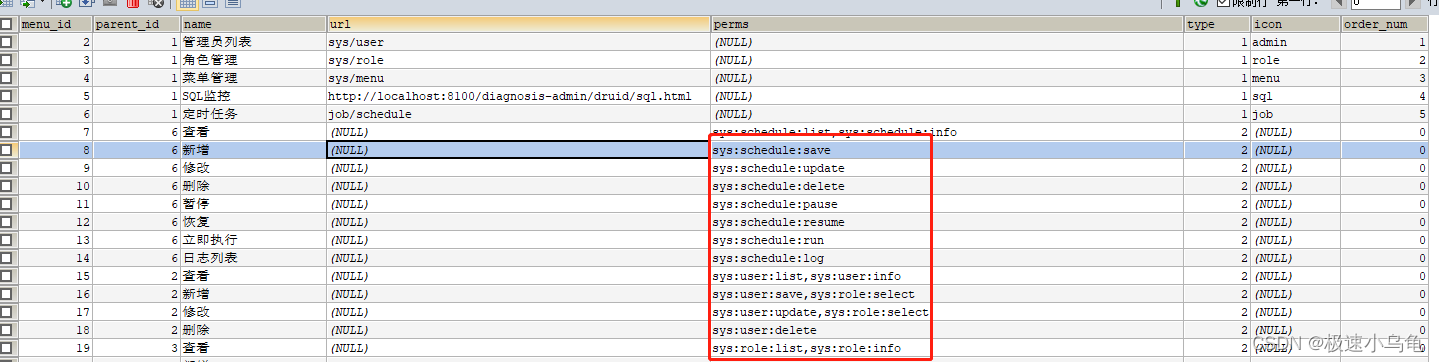
prePostEnabled = true 检查是否有权限权限(实际开发中多是使用这个方法,因为在管理后台中我们创建菜单时已经将权限标识创建完成了),可以给大家看一下
securedEnabled = true 检查是否拥有角色
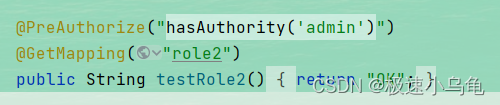
2.在方法上使用注解

如上图就是说明这个方法需要vip1的角色权限,因为不常用具体就不展开叙述了。
接下来我们说一下常用的注解
@PreAuthorize()该注解表示在请求之前检查权限
@PostAuthorize()该注解表示在请求之后检查
hasAuthority(String authority) 表示拥有当前传入的权限表示才能访问
hasAnyAuthority(String... authorities) 表示拥有当前传入的权限标识中任意一个权限都能访问
hasRole(String role) 表示拥有当前传入角色能够访问
hasAnyRole(String... roles) 表示拥有当前传入角色中任意一个角色都能够访问。
=================================================================
Ok,到此为止简单的整合学习就完成了,后面会写一篇基于微服务框架的整合,因为目前项目前后端不分离的已经很少了。当前都是使用微服务然后前后端分离进行开发的。后面抽空会基于微服务再写写一篇。
如果有兴趣的可以加微信交流