Spring
一、Spring介绍
1.Spring简介
Spring是一个开源框架,为简化企业级开发而生。它以IOC(控制反转)和AOP(面向切面)为思想内核,提供了控制层SpringMVC、数据层SpringData、服务层事务管理等众多技术,并可以整合众多第三方框架。
Spring将很多复杂的代码变得优雅简洁,有效的降低代码的耦合度,极大的方便项目的后期维护、升级和扩展。
2.Spring体系结构

Spring框架根据不同的功能被划分成了多个模块,这些模块可以满足一切企业级应用开发的需求,在开发过程中可以根据需求有选择性地使用所需要的模块。
Core Container:Spring核心模块,任何功能的使用都离不开该模块,是其他模块建立的基础。
Data Access/Integration:该模块提供了数据持久化的相应功能。
Web:该模块提供了web开发的相应功能。
AOP:提供了面向切面编程实现
Aspects:提供与AspectJ框架的集成,该框架是一个面向切面编程框架。
Instrumentation:提供了类工具的支持和类加载器的实现,可以在特定的应用服务器中使用。
Messaging:为Spring框架集成一些基础的报文传送应用
Test:提供与测试框架的集成
二、SpringIOC
1.控制反转思想
IOC(Inversion of Control) :程序将创建对象的权利交给框架。
之前在开发过程中,对象实例的创建是由调用者管理的,代码如下:
1public interface StudentDao {


2    // 根据id查询学生
3    Student findById(int id);
4}
5
6public class StudentDaoImpl implements StudentDao{


7    @Override
8    public Student findById(int id) {


9        // 模拟从数据库查找出学生
10        return new Student(1,"李星云","长安");
11    }
12}
13
14public class StudentService {


15    public Student findStudentById(int id){


16        // 此处就是调用者在创建对象
17        StudentDao studentDao = new StudentDaoImpl();
18        return studentDao.findById(1);
19    }
20}
这种写法有两个缺点:
1.浪费资源:StudentService调用方法时即会创建一个对象,如果不断调用方法则会创建大量StudentDao对象。
2.代码耦合度高:假设随着开发,我们创建了StudentDao另一个更加完善的实现类StudentDaoImpl2,如果在StudentService中想使用StudentDaoImpl2,则必须修改源码。
而IOC思想是将创建对象的权利交给框架,框架会帮助我们创建对象,分配对象的使用,控制权由程序代码转移到了框架中,控制权发生了反转,这就是Spring的IOC思想。而IOC思想可以完美的解决以上两个问题。
2.自定义对象容器
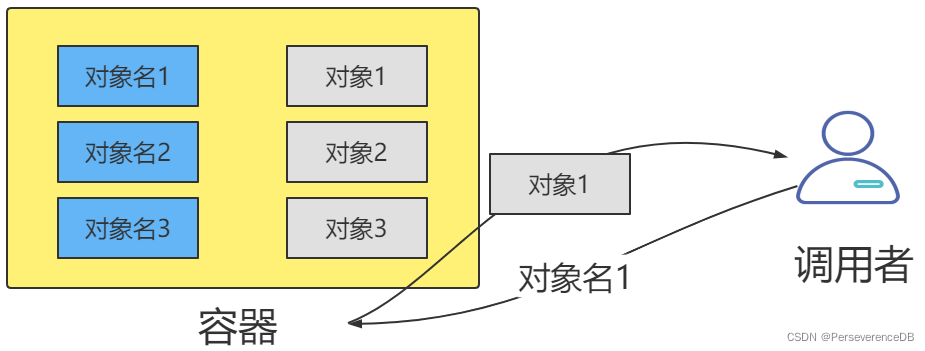
接下来我们通过一段代码模拟IOC思想。创建一个集合容器,先将对象创建出来放到容器中,需要使用对象时,只需要从容器中获取对象即可,而不需要重新创建,此时容器就是对象的管理者。
1.创建实体类
1public class Student {


2    private int id;
3    private String name;
4    private String address;
5    // 省略getter/setter/构造方法/tostring
6}
2.创建Dao接口和实现类
1public interface StudentDao {


2    // 根据id查询学生
3    Student findById(int id);
4}
5
6public class StudentDaoImpl implements StudentDao{


7    @Override
8    public Student findById(int id) {


9        // 模拟从数据库查找出学生
10        return new Student(1,"小猪猪","雅安");
11    }
12}
13
14public class StudentDaoImpl2 implements StudentDao{


15    @Override
16    public Student findById(int id) {


17        // 模拟根据id查询学生
18        System.out.println("新方法!!!");
19        return new Student(1,"逍遥","泸州");
20    }
21}
3.创建配置文件bean.properties,该文件中定义管理的对象
1studentDao=com.itbaizhan.dao.StudentDaoImpl
4.创建容器管理类,该类在类加载时读取配置文件,将配置文件中配置的对象全部创建并放入容器中。
1public class Container {


2    static Map<String,Object> map = new HashMap();
3
4    static {


5        // 读取配置文件
6        InputStream is = Container.class.getClassLoader().getResourceAsStream("bean.properties");
7        Properties properties = new Properties();
8        try {


9            properties.load(is);
10        } catch (IOException e) {


11            e.printStackTrace();
12        }
13
14        // 遍历配置文件的所有配置
15        Enumeration<Object> keys = properties.keys();
16        while (keys.hasMoreElements()){


17            String key = keys.nextElement().toString();
18            String value = properties.getProperty(key);
19            try {


20                // 创建对象
21                Object o = Class.forName(value).newInstance();
22                // 将对象放入集合中
23                map.put(key,o);
24            } catch (Exception e) {


25                e.printStackTrace();
26            }
27        }
28    }
29
30    // 从容器中获取对象
31    public static Object getBean(String key){


32        return map.get(key);
33    }
34}
5.创建Dao对象的调用者StudentService
1public class StudentService {


2    public Student findStudentById(int id){


3        // 从容器中获取对象
4        StudentDao studentDao = (StudentDao) Container.getBean("studentDao");
5        System.out.println(studentDao.hashCode());
6        return studentDao.findById(id);
7    }
8}
6.测试StudentService
1public class Test {


2    public static void main(String[] args) {


3      StudentService studentService = new StudentService();
4      System.out.println(studentService.findStudentById(1));
5      System.out.println(studentService.findStudentById(1));
6    }
7}
测试结果:
1.StudentService从容器中每次拿到的都是同一个StudentDao对象,节约了资源。
2.如果想使用StudentDaoImpl2对象,只需要修改bean.properties的内容为
1 studentDao = com.package.dao.StudentDaoImpl2
无需修改Java源码。
3.Spring实现IOC
接下来我们使用Spring实现IOC,Spring内部也有一个容器用来管理对象。
1.创建Maven工程,引入依赖
1<dependencies>
2    <dependency>
3        <groupId>org.springframework</groupId>
4        <artifactId>spring-context</artifactId>
5        <version>5.3.13</version>
6    </dependency>
7    <dependency>
8        <groupId>junit</groupId>
9        <artifactId>junit</artifactId>
10        <version>4.12</version>
11        <scope>test</scope>
12    </dependency>
13</dependencies>
2.创建POJO类、Dao类和接口
1public class Student {


2    private int id;
3    private String name;
4    private String address;
5    // 省略getter/setter/构造方法/tostring
6}
7
8public interface StudentDao {


9    // 根据id查询学生
10    Student findById(int id);
11}
12
13public class StudentDaoImpl implements StudentDao{


14    @Override
15    public Student findById(int id) {


16        // 模拟从数据库查找出学生
17        return new Student(1,"锤形态小跑","皮尔特沃夫");
18    }
19}
3.编写xml配置文件,配置文件中配置需要Spring帮我们创建的对象。
1<?xml version="1.0" encoding="UTF-8"?>
2<beans xmlns="http://www.springframework.org/schema/beans"
3       xmlns:xsi="http://www.w3.org/2001/XMLSchema-instance"
4       xsi:schemaLocation="http://www.springframework.org/schema/beans
5        http://www.springframework.org/schema/beans/spring-beans.xsd">
6
7    <bean id="studentDao" class="com.package.dao.StudentDaoImpl"></bean>
8
9</beans>
4.测试从Spring容器中获取对象。
1public class TestContainer {


2    @Test
3    public void t1(){


4        // 创建Spring容器
5        ApplicationContext ac = new ClassPathXmlApplicationContext("bean.xml");
6        // 从容器获取对象
7        StudentDao studentDao1 = (StudentDao) ac.getBean("studentDao");
8        StudentDao studentDao2 = (StudentDao) ac.getBean("studentDao");
9        System.out.println(studentDao1.hashCode());
10        System.out.println(studentDao2.hashCode());
11        System.out.println(studentDao1.findById(1));
12    }
13}
4.Spring容器类型

容器接口
BeanFactory:BeanFactory是Spring容器中的顶层接口,它可以对Bean对象进行管理。
ApplicationContext:ApplicationContext是BeanFactory的子接口。它除了继承 BeanFactory的所有功能外,还添加了对国际化、资源访问、事件传播等方面的良好支持。
ApplicationContext有以下三个常用实现类:
容器实现类
ClassPathXmlApplicationContext:该类可以从项目中读取配置文件
FileSystemXmlApplicationContext:该类从磁盘中读取配置文件
AnnotationConfigApplicationContext:使用该类不读取配置文件,而是会读取注解
1@Test
2public void t2(){


3    // 创建spring容器
4    //        ApplicationContext ac = new ClassPathXmlApplicationContext("bean.xml");
5    ApplicationContext ac = new FileSystemXmlApplicationContext("D:\code\webproject\spring\spring_ioc1\src\main\resources\bean.xml");
6
7    // 从容器中获取对象
8    StudentDao userDao = (StudentDao) ac.getBean("studentDao");
9    System.out.println(userDao);
10    System.out.println(userDao.findById(1));
11}
5.对象创建方式

Spring会帮助我们创建bean,那么它底层是调用什么方法进行创建的呢?
使用构造方法
Spring默认使用类的空参构造方法创建bean:
1// 假如类没有空参构造方法,将无法完成bean的创建
2public class StudentDaoImpl implements StudentDao{


3    public StudentDaoImpl(int a){

    }
4
5    @Override
6    public Student findById(int id) {


7        // 模拟根据id查询学生
8        return new Student(1,"小兔兔","加利福尼亚");
9    }
10}
使用工厂类的方法
Spring可以调用工厂类的方法创建bean:
1.创建工厂类,工厂类提供创建对象的方法:
1public class StudentDaoFactory {


2    public StudentDao getStudentDao(){


3        return new StudentDaoImpl(1);
4    }
5}
2.在配置文件中配置创建bean的方式为工厂方式。
1<!--  id:工厂对象的id,class:工厂类  -->
2<bean id="studentDaoFactory" class="com.package.dao.StudentDaoFactory"></bean>
3<!--  id:bean对象的id,factory-bean:工厂对象的id,factory-method:工厂方法 -->
4<bean id="studentDao" factory-bean="studentDaoFactory" factory-method="getStudentDao"></bean>
3.测试
使用工厂类的静态方法
Spring可以调用工厂类的静态方法创建bean:
1.创建工厂类,工厂提供创建对象的静态方法。
1public class StudentDaoFactory2 {


2    public static StudentDao getStudentDao2() {


3        return new StudentDaoImpl();
4    }
5}
2.在配置文件中配置创建bean的方式为工厂静态方法。
1<!-- id:bean的id  class:工厂全类名 factory-method:工厂静态方法   -->
2<bean id="studentDao" class="com.package.dao.StudentDaoFactory2" factory-method="getStudentDao2"></bean>
3.测试
6.对象的创建策略
Spring通过配置<bean>中的scope属性设置对象的创建策略,共有五种创建策略:
singleton:单例,默认策略。整个项目只会创建一个对象,通过<bean>中的lazy-init属性可以设置单例对象的创建时机:
lazy-init="false"(默认):立即创建,在容器启动时会创建配置文件中的所有Bean对象。
lazy-init="true":延迟创建,第一次使用Bean对象时才会创建。
配置单例策略:
1<!--    <bean id="studentDao" class="com.package.dao.StudentDaoImpl2" scope="singleton" lazy-init="true"></bean>-->
2<bean id="studentDao" class="com.package.dao.StudentDaoImpl2" scope="singleton" lazy-init="false"></bean>
测试单例策略:
1// 为Bean对象的类添加构造方法
2public StudentDaoImpl2(){


3    System.out.println("创建StudentDao!!!");
4}
5
6@Test
7public void t2(){


8    // 创建Spring容器
9    ApplicationContext ac = new ClassPathXmlApplicationContext("bean1.xml");
10    // 从容器获取对象
11    StudentDao studentDao1 = (StudentDao) ac.getBean("studentDao");
12    StudentDao studentDao2 = (StudentDao) ac.getBean("studentDao");
13    StudentDao studentDao3 = (StudentDao) ac.getBean("studentDao");
14    System.out.println(studentDao1.hashCode());
15    System.out.println(studentDao2.hashCode());
16    System.out.println(studentDao3.hashCode());
17}
prototype:多例,每次从容器中获取时都会创建对象。
1<!-- 配置多例策略 -->
2<bean id="studentDao"   class="com.package.dao.StudentDaoImpl2" scope="prototype"></bean>
request:每次请求创建一个对象,只在web环境有效。
session:每次会话创建一个对象,只在web环境有效。
gloabal-session:一次集群环境的会话创建一个对象,只在web环境有效。
7.对象的销毁时机
对象的创建策略不同,销毁时机也不同:
singleton:对象随着容器的销毁而销毁。
prototype:使用JAVA垃圾回收机制销毁对象。
request:当处理请求结束,bean实例将被销毁。
session:当HTTP Session最终被废弃的时候,bean也会被销毁掉。
gloabal-session:集群环境下的session销毁,bean实例也将被销毁。
8.生命周期方法
Bean对象的生命周期包含创建——使用——销毁,Spring可以配置Bean对象在创建和销毁时自动执行的方法:
1.定义生命周期方法
1public class StudentDaoImpl2 implements StudentDao{


2     // 创建时自动执行的方法
3    public void init(){


4        System.out.println("创建StudentDao!!!");
5    }
6
7    // 销毁时自动执行的方法
8    public void destory(){


9        System.out.println("销毁StudentDao!!!");
10    }
11}
2.配置生命周期方法
1<!-- init-method:创建对象时执行的方法  destroy-method:销毁对象时执行的方法  -->
2<bean id="studentDao" class="com.package.dao.StudentDaoImpl2" scope="singleton"
3      init-method="init" destroy-method="destory"></bean>
3.测试
1@Test
2public void t3(){


3    // 创建Spring容器
4    ClassPathXmlApplicationContext ac = new ClassPathXmlApplicationContext("bean1.xml");
5
6    // 销毁Spring容器,ClassPathXmlApplicationContext才有销毁容器的方法
7    ac.close();
8}
9.获取Bean对象的方式
Spring有多种获取容器中对象的方式:
通过id/name获取
1.配置文件
1<bean name="studentDao" class="com.package.dao.StudentDaoImpl2"></bean>
2
3<bean id="studentDao" class="com.package.dao.StudentDaoImpl2"></bean>
2.获取对象
1StudentDao studentDao = (StudentDao) ac.getBean("studentDao");
通过类型获取
1.配置文件
1<bean name="studentDao" class="com.package.dao.StudentDaoImpl2"></bean>
2.获取对象
1StudentDao studentDao2 = ac.getBean(StudentDao.class);
可以看到使用类型获取不需要强转。
通过类型+id/name获取
虽然使用类型获取不需要强转,但如果在容器中有一个接口的多个实现类对象,则获取时会报错,此时需要使用类型+id/name获取
1.配置文件
1<bean name="studentDao" class="com.package.dao.StudentDaoImpl2"></bean>
2<bean name="studentDao1" class="com.package.dao.StudentDaoImpl"></bean>
2.获取对象
1StudentDao studentDao2 = ac.getBean("studentDao",StudentDao.class);
三、依赖注入
1.什么是依赖注入

依赖注入(Dependency Injection,简称DI),它是Spring控制反转思想的具体实现。
控制反转将对象的创建交给了Spring,但是对象中可能会依赖其他对象。比如service类中要有dao类的属性,我们称service依赖于dao。之前需要手动注入属性值,代码如下:
1public interface StudentDao {


2    Student findById(int id);
3}
4
5public class StudentDaoImpl implements StudentDao{


6    @Override
7    public Student findById(int id) {


8        // 模拟根据id查询学生
9        return new Student(1,"王阳明","绍兴府");
10    }
11}
12
13public class StudentService {


14    // service依赖dao,手动注入属性值,即手动维护依赖关系
15    private StudentDao studentDao = new StudentDaoImpl();
16
17    public Student findStudentById(int id){


18        return studentDao.findById(id);
19    }
20}
此时,当StudentService的想要使用StudentDao的另一个实现类如StudentDaoImpl2时,则需要修改Java源码,造成代码的可维护性降低。
而使用Spring框架后,Spring管理Service对象与Dao对象,此时它能够为Service对象注入依赖的Dao属性值。这就是Spring的依赖注入。简单来说,控制反转是创建对象,依赖注入是为对象的属性赋值。
2.依赖注入方式
在之前开发中,可以通过setter方法或构造方法设置对象属性值:
1// setter方法设置属性
2StudentService studentService = new StudentService();
3StudentDao studentDao = new StudentDao();
4studentService.setStudentDao(studentDao);
5
6// 构造方法设置属性
7StudentDao studentDao = new StudentDao();
8StudentService studentService = new StudentService(studentDao);
Spring可以通过调用setter方法或构造方法给属性赋值
Setter注入
1.被注入类编写属性的setter方法
1public class StudentService {


2    private StudentDao studentDao;
3    public void setStudentDao(StudentDao studentDao) {


4        this.studentDao = studentDao;
5    }
6}
2.配置文件中,给需要注入属性值的<bean>中设置<property>
1<bean id="studentDao" class="com.package.dao.StudentDaoImpl"></bean>
2<bean id="studentService" class="com.package.service.StudentService">
3    <!--依赖注入-->
4    <!--name:对象的属性名 ref:容器中对象的id值-->
5    <property name="studentDao/*属性名private 'StudentDao' studentDao;*/" ref="studentDao/*同bean的id*/"></property>
6</bean>
3.测试是否注入成功
1@Test
2public void t2(){


3    ApplicationContext ac = new ClassPathXmlApplicationContext("bean.xml");
4    StudentService studentService = (StudentService) ac.getBean("studentService");
5    System.out.println(studentService.findStudentById(1));
6}
构造方法注入
1.被注入类编写有参的构造方法
1public class StudentService {


2    private StudentDao studentDao;
3    public StudentService(StudentDao studentDao) {


4        this.studentDao = studentDao;
5    }
6}
2.给需要注入属性值的中设置
1<bean id="studentDao" class="com.package.dao.StudentDaoImpl"></bean>
2
3<bean id="studentService" class="com.package.service.StudentService">
4    <!-- 依赖注入 -->
5    <!-- name:对象的属性名  ref:配置文件中注入对象的id值 -->
6    <constructor-arg name="studentDao" ref="studentDao"></constructor-arg>
7</bean>
3.测试是否注入成功
1@Test
2public void t2(){


3    ApplicationContext ac = new ClassPathXmlApplicationContext("bean.xml");
4    StudentService studentService = (StudentService) ac.getBean("studentService");
5    System.out.println(studentService.findStudentById(1));
6}
自动注入
自动注入不需要在<bean>标签中添加其他标签注入属性值,而是自动从容器中找到相应的bean对象设置为属性值。
自动注入有两种配置方式:
全局配置:在<beans>中设置default-autowire属性可以定义所有bean对象的自动注入策略。
局部配置:在<bean>中设置autowire属性可以定义当前bean对象的自动注入策略。
autowire的取值如下:
no:不会进行自动注入。
default:全局配置default相当于no,局部配置default表示使用全局配置
byName:在Spring容器中查找id与属性名相同的bean,并进行注入。需要提供set方法。
byType:在Spring容器中查找类型与属性类型相同的bean,并进行注入。需要提供set方法。
constructor:在Spring容器中查找id与属性名相同的bean,并进行注入。需要提供构造方法。
3.依赖注入类型
DI支持注入bean类型、基本数据类型和字符串、List集合、Set集合、Map集合、Properties对象类型等,他们的写法如下:
1.准备注入属性的类
1public class StudentService {


2    private StudentDao studentDao; // bean属性
3    private String name; //字符串类型
4    private int count; //基本数据类型
5    private List<String> names; // 字符串类型List集合
6    private List<Student> students1; // 对象类型List集合
7    private Set<Student> students2; // 对象类型Set集合
8    private Map<String,String> names2; // 字符串类型Map集合
9    private Map<String,Student> students3; // 对象类型Map集合
10    private Properties properties; //Properties类型
11
12    // 省略getter/setter/toString
13}
2.准备测试方法
1@Test
2public void t3(){


3    ApplicationContext ac = new ClassPathXmlApplicationContext("bean1.xml");
4    StudentService studentService = (StudentService) ac.getBean("studentService");
5    System.out.println(studentService);
6}
注入bean类型
写法一:
1<bean id="studentDao" class="com.package.dao.StudentDaoImpl"></bean>
2
3<bean id="studentService" class="com.package.service.StudentService">
4    <property name="studentDao" ref="studentDao"></property>
5</bean>
写法二:
1<bean id="studentDao" class="com.package.dao.StudentDaoImpl"></bean>
2
3<bean id="studentService" class="com.package.service.StudentService">
4    <property name="studentDao" >
5        <ref bean="studentDao"></ref>
6    </property>
7</bean>
注入基本数据类型
1<bean id="studentService" class="com.package.service.StudentService">
2    <!--  写法一 name:属性名  value:属性值-->
3    <property name="name" value="玛卡巴卡"></property>
4
5    <!--  写法二 name:属性名  value:属性值-->
6    <property name="count">
7        <value>10</value>
8    </property>
9</bean>
注入List集合
1<bean id="studentService" class="com.package.service.StudentService">
2    <!-- 简单数据类型List集合 name:属性名 -->
3    <property name="names">
4        <list>
5            <value>蚩梦</value>
6            <value>阿姐</value>
7        </list>
8    </property>
9
10    <!-- 对象类型List集合 name:属性名 -->
11    <property name="students1">
12        <list>
13            <bean class="com.package.domain.Student">
14                <property name="id" value="1"/>
15                <property name="name" value="蚩梦"/>
16                <property name="address" value="taoqi"/>
17            </bean>
18            <bean class="com.itbaizhan.domain.Student">
19                <property name="id" value="2"/>
20                <property name="name" value="阿姐"/>
21                <property name="address" value="keai"/>
22            </bean>
23        </list>
24    </property>
25</bean>
注入Set集合
1<bean id="studentService" class="com.package.service.StudentService">
2    <!-- Set集合 -->
3    <property name="students2">
4        <set>
5            <bean class="com.package.domain.Student">
6                <property name="id" value="1"/>
7                <property name="name" value="Tom"/>
8                <property name="address" value="myheart"/>
9            </bean>
10            <bean class="com.itbaizhan.domain.Student">
11                <property name="id" value="2"/>
12                <property name="name" value="Jerry"/>
13                <property name="address" value="myhome"/>
14            </bean>
15        </set>
16    </property>
17</bean>
注入Map集合
简单数据类型Map集合:
1<bean id="studentService" class="com.package.service.StudentService">
2    <property name="names2">
3        <map>
4            <entry key="student1" value="libai"/>
5            <entry key="student2" value="dufu"/>
6        </map>
7    </property>
8</bean>
对象类型Map集合:
1<bean id="studentService" class="com.package.service.StudentService">
2    <property name="students3">
3        <map>
4            <entry key="student1" value-ref="s1"/>
5            <entry key="student2" value-ref="s2"/>
6        </map>
7    </property>
8</bean>
9
10<bean id="s1" class="com.package.domain.Student">
11    <property name="id" value="1"/>
12    <property name="name" value="wangyangming"/>
13    <property name="address" value="Chinese"/>
14</bean>
15<bean id="s2" class="com.package.domain.Student">
16    <property name="id" value="2"/>
17    <property name="name" value="heigeer"/>
18    <property name="address" value="earth"/>
19</bean>
注入Properties对象
1<bean id="studentService" class="com.package.service.StudentService">
2    <property name="properties">
3        <props>
4            <prop key="配置1">值1</prop>
5            <prop key="配置2">值2</prop>
6        </props>
7    </property>
8</bean>
四、注解实现IOC
1.@Component
作用:用于创建对象,放入Spring容器,相当于<bean id="" class="">
位置:类上方
注意:
要在配置文件中配置扫描的包,扫描到该注解才能生效。
1<context:component-scan base-package="com.package"></context:component-scan>
@Component注解配置bean的默认id是首字母小写的类名。也可以手动设置bean的id值。
1// 此时bean的id为studentDaoImpl
2@Component
3public class StudentDaoImpl implements StudentDao{


4    public Student findById(int id) {


5        // 模拟根据id查询学生
6        return new Student(1,"xiaokeai","wherever");
7    }
8}
9
10// 此时bean的id为studentDao
11@Component("studentDao")
12public class StudentDaoImpl implements StudentDao{


13    public Student findById(int id) {


14        // 模拟根据id查询学生
15        return new Student(1,"xiaotaoqi","here");
16    }
17}
2.@Repository、@Service、@Controller
作用:这三个注解和@Component的作用一样,使用它们是为了区分该类属于什么层。
位置:
@Repository用于Dao层
@Service用于Service层
@Controller用于Controller层
1@Repository
2public class StudentDaoImpl implements StudentDao{

    }
3
4@Service
5public class StudentService {

    }
3.@Scope
作用:指定bean的创建策略
位置:类上方
取值:singleton prototype request session globalsession
1@Service
2@Scope("singleton")
3public class StudentService {

    }
4.@Autowired
作用:从容器中查找符合属性类型的对象自动注入属性中。用于代替<bean>中的依赖注入配置。
位置:属性上方、setter方法上方、构造方法上方。
注意:
1.@Autowired写在属性上方进行依赖注入时,可以省略setter方法。
1@Component
2public class StudentService {


3    @Autowired
4    private StudentDao studentDao;
5    public Student findStudentById(int id){


6        return studentDao.findById(id);
7    }
8}
9
10@Test
11public void t2(){


12    ApplicationContext ac = new ClassPathXmlApplicationContext("bean.xml");
13    StudentService studentService = (StudentService) ac.getBean("studentService");
14    System.out.println(studentService.findStudentById(1));
15}
2.容器中没有对应类型的对象会报错
1// 如果StudentDaoImpl没有放到容器中会报错
2//@Component("studentDao")
3public class StudentDaoImpl implements StudentDao{


4    public Student findById(int id) {


5        // 模拟根据id查询学生
6        return new Student(1,"name","address");
7    }
8}
3.容器中有多个对象匹配类型时,会找beanId等于属性名的对象,找不到会报错。
1// 如果容器中都多个同类型对象,会根据id值等于属性名找对象
2@Component("studentDao")
3public class StudentDaoImpl implements StudentDao{


4    public Student findById(int id) {


5        // 模拟根据id查询学生
6        return new Student(1,"peiqi","tonghua");
7    }
8}
9
10@Component
11public class StudentDaoImpl implements StudentDao{


12    public Student findById(int id) {


13        // 模拟根据id查询学生
14        return new Student(1,"wangzi","chengbao");
15    }
16}
5.@Qualifier
作用:在按照类型注入对象的基础上,再按照bean的id注入。
位置:属性上方
注意:@Qualifier须和@Autowired一起使用。
1@Component
2public class StudentService {


3    @Autowired
4    @Qualifier("studentDaoImpl2")
5    private StudentDao studentDao;
6    public Student findStudentById(int id){


7        return studentDao.findById(id);
8    }
9}
6.@Value
作用:注入String类型和基本数据类型的属性值。
位置:属性上方
用法:
1.直接设置固定的属性值
1@Service
2public class StudentService {


3    @Value("1")
4    private int count;
5
6    @Value("hello")
7    private String str;
8}
2.获取配置文件中的属性值:
(1).编写配置文件db.properties
1jdbc.username=username1
2jdbc.password=password1
(2).spring核心配置文件扫描配置文件
1<context:property-placeholder location="db.properties"></context:property-placeholder>
(3).注入配置文件中的属性值
1@Value("${jdbc.username}")
2private String username;
3
4@Value("${jdbc.password}")
5private String password;
7.@Configuration
此时基于注解的IOC配置已经完成,但是我们依然离不开Spring的xml配置文件。接下来我们脱离bean.xml,使用纯注解实现IOC。
在真实开发中,我们一般还是会保留xml配置文件,很多情况下使用配置文件更加方便。
纯注解实现IOC需要一个Java类代替xml文件。这个Java类上方需要添加@Configuration,表示该类是一个配置类,作用是代替配置文件。
1@Configuration
2public class SpringConfig {


3}
8.@ComponentScan
作用:指定spring在初始化容器时扫描的包。
位置:配置类上方
1@Configuration
2@ComponentScan("com.package")
3public class SpringConfig {


4}
9.@Bean
作用:将方法的返回值对象放入Spring容器中。如果想将第三方类的对象放入容器,可以使用@Bean
位置:配置类的方法上方。
属性:name:给bean对象设置id
注意:@Bean修饰的方法如果有参数,spring会根据参数类型从容器中查找可用对象。
举例:如果想将jdbc连接对象放入Spring容器,我们无法修改Connection源码添加@Component,此时就需要使用将@Bean该对象放入Spring容器
1.添加驱动依赖
1<dependency>
2    <groupId>mysql</groupId>
3    <artifactId>mysql-connector-java</artifactId>
4    <version>8.0.27</version>
5</dependency>
2.将Connection对象放入Spring容器
1@Bean(name = "connection")
2public Connection getConnection(){


3    try {


4        Class.forName("com.mysql.cj.jdbc.Driver");
5        return DriverManager.getConnection("jdbc:mysql:///mysql", "username1", "password1");
6    } catch (Exception exception) {


7        return null;
8    }
9}
3.测试
1@Test
2public void t5(){


3    ApplicationContext ac = new AnnotationConfigApplicationContext(SpringConfig.class);
4    Connection connection = (Connection) ac.getBean("connection");
5    System.out.println(connection);
6}
10.@Import
作用:如果配置过多,会有多个配置类,该注解可以为主配置类导入其他配置类
位置:主配置类上方
1// Jdbc配置类
2@Configuration
3public class JdbcConfig {


4    @Bean(name = "connection")
5    public Connection getConnection(){


6        try {


7            Class.forName("com.mysql.cj.jdbc.Driver");
8            return DriverManager.getConnection("jdbc:mysql:///mysql", "root", "root");
9        } catch (Exception exception) {


10            return null;
11        }
12    }
13}
14
15// 主配置类
16@Configuration
17@ComponentScan("com.package")
18@Import(JdbcConfig.class)
19public class SpringConfig {


20
21}
11.@PropertySource
作用:代替配置文件中的<context:property-placeholder>扫描配置文件
位置:配置类上方
注意:配置文件位置前要加关键字classpath
1@Configuration
2@PropertySource("classpath:db.properties")
3public class JdbcConfig {


4    @Value("${jdbc.username}")
5    private String username;
6
7    @Value("${jdbc.password}")
8    private String password;
9
10}
五、Spring整合MyBatis
1.搭建环境
我们知道使用MyBatis时需要写大量创建SqlSessionFactoryBuilder、SqlSessionFactory、SqlSession等对象的代码,而Spring的作用是帮助我们创建和管理对象,所以我们可以使用Spring整合MyBatis,简化MyBatis开发。
创建maven项目,引入依赖。
1<dependencies>
2    <!--  mybatis  -->
3    <dependency>
4        <groupId>org.mybatis</groupId>
5        <artifactId>mybatis</artifactId>
6        <version>3.5.7</version>
7    </dependency>
8    <!--  mysql驱动包  -->
9    <dependency>
10        <groupId>mysql</groupId>
11        <artifactId>mysql-connector-java</artifactId>
12        <version>8.0.26</version>
13    </dependency>
14    <!-- spring -->
15    <dependency>
16        <groupId>org.springframework</groupId>
17        <artifactId>spring-context</artifactId>
18        <version>5.3.13</version>
19    </dependency>
20    <dependency>
21        <groupId>org.springframework</groupId>
22        <artifactId>spring-tx</artifactId>
23        <version>5.3.13</version>
24    </dependency>
25    <dependency>
26        <groupId>org.springframework</groupId>
27        <artifactId>spring-jdbc</artifactId>
28        <version>5.3.13</version>
29    </dependency>
30    <!-- MyBatis与Spring的整合包,该包可以让Spring创建MyBatis的对象 -->
31    <dependency>
32        <groupId>org.mybatis</groupId>
33        <artifactId>mybatis-spring</artifactId>
34        <version>2.0.6</version>
35    </dependency>
36</dependencies>
2.编写配置文件
1.编写数据库配置文件db.properties
1jdbc.driverClassName=com.mysql.jdbc.Driver
2jdbc.url=jdbc:mysql:///student
3jdbc.username=root
4jdbc.password=root
2.创建MyBatis配置文件SqlMapConfig.xml,数据源、扫描接口都交由Spring管理,不需要在MyBatis配置文件中设置。
1<?xml version="1.0" encoding="UTF-8"?>
2<!DOCTYPE configuration
3        PUBLIC "-//mybatis.org//DTD Config 3.0//EN"
4        "http://mybatis.org/dtd/mybatis-3-config.dtd">
5<configuration>
6</configuration>
3.创建Spring配置文件applicationContext.xml
1<?xml version="1.0" encoding="UTF-8"?>
2<beans xmlns="http://www.springframework.org/schema/beans"
3       xmlns:context="http://www.springframework.org/schema/context"
4       xmlns:xsi="http://www.w3.org/2001/XMLSchema-instance"
5       xsi:schemaLocation="http://www.springframework.org/schema/beans
6         http://www.springframework.org/schema/beans/spring-beans.xsd
7         http://www.springframework.org/schema/context
8         http://www.springframework.org/schema/context/spring-context.xsd">
9    <!-- 包扫描 -->
10    <context:component-scan base-package="com.package"></context:component-scan>
11
12    <!-- 读取配置文件 -->
13    <context:property-placeholder location="classpath:db.properties"></context:property-placeholder>
14    <!-- 创建druid数据源对象 -->
15    <bean id="dataSource" class="com.alibaba.druid.pool.DruidDataSource">
16        <property name="driverClassName" value="${jdbc.driverClassName}"></property>
17        <property name="url" value="${jdbc.url}"></property>
18        <property name="username" value="${jdbc.username}"></property>
19        <property name="password" value="${jdbc.password}"></property>
20    </bean>
21
22    <!-- Spring创建封装过的SqlSessionFactory -->
23    <bean id="sqlSessionFactory" class="org.mybatis.spring.SqlSessionFactoryBean">
24        <property name="dataSource" ref="dataSource"></property>
25    </bean>
26
27    <!-- Spring创建封装过的SqlSession -->
28    <bean id="sqlSession" class="org.mybatis.spring.SqlSessionTemplate">
29        <constructor-arg name="sqlSessionFactory" ref="sqlSessionFactory"/>
30    </bean>
31
32</beans>
3.准备数据库和实体类
准备数据库
1CREATE DATABASE `student`;
2USE `student`;
3DROP TABLE IF EXISTS `student`;
4CREATE TABLE `student` (
5  `id` int(11) NOT NULL AUTO_INCREMENT,
6  `name` varchar(255) DEFAULT NULL,
7  `sex` varchar(10) DEFAULT NULL,
8  `address` varchar(255) DEFAULT NULL,
9  PRIMARY KEY (`id`)
10) ENGINE=InnoDB AUTO_INCREMENT=3 DEFAULT CHARSET=utf8;
11
12insert  into `student`(`id`,`name`,`sex`,`address`) values (1,'弋痕夕','男','炽天殿'),(2,'山鬼谣','男','阳天殿');
准备实体类
1public class Student {


2    private int id;
3    private String name;
4    private String sex;
5    private String address;
6
7    // 省略构造方法/getter/setter/tostring
8}
4.编写持久层接口和service类
编写持久层接口
1@Repository
2public interface StudentDao {


3    // 查询所有学生
4    @Select("select * from student")
5    List<Student> findAll();
6
7    // 添加学生
8    @Insert("insert into student values(null,#{name},#{sex},#{address})")
9    void add(Student student);
10}
编写service类
1@Service
2public class StudentService {


3    // SqlSession对象
4    @Autowired
5    private SqlSessionTemplate sqlSession;
6
7    // 使用SqlSession获取代理对象
8    public List<Student> findAllStudent(){


9        StudentDao studentDao = sqlSession.getMapper(StudentDao.class);
10        return studentDao.findAll();
11    }
12}
5.Spring整合Junit进行单元测试
之前进行单元测试时都需要手动创建Spring容器,能否在测试时让Spring自动创建容器呢?
1.引入Junit和Spring整合Junit依赖
1<!-- junit,如果Spring5整合junit,则junit版本至少在4.12以上 -->
2<dependency>
3    <groupId>junit</groupId>
4    <artifactId>junit</artifactId>
5    <version>4.12</version>
6    <scope>test</scope>
7</dependency>
8<!-- spring整合测试模块 -->
9<dependency>
10    <groupId>org.springframework</groupId>
11    <artifactId>spring-test</artifactId>
12    <version>5.3.13</version>
13</dependency>
2.编写测试类
1// JUnit使用Spring方式运行代码,即自动创建spring容器。
2@RunWith(SpringJUnit4ClassRunner.class)
3// 告知创建spring容器时读取哪个配置类或配置文件
4// 配置类写法:@ContextConfiguration(classes=配置类.class)
5@ContextConfiguration(locations="classpath:applicationContext.xml")
6public class StudentServiceTest {


7    @Autowired
8    private StudentService studentService;
9
10    @Test
11    public void testFindAll(){


12        List<Student> allStudent = studentService.findAllStudent();
13        allStudent.forEach(System.out::println);
14    }
15}
注:使用SqlSessionTemplate创建代理对象还是需要注册接口或者映射文件的。
1.在MyBatis配置文件注册接口
1<configuration>
2    <mappers>
3        <mapper class="com.package.dao.StudentDao"></mapper>
4    </mappers>
5</configuration>
2.创建sqlSessionFactory时指定MyBatis配置文件
1<!-- 创建Spring封装过的SqlSessionFactory -->
2<bean id="sqlSessionFactory" class="org.mybatis.spring.SqlSessionFactoryBean">
3    <property name="dataSource" ref="dataSource"></property>
4    <property name="configLocation" value="classpath:SqlMapConfig.xml"></property>
5</bean>
6.自动创建代理对象
Spring提供了MapperScannerConfigurer对象,该对象可以自动扫描包创建代理对象,并将代理对象放入容器中,此时不需要使用SqlSession手动创建代理对象。
1.创建MapperScannerConfigurer对象
1<!-- 该对象可以自动扫描持久层接口,并为接口创建代理对象 -->
2<bean id="mapperScanner" class="org.mybatis.spring.mapper.MapperScannerConfigurer">
3    <!-- 配置扫描的接口包 -->
4    <property name="basePackage" value="com.package.dao"></property>
5</bean>
2.Service类直接使用代理对象即可
1@Service
2public class StudentService {


3    // 直接注入代理对象
4    @Autowired
5    private StudentDao studentDao;
6
7    // 直接使用代理对象
8    public void addStudent(Student student){


9        studentDao.add(student);
10    }
11}
3.测试
1@RunWith(SpringJUnit4ClassRunner.class)
2@ContextConfiguration(locations="classpath:applicationContext.xml")
3public class StudentServiceTest {


4    @Autowired
5    private StudentService studentService;
6
7    @Test
8    public void testAdd(){


9        Student student = new Student(0, "嘟嘟", "女", "上海");
10        studentService.addStudent(student);
11    }
12}
六、SpringAOP
1.AOP简介
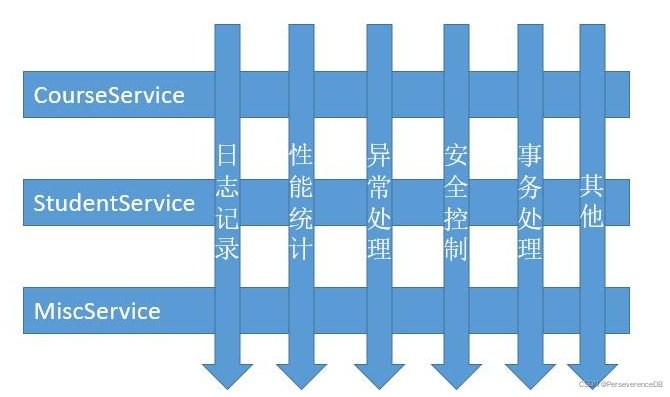
AOP的全称是Aspect Oriented Programming,即面向切面编程。是实现功能统一维护的一种技术,它将业务逻辑的各个部分进行隔离,使开发人员在编写业务逻辑时可以专心于核心业务,从而提高了开发效率。
作用:在不修改源码的基础上,对已有方法进行增强。
实现原理:动态代理技术。
优势:减少重复代码、提高开发效率、维护方便
应用场景:事务处理、日志管理、权限控制、异常处理等方面。
2.AOP相关术语
为了更好地理解AOP,就需要对AOP的相关术语有一些了解
| 名称 | 说明 |
|---|---|
| Joinpoint(连接点) | 指能被拦截到的点,在Spring中只有方法能被拦截。 |
| Pointcut(切点) | 指要对哪些连接点进行拦截,即被增强的方法。 |
| Advice(通知) | 指拦截后要做的事情,即切点被拦截后执行的方法。 |
| Aspect(切面) | 切点+通知称为切面 |
| Target(目标) | 被代理的对象 |
| Proxy(代理) | 代理对象 |
| Weaving(织入) | 生成代理对象的过程 |
3.AOP入门
AspectJ是一个基于Java语言的AOP框架,在Spring框架中建议使用AspectJ实现AOP。
接下来我们写一个AOP入门案例:dao层的每个方法结束后都可以打印一条日志:
1.引入依赖
1<!-- spring -->
2<dependency>
3    <groupId>org.springframework</groupId>
4    <artifactId>spring-context</artifactId>
5    <version>5.3.13</version>
6</dependency>
7<!-- AspectJ -->
8<dependency>
9    <groupId>org.aspectj</groupId>
10    <artifactId>aspectjweaver</artifactId>
11    <version>1.8.7</version>
12</dependency>
13<!--  junit  -->
14<dependency>
15    <groupId>junit</groupId>
16    <artifactId>junit</artifactId>
17    <version>4.12</version>
18    <scope>test</scope>
19</dependency>
2.编写连接点
1@Repository
2public class UserDao {


3    public void add(){


4        System.out.println("用户新增");
5    }
6    public void delete(){


7        System.out.println("用户删除");
8    }
9    public void update(){


10        System.out.println("用户修改");
11    }
12}
3.编写通知类
public class MyAspectJAdvice {


    // 后置通知
    public void myAfterReturning() {


        System.out.println("打印日志...");
   }
}
4.配置切面
<?xml version="1.0" encoding="UTF-8"?>
<beans
xmlns="http://www.springframework.org/schema/beans"
xmlns:context="http://www.springframework.org/schema/context"
xmlns:aop="http://www.springframework.org/schema/aop"
xmlns:xsi="http://www.w3.org/2001/XMLSchema-instance"
xsi:schemaLocation="http://www.springframework.org/schema/beans
http://www.springframework.org/schema/beans/spring-beans.xsd
http://www.springframework.org/schema/context
http://www.springframework.org/schema/context/spring-context.xsd
http://www.springframework.org/schema/aop
http://www.springframework.org/schema/aop/
spring-aop.xsd">
    <context:component-scan basepackage="com.package">
</context:component-scan>

   <!-- 通知对象 -->
    <bean id="myAspectJAdvice"
class="com.itbaizhan.advice.MyAspectAdvice
"></bean>
    <!-- 配置AOP -->
    <aop:config>
        <!-- 配置切面 -->
        <aop:aspect ref="myAspectJAdvice">
            <!-- 配置切点 -->
            <aop:pointcut id="myPointcut" expression="execution(* com.package.dao.UserDao.*(..))"/>
            <!-- 配置通知 -->
            <aop:after-returning method="myAfterReturning" pointcutref="myPointcut"/>
       </aop:aspect>
    </aop:config>
</beans>
5.测试
public class UserDaoTest {


	@Test
	public void testAdd(){


		ApplicationContext ac = new ClassPathXmlApplicationContext("bean.xml");
		UserDao userDao = (UserDao) ac.getBean("userDao");
		userDao.add();
	}
	@Test
	public void testDelete(){


		ApplicationContext ac = new ClassPathXmlApplicationContext("bean.xml");
		UserDao userDao = (UserDao) ac.getBean("userDao");
		userDao.update();
	}
}
4.通知类型
AOP有以下几种常用的通知类型:
| 通知类型 | 描述 |
|---|---|
| 前置通知 | 在方法执行前添加功能 |
| 后置通知 | 在方法正常执行后添加功能 |
| 异常通知 | 在方法抛出异常后添加功能 |
| 最终通知 | 无论方法是否抛出异常,都会执行该通知 |
| 环绕通知 | 在方法执行前后添加功能 |
1 编写通知方法
// 通知类
public class MyAspectAdvice {


    // 后置通知
    public void myAfterReturning(JoinPoint
joinPoint) {


        System.out.println("切点方法名:" +
joinPoint.getSignature().getName());
        System.out.println("目标对象:" +
joinPoint.getTarget());
        System.out.println("打印日志" +
joinPoint.getSignature().getName() + "方法
被执行了!");
   }
    // 前置通知
    public void myBefore() {


        System.out.println("前置通知...");
   }
    // 异常通知
    public void myAfterThrowing(Exception
ex) {


        System.out.println("异常通知...");
         System.err.println(ex.getMessage());
   }
    // 最终通知
    public void myAfter() {


        System.out.println("最终通知");
   }
    // 环绕通知
    public Object
myAround(ProceedingJoinPoint
proceedingJoinPoint) throws Throwable {


        System.out.println("环绕前");
        Object obj =
proceedingJoinPoint.proceed(); // 执行方法
        System.out.println("环绕后");
        return obj;
   }
}
2 配置切面
<!-- 配置AOP -->
<aop:config>
    <!-- 配置切面 -->
    <aop:aspect ref="myAspectJAdvice">
        <!-- 配置切点 -->
        <aop:pointcut id="myPointcut"
expression="execution(*
com.itbaizhan.dao.UserDao.*(..))"/>
        <!-- 前置通知 -->
        <aop:before method="myBefore"
pointcut-ref="myPointcut"></aop:before>
        <!-- 后置通知 -->
        <aop:after-returning
method="myAfterReturning" pointcutref="myPointcut"/>

       <!-- 异常通知 -->
        <aop:after-throwing
method="myAfterThrowing" pointcutref="myPointcut"
throwing="ex"/>
        <!-- 最终通知 -->
        <aop:after method="myAfter"
pointcut-ref="myPointcut"></aop:after>
        <!-- 环绕通知 -->
        <aop:around method="myAround"
pointcut-ref="myPointcut"></aop:around>
    </aop:aspect>
</aop:config>
5.切点表达式
使用AspectJ需要使用切点表达式配置切点位置,写法如下:
标准写法:访问修饰符 返回值 包名.类名.方法名(参数列表)
访问修饰符可以省略。
返回值使用*代表任意类型。
包名使用*表示任意包,多级包结构要写多个*,使用*..表示任意包结构
类名和方法名都可以用*实现通配。
参数列表
基本数据类型直接写类型
引用类型写包名.类名
*表示匹配一个任意类型参数
..表示匹配任意类型任意个数的参数
全通配:* *..*.*(..)
6.多切面配置
我们可以为切点配置多个通知,形成多切面,比如希望dao层的每个方法结束后都可以打印日志并发送邮件:
1.编写发送邮件的通知:
1public class MyAspectJAdvice2 {


2    // 后置通知
3    public void myAfterReturning(JoinPoint joinPoint) {


4        System.out.println("发送邮件");
5    }
6}
2.配置切面:
1<!-- 通知对象 -->
2<bean id="myAspectJAdvice" class="com.package.advice.MyAspectAdvice"></bean>
3<bean id="myAspectJAdvice2" class="com.package.advice.MyAspectAdvice2"></bean>
4
5<!-- 配置AOP -->
6<aop:config>
7    <!-- 配置切面 -->
8    <aop:aspect ref="myAspectJAdvice">
9        <!-- 配置切点 -->
10        <aop:pointcut id="myPointcut" expression="execution(* *..*.*(..))"/>
11        <!-- 后置通知 -->
12        <aop:after-returning method="myAfterReturning" pointcut-ref="myPointcut"/>
13    </aop:aspect>
14
15    <aop:aspect ref="myAspectJAdvice2">
16        <aop:pointcut id="myPointcut2" expression="execution(* com.package.dao.UserDao.*(..))"/>
17        <aop:after-returning method="myAfterReturning" pointcut-ref="myPointcut2"/>
18    </aop:aspect>
19</aop:config>
7.注解配置AOP
Spring可以使用注解代替配置文件配置切面:
1.在xml中开启AOP注解支持
1<!-- 开启注解配置Aop -->
2<aop:aspectj-autoproxy></aop:aspectj-autoproxy>
2.在通知类上方加入注解@Aspect
3.在通知方法上方加入注解@Before/@AfterReturning/@AfterThrowing/@After/@Around
1@Aspect
2@Component
3public class MyAspectAdvice {


4    // 后置通知
5    @AfterReturning("execution(* com.package.dao.UserDao.*(..))")
6    public void myAfterReturning(JoinPoint joinPoint) {


7        System.out.println("切点方法名:" + joinPoint.getSignature().getName());
8        System.out.println("目标对象:" + joinPoint.getTarget());
9        System.out.println("打印日志" + joinPoint.getSignature().getName() + "方法被执行了!");
10    }
11
12    // 前置通知
13    @Before("execution(* com.package.dao.UserDao.*(..))")
14    public void myBefore() {


15        System.out.println("前置通知...");
16    }
17
18    // 异常通知
19    @AfterThrowing(value = "execution(* com.package.dao.UserDao.*(..))",throwing = "ex")
20    public void myAfterThrowing(Exception ex) {


21        System.out.println("异常通知...");
22        System.err.println(ex.getMessage());
23    }
24
25    // 最终通知
26    @After("execution(* com.package.dao.UserDao.*(..))")
27    public void myAfter() {


28        System.out.println("最终通知");
29    }
30
31    // 环绕通知
32    @Around("execution(* com.package.dao.UserDao.*(..))")
33    public Object myAround(ProceedingJoinPoint proceedingJoinPoint) throws Throwable {


34        System.out.println("环绕前");
35        Object obj = proceedingJoinPoint.proceed(); // 执行方法
36        System.out.println("环绕后");
37        return obj;
38    }
39}
4.测试:
1@Test
2public void testAdd2(){


3    ApplicationContext ac = new ClassPathXmlApplicationContext("bean1.xml");
4    UserDao userDao = (UserDao) ac.getBean("userDao");
5    userDao.update();
6}
如何为一个类下的所有方法统一配置切点:
1.在通知类中添加方法配置切点
1@Pointcut("execution(* com.package.dao.UserDao.*(..))")
2public void pointCut(){

    }
2.在通知方法上使用定义好的切点
1@Before("pointCut()")
2public void myBefore(JoinPoint joinPoint) {


3    System.out.println("前置通知...");
4}
5
6@AfterReturning("pointCut()")
7public void myAfterReturning(JoinPoint joinPoint) {


8    System.out.println("后置通知...");
9}
配置类如何代替xml中AOP注解支持?
在配置类上方添加@EnableAspectJAutoProxy即可
1@Configuration
2@ComponentScan("com.package")
3@EnableAspectJAutoProxy
4public class SpringConfig {


5
6}
8.原生Spring实现AOP
除了AspectJ,Spring支持原生方式实现AOP。
1.引入依赖
1<!-- AOP -->
2<dependency>
3    <groupId>org.springframework</groupId>
4    <artifactId>spring-aop</artifactId>
5    <version>5.3.13</version>
6</dependency>
2.编写通知类
1// Spring原生Aop的通知类
2public class SpringAop implements MethodBeforeAdvice, AfterReturningAdvice, ThrowsAdvice, MethodInterceptor {


3    /**
4     * 前置通知
5     * @param method 目标方法
6     * @param args 目标方法的参数列表
7     * @param target 目标对象
8     * @throws Throwable
9     */
10    @Override
11    public void before(Method method, Object[] args, Object target) throws Throwable {


12        System.out.println("前置通知");
13    }
14
15    /**
16     * 后置通知
17     * @param returnValue 目标方法的返回值
18     * @param method 目标方法
19     * @param args 目标方法的参数列表
20     * @param target 目标对象
21     * @throws Throwable
22     */
23    @Override
24    public void afterReturning(Object returnValue, Method method, Object[] args, Object target) throws Throwable {


25        System.out.println("后置通知");
26    }
27
28    /**
29     * 环绕通知
30     * @param invocation 目标方法
31     * @return
32     * @throws Throwable
33     */
34    @Override
35    public Object invoke(MethodInvocation invocation) throws Throwable {


36        System.out.println("环绕前");
37        Object proceed = invocation.proceed();
38        System.out.println("环绕后");
39        return proceed;
40    }
41
42    /**
43     * 异常通知
44     * @param ex 异常对象
45     */
46    public void afterThrowing(Exception ex){


47        System.out.println("发生异常了!");
48    }
49}
Spring原生方式实现AOP时,只支持四种通知类型:
| 通知类型 | 实现接口 |
|---|---|
| 前置通知 | MethodBeforeAdvice |
| 后置通知 | AfterReturningAdvice |
| 异常通知 | ThrowsAdvice |
| 环绕通知 | MethodInterceptor |
3.编写配置类
1<!-- 通知对象 -->
2<bean id="springAop" class="com.package.advice.SpringAop"></bean>
3
4<!-- 配置代理对象 -->
5<bean id="userDaoProxy" class="org.springframework.aop.framework.ProxyFactoryBean">
6    <!-- 配置目标对象 -->
7    <property name="target" ref="userDao"></property>
8    <!-- 配置通知 -->
9    <property name="interceptorNames">
10        <list>
11            <value>springAop</value>
12        </list>
13    </property>
14    <!-- 代理对象的生成方式  true:使用CGLib false:使用原生JDK生成-->
15    <property name="proxyTargetClass" value="true"></property>
16</bean>
4.编写测试类
1public class UserDaoTest2 {


2    @Test
3    public void testAdd(){


4        ApplicationContext ac = new ClassPathXmlApplicationContext("bean2.xml");
5        UserDao userDao = (UserDao) ac.getBean("userDaoProxy"); // 获取的是代理对象
6        userDao.update();
7    }
8}
9.SchemaBased实现AOP
SchemaBased(基础模式)配置方式是指使用Spring原生方式定义通知,而使用AspectJ框架配置切面。
1.编写通知类
1public class SpringAop implements MethodBeforeAdvice, AfterReturningAdvice, ThrowsAdvice, MethodInterceptor {


2    /**
3     * 前置通知
4     * @param method 目标方法
5     * @param args 目标方法的参数列表
6     * @param target 目标对象
7     * @throws Throwable
8     */
9    @Override
10    public void before(Method method, Object[] args, Object target) throws Throwable {


11        System.out.println("前置通知");
12    }
13
14    /**
15     * 后置通知
16     * @param returnValue 目标方法的返回值
17     * @param method 目标方法
18     * @param args 目标方法的参数列表
19     * @param target 目标对象
20     * @throws Throwable
21     */
22    @Override
23    public void afterReturning(Object returnValue, Method method, Object[] args, Object target) throws Throwable {


24        System.out.println("后置通知");
25    }
26
27    /**
28     * 环绕通知
29     * @param invocation 目标方法
30     * @return
31     * @throws Throwable
32     */
33    @Override
34    public Object invoke(MethodInvocation invocation) throws Throwable {


35        System.out.println("环绕前");
36        Object proceed = invocation.proceed();
37        System.out.println("环绕后");
38        return proceed;
39    }
40
41    /**
42     * 异常通知
43     * @param ex 异常对象
44     */
45    public void afterThrowing(Exception ex){


46        System.out.println("发生异常了!");
47    }
48}
2.配置切面
1<!-- 通知对象 -->
2<bean id="springAop2" class="com.package.aop.SpringAop2"/>
3
4<!-- 配置切面 -->
5<aop:config>
6    <!-- 配置切点-->
7    <aop:pointcut id="myPointcut" expression="execution(* com.package.dao.UserDao.*(..))"/>
8    <!-- 配置切面:advice-ref:通知对象 pointcut-ref:切点 -->
9    <aop:advisor advice-ref="springAop2" pointcut-ref="myPointcut"/>
10</aop:config>
3.测试
1@Test
2public void t6(){


3    ApplicationContext ac = new ClassPathXmlApplicationContext("aop3.xml");
4    UserDao userDao = (UserDao) ac.getBean("userDao");
5    userDao.add();
6}
七、Spring事务
1.事务简介
事务:不可分割的原子操作。即一系列的操作要么同时成功,要么同时失败。
开发过程中,事务管理一般在service层,service层中可能会操作多次数据库,这些操作是不可分割的。否则当程序报错时,可能会造成数据异常。
如:张三给李四转账时,需要两次操作数据库:张三存款减少、李四存款增加。如果这两次数据库操作间出现异常,则会造成数据错误。
1.准备数据库
1CREATE DATABASE `spring` ;
2USE `spring`;
3DROP TABLE IF EXISTS `account`;
4
5CREATE TABLE `account` (
6  `id` int(11) NOT NULL AUTO_INCREMENT,
7  `username` varchar(255) DEFAULT NULL,
8  `balance` double DEFAULT NULL,
9  PRIMARY KEY (`id`)
10) ENGINE=InnoDB AUTO_INCREMENT=3 DEFAULT CHARSET=utf8;
11
12insert  into `account`(`id`,`username`,`balance`) values (1,'猪猪侠',1000),(2,'开心超人',1000);
2.创建maven项目,引入依赖
1<dependencies>
2    <!--  mybatis  -->
3    <dependency>
4        <groupId>org.mybatis</groupId>
5        <artifactId>mybatis</artifactId>
6        <version>3.5.7</version>
7    </dependency>
8    <!--  mysql驱动包  -->
9    <dependency>
10        <groupId>mysql</groupId>
11        <artifactId>mysql-connector-java</artifactId>
12        <version>8.0.26</version>
13    </dependency>
14    <!--  druid连接池  -->
15    <dependency>
16        <groupId>com.alibaba</groupId>
17        <artifactId>druid</artifactId>
18        <version>1.2.8</version>
19    </dependency>
20    <!-- spring -->
21    <dependency>
22        <groupId>org.springframework</groupId>
23        <artifactId>spring-context</artifactId>
24        <version>5.3.13</version>
25    </dependency>
26    <dependency>
27        <groupId>org.springframework</groupId>
28        <artifactId>spring-tx</artifactId>
29        <version>5.3.13</version>
30    </dependency>
31    <dependency>
32        <groupId>org.springframework</groupId>
33        <artifactId>spring-jdbc</artifactId>
34        <version>5.3.13</version>
35    </dependency>
36    <!-- MyBatis与Spring的整合包,该包可以让Spring创建MyBatis的对象 -->
37    <dependency>
38        <groupId>org.mybatis</groupId>
39        <artifactId>mybatis-spring</artifactId>
40        <version>2.0.6</version>
41    </dependency>
42
43    <!-- junit,如果Spring5整合junit,则junit版本至少在4.12以上 -->
44    <dependency>
45        <groupId>junit</groupId>
46        <artifactId>junit</artifactId>
47        <version>4.12</version>
48        <scope>test</scope>
49    </dependency>
50    <!-- spring整合测试模块 -->
51    <dependency>
52        <groupId>org.springframework</groupId>
53        <artifactId>spring-test</artifactId>
54        <version>5.3.13</version>
55        <scope>test</scope>
56    </dependency>
57</dependencies>
3.创建配置文件
1<?xml version="1.0" encoding="UTF-8"?>
2<beans xmlns="http://www.springframework.org/schema/beans"
3       xmlns:context="http://www.springframework.org/schema/context"
4       xmlns:xsi="http://www.w3.org/2001/XMLSchema-instance"
5       xsi:schemaLocation="http://www.springframework.org/schema/beans
6         http://www.springframework.org/schema/beans/spring-beans.xsd
7         http://www.springframework.org/schema/context
8         http://www.springframework.org/schema/context/spring-context.xsd">
9    <!-- 包扫描 -->
10    <context:component-scan base-package="com.package"></context:component-scan>
11    <!-- 创建druid数据源对象 -->
12    <bean id="dataSource" class="com.alibaba.druid.pool.DruidDataSource">
13        <property name="driverClassName" value="com.mysql.jdbc.Driver"></property>
14        <property name="url" value="jdbc:mysql:///spring"></property>
15        <property name="username" value="root"></property>
16        <property name="password" value="root"></property>
17    </bean>
18
19    <bean id="sqlSessionFactory" class="org.mybatis.spring.SqlSessionFactoryBean">
20        <property name="dataSource" ref="dataSource"></property>
21    </bean>
22
23    <bean id="mapperScanner" class="org.mybatis.spring.mapper.MapperScannerConfigurer">
24        <property name="basePackage" value="com.package.dao"></property>
25    </bean>
26</beans>
4.编写Java代码
1// 账户
2public class Account {


3    private int id; // 账号
4    private String username; // 用户名
5    private double balance; // 余额
6
7    // 省略getter/setter/tostring/构造方法
8}
9
10@Repository
11public interface AccountDao {


12    // 根据id查找用户
13    @Select("select * from account where id = #{id}")
14    Account findById(int id);
15
16    // 修改用户
17    @Update("update account set balance = #{balance} where id = #{id}")
18    void update(Account account);
19}
20
21@Service
22public class AccountService {


23    @Autowired
24    private AccountDao accountDao;
25
26    /**
27     * 转账
28     * @param id1 转出人id
29     * @param id2 转入人id
30     * @param price 金额
31     */
32    public void transfer(int id1, int id2, double price) {


33        // 转出人减少余额
34        Account account1 = accountDao.findById(id1);
35        account1.setBalance(account1.getBalance()-price);
36        accountDao.update(account1);
37
38        int i = 1/0; // 模拟程序出错
39
40        // 转入人增加余额
41        Account account2 = accountDao.findById(id2);
42        account2.setBalance(account2.getBalance()+price);
43        accountDao.update(account2);
44    }
45}
5.测试转账
1@RunWith(SpringJUnit4ClassRunner.class)
2@ContextConfiguration(locations="classpath:applicationContext.xml")
3public class AccountServiceTest {


4    @Autowired
5    private AccountService accountService;
6
7    @Test
8    public void testTransfer(){


9        accountService.transfer(1,2,500);
10    }
11}
此时没有事务管理,会造成张三的余额减少,而李四的余额并没有增加。所以事务处理位于业务层,即一个service方法是不能分割的。
2.Spring事务管理方案
在service层手动添加事务可以解决该问题:
1@Autowired
2private SqlSessionTemplate sqlSession;
3
4public void transfer(int id1, int id2, double price) {


5    try{


6        // account1修改余额
7        Account account1 = accountDao.findById(id1);
8        account1.setBalance(account1.getBalance()-price);
9        accountDao.update(account1);
10
11        int i = 1/0; // 模拟转账出错
12
13        // account2修改余额
14        Account account2 = accountDao.findById(id2);
15        account2.setBalance(account2.getBalance()+price);
16        accountDao.update(account2);
17        sqlSession.commit();
18    }catch(Exception ex){


19        sqlSession.rollback();
20    }
21}
但在Spring管理下不允许手动提交和回滚事务。此时我们需要使用Spring的事务管理方案,在Spring框架中提供了两种事务管理方案:
1.编程式事务:通过编写代码实现事务管理。
2.声明式事务:基于AOP技术实现事务管理。
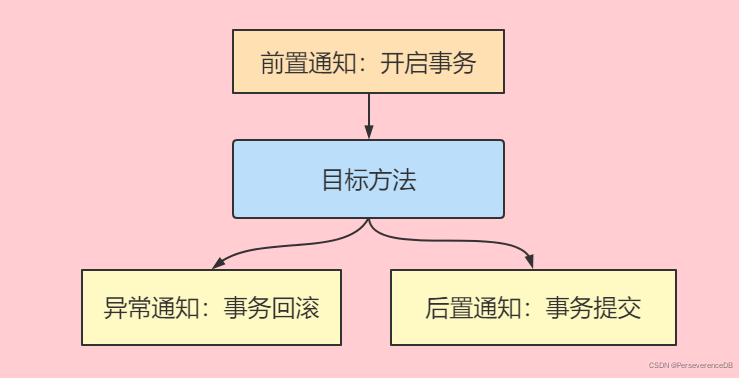
Spring的声明式事务管理在底层采用了AOP技术,其最大的优点在于无需通过编程的方式管理事务,只需要在配置文件中进行相关的规则声明,就可以将事务规则应用到业务逻辑中。
使用AOP技术为service方法添加如下通知:
3.Spring事务管理器
Spring依赖事务管理器进行事务管理,事务管理器即一个通知类,我们为该通知类设置切点为service层方法即可完成事务自动管理。由于不同技术操作数据库,进行事务操作的方法不同。如:JDBC提交事务是connection.commit(),MyBatis提交事务是sqlSession.commit(),所以Spring提供了多个事务管理器。
| 事务管理器名称 | 作用 |
|---|---|
| org.springframework.jdbc.datasource.DataSourceTransactionManager | 针对JDBC技术提供的事务管理器。适用于JDBC和MyBatis。 |
| org.springframework.orm.hibernate3.HibernateTransactionManager | |
| org.springframework.orm.jpa.JpaTransactionManager | 针对于JPA技术提供的事务管理器。适用于JPA技术。 |
| org.springframework.transaction.jta.JtaTransactionManager | 跨越了多个事务管理源。适用在两个或者是多个不同的数据源中实现事务控制。 |
我们使用MyBatis操作数据库,接下来使用DataSourceTransactionManager进行事务管理。
1.引入依赖
1<!-- 事务管理 -->
2<dependency>
3    <groupId>org.springframework</groupId>
4    <artifactId>spring-tx</artifactId>
5    <version>5.3.13</version>
6</dependency>
7<!-- AspectJ -->
8<dependency>
9    <groupId>org.aspectj</groupId>
10    <artifactId>aspectjweaver</artifactId>
11    <version>1.8.7</version>
12</dependency>
2.在配置文件中引入约束
1xmlns:aop="http://www.springframework.org/schema/aop"
2xmlns:tx="http://www.springframework.org/schema/tx"
3
4http://www.springframework.org/schema/aop
5http://www.springframework.org/schema/aop/spring-aop.xsd
6http://www.springframework.org/schema/tx
7http://www.springframework.org/schema/tx/spring-tx.xsd
3.进行事务配置
1<!-- 事务管理器  -->
2<bean id="transactionManager" class="org.springframework.jdbc.datasource.DataSourceTransactionManager">
3    <property name="dataSource" ref="dataSource"></property>
4</bean>
5
6<!-- 进行事务相关配置 -->
7<tx:advice id = "txAdvice">
8    <tx:attributes>
9        <tx:method name="*"/>
10    </tx:attributes>
11</tx:advice>
12
13<!-- 配置切面 -->
14<aop:config>
15    <!-- 配置切点 -->
16    <aop:pointcut id="pointcut" expression="execution(* com.package.service.*.*(..))"/>
17    <!-- 配置通知 -->
18    <aop:advisor advice-ref="txAdvice" pointcut-ref="pointcut"></aop:advisor>
19</aop:config>
4.事务控制的API
Spring进行事务控制的功能是由三个接口提供的,这三个接口是Spring实现的,在开发中我们很少使用到,只需要了解他们的作用即可:
PlatformTransactionManager接口
PlatformTransactionManager是Spring提供的事务管理器接口,所有事务管理器都实现了该接口。该接口中提供了三个事务操作方法:
TransactionStatus getTransaction(TransactionDefinition definition):获取事务状态信息。
void commit(TransactionStatus status):事务提交
void rollback(TransactionStatus status):事务回滚
TransactionDefinition接口
TransactionDefinition是事务的定义信息对象,它有如下方法:
String getName():获取事务对象名称。
int getIsolationLevel():获取事务的隔离级别。
int getPropagationBehavior():获取事务的传播行为。
int getTimeout():获取事务的超时时间。
boolean isReadOnly():获取事务是否只读。
TransactionStatus接口
TransactionStatus是事务的状态接口,它描述了某一时间点上事务的状态信息。它有如下方法:
void flush() 刷新事务
boolean hasSavepoint() 获取是否存在保存点
boolean isCompleted() 获取事务是否完成
boolean isNewTransaction() 获取是否是新事务
boolean isRollbackOnly() 获取是否回滚
void setRollbackOnly() 设置事务回滚
在<tx:advice>中可以进行事务的相关配置:
1<tx:advice id="txAdvice">
2    <tx:attributes>
3        <tx:method name="*"/>
4        <tx:method name="find*" read-only="true"/>
5    </tx:attributes>
6</tx:advice>
<tx:method>中的属性:
name:指定配置的方法。*表示所有方法,find*表示所有以find开头的方法。
read-only:是否是只读事务,只读事务不存在数据的修改,数据库将会为只读事务提供一些优化手段,会对性能有一定提升,建议在查询中开启只读事务。
timeout:指定超时时间,在限定的时间内不能完成所有操作就会抛异常。默认永不超时
rollback-for:指定某个异常事务回滚,其他异常不回滚。默认所有异常回滚。
no-rollback-for:指定某个异常不回滚,其他异常回滚。默认所有异常回滚。
propagation:事务的传播行为
isolation:事务的隔离级别
5.事务的传播行为
事务传播行为是指多个含有事务的方法相互调用时,事务如何在这些方法间传播。
如果在service层的方法中调用了其他的service方法,假设每次执行service方法都要开启事务,此时就无法保证外层方法和内层方法处于同一个事务当中。
1// method1的所有方法在同一个事务中
2public void method1(){


3    // 此时会开启一个新事务,这就无法保证method1()中所有的代码是在同一个事务中
4    method2();
5    System.out.println("method1");
6}
7
8public void method2(){


9    System.out.println("method2");
10}
事务的传播特性就是解决这个问题的,Spring帮助我们将外层方法和内层方法放入同一事务中。
| 传播行为 | 介绍 |
|---|---|
| REQUIRED | 默认。支持当前事务,如果当前没有事务,就新建一个事务。这是最常见的选择。 |
| SUPPORTS | 支持当前事务,如果当前没有事务,就以非事务方式执行。 |
| MANDATORY | 支持当前事务,如果当前没有事务,就抛出异常。 |
| REQUIRES_NEW | 新建事务,如果当前存在事务,把当前事务挂起。 |
| NOT_SUPPORTED | 以非事务方式执行操作,如果当前存在事务,就把当前事务挂起。 |
| NEVER | 以非事务方式执行,如果当前存在事务,则抛出异常。 |
| NESTED | 必须在事务状态下执行,如果没有事务则新建事务,如果当前有事务则创建一个嵌套事务 |
6.事务的隔离级别
事务隔离级别反映事务提交并发访问时的处理态度,隔离级别越高,数据出问题的可能性越低,但效率也会越低。
| 隔离级别 | 脏读 | 不可重复读 | 幻读 |
|---|---|---|---|
| READ_UNCOMMITED(读取未提交内容) | Yes | Yes | Yes |
| READ_COMMITED(读取提交内容) | No | Yes | Yes |
| REPEATABLE_READ(重复读) | No | No | Yes |
| SERIALIZABLE(可串行化) | No | No | No |
如果设置为DEFAULT会使用数据库的隔离级别。
SqlServer , Oracle默认的事务隔离级别是READ_COMMITED
Mysql的默认隔离级别是REPEATABLE_READ
7.注解配置声明式事务
Spring支持使用注解配置声明式事务。用法如下:
1.注册事务注解驱动
1<!-- 注册事务注解驱动 -->
2<tx:annotation-driven transaction-manager="transactionManager"></tx:annotation-driven>
2.在需要事务支持的方法或类上加@Transactional
1@Service
2// 作用于类上时,该类的所有public方法将都具有该类型的事务属性
3@Transactional(propagation = Propagation.REQUIRED,isolation = Isolation.DEFAULT)
4public class AccountService {


5    @Autowired
6    private AccountDao accountDao;
7
8    /**
9     * 转账
10     * @param id1 转出人id
11     * @param id2 转入人id
12     * @param price 金额
13     */
14    // 作用于方法上时,该方法将都具有该类型的事务属性
15    @Transactional(propagation = Propagation.REQUIRED,isolation = Isolation.DEFAULT)
16    public void transfer(int id1, int id2, double price) {


17        // account1修改余额
18        Account account1 = accountDao.findById(id1);
19        account1.setBalance(account1.getBalance()-price);
20        accountDao.update(account1);
21
22        int i = 1/0; // 模拟转账出错
23
24        // account2修改余额
25        Account account2 = accountDao.findById(id2);
26        account2.setBalance(account2.getBalance()+price);
27        accountDao.update(account2);
28    }
29}
3.配置类代替xml中的注解事务支持:在配置类上方写@EnableTranscationManagement
1@Configuration
2@ComponentScan("com.package")
3@EnableTransactionManagement
4public class SpringConfig {


5
6    @Bean
7    public DataSource getDataSource(){


8        DruidDataSource druidDataSource = new DruidDataSource();
9        druidDataSource.setDriverClassName("com.mysql.jdbc.Driver");
10        druidDataSource.setUrl("jdbc:mysql:///spring");
11        druidDataSource.setUsername("root");
12        druidDataSource.setPassword("root");
13        return druidDataSource;
14    }
15
16    @Bean
17    public SqlSessionFactoryBean getSqlSession(DataSource dataSource){


18        SqlSessionFactoryBean sqlSessionFactoryBean = new SqlSessionFactoryBean();
19        sqlSessionFactoryBean.setDataSource(dataSource);
20        return sqlSessionFactoryBean;
21    }
22
23    @Bean
24    public MapperScannerConfigurer getMapperScanner(){


25        MapperScannerConfigurer mapperScannerConfigurer = new MapperScannerConfigurer();
26        mapperScannerConfigurer.setBasePackage("com.package.dao");
27        return mapperScannerConfigurer;
28    }
29
30    @Bean
31    public DataSourceTransactionManager getTransactionManager(DataSource dataSource){


32        DataSourceTransactionManager dataSourceTransactionManager = new DataSourceTransactionManager();
33        dataSourceTransactionManager.setDataSource(dataSource);
34        return dataSourceTransactionManager;
35    }
36}