文章目录
前言
本篇,作者将分享如何在QT环境下,使用FFmpeg函数库解码本地视频(下篇)—— 解码本地视频并在窗口中播放。
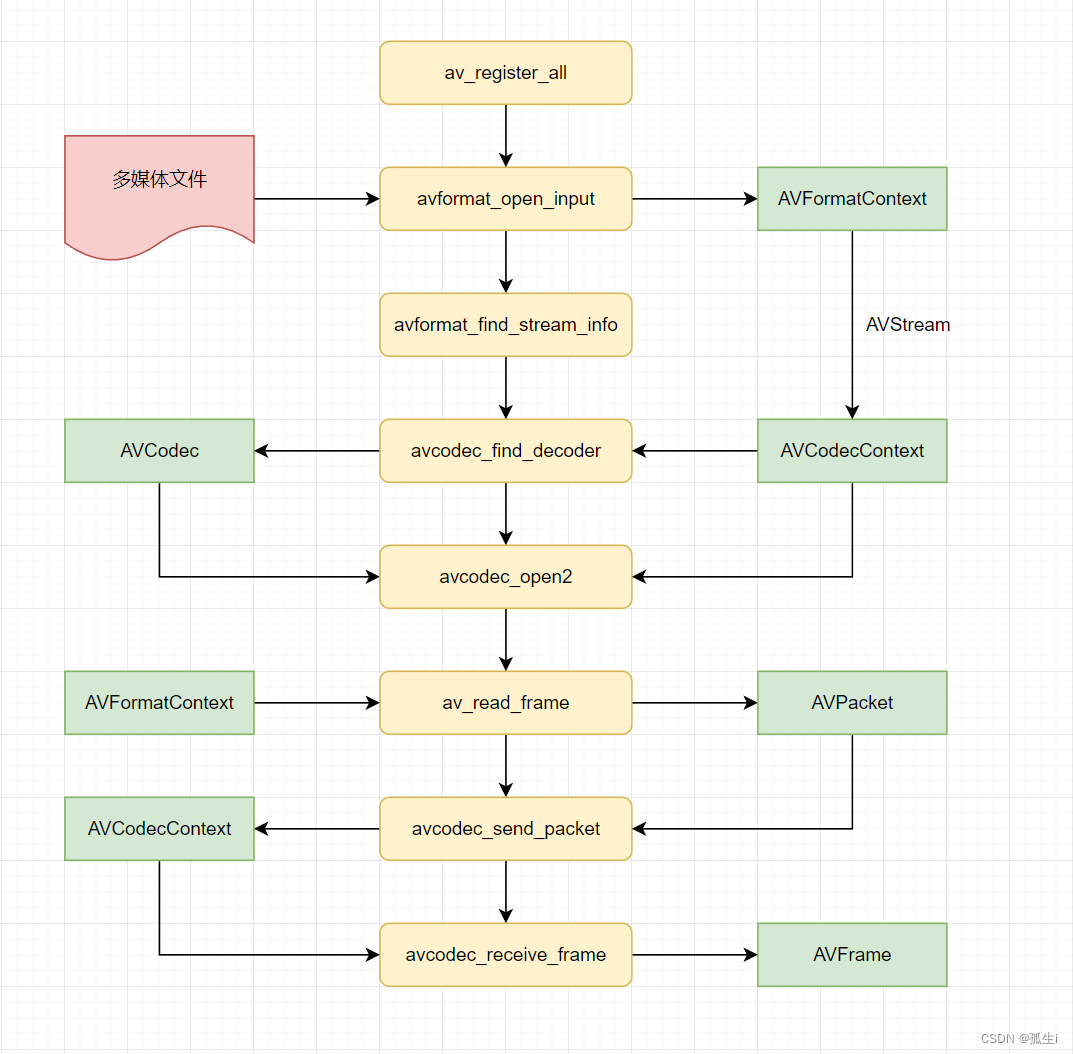
一、FFmpeg解码流程
- 下图为解码流程图,黄色部分为解码所调用函数,绿色部分为解码所需要的参数(结构体)。
二、解码播放实现效果
- 本地视频解码后,将解码后的视频帧在窗口中进行播放,如下图所示。
三、具体步骤及源码
1.FFmpeg头文件引用
//当前C++兼容C语言
extern "C"
{


//avcodec:编解码(最重要的库)
#include <libavcodec/avcodec.h>
//avformat:封装格式处理
#include <libavformat/avformat.h>
//swscale:视频像素数据格式转换
#include <libswscale/swscale.h>
//avdevice:各种设备的输入输出
#include <libavdevice/avdevice.h>
//avutil:工具库(大部分库都需要这个库的支持)
#include <libavutil/avutil.h>
}
2.环境注册
- 我们需要对硬件设备注册、网络注册,以及复用器和编码器注册等。
	//环境注册
    av_register_all();        	  //复用器、编码器等注册
    avdevice_register_all();  	  //硬件设备注册
    avformat_network_init();   	 //网络注册
3.创建封装格式上下文
- 创建并通过函数avformat_alloc_context()初始化封装格式上下文。
AVFormatContext *formatContext = avformat_alloc_context();
4.打开多媒体文件
- 打开本地文件到封装格式上下文中。若打开失败,则对错误信息进行打印。
    int avformat_open_ret = avformat_open_input(&formatContext,filename.toLatin1(),NULL,NULL);
    if(avformat_open_ret < 0)
    {


        char *result = new char[64];
        av_strerror(avformat_open_ret,result,64);
        qDebug() << QString("错误信息:%1").arg(result);
    }
    qDebug() << "打开多媒体文件成功!";
5.获取音视频流信息
- 在封装格式上下文中获取音视频流信息。若获取失败,则对错误信息进行打印。
    int avformat_find_ret = avformat_find_stream_info(formatContext,NULL);
    if(avformat_find_ret < 0)
    {


        char *result = new char[64];
        av_strerror(avformat_open_ret,result,64);
        qDebug() << QString("错误信息:%1").arg(result);
    }
    qDebug() << "获取音视频流信息成功!";
6.寻找视频流
- 通过遍历封装格式上下文中所有的流信息,找到视频流并保存视频流索引。
    int streamIndex = -1;
    for(int i=0;i<formatContext->nb_streams;i++)
    {


        if(formatContext->streams[i]->codec->codec_type == AVMEDIA_TYPE_VIDEO)
        {


            streamIndex = i;
            break;
        }
    }
    if(streamIndex == -1)
    {


        qDebug() << "找不到相应的流信息!";
    }
7.获取解码器上下文
- 通过视频流索引,获取解码器上下文。
AVCodecContext *codecContext = formatContext->streams[streamIndex]->codec;
8.查找合适的解码器
- 通过解码上下文的属性id寻找合适的解码器。
	AVCodec *codec = avcodec_find_decoder(codecContext->codec_id);
    if(codec == NULL)
    {


        qDebug() << "找不到合适的解码器!";
    }
9.打开解码器
- 通过解码器上下文,打开寻找到的解码器。
    int avcodec_open_ret = avcodec_open2(codecContext,codec,NULL);
    if(avcodec_open_ret < 0)
    {


        char *result = new char[64];
        av_strerror(avformat_open_ret,result,64);
        qDebug() << QString("错误信息:%1").arg(result);
    }
    qDebug() << "打开解码器成功!";
10.数据容器初始化
- 对接收数据的数据包、数据帧、数据缓冲区容器动态分配内存空间。
	//数据包初始化
	AVPacket *packet = av_packet_alloc();

	//输入视频帧初始化
    AVFrame *frame = av_frame_alloc();

    //输出RGB帧初始化
    AVFrame *frameRGB = av_frame_alloc();

    //给缓冲区动态分配内存
    uint8_t *pOutbuffer = (uint8_t*)av_malloc(avpicture_get_size(AV_PIX_FMT_RGB32,codecContext->width,codecContext->height));

    //初始化缓冲区
    avpicture_fill((AVPicture *)frameRGB, pOutbuffer,AV_PIX_FMT_RGB32, codecContext->width,codecContext->height);
11.获取图像转换上下文
- 通过解码器上下文获取图像转换上下文。
    SwsContext *sws = sws_getContext(codecContext->width,codecContext->height,codecContext->pix_fmt,
                               codecContext->width,codecContext->height,AV_PIX_FMT_RGB32,
                               SWS_BICUBIC,NULL,NULL,NULL);
12.读取视频帧并显示
- 从封装格式上下文读取信息到数据包,再从数据包读取到数据帧,最后将数据转为图像并显示。
	//计算解码帧数
    int frameNum = 0;
    //创建标签显示图像
    QLabel *imgLabel = new QLabel(this);
    imgLabel ->setGeometry(0,0,600,330);
    //读取视频帧
    while(av_read_frame(formatContext,packet) >= 0)
    {


        if(packet->stream_index == streamIndex)
        {


            avcodec_send_packet(codecContext,packet);
            int decode_video_ret = avcodec_receive_frame(codecContext,frame);
            if(decode_video_ret >= 0)
            {


            	//计算帧数
                frameNum++;
				qDebug() << QString("正在解码播放第%1帧数据").arg(frameNum);
				//视频流数据转换为RGB图像数据
                sws_scale(sws, (const unsigned char* const*)frame->data,frame->linesize, 0,
                          codecContext->height,frameRGB->data,frameRGB->linesize);
				//数据转换为图像
                QImage  *tmpImg  = new QImage((uchar *)pOutbuffer,codecContext->width,
                                              codecContext->height,QImage::Format_RGB32);
               	//加载到标签中显示
				imgLabel->setPixmap(QPixmap::fromImage(img));
   				imgLabel->setScaledContents(true);
            }
        }
    }
四、FFmpeg参考资料
版权声明:本文部分内容,参考CSDN博主「雷霄骅」原创文章整理而成,供学习参考使用。
博客地址:https://blog.csdn.net/leixiaohua1020?type=blog。
总结
以上就是浅显易懂 FFmpeg学习(04)— QT+FFmpeg解码本地视频(下篇)的所有内容,希望大家阅读后都能有所收获!原创不易,转载请标明出处,若文章出现有误之处,欢迎读者留言指正批评!