## 准备知识
Activity中view的创建流程
通过这篇文章,我们简单总结下,
Activity 上下文Context 绑定的Window 内部持有的根View 也就是DecorView,它是一个最顶层的view,包含一个 页面中所有的view ,包括状态栏,标题栏,以及Acitivity中的layout中的view标签 反射创造view对象。
而 Acitivity中的layout中的view标签 是通过
LayoutInflater.from(mContext).inflate(resId, contentParent)。
反射 创造 各种view对象然后放在 父容器 contentParent 中,这个父容器 contentParent其实就是
DecorView 的子view subdecor中的一个id 叫做android.R.id.content 的view
即
ViewGroup contentParent = mSubDecor.findViewById(android.R.id.content);
LayoutInflater.from(mContext).inflate(resId, contentParent)。
Window
那么Window 是什么,为什么要有window ,我们先了解Window 。
我们手机 有很多个应用,每个应用又有很多个页面,那么手机什么时候需要显示什么页面,这个时候就需要有一个机制来管理当前显示哪个页面。
于是Android 系统中创建了一个系统服务WindowManagerService(WMS)专门用来管理屏幕上的窗口,而View只能显示在对应的窗口上,如果不符合规定就不开辟窗口进而对应的View也无法显示 ,window机制就是为了管理屏幕上的view的显示以及触摸事件的传递问题
Window是一个抽象类,它真正的实现是 PhoneWindow,PhoneWindow内部会持有一个View(根View)。
一个Window会绑定一个View,他们之间是靠 ViewRootImpl来建议一个关系的。
所以说 一个Window对应一个ViewRootImpl对应一个View,
View不能单独存在,必须依附在window身上,有view的地方就有window,有window的地方就有view。
也就是说你可以这么理解,手机上每个页面视图其实就是一个个 Window,而页面是什么样子 就是靠 ViewRootImpl.setView下的View表现出来的 ,点击事件也是由Window接收再分配给 View,再根据具体情况分发给View的哪个子view 去消费这个事件。
Window类级别
Window有三种类型,分别是系统Window ,应用Window、子Window。
系统Window是需要在androidMinifest上 声明权限 才 能创建的Window,比如Toast和系统状态栏。
应用类Window对应着一个Activity。
子Window不能单独存在,需要附属在特定的父Window之中,比如常见的Dialog。
Window类级别 是通过 WindowManager.LayoutParams的type参数指定的。
Window的管理 WindowManager
管理window 靠的就是 WindowManager ,
WindowManager它是一个接口,
它继承 ViewManager。
ViewManager 有其中3个重要的方法.
addView,updateViewLayout, removeView
所以WindowManager也有这3个方法,
它的真正实现是WindowManagerImpl,而WindowManagerImpl里面内部把工作内容真正实现交给了WindowManagerGLobal,所以真正的实现其实是 WindowManagerGLobal 类。
这个WindowManagerGLobal类管理着所以view ,ViewRootImpl,WindowManager.LayoutParam以及他们的对应关系
    private final ArrayList<View> mViews = new ArrayList<View>();
    private final ArrayList‹ViewRootImpl>mRoots =new ArrayList‹ViewRootImp1>();
    private final ArrayList<WindowManager.LayoutParams›mParams =new ArrayList<WindowManager.LayoutParams>();
mViews保留着全部的view
mRoots保留全部的ViewRootImpl
mParams保留全部的 布局参数
WindowManager的3个方法。addView,updateViewLayout, removeView
都是针对view 进行添加更新和删除,并没有针对window的,也验证了我们前面说的
window 是抽象的,他没有实体,真正的实体其实是 window 连接的 view,有window,就代表着有view
所以说 使用WindowManager 添加删除更新操作 Window,其实实际可以说是 WindowManager 添加删除更新操作一个window下 View。删除一个window 就把window下的view移除就是删除一个window。
WindowManager 与WMS的IPC通信
每个应用进程中 WindowManager 实例 管理 着当前进程下的所有的Window。
应用进程中的 WindowManager 对Window的操作 增加删除更新操作等 其实是
应用进程下WindowManager与系统进程WMS的一个AIDL 通信。这里的binder 对象是 Session
WMS会为每个进程管理保留着每个Session binder对象。
所以说 进程中的WindowManager调用的 3个方法。addView,updateViewLayout, removeView 。
其实是调用 binder 对象 Session 的代理对象 的对应方法。然后由WMS的binder Session接收并调用对应的方法
下面我们来看addView,updateViewLayout, removeView
如何使用WindowManager 添加一个 Window
使用 WindowManager 添加一个 Window 就是
windowManager.addView 添加一个view,其实就是添加一个window 并通过viewRootImpl 绑定上view
        WindowManager windowManager = getWindowManager();
        View view;
        WindowManager.LayoutParams layoutParams = new WindowManager.LayoutParams();
        layoutParams.width = WindowManager.LayoutParams.WRAP_CONTENT;
        layoutParams.height = WindowManager.LayoutParams.WRAP_CONTENT;
        layoutParams.x = 100;
        layoutParams.y = 100;
        layoutParams.gravity = Gravity.LEFT | Gravity.TOP;
        layoutParams.type = WindowManager.LayoutParams.TYPE_SYSTEM_OVERLAY;
        layoutParams.flags = WindowManager.LayoutParams.FLAG_NOT_TOUCH_MODAL;
        windowManager.addView(view,layoutParams);
通过 WindowManager.LayoutParams layoutParams 设置这个window 的属性。
其中 layoutParams.type 这个数据代表这个window 是什么类型
layoutParams.flags 而这表示这个window 的标签属性
由如下可以选:
FLAG_NOT_FOCUSABLE
表示Window不需要获取焦点,也不需要接收各种输入事件,此标记会同时启用FLAG_NOT_TOUCH_MODAL,最终事件会直接传递给下层的具有焦点的Window,相当于自己不需要事件。
FLAG_NOT_TOUCH_MODAL
在此模式下,系统会将当前Window区域以外的单击事件传递给底层的Window,当前Window区域以内的单击事件则自己处理。这个标记很重要,一般来说都需要开启此标记,否则其他Window将无法收到单击事件。相当于自己需要事件,其他人需要
FLAG_SHOW_WHEN_LOCKED
开启此模式可以让Window显示在锁屏的界面上。
前面我们说了WindowManager方法的真正实现其实是WindowManagerGLobal,所以说windowManager.addView真正效果看
WindowManagerGLobal.addview
在这个方法中会为当前view 创建对应的viewRootImpl,然后把 view ,viewRootImpl ,WindowManager.LayoutParams保存在上面说的 WindowManagerGLobal类里的 mViews,mRoots,mParams列表中。
接着调用 ViewRootImpl.setView 这个方法等下再讲。
然后通过WMS 的binder的代理对象跟WMS进程一次IPC 通信进行window的添加。
Window 的删除
windowManager提供两种删除接口
分别是
        windowManager.removeView(view);//同步删除
        windowManager.removeViewImmediate(view);//异步删除
我们说了 windowManager.removeView> WindowManagerGLobal.removeView
windowManager.removeViewImmediate> WindowManagerGLobal.removeViewImmediate
实际不管哪个删除 还是通过view 对应的viewRootImpl调用的die() 方法。
而异步与同步删除的区别在于 ,如果是同步删除就直接调用viewRootImpl的die()去删除
而如果是异步的删除,会先发送一条message 消息。这个时候这个view还没被删除。 它会被保存在 WindowManagerGLobal.
中的 ArraysetmDyingViews 这个list对象这个,这个list对象就是专门来保存着这些还没被删除的view的
发送消息后然后由viewRootImpl中的handle 去接受,接到到再去调用 viewRootImpl的die()去删除。
在这个 viewRootImpl的die()方法中会做的事情:
- 把WindowManagerGLobal的 mViews,mRoots,mParams删除对应的数据
- 通过WMS 的binder的代理对象跟WMS进程一次IPC 通信进行window的删除
- 调用View.dispatchDetachedFromWindows() 方法,这个方法内部会调用 View 的
onDetachedFromWindow()方法 也就是当view从window移除的时候,View 的
**onDetachedFromWindow()**方法会变调用,我们可以重写这个方法,在这个方法做一些资源的回收,比如终止动画,停止现线程等
Window的更新
windowManager.updateViewLayout(view,WindowManager.LayoutParams);
对window的更新主要跟下view的 WindowManager.LayoutParams 布局,比如一些位置等信息改变了,你就可以调用
当然 windowManager.updateViewLayout 实际也是 WindowManagerGLobal.updateViewLayout
在这个方法 会 对 view .setLayoutParams 重新设置个新的布局参数,然后再调用view 的 viewRootImpl 调用
viewRootImpl.setLayoutParams()
然后在这个方法 中调用 scheduleTraversals 对view 进行重新的绘制流程
当然viewRootImpl依旧会通过WMS 的binder的代理对象跟WMS进程一次IPC 通信进行window的更新
View到底是怎么绘制的
前面我们说了WindowManager方法的真正实现其实是WindowManagerGLobal,所以说windowManager.addView真正效果看
WindowManagerGLobal.addview
    public void addView(View view, ViewGroup.LayoutParams params,
            Display display, Window parentWindow) {
        ……

        final WindowManager.LayoutParams wparams = (WindowManager.LayoutParams) params;
        if (parentWindow != null) {
            parentWindow.adjustLayoutParamsForSubWindow(wparams);
        } else {
            final Context context = view.getContext();
            if (context != null
                    && (context.getApplicationInfo().flags
                            & ApplicationInfo.FLAG_HARDWARE_ACCELERATED) != 0) {
                wparams.flags |= WindowManager.LayoutParams.FLAG_HARDWARE_ACCELERATED;
            }
        }

        ViewRootImpl root;
        View panelParentView = null;

        synchronized (mLock) {
             ……
            // 创建ViewRootImpl
            root = new ViewRootImpl(view.getContext(), display);

            view.setLayoutParams(wparams);

            mViews.add(view);
            mRoots.add(root);
            mParams.add(wparams);

            try {
                //调用ViewRootImpl.setView
                root.setView(view, wparams, panelParentView);
            } catch (RuntimeException e) {
                if (index >= 0) {
                    removeViewLocked(index, true);
                }
                throw e;
            }
        }
    }
所以说,windowManager.addView添加一个window view,其实是靠window对应的ViewRootImpl调用setView,把一个view 给绑定在window身上的。我们看下setview
#ViewRootImpl.java
public void setView(View view, WindowManager.LayoutParams attrs, View panelParentView) {
    synchronized (this) {
        if (mView == null) {
            mView = view;

            requestLayout();

            try {
                res = mWindowSession.addToDisplay(mWindow, mSeq, mWindowAttributes,
                        getHostVisibility(), mDisplay.getDisplayId(), mTmpFrame,
                        mAttachInfo.mContentInsets, mAttachInfo.mStableInsets,
                        mAttachInfo.mOutsets, mAttachInfo.mDisplayCutout, mInputChannel,
                        mTempInsets);
                setFrame(mTmpFrame);
            } catch (RemoteException e) {
            }
            //省略
            //输入事件接收
        }
    }
}
setview这个方法关键是调用了requestLayout()这个方法我们继续看requestLayout这个方法
ViewRootImpl.java
public void requestLayout() {
    if (!mHandlingLayoutInLayoutRequest) {
        checkThread();
        mLayoutRequested = true;
        //绘制请求
        scheduleTraversals();
    }
}

void scheduleTraversals() {
    if (!mTraversalScheduled) {
        mTraversalScheduled = true;
        mTraversalBarrier = mHandler.getLooper().getQueue().postSyncBarrier();
        //主要是将mTraversalRunnable 放入队列
        mChoreographer.postCallback(
                Choreographer.CALLBACK_TRAVERSAL, mTraversalRunnable, null);
        //省略
    }
}

final class TraversalRunnable implements Runnable {
    @Override
    public void run() {
        doTraversal();
    }
}

void doTraversal() {
    //没有取消绘制的话则开始绘制
    if (mTraversalScheduled) {
        mTraversalScheduled = false;
        //移除同步屏障
        mHandler.getLooper().getQueue().removeSyncBarrier(mTraversalBarrier);

        //真正开始执行measure、layout、draw等方法
        performTraversals();
    }
}
也就是 requestLayout 调用了 scheduleTraversals ,在scheduleTraversals方法中通过主线程handle发送了个Runnable。
在Runnable中调用了performTraversals。真正开始执行measure、layout、draw等方法。
那么整个流程如下

接下来我们来学习View 的绘制
坐标系
Android系统中有两种坐标系,分别为Android坐标系和View坐标系。
Android坐标系
在Android中,将屏幕左上角的顶点作为Android坐标系的原点,这个原点向右是X轴正方向,向下是Y轴正方向

View坐标系
它与Android坐标系并不冲突,两者是共同存在的,它们一起来帮助开发者更好地控制View。
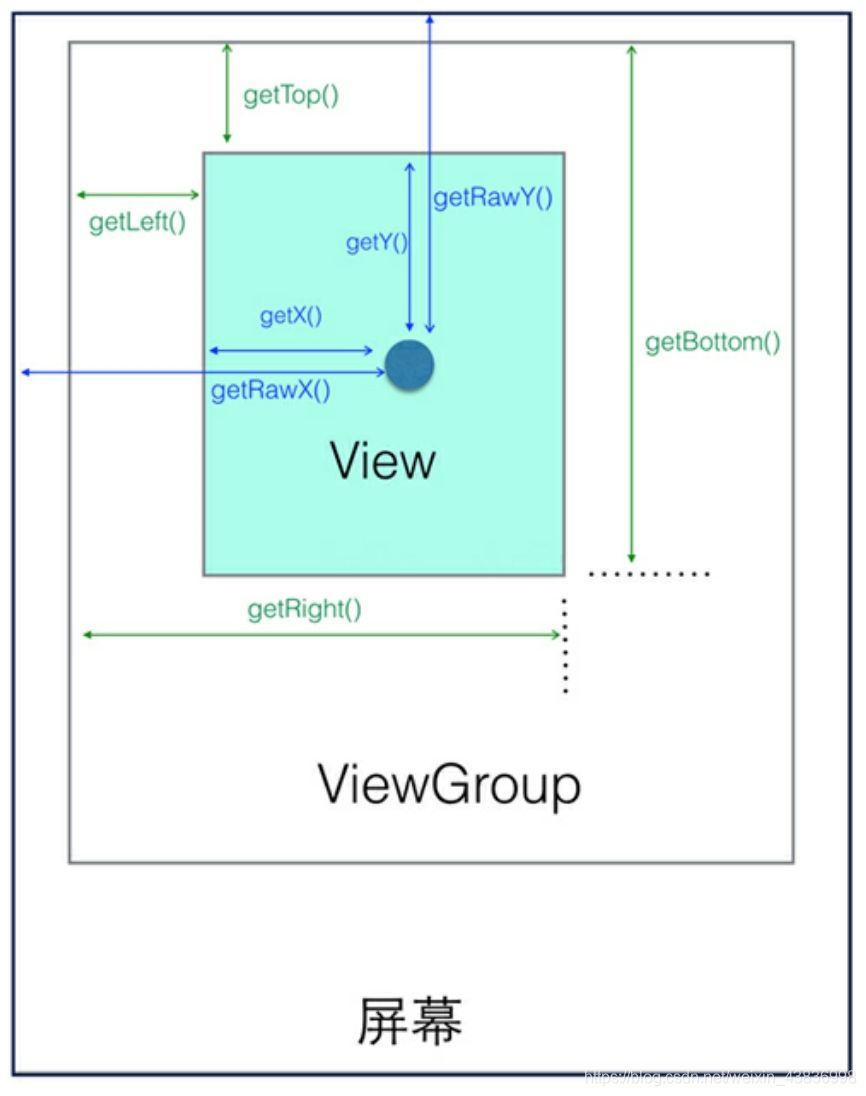
从上图我们可以得知很重要的坐标:
先从view自身宽高度看起:
width=getRight-getleft;
Height=getbottom-gettop;
当然这样做显然有些麻烦,因为系统已经向我们提供了获取View宽和高的方法。getHeight()用来获取 View 自身的高度,getWidth()用来获取 View 自身的宽度。
View自身的坐标 (注意是跟父布局相量的不是整个屏幕)
通过如下方法可以获得View到其父控件(ViewGroup)的距离。
• getTop():获取View自身顶边到其父布局顶边的距离。
• getLeft():获取View自身左边到其父布局左边的距离。
• getRight():获取View自身右边到其父布局左边的距离。
• getBottom():获取View自身底边到其父布局顶边的距离。
都是以左上来量的
.MotionEvent提供的方法
图中间的那个圆点,假设就是我们触摸的点。我们知道无论是View还是ViewGroup,最终的点击事件都会由onTouchEvent(MotionEvent event)方法来处理。MotionEvent在用户交互中作用重大,其内部提供了很多事件常量,比如我们常用的ACTION_DOWN、ACTION_UP和ACTION_MOVE。此外,MotionEvent也提供了获取焦点坐标的各种方法。
• getX():在view点击的点到view左边的距离
• getY():在view点击的点到view上边的距离
• getRawX():点击的点到整个屏幕左边的距离
• getRawY():点击的点到整个屏幕上边的距离
view的绘制流程
View的绘制分别为
view.measure() 测量这个view的测量宽高
view.layout() 确定这个view的最终宽高和摆放位置
**view.draw()**画出这个view
注意只有view.measure()做完之后,才能通过 getMeasuredWidth();获取view.measure()的测量宽高,
只有view.layout()布局完之后,才能通过 getWidth()获取view.layout()的最终宽高,
一般view.measure()的宽高就是最终宽高了。
measure
measure流程
不要管是viewgroup和view的measure流程中,他们其实都是一样,viewgroup也就是一个view,当要对一个view进行测量都是调用view.measure(int widthMeasureSpec, int heightMeasureSpec) .参数MeasureSpec是这个view的MeasureSpec。

入口:measure()源码
 public final void measure(int widthMeasureSpec, int heightMeasureSpec) {
    ...
    int cacheIndex = (mPrivateFlags & PFLAG_FORCE_LAYOUT) == PFLAG_FORCE_LAYOUT ? -1 :
            mMeasureCache.indexOfKey(key);
    if (cacheIndex < 0 || sIgnoreMeasureCache) {

        // 调用onMeasure()计算视图大小
        onMeasure(widthMeasureSpec, heightMeasureSpec);
        mPrivateFlags3 &= ~PFLAG3_MEASURE_NEEDED_BEFORE_LAYOUT;
    } else {
        ...
}

measure源码只需要知道它的作用只是调用onmeasure,并传入view的MeasureSpec进入onmeasure里面就没了。
onmeasure源码如下:
 protected void onMeasure(int widthMeasureSpec, int heightMeasureSpec) {
    // 参数说明:View的MeasureSpec

    setMeasuredDimension(getDefaultSize(getSuggestedMinimumWidth(), widthMeasureSpec),
                         getDefaultSize(getSuggestedMinimumHeight(), heightMeasureSpec));

}
分析:onMeasu内有3个方法。
setMeasuredDimension :设置view的测量宽高
getDefaultSize():得到view的宽高
getSuggestedMinimumWidth():给予view一个默认值。
从代码上我们可以看到,setMeasuredDimension()设置的参数就是view的宽高,而这宽高值是从getDefaultSize()获得的。而
getSuggestedMinimumWidth()就是给予view一个默认值,这里要区别开来measureSpec参数已经有了view的size了,不过,这里会再提供个size给view,而这个size,就是通过getSuggestedMinimumWidth()而来。
下面我们看getDefaultSize()的源码
  public static int getDefaultSize(int size, int measureSpec) {

        // 参数说明:
        // size:提供给view的一个大小  ,
        // measureSpec:view的measureSpec

            // 设置默认大小
            int result = size;

            // 获取宽/高测量规格的模式 & 测量大小
            int specMode = MeasureSpec.getMode(measureSpec);
            int specSize = MeasureSpec.getSize(measureSpec);

            switch (specMode) {
                // 模式为UNSPECIFIED时,使用提供的默认大小 = 参数Size
                case MeasureSpec.UNSPECIFIED:
                    result = size;
                    break;

                // 模式为AT_MOST,EXACTLY时,使用View测量后的宽/高值 = measureSpec中的Size
                case MeasureSpec.AT_MOST:
                case MeasureSpec.EXACTLY:
                    result = specSize;
                    break;
            }

         // 返回View的宽/高值
            return result;
        }
从getDefaultSize代码中我们可以知道,只有view的MeasureSpec,模式是UNSPECIFIED,这个默认值才会发生作用,不然,getDefaultSize得到的值,也就是setMeasuredDimension()的值就是view的MeasureSpec中的size值。
而MeasureSpec,模式UNSPECIFIED不会用到,所以,从总体view.measure()整个流程源码上看,view.measure()的测量值就是view的MeasureSpec的size值。,而不管view的在xml中设置match还是dp还是wrap,效果都是view的MeasureSpec的size值。
全部总结为
在调view.measure(int widthMeasureSpec, int heightMeasureSpec)时,必须已经知道这个view的MeasureSpec,然后再调用view.measure(int widthMeasureSpec, int heightMeasureSpec),
measure会去调用onmeasure(),在onmeasure中通过 setMeasuredDimension(width,height)设置view的宽高。而这个值通过getDefaultSize(int size, int measureSpec) 函数里面的逻辑而来,而getDefaultSize给出来的值就是view的MeasureSpec的size值,也就是view.measure()整个源码流程的测量值就是view的MeasureSpec的size值。,而不管view的在xml中设置match还是dp还是wrap,效果都是view的MeasureSpec的size值。 所以从这里我们可以启发到,这个view的MeasureSpec决定了view的宽高,显得非常重要,我们也可以在得到一个启发。如果这个view的MeasureSpec的size不是我们想要的值,我们完全可以重写onmeasure。根据逻辑得到正确的值然然后去setMeasuredDimension()。
那么MeasureSpec是什么?如何得到view的MeasureSpec
MeasureSpec = 测量模式(mode) + 测量大小(size)
测量模式(Mode)的类型有3种:UNSPECIFIED、EXACTLY 和AT_MOST
EXACTLY ;view设置match,或者dp。
AT_MOST :view设置wrap。
UNSPECIFIED:view不约束子view ,一般用不到。忽略不管
size:view的大小。
View的MeasureSpec值根据View的布局参数(LayoutParams)和父容器的MeasureSpec值计算得来的
也就是view的MeasureSpec是需要靠父view制作的,也就是靠父类去制作子view的MeasureSpec
父view会去调用系统代码getChildMeasureSpec(int spec, int padding, int childDimension),来返回这个view的MeasureSpec。所以,view的测量宽高是看view的MeasureSpec的size,而MeasureSpec是父类调用
getChildMeasureSpec(),而来的所以getChildMeasureSpec代码非常重要。
源码如下:
 public static int getChildMeasureSpec(int spec, int padding, int childDimension) {

         //参数说明
         * @param spec 父view的MeasureSpec
         * @param padding 父view的内边距
         * @param childDimension 子view设置的size

            //父view的测量模式
            int specMode = MeasureSpec.getMode(spec);

            //父view的大小
            int specSize = MeasureSpec.getSize(spec);

            //通过父view计算出的子view = 父大小-边距(父要求的大小,但子view不一定用这个值)
            int size = Math.max(0, specSize - padding);

            //子view想要的实际大小和模式(需要计算)
            int resultSize = 0;
            int resultMode = 0;

            //通过父view的MeasureSpec和子view的LayoutParams确定子view的 MeasureSpec

            switch (specMode) {
            // 当父view的模式为EXACITY时
            case MeasureSpec.EXACTLY:
                // 当子view的LayoutParams>0,即子view设为多少dp
                if (childDimension >= 0) {
                    //子view大小为子自身所赋的值,模式大小为EXACTLY
                    resultSize = childDimension;
                    resultMode = MeasureSpec.EXACTLY;

                // 当子view的LayoutParams为MATCH_PARENT时(-1)
                } else if (childDimension == LayoutParams.MATCH_PARENT) {
                    //子view大小为父view要求的大小,模式为EXACTLY
                    resultSize = size;
                    resultMode = MeasureSpec.EXACTLY;

                // 当子view的LayoutParams为WRAP_CONTENT时(-2)
                } else if (childDimension == LayoutParams.WRAP_CONTENT) {
                    //子view决定自己的大小,但最大不能超过父view,但是这里还是设置了子view的大小为父view要求的大小模式为AT_MOST
                    resultSize = size;
                    resultMode = MeasureSpec.AT_MOST;
                }
                break;

            // 当父view的模式为AT_MOST时
            case MeasureSpec.AT_MOST:
                // 道理同上
                if (childDimension >= 0) {
                    resultSize = childDimension;
                    resultMode = MeasureSpec.EXACTLY;
                } else if (childDimension == LayoutParams.MATCH_PARENT) {
                    resultSize = size;
                    resultMode = MeasureSpec.AT_MOST;
                } else if (childDimension == LayoutParams.WRAP_CONTENT) {
                    resultSize = size;
                    resultMode = MeasureSpec.AT_MOST;
                }
                break;

            // 当父view的模式为UNSPECIFIED时,父容器不对view有任何限制,要多大给多大
            // 多见于ListView、GridView
            case MeasureSpec.UNSPECIFIED:
                if (childDimension >= 0) {
                    // 子view大小为子自身所赋的值
                    resultSize = childDimension;
                    resultMode = MeasureSpec.EXACTLY;
                } else if (childDimension == LayoutParams.MATCH_PARENT) {
                    // 因为父view为UNSPECIFIED,所以MATCH_PARENT的话子类大小为0
                    resultSize = 0;
                    resultMode = MeasureSpec.UNSPECIFIED;
                } else if (childDimension == LayoutParams.WRAP_CONTENT) {
                    // 因为父view为UNSPECIFIED,所以WRAP_CONTENT的话子类大小为0
                    resultSize = 0;
                    resultMode = MeasureSpec.UNSPECIFIED;
                }
                break;
            }
            return MeasureSpec.makeMeasureSpec(resultSize, resultMode);
        }
重上面getChildMeasureSpec的代码得出了一个结论,
view.measure()流程一大堆走到最后设置的值就是看view.MeasureSpec.size,这个值,而这个MeasureSpec通过父类调用的getChildMeasureSpec而来,而从getChildMeasureSpec来看,
如果view在xml设置了多少dp 那么就是view.measure()测量最终值就是多少dp,
如果view在xml设置match,那么就是view.measure()测量最终值就是父类能给它的最大值,也就是
(父类的长度 - 父类设置的内边)
如果view在xml设置wrap,那么就是view.measure()测量最终值就是父类能给它的最大值,也就是
(父类的长度 - 父类设置的内边)
在上面的第三个看,当你view在xml设置wrap出现的效果不是包含自身,却是跟view在xml设置match一样,这是非常不合理的,所以当你的自定义view在xml有需要设置wrap希望包含自身宽度的这个需求,而这个时候就要重写
onmeasure(),根据自身情况去设置setMeasuredDimension(width,height)。
代码如下:
 @Override
    protected void onMeasure(int widthMeasureSpec, int heightMeasureSpec) {
        super.onMeasure(widthMeasureSpec, heightMeasureSpec);
        //最终测量长宽
        int endHeight=0, endWidth=0;

        //view的MeasureSpec
        int widthSize = MeasureSpec.getSize(widthMeasureSpec);
        int widthMode = MeasureSpec.getMode(widthMeasureSpec);
        int heightSize = MeasureSpec.getSize(heightMeasureSpec);
        int heightMode = MeasureSpec.getMode(heightMeasureSpec);

        //如果view宽高都设置了dp或者match那么不需要计算逻辑直接最终宽高就是view设置的dp或者match
        if(widthMode==MeasureSpec.EXACTLY&&heightMode==MeasureSpec.EXACTLY){
            endHeight=heightSize;
            endWidth=widthSize;
            setMeasuredDimension(endWidth, endHeight);
            return;
        }
        //如果view宽设置了dp或者match那么宽不需要计算逻辑view的宽就是view设置的dp或者match
        if (widthMode == MeasureSpec.EXACTLY){
            endWidth=widthSize;
        }
        //如果view高设置了dp或者match那么高不需要计算逻辑view的高就是view设置的dp或者match
        if (heightSize == MeasureSpec.EXACTLY){
            endHeight=heightSize;
        }
        //以下根据需要求计算宽或者高或者宽和高的最终值
        //....

        //最终设置进去最终值
        setMeasuredDimension(endWidth, endHeight);
    }
以上只有//…这一部分才需要变化的其他都死不变的代码。
从上面的我们知道view的viewgroup和view都是一个view,measure流程都一样,不过,对于viewgroup来说,它很多时候在计算自身宽高的时候,往往需要根据情况去看下子view的大小才来设置宽高,类似与Linearlayout,子view是水平排列还是竖直排列,需求不同viewgroup的大下就是不同的。当然,viewgroup也可以完全不考虑子view直接写dp或者match,或者wrap,(从上面我们知道写wrap跟写match效果是一样的)。也就是,viewgroup在上面的 //…这一部中需去遍历子view大小然后根据需求设置viewgroup大小外其他都是跟单一view是一样的。
以下是重写viewgroup的onMeasure逻辑的流程
  @Override
    protected void onMeasure(int widthMeasureSpec, int heightMeasureSpec) {
        super.onMeasure(widthMeasureSpec, heightMeasureSpec);

        //最终测量长宽
        int endHeight = 0, endWidth = 0;

        //view的MeasureSpec
        int widthSize = MeasureSpec.getSize(widthMeasureSpec);
        int widthMode = MeasureSpec.getMode(widthMeasureSpec);
        int heightSize = MeasureSpec.getSize(heightMeasureSpec);
        int heightMode = MeasureSpec.getMode(heightMeasureSpec);

        //如果view宽高都设置了dp或者match那么不需要计算逻辑直接最终宽高就是view设置的dp或者match
        if (widthMode == MeasureSpec.EXACTLY && heightMode == MeasureSpec.EXACTLY) {
            endHeight = heightSize;
            endWidth = widthSize;
            setMeasuredDimension(endWidth, endHeight);
            return;
        }
        //如果view宽设置了dp或者match那么宽不需要计算逻辑view的宽就是view设置的dp或者match
        if (widthMode == MeasureSpec.EXACTLY) {
            endWidth = widthSize;
        }
        //如果view高设置了dp或者match那么高不需要计算逻辑view的高就是view设置的dp或者match
        if (heightSize == MeasureSpec.EXACTLY) {
            endHeight = heightSize;
        }

        //以下根据需要求计算宽或者高或者宽和高的最终值
        //测量子view确定最终的宽高
        measureChildren(widthMeasureSpec, heightMeasureSpec);
        //最终值是子view的宽全加起来,高全加起来,当然这里只是个模板样式,具体根据需求怎么来
        for (int i = 0; i < getChildCount(); i++) {
            View view = getChildAt(i);
            endHeight += view.getHeight();
            endWidth += view.getWidth();
        }
        //设置最终宽高
        setMeasuredDimension(endWidth, endHeight);
    }
从上可看出:
只有在 //以下根据需要求计算宽或者高或者宽和高的最终值 需要去根据子view来实现最终值外,其他的都是跟单一view一样的,
所以我们就只需关注如何测量子view来根据需求得到最终的值。
上面中 measureChildren(widthMeasureSpec, heightMeasureSpec); 是调用的系统方法。
参数是viewgroup的MeasureSpec
下面是measureChildren(widthMeasureSpec, heightMeasureSpec)源码
/**
遍历子View & 调用measureChild()
**/
protected void measureChildren(int widthMeasureSpec, int heightMeasureSpec) {
    // 参数说明:父视图的测量规格(MeasureSpec)

            final int size = mChildrenCount;
            final View[] children = mChildren;

            // 遍历所有子view
            for (int i = 0; i < size; ++i) {
                final View child = children[i];
                 // 调用measureChild()进行下一步的测量 ->>分析1
                if ((child.mViewFlags & VISIBILITY_MASK) != GONE) {
                    measureChild(child, widthMeasureSpec, heightMeasureSpec);
                }
            }
        }
/**
通过父视图的MeasureSpec 和每个子view布局参数LayoutParams调用getChildMeasureSpec得到每个子View的MeasureSpec,然后调用子View的measure()去得到子view的测量宽高
**/
  protected void measureChild(View child, int parentWidthMeasureSpec,
            int parentHeightMeasureSpec) {

        //  获取子viewLayoutParams
        final LayoutParams lp = child.getLayoutParams();
        // 根据父视图的MeasureSpec & 子viewLayoutParams,计算单个子View的MeasureSpec
        final int childWidthMeasureSpec = getChildMeasureSpec(parentWidthMeasureSpec, mPaddingLeft + mPaddingRight, lp.width);//参数为viewgroup的MeasureSpec,viewgroup的内边距,子view的宽高。
        final int childHeightMeasureSpec = getChildMeasureSpec(parentHeightMeasureSpec, mPaddingTop + mPaddingBottom, lp.height);
        //  调用子View的measure()去得到子view的测量宽高
        child.measure(childWidthMeasureSpec, childHeightMeasureSpec);
    }
    // 回到调用原处
通过measureChildren()一整个源码看下来我们就验证了,一开始的结论,view的MeasureSpec,值是根据view布局参数LayoutParams和父view的MeasureSpec
而来的,且view的MeasureSpec是靠父类去调用getChildMeasureSpec()得到view的MeasureSpec,调用
view.measure(childWidthMeasureSpec, childHeightMeasureSpec);对一个view进行测量需要先得到view的MeasureSpec,这个值考父类去调用getChildMeasureSpec()得到。
注意,在上面viewgroup中,调用了measureChildren()测量了每一个view的目的是为了根据子view的大小来安排view group的大小,但是测量的每一个子view的大小不包含子view在xml中设置的外边距,这个外边距也是viewgroup需要计算的范围。也就是我们需要得到每一个子vieiw的外边距
那能不能利用子view的LayoutParams得到layout_marginTop呢 ,其实是不可以的,因为 LayoutParams并没有包含view的margin属性,真正包含view的margin属性的是MarginLayoutParams 这个类,MarginLayoutParams 是LayoutParams的子类,所有 我们如果想得到margin 属性就得用MarginLayoutParams。
重写函数 然后返回得是MarginLayoutParams
 @Override
    protected LayoutParams generateLayoutParams(LayoutParams p) {
        return new MarginLayoutParams(p);
    }

    @Override
    public LayoutParams generateLayoutParams(AttributeSet attrs) {
        return new MarginLayoutParams(getContext(), attrs);
    }
也就是自定义viewgroup的重写onmeasure模板如下
    @Override
    protected void onMeasure(int widthMeasureSpec, int heightMeasureSpec) {
        super.onMeasure(widthMeasureSpec, heightMeasureSpec);

        //最终测量长宽
        int endHeight = 0, endWidth = 0;

        //view的MeasureSpec
        int widthSize = MeasureSpec.getSize(widthMeasureSpec);
        int widthMode = MeasureSpec.getMode(widthMeasureSpec);
        int heightSize = MeasureSpec.getSize(heightMeasureSpec);
        int heightMode = MeasureSpec.getMode(heightMeasureSpec);

        //如果view宽高都设置了dp或者match那么不需要计算逻辑直接最终宽高就是view设置的dp或者match
        if (widthMode == MeasureSpec.EXACTLY && heightMode == MeasureSpec.EXACTLY) {
            endHeight = heightSize;
            endWidth = widthSize;
            setMeasuredDimension(endWidth, endHeight);
            return;
        }
        //如果view宽设置了dp或者match那么宽不需要计算逻辑view的宽就是view设置的dp或者match
        if (widthMode == MeasureSpec.EXACTLY) {
            endWidth = widthSize;
        }
        //如果view高设置了dp或者match那么高不需要计算逻辑view的高就是view设置的dp或者match
        if (heightSize == MeasureSpec.EXACTLY) {
            endHeight = heightSize;
        }

        //以下根据需要求计算宽或者高或者宽和高的最终值
        //测量子view确定最终的宽高
        measureChildren(widthMeasureSpec, heightMeasureSpec);
        //最终值是子view的宽高并且外边距加起来,当然这里只是个模板样式,具体根据需求怎么来
        for (int i = 0; i < getChildCount(); i++) {
            View view = getChildAt(i);
            endHeight += view.getHeight()+((MarginLayoutParams)view.getLayoutParams()).topMargin+((MarginLayoutParams)view.getLayoutParams()).bottomMargin;
            endWidth += view.getWidth()+((MarginLayoutParams)view.getLayoutParams()).leftMargin+((MarginLayoutParams)view.getLayoutParams()).rightMargin;
        }

        //设置最终宽高
        setMeasuredDimension(endWidth, endHeight);
    }

@Override
    protected LayoutParams generateLayoutParams(LayoutParams p) {
        return new MarginLayoutParams(p);
    }

    @Override
    public LayoutParams generateLayoutParams(AttributeSet attrs) {
        return new MarginLayoutParams(getContext(), attrs);
    }
通过view的measure流程总结,继承一个view或者继承一个viewgroup都不需要一定重写onmeasure,对于单一view来说,它是因为在xml中设置了wrap效果跟match效果一样所以才需要去重写根据需求计算最终长高,而对于viewgroup来说,
它在因为在xml中设置了wrap效果跟match效果一样去重写根据需求计算最终长高,在测量这个长高的时候是根据需要去先测量每一个子view的大小,然后根据子view的大小根据需要设置自身的大小
layout流程

对于view的layout流程,只需要知道,当对于一个view不管是viewgroup还是单一view进行摆放的时候,调用的都是
view.layout(Left, Top, Right, Bottom); 4个参数就是这个view相对于父容器的位置,不是相对于手机的位置,而当调用
view.layout(Left, Top, Right, Bottom);对这个view进行摆放确认完后,内部会去再去自动调用onlayout,对这view的子view们进行摆放,如果是单一view就没啥事单一view里面是空的,如果是viewgroup里面就会有相应的摆放逻辑,
onLayout(boolean changed, int l, int t, int r, int b) 的参数中,都是表示父view的饿,也就是 view.layout(Left, Top, Right, Bottom)确定完view的位置后,然后把view的位置还有view相对于上一次摆放是否改变的情况通过 onLayout参数传给子view。
所以对于单一view并不需要重新onlayout,只有直接继承viewgroup才需要重新onlayout
draw

对于view的draw流程,只需要知道,当对于一个view不管是viewgroup还是单一view进行绘画的时候,调用的都是
view.draw()。调用后,内部会一步一步去调用具体绘画ondraw()函数,绘制完这个view后,如果这个view有子view就会调用dispathDraw()并且一个个去调用子view的draw然后ondraw()
至此 ,view的绘制流程讲解完。
自定义view
创建自定义view有以下几种
继承系统View控件 如继承自TextView等系统控件,在系统控件的基础功能上进行扩展
继承View 不复用系统控件逻辑,继承View进行功能定义
继承系统ViewGroup 如继承自LinearLayout等系统控件,在系统控件的基础功能上进行扩展
继承ViewViewGroup 不复用系统控件逻辑,继承ViewGroup进行功能定义
在讲解自定义view之前,先将自定义view属性。
自定义view属性
Android系统的控件以android开头的都是系统view自带的属性。而我们可以直接设置一些view属性供我们的自定义view使用,注意,自定义属性,只能给自定义view用,不能给系统view用
a、如何自定义属性
在res/values中的attrs.xml中自定义属性。例如
<declare-styleable name="TestView">
   <attr name="attrone" format="dimension"/>
   <attr name="attrtwo" format="string" >
    <enum name="one" value="0"/>
    <enum name="two" value="1"/>
   </attr>
</declare-styleable>
分析一下以上代码代表的含义:
declare-styleable: 表示一个属性组。它的name必须和你自定义view的名字相同。
attr:表示单独的一个属性。format代表属性的格式。格式包括很多种:比如颜色,数值,枚举等。 看下图:
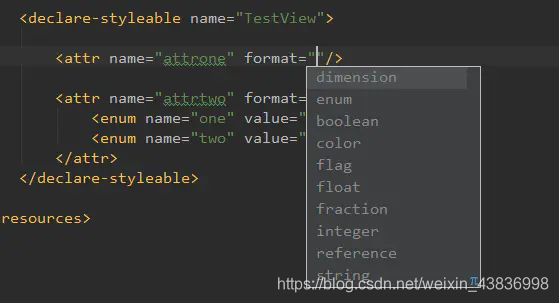
这里总结了属性的定义格式:
 1   <declare-styleable name="TextView">
         2  <attr  name ="属性1" format = "这个属性的取值格式">
            3  <enum name="取值1" value="程序中对应的值"/>
               <enum name="取值1" value="程序中对应的值"/>
               <enum name="取值1" value="程序中对应的值"/>
               <enum name="取值1" value="程序中对应的值"/>
            4  <flag name="取值1" value="程序中对应的值" />
               <flag name="取值2" value="程序中对应的值" />
               <flag name="取值3" value="程序中对应的值" />
    </declare-styleable>
其中3和4是可以省略的,3就是我们提前给这个属性设置了几个值,可以直接在这几个值中取。与4的区别就是:flag可以在布局文件中这样使用 取值1|取值2 也就是说可以取多个值。
b、如何使用自定义属性?
首先在使用自定view的xml文件里加入命名空间:xmlns:app=“http://schemas.android.com/apk/res-auto”
加入后,才可以在在自定view上使用app:,而android:是系统的属性。如:
<com.mg.axe.androiddevelop.view.TestView
   android:layout_width="match_parent"
   android:layout_height="match_parent"
   app:attrone="10dp"
   app:attrtwo="two"    />
c、如何获取自定义属性 ?
在自定义view的构造函数内,利用TypedArray获取相对应的属性
typedArray.getInt(int index, float defValue);
typedArray.getDimension(int index, float defValue);
typedArray.getBoolean(int index, float defValue);
typedArray.getColor(int index, float defValue);
typedArray.getString(int index)
typedArray.getDrawable(int index);
typedArray.getResources();
参数index 为你自定义属性组里设置的属性
格式为R.styleable…
参数defValue 为默认值
自定view的时候,会有4个构造函数,例如如下
 public CarsonView(Context context) {
        super(context);
        // 如果View是在Java代码里面new的,则调用第一个构造函数
    }


    public  CarsonView(Context context, AttributeSet attrs) {
        super(context, attrs);
        // 如果View是在xml里写入,则调用第二个构造函数
// 自定义属性在这个函数内获得
    }


    public  CarsonView(Context context, AttributeSet attrs, int defStyleAttr) {
        super(context, attrs, defStyleAttr);
        // 不会自动调用
// 一般是在第二个构造函数里主动调用
// 如View有style属性时
    }


    public  CarsonView(Context context, AttributeSet attrs, int defStyleAttr, int defStyleRes) {
        super(context, attrs, defStyleAttr, defStyleRes);
           //API21之后才使用
    // 不会自动调用
    // 一般是在第二个构造函数里主动调用
    // 如View有style属性时
    }
其中常用的就第一二个,而三四并不常用,其中的参数 int defStyleAttr, int defStyleRes,不明白再去百度。
注意 使用完TypedArray 记得一定要 typedArray.recycle();
TypedArray的使用场景之一,就是上述的自定义View,会随着 Activity的每一次Create而Create,因此,需要系统频繁的创建array,对内存和性能是一个不小的开销,如果不使用池模式,每次都让GC来回收,很可能就会造成OutOfMemory。
具体使用如下:
<declare-styleable name="TestView">
        <attr name="attrone" format="dimension"/>
        <attr name="attrtwo" format="string" >
            <enum name="one" value="0"/>
            <enum name="two" value="1"/>
        </attr>
    </declare-styleable>


    <declare-styleable name="RadialGradientButton">
        <attr name="minRadius" format="integer"/>
        <attr name="centerColor" format="reference" />
        <attr name="edgeColor" format="reference" />
    </declare-styleable>
 <com.example.administrator.module.CustomView.RadialGradientButton
       android:layout_width="50dp"
       android:layout_height="50dp"
       app:layout_constraintLeft_toLeftOf="parent"
       app:layout_constraintTop_toTopOf="parent"
       app:minRadius="20"
       app:centerColor="@color/colorPrimaryDark"
       app:edgeColor="@color/colorAccent"></com.example.administrator.module.CustomView.RadialGradientButton>
 private void init( Context context,AttributeSet attrs) {


        setLayerType(LAYER_TYPE_SOFTWARE, null);

        TypedArray typedArray = context.obtainStyledAttributes(attrs, R.styleable.RadialGradientButton);
        minRadius=typedArray.getInt(R.styleable.RadialGradientButton_minRadius,10);
        centerColor= typedArray.getResourceId(R.styleable.RadialGradientButton_centerColor,0x00FFFFFF);
        edgeColor = typedArray.getResourceId(R.styleable.RadialGradientButton_edgeColor, 0xFF58FAAC);
        typedArray.recycle();

    }

    public RadialGradientButton(Context context, AttributeSet attrs) {


        super(context, attrs);
        init(context,attrs);
    }
ok,继续讲自定view
继承View子类,以TextVIew为例子。
需求:为文字TextVIew设置背景,并在布局中间添加一条横线。
public class LineTextView extends TextView {

    //定义画笔,用来绘制中心曲线
    private Paint mPaint;

    /**
     * 创建构造方法
     * @param context
     */
    public LineTextView(Context context) {
        super(context);
        init();
    }

    public LineTextView(Context context, @Nullable AttributeSet attrs) {
        super(context, attrs);
        init();
    }

    public LineTextView(Context context, @Nullable AttributeSet attrs, int defStyleAttr) {
        super(context, attrs, defStyleAttr);
        init();
    }

    private void init() {
        mPaint = new Paint();
        mPaint.setColor(Color.BLACK);
    }

    //重写draw方法,绘制我们需要的中间线以及背景
    @Override
    protected void onDraw(Canvas canvas) {
        super.onDraw(canvas);
        int width = getWidth();
        int height = getHeight();
        mPaint.setColor(Color.BLUE);
        //绘制方形背景
        RectF rectF = new RectF(0,0,width,height);
        canvas.drawRect(rectF,mPaint);
        mPaint.setColor(Color.BLACK);
        //绘制中心曲线,起点坐标(0,height/2),终点坐标(width,height/2)
        canvas.drawLine(0,height/2,width,height/2,mPaint);
    }
}
然后再xml中使用:
<?xml version="1.0" encoding="utf-8"?>
<LinearLayout xmlns:android="http://schemas.android.com/apk/res/android"
    xmlns:app="http://schemas.android.com/apk/res-auto"
    xmlns:tools="http://schemas.android.com/tools"
    android:layout_width="match_parent"
    android:layout_height="match_parent"
    tools:context=".MainActivity"
    android:orientation="vertical">
<com.example.administrator.module.CustomView.LineTextView
    android:layout_width="50dp"
    android:layout_height="30dp"
    android:text="sssdf"/>

</LinearLayout>
继承View子类 ,并不需要重写measure,layout流程,因为我们希望复用相应系统控件的measure,layout,只需要重写draw流程,具体为onDraw函数,并通过笔画画出需要的效果。
b.直接继承View
public class RectView extends View {
    //定义画笔
    private Paint mPaint = new Paint();

    /**
     * 实现构造方法
     *
     * @param context
     */
    public RectView(Context context) {
        super(context);
        init();
    }

    public RectView(Context context, @Nullable AttributeSet attrs) {
        super(context, attrs);
        init();
    }

    public RectView(Context context, @Nullable AttributeSet attrs, int defStyleAttr) {
        super(context, attrs, defStyleAttr);
        init();
    }

    private void init() {
        mPaint.setColor(Color.BLUE);

    }

 @Override
    protected void onMeasure(int widthMeasureSpec, int heightMeasureSpec) {
        super.onMeasure(widthMeasureSpec, heightMeasureSpec);
        //最终测量长宽
        int endHeight=0, endWidth=0;

        //view的MeasureSpec
        int widthSize = MeasureSpec.getSize(widthMeasureSpec);
        int widthMode = MeasureSpec.getMode(widthMeasureSpec);
        int heightSize = MeasureSpec.getSize(heightMeasureSpec);
        int heightMode = MeasureSpec.getMode(heightMeasureSpec);

        //如果view宽高都设置了dp或者match那么不需要计算逻辑直接最终宽高就是view设置的dp或者match
        if(widthMode==MeasureSpec.EXACTLY&&heightMode==MeasureSpec.EXACTLY){
            endHeight=heightSize;
            endWidth=widthSize;
            setMeasuredDimension(endWidth, endHeight);
            return;
        }
        //如果view宽设置了dp或者match那么宽不需要计算逻辑view的宽就是view设置的dp或者match
        if (widthMode == MeasureSpec.EXACTLY){
            endWidth=widthSize;
        }
        //如果view高设置了dp或者match那么高不需要计算逻辑view的高就是view设置的dp或者match
        if (heightSize == MeasureSpec.EXACTLY){
            endHeight=heightSize;
        }
        //以下根据需要求计算宽或者高或者宽和高的最终值
        //....

        //最终设置进去最终值
        setMeasuredDimension(endWidth, endHeight);
    }

    /**
     * 重写draw方法
     *
     * @param canvas
     */
    @Override
    protected void onDraw(Canvas canvas) {
        super.onDraw(canvas);
        //获取各个编剧的padding值
        int paddingLeft = getPaddingLeft();
        int paddingRight = getPaddingRight();
        int paddingTop = getPaddingTop();
        int paddingBottom = getPaddingBottom();
        //获取绘制的View的宽度
        int width = getWidth() - paddingLeft - paddingRight;
        //获取绘制的View的高度
        int height = getHeight() - paddingTop - paddingBottom;
        //绘制View,左上角坐标(0+paddingLeft,0+paddingTop),右下角坐标(width+paddingLeft,height+paddingTop)
        canvas.drawRect(0 + paddingLeft, 0 + paddingTop, width + paddingLeft, height + paddingTop, mPaint);
    }
}
直接继承view需要重写 ondraw,看情况重写onmeasure()
问:为什么直接继承view就有可能需要重写onmeasure,而继承系统的view就不需要呢?
因为直接继承view系统源码已经写好了当view在xml设置wrap不出现match的情况了。
c 继承系统viewgroup
注意继承系统viewgroup的时候。默认是不会调用ondraw方法的,如果想要开启ondraw方法,需要调用setWillNotDraw(false);
就是将多个控件组合成为一个新的控件,主要解决多次重复使用同一类型的布局。如我们顶部的HeaderView以及dailog等,我们都可以把他们组合成一个新的控件。
我们通过一个自定义HeaderView实例来了解自定义组合控件的用法。
- 编写布局文件
<RelativeLayout xmlns:android="http://schemas.android.com/apk/res/android"
    android:layout_width="match_parent"
    android:id="@+id/header_root_layout"
    android:layout_height="45dp"
    android:background="#827192">

    <ImageView
        android:id="@+id/header_left_img"
        android:layout_width="45dp"
        android:layout_height="45dp"
        android:layout_alignParentLeft="true"
        android:paddingLeft="12dp"
        android:paddingRight="12dp"
        android:src="@drawable/back"
        android:scaleType="fitCenter"/>

    <TextView
        android:id="@+id/header_center_text"
        android:layout_width="wrap_content"
        android:layout_height="wrap_content"
        android:layout_centerInParent="true"
        android:lines="1"
        android:maxLines="11"
        android:ellipsize="end"
        android:text="title"
        android:textStyle="bold"
        android:textColor="#ffffff"/>

    <ImageView
        android:id="@+id/header_right_img"
        android:layout_width="45dp"
        android:layout_height="45dp"
        android:layout_alignParentRight="true"
        android:src="@drawable/add"
        android:scaleType="fitCenter"
        android:paddingRight="12dp"
        android:paddingLeft="12dp"/>

</RelativeLayout>
2.在java代码中编写
public class YFHeaderView extends RelativeLayout {

    private ImageView img_left;
    private TextView text_center;
    private ImageView img_right;
    private RelativeLayout layout_root;
    private Context context;
    String element;

    private int showView;

    public YFHeaderView(Context context) {
        super(context);
        this.context = context;
        initView(context);
    }

    public YFHeaderView(Context context, AttributeSet attrs) {
        super(context, attrs);
        this.context = context;
        initView(context);
        initAttrs(context, attrs);
    }

    public YFHeaderView(Context context, AttributeSet attrs, int defStyleAttr) {
        super(context, attrs, defStyleAttr);
        this.context = context;
        initView(context);
        initAttrs(context, attrs);
    }

    private void initAttrs(Context context, AttributeSet attrs) {
        TypedArray mTypedArray = context.obtainStyledAttributes(attrs, R.styleable.HeaderBar);
        String title = mTypedArray.getString(R.styleable.HeaderBar_title_text);
        if (!TextUtils.isEmpty(title)) {
            text_center.setText(title);
        }
        showView = mTypedArray.getInt(R.styleable.HeaderBar_show_views, 0x26);
        text_center.setTextColor(mTypedArray.getColor(R.styleable.HeaderBar_title_text_clolor, Color.WHITE));
        mTypedArray.recycle();
        showView(showView);

    }

    private void showView(int showView) {
        Long data = Long.valueOf(Integer.toBinaryString(showView));
        element = String.format("%06d", data);
        for (int i = 0; i < element.length(); i++) {
            if(i == 0) ;
            if(i == 1) text_center.setVisibility(element.substring(i,i+1).equals("1")? View.VISIBLE:View.GONE);
            if(i == 2) img_right.setVisibility(element.substring(i,i+1).equals("1")? View.VISIBLE:View.GONE);
            if(i == 3) ;
            if(i == 4) img_left.setVisibility(element.substring(i,i+1).equals("1")? View.VISIBLE:View.GONE);
            if(i == 5) ;
        }

    }

    private void initView(final Context context) {
        LayoutInflater.from(context).inflate(R.layout.view_header, this, true);
        img_left = (ImageView) findViewById(R.id.header_left_img);
        img_right = (ImageView) findViewById(R.id.header_right_img);
        text_center = (TextView) findViewById(R.id.header_center_text);
        layout_root = (RelativeLayout) findViewById(R.id.header_root_layout);
        layout_root.setBackgroundColor(Color.BLACK);
        text_center.setTextColor(Color.WHITE);

        img_left.setOnClickListener(new OnClickListener() {
            @Override
            public void onClick(View view) {
                Toast.makeText(context, element + "", Toast.LENGTH_SHORT).show();
            }
        });
    }

    private void setTitle(String title) {
        if (!TextUtils.isEmpty(title)) {
            text_center.setText(title);
        }
    }


    private void setLeftListener(OnClickListener onClickListener) {
        img_left.setOnClickListener(onClickListener);
    }

    private void setRightListener(OnClickListener onClickListener) {
        img_right.setOnClickListener(onClickListener);
    }

}
3.在需要的布局文件中进行设置
    <com.example.yf.view.YFHeaderView
        android:layout_width="match_parent"
        android:layout_height="45dp"
        app:title_text="标题"
        app:show_views="center_text|left_img|right_img">

    </com.example.yf.view.YFHeaderView>
继承系统viewgroup 并不需要重写什么函数,它只是把多个控件给组合一个控件,利用的流程也是系统viewgroup的流程,所以并不需要重写。
d。继承ViewGroup
继承ViewGroup一定需要重写onlayout去摆放子view的位置,看情况去重写onmeasrue()去设置本身的大小
上一个自定义流式布局的例子:
package com.example.test;

import android.content.Context;
import android.util.AttributeSet;
import android.util.Log;
import android.view.View;
import android.view.ViewGroup;

import java.util.ArrayList;
import java.util.List;

public class FlowLayout extends ViewGroup {
    //记录每一行里面那一行中最高的高度,FlowLayout就是以每一行中最高的item为高的
    private List<Integer> arrayLineHeight = new ArrayList<>();


    public FlowLayout(Context context) {
        super(context);
    }

    public FlowLayout(Context context, AttributeSet attrs) {
        super(context, attrs);
    }

    public FlowLayout(Context context, AttributeSet attrs, int defStyleAttr) {
        super(context, attrs, defStyleAttr);

    }


    @Override
    protected void onMeasure(int widthMeasureSpec, int heightMeasureSpec) {
        super.onMeasure(widthMeasureSpec, heightMeasureSpec);
        arrayLineHeight.clear();
        //最终测量长宽
        int endHeight = 0;
        int endWidth = 0;

        //view的MeasureSpec
        int widthSize = MeasureSpec.getSize(widthMeasureSpec);
        int widthMode = MeasureSpec.getMode(widthMeasureSpec);
        int heightSize = MeasureSpec.getSize(heightMeasureSpec);
        int heightMode = MeasureSpec.getMode(heightMeasureSpec);

        //如果view宽高都设置了dp或者match那么不需要计算逻辑直接最终宽高就是view设置的dp或者match
        if (widthMode == MeasureSpec.EXACTLY && heightMode == MeasureSpec.EXACTLY) {
            endHeight = heightSize;
            endWidth = widthSize;
            setMeasuredDimension(endWidth, endHeight);
            return;
        }
        //如果view宽设置了dp或者match那么宽不需要计算逻辑view的宽就是view设置的dp或者match
        if (widthMode == MeasureSpec.EXACTLY) {
            endWidth = widthSize;
        }
        //如果view高设置了dp或者match那么高不需要计算逻辑view的高就是view设置的dp或者match
        if (heightSize == MeasureSpec.EXACTLY) {
            endHeight = heightSize;
        }
        //如果宽或者高设置的wrap,那么宽或者高就肯定要根据情况去计算
        if (widthMode == MeasureSpec.AT_MOST || heightMode == MeasureSpec.AT_MOST) {
            //以下根据需要求计算宽或者高或者宽和高的最终值
            //测量子view确定最终的宽高
            measureChildren(widthMeasureSpec, heightMeasureSpec);
            //如果flowLayout一个空间也没,既然设置了wrap,那么这个flowLayout高就为0.
            if (getChildCount() == 0) {
                endHeight = 0;
            } else {
                //onMeasure的目的是测量view的最终宽高,而测量view的子view区域只是view的其中一部分,所以一开始view的最终宽高就得加上view的内边距
                endHeight = endHeight + getPaddingTop() + getPaddingBottom();

                int lineHeight = 0;
                int lineWidth = 0;

                for (int i = 0; i < getChildCount(); i++) {
                    //不断累加每一项目的长度以及它再xml设置的左右边距
                    lineWidth = lineWidth + getChildAt(i).getMeasuredWidth() + ((MarginLayoutParams) getChildAt(i).getLayoutParams()).leftMargin + ((MarginLayoutParams) getChildAt(i).getLayoutParams()).rightMargin;

                    //如果加起来的长度大于最大长,那么证明需要换行,那么数据一切清空,记录上一行的最大高度,重新来过
                    if (lineWidth > endWidth - getPaddingRight() - getPaddingLeft()) {
                        lineWidth = 0;//清空并且再次计算新的一行的长度。
                        endHeight = endHeight + lineHeight;//总长添加上一行的最大值
                        arrayLineHeight.add(lineHeight);//记录上一行的最高高度
                        lineHeight = 0;//lineHeight清空
                        i = i - 1;//回退上一格,因为暴露出来的一项需要拿来添加到新的一行的宽度,如果不回退,那么露出来的一项会被忽略这不合理。
                    }else {
                        //lineHeight表示当前行最大的那个item的高度,当然需要包含上下边距
                        lineHeight = Math.max(lineHeight, getChildAt(i).getMeasuredHeight() + ((MarginLayoutParams) getChildAt(i).getLayoutParams()).topMargin + ((MarginLayoutParams) getChildAt(i).getLayoutParams()).bottomMargin);
                    }
                }
                //遍历完所有的item后,也就是把所有的上一行都加起来了,最后就需要把最后一行的最大item加起来了
                arrayLineHeight.add(lineHeight);//记录最后一行的最高高度
                endHeight = endHeight + lineHeight;//总长添加最后一行的最大值
            }
        }
        setMeasuredDimension(endWidth, endHeight);
        Log.d("zjs", "onMeasure:endWidth " + endWidth + "onMeasure:endHeight " + endHeight);
    }


    @Override
    protected void onLayout(boolean changed, int l, int t, int r, int b) {

        int parentPaddingLeft = getPaddingLeft();
        int parentPaddingTop = getPaddingTop();
        int parentPaddingRight = getPaddingRight();
        int parentPaddingBottom = getPaddingBottom();

        //每个孩子固定的变量,而以oldTop,oldLeft这两个跟随移动的值来给予每个孩子正确的值
        int childLeft = 0;
        int childTop = 0;
        int childRight = 0;
        int childBottom = 0;

        //这个变量,用来记录每个item的摆放前它距离它父view上边距的距离,而一开始这个距离就应该等于父view设置的上边距
        int oldTop = parentPaddingTop;
        //这个变量,用来记录每个item的摆放前它距离它父view左边距的距离,而一开始这个距离就应该等于父view设置的左边距
        int oldLeft = parentPaddingLeft;

        int j = 0;

        for (int i = 0; i < getChildCount(); i++) {
            View view = getChildAt(i);

            //每个item在摆放前的左边距等与他们以左到父view的长度+他们每个人自己设置的左边距
            childLeft = oldLeft + ((MarginLayoutParams) view.getLayoutParams()).leftMargin;
            //每个item在摆放前的上边距等与他们以上行列的高度+他们每个人自己设置的上边距
            childTop = oldTop + ((MarginLayoutParams) view.getLayoutParams()).topMargin;

            childRight = childLeft + view.getMeasuredWidth();
            childBottom = childTop + view.getMeasuredHeight();

            //如果到达了换行的那一格时候,oldLeft要回到初始值,oldTop要是以上的高度,然后孩子的四个位置重新赋值。
            if (childRight >= getMeasuredWidth() - parentPaddingLeft - parentPaddingRight) {
                oldLeft = parentPaddingLeft;
                oldTop += arrayLineHeight.get(j);

                //每个item在摆放前的左边距等与他们以左到父view的长度+他们每个人自己设置的左边距
                childLeft = oldLeft + ((MarginLayoutParams) view.getLayoutParams()).leftMargin;
                //每个item在摆放前的上边距等与他们以上行列的高度+他们每个人自己设置的上边距
                childTop = oldTop + ((MarginLayoutParams) view.getLayoutParams()).topMargin;

                childRight = childLeft + view.getMeasuredWidth();
                childBottom = childTop + view.getMeasuredHeight();

            }
            view.layout(childLeft, childTop, childRight, childBottom);
            //oldLeft要是当前view的childRight+当前view设置的右边距。这样下一个view摆放的位置前的oldLeft才是正确的值
            oldLeft = childRight + ((MarginLayoutParams) view.getLayoutParams()).rightMargin;

        }
    }

    @Override
    protected LayoutParams generateLayoutParams(LayoutParams p) {
        return new MarginLayoutParams(p);
    }

    @Override
    public LayoutParams generateLayoutParams(AttributeSet attrs) {
        return new MarginLayoutParams(getContext(), attrs);
    }
}
补充
自定义View绘制流程函数调用链(简化版)
这里有个onSizeChanged 方法。这个方法很方便 ,这个函数在视图大小发生改变时调用。它的目的是确定view最终的宽高,
@Override
protected void onSizeChanged(int w, int h, int oldw, int oldh) {


    super.onSizeChanged(w, h, oldw, oldh);
}
可以看出,它又四个参数,分别为 宽度,高度,上一次宽度,上一次高度。
而且也要注意 invalidate()是只重新掉了ondraw
特别注意:
api25-24:执行2次onMeasure、2次onLayout、1次onDraw,理论上执行三次测量,但由于测量优化策略,第三次不会执行onMeasure。
api23-21:执行3次onMeasure、2次onLayout、1次onDraw,forceLayout标志位,离奇被置为true,导致无测量优化。
api19-16:执行2次onMeasure、2次onLayout、1次onDraw,原因第一次performTranversals中只会执行measureHierarchy中的performMeasure,forceLayout标志位,离奇被置位true,导致无测量优化。
总之,造成这个现象的根本原因是performTranversal函数在View的测量流程中会执行2次。
具体原因看:
链接:https://www.jianshu.com/p/733c7e9fb284
具体是调用了几次不好说,还是得通过打印日记来说明。
为什么要说这个呢。因为你在自定义做计算逻辑的时候,很可能因为类似onmesure中调用了两次导致数据错乱情况,或者造成内存抖动的情况,所以在做自定义view重写函数的时候先打印logs有几次再后面继续。
比如如下的一种情况要这么做:
再new Arraylist的时候,最好放在属性上,然后再每次onmesure的时候去clear。首先,如果不clear,会因为多次调用onmesure,导致你的数据错乱,而如果选择直接onmesure里面去new Arraylist就会造成内存抖动,内存抖动就是内存不断的创建释放一上一下的。
public class MyLayout extends ViewGroup {

private List<Integer>list= new ArrayList<>();

    public MyLayout(Context context) {
        super(context);
    }

    public MyLayout(Context context, AttributeSet attrs) {
        super(context, attrs);
    }

    public MyLayout(Context context, AttributeSet attrs, int defStyleAttr) {
        super(context, attrs, defStyleAttr);

    }

    @Override
    protected void onMeasure(int widthMeasureSpec, int heightMeasureSpec) {
        super.onMeasure(widthMeasureSpec, heightMeasureSpec);
          list.clear();
    }

    @Override
    protected void onLayout(boolean changed, int l, int t, int r, int b) {

    }
}