在vue3中自定义实现MessageBox弹窗
element的
ElMessageBox.alertElMessageBox.confirm… 方法还是很好用的。不过element自带的msgbox弹窗有限,自定义过于复杂,如何将自定义的组件封装成MessageBox弹窗的组件是本文的重点。
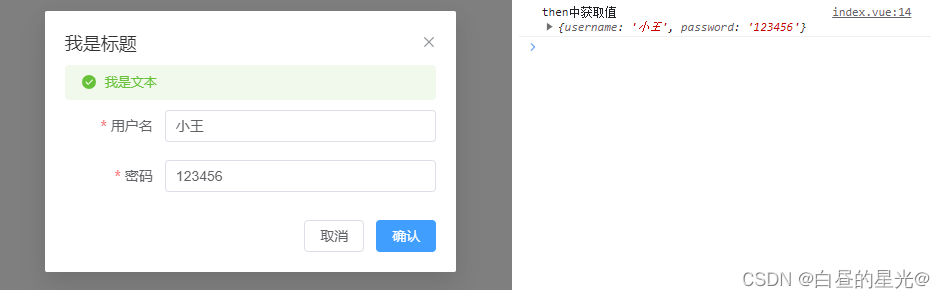
首先看下效果
<!-- index.vue -->
<template>
    <div>
        <el-button type="primary" @click="open">调用</el-button>
    </div>
</template>

<script setup>
    import {

       myMsgBox } from './components/myMsgBox.js';
    function open() {


        myMsgBox('我是文本', '我是标题', {


            showIcon:true,
            type:'success',
        }).then((data)=>{


            console.log('then中获取值',data);
        }).catch(()=>{


            console.log('catch就是关闭弹窗');
        })
    }

</script>
可能需要的知识
我的实现思路
- 首先封装一个
myForm组件
可以封装任意内容,和普通组件一样,这里封装了一个登录表单
<!-- myForm.vue -->
<template>
    <el-dialog v-model="dialogVisible" class="customer-container" :title="title" width="30%" @close="dialogClose">
        <el-alert style="margin-bottom: 10px" :show-icon="options.showIcon" :title="text" :type="options.type" :closable="false">
        </el-alert>
        <el-form label-width="100px" ref="formRef" :model="formData" :rules="formRules">
            <el-form-item label="用户名" prop="username">
                <el-input v-model="formData.username" />
            </el-form-item>
            <el-form-item label="密码" prop="password">
                <el-input v-model="formData.password" />
            </el-form-item>
        </el-form>
        <template #footer>
            <span>
                <el-button @click="dialogVisible = false">取消</el-button>
                <el-button type="primary" @click="submitForm"> 确认 </el-button>
            </span>
        </template>
    </el-dialog>
</template>

<script setup>
    import {


        ref,
        defineProps,
        defineExpose,
        defineEmits
    } from 'vue';
    import {


        ElMessageBox
    } from 'element-plus';

    // 定义props
    const {


        title,
        text,
        options
    } = defineProps({


        title: {


            type: String,
            default: '标题',
        },
        text: {


            type: String,
            default: '文本',
        },
        options: {


            type: Object,
            default:{


                type:'success',
                showIcon:true,
            }
        }
    });
    // 定义emits
    const emit = defineEmits(['submit','closed']);

    // 定义表单数据
    let dialogVisible = ref(false);
    let formData = ref({


        username: '',
        password: '',
    });
    let formRef = ref();
    let formRules = ref({


        username: [{


            required: true,
            message: '请输入账号',
            trigger: 'blur',
        }, ],
        password: [{


            required: true,
            message: '请输入密码',
            trigger: 'blur',
        }, ],
    });

    // 重置表单
    function resetForm(params) {


        formData.value = {


            username: '',
            password: '',
        };
    }

    // 提交数据
    function submitForm(params) {


        formRef.value.validate((valid, fields) => {


            if (valid) {


                dialogVisible.value = false;
                emit('submit', JSON.parse(JSON.stringify(formData.value)));
            }
        });
    }

    // 关闭弹窗
    function dialogClose(){


        emit('closed');
    }

    defineExpose({


        showDialog: () => {


            resetForm();
            dialogVisible.value = true;
        },
        hideDialog: () => {


            dialogVisible.value = false;
        },
    });
</script>
<style>
    /* 由于直接添加到body所以没有使用scoped */
    .customer-container .el-dialog__body {


        padding-top: 0;
        padding-bottom: 0;
    }
</style>
- 然后封装
myMsgBox方法重点,重点,重点
myMsgBox方法接受三个参数,返回一个promise对象。
在监听到onSubmit时resolve并返回输入的数据,在监听到onClosed时需要销毁实例
我们首先会在body中插入一个div容器,然后创建一个app节点,再使用app.mount方法将新创建的虚拟DOM挂载到这个容器上
关键在于如何创建虚拟DOM,一般来说我们都是通过template模板的方式。例如
<template>
  <div>
    <el-button type="primary" @click="open">调用</el-button>
    <myForm ref="myFormRef" title="我是标题" text="我是文本" :options="{ showIcon: true, type: 'success' }" @submit="submit"></myForm>
  </div>
</template>
想要再js中创建虚拟DOM们就需要使用createApp,同时使用h()函数将属性和事件绑定到了组件上。
完整代码如下
/* myMsgBox.js */
import ElementPlus from 'element-plus';
import myForm from './myForm.vue';
import {


    h,
    ref,
    createApp
} from "vue";

export function myMsgBox(text, title, options) {


    return new Promise((resolve, reject) => {


        // 保存组件实例
        let myFormRef = ref();
        // 创建容器
        const mountNode = document.createElement('div');
        // 将容器插入到body内
        document.body.appendChild(mountNode);
        // 创建节点
        const app = createApp({


            render() {


                // 这里使用了h()函数,等价于<myForm :title="title" :text="text" :options="options" @submit="..." @onClosed="..."></myForm>
                return h(myForm, {


                    ref: myFormRef,
                    // 参数
                    title: title,
                    text: text,
                    // 配置项
                    options: options,
                    // 事件
                    onSubmit: (data) => {


                        resolve(data);
                    },
                    onClosed: () => {


                        // 这里将容器给清除掉( 至于是否还存在其他内存泄漏,就不太清楚了 )
                        setTimeout(() => {


                            mountNode.remove();
                        }, 500);
                        reject();

                    }
                })
            }
        });
        // 由于内部使用了el-dialog所以必须挂载否则解析错误
        app.use(ElementPlus);
        // 挂载容器,instance就是容器的实例
        let instance = app.mount(mountNode);
        // 打开弹窗
        myFormRef.value.showDialog();
    })
}
最后我们来对比一下和直接使用组件的区别
通过方法调用
<!-- index.vue -->
<template>
    <div>
        <el-button type="primary" @click="open">调用</el-button>
    </div>
</template>

<script setup>
    import {

       myMsgBox } from './components/myMsgBox.js';

    function open() {


        myMsgBox('我是文本', '我是标题', {


            showIcon:true,
            type:'success',
        }).then((data)=>{


            console.log('then中获取值',data);
        }).catch(()=>{


            console.log('catch就是关闭弹窗');
        })
    }

</script>
先模板引入再调用
<!-- index.vue -->
<template>
  <div>
    <el-button type="primary" @click="open">调用</el-button>
    <myForm ref="myFormRef" title="我是标题" text="我是文本" :options="{ showIcon: true, type: 'success' }" @submit="submit"></myForm>
  </div>
</template>

<script setup>
import myForm from "./components/myForm.vue";
import {

       h, ref, createApp } from "vue";

let myFormRef = ref();

function open() {


  myFormRef.value.showDialog();
}

function submit(data) {


  console.log(data);
}
</script>
好像也没省多少代码…