分支简介
前言
很多版本控制系统都有分支这个概念
使用分支意味着可以将日常工作从主线上脱离,从而避免影响主线
Git 鼓励在工作流程中频繁使用分支和合并
Git 是如何保存数据的
Git 保存的不是文件的变化或者差异,而是一系列不同时刻的快照
在进行提交操作时,Git 会保存一个提交对象(commit object)
提交对象会包含一个指向暂存内容快照的指针,还包含了作者的姓名和邮箱、提交时输入的信息以及指向它的父对象的指针
首次提交产生的提交对象没有父对象,普通提交操作产生的提交对象有一个父对象, 而由多个分支合并产生的提交对象有多个父对象
实际栗子
假设现在有一个工作目录,里面包含了三个将要被暂存和提交的文件
暂存操作会为每一个文件计算校验和( SHA-1 哈希算法)
然后会把当前版本的文件快照保存到 Git 仓库中 (Git 使用 blob 对象来保存它们)
扫描二维码关注公众号,回复: 16067965 查看本文章
最终将校验和加入到暂存区域等待提交
git add README test.rb LICENSE
git commit -m 'The initial commit of my project'
执行 git commit 后的步骤
Git 会先计算每一个子目录(本例中只有项目根目录)的校验和
然后在 Git 仓库中这些校验和保存为树对象
commit 提交对象包含 tree 对象的指针,GIt 就可以在需要的时候重现此次保存的快照
Git 仓库中有五个对象
三个 blob 对象:保存着文件快照
一个 tree 对象:记录着目录结构和 blob 对象索引
一个 commit 对象:包含着指向树对象的指针和所有提交信息
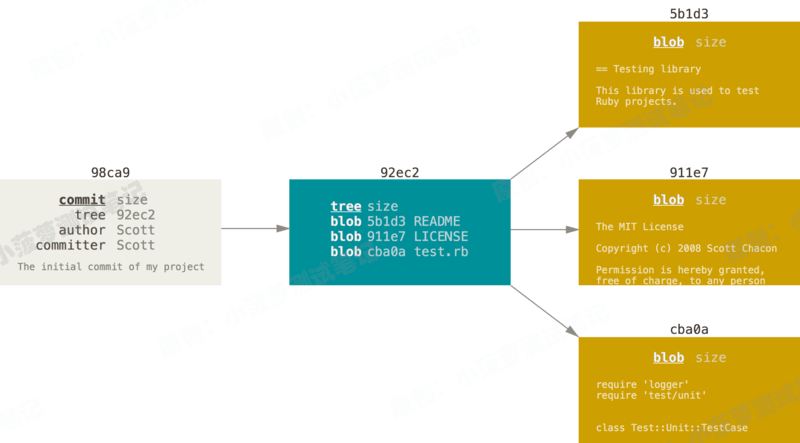
提交对象和它的树结构
做些修改后再次提交,那么这次产生的提交对象会包含一个指向上次提交对象(父对象)的指针。
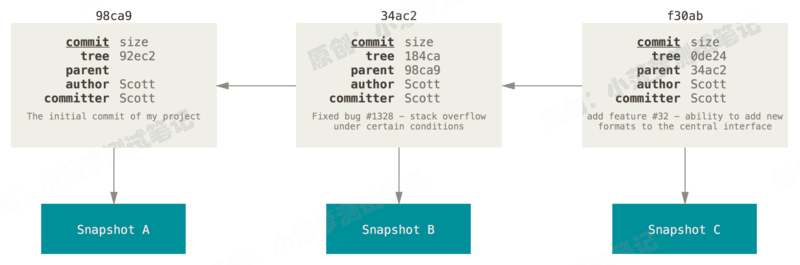
多个提交对象和它们的父对象
Git 的分支的本质
仅仅是指向提交对象的可变指针
Git 的默认分支名字是 master
每次提交后,master 分支的指针都会指向最新的提交对象
master 分支会在每次提交时自动向前移动
Git 的 master 分支并不是一个特殊分支,它就跟其它分支完全没有区别
之所以几乎每一个仓库都有 master 分支,是因为 git init 命令默认创建它
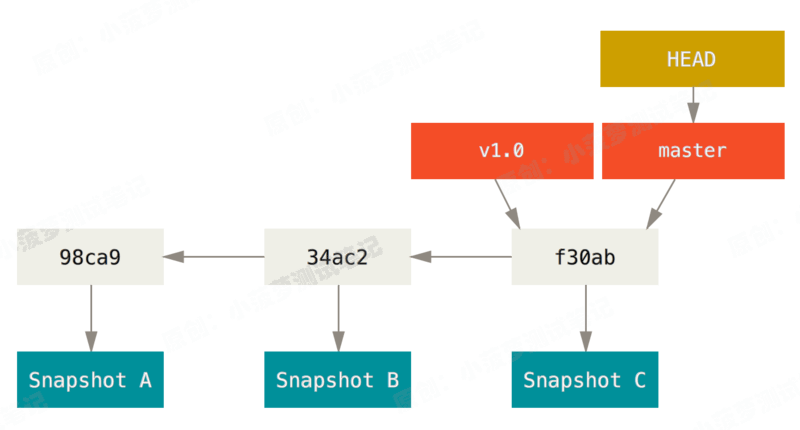
分支及其提交历史
创建分支
它只是为你创建了一个可以移动的新的指针
创建一个 testing 分支
git branch testing这会在当前所在的提交对象上创建一个指针
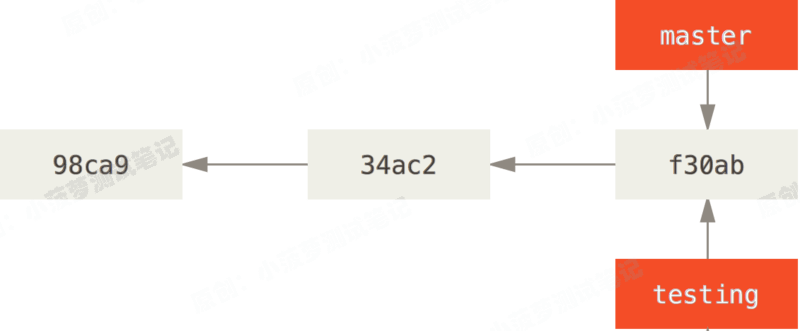
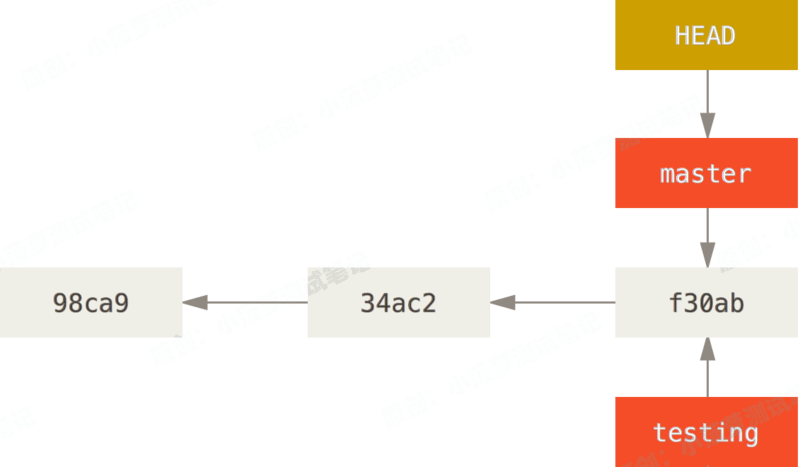
两个指向相同提交历史的分支
Git 如何知道当前在哪一个分支上呢?
它有一个名为 HEAD 的特殊指针
在 Git 中,它是一个指针,指向当前所在的本地分支
这里本地当前是 master 分支,因为 git branch 命令仅仅创建一个新分支,并不会自动切换到新分支中去
切换分支
第1种方式git checkout <分支名>
第2种方式git switch <分支名>
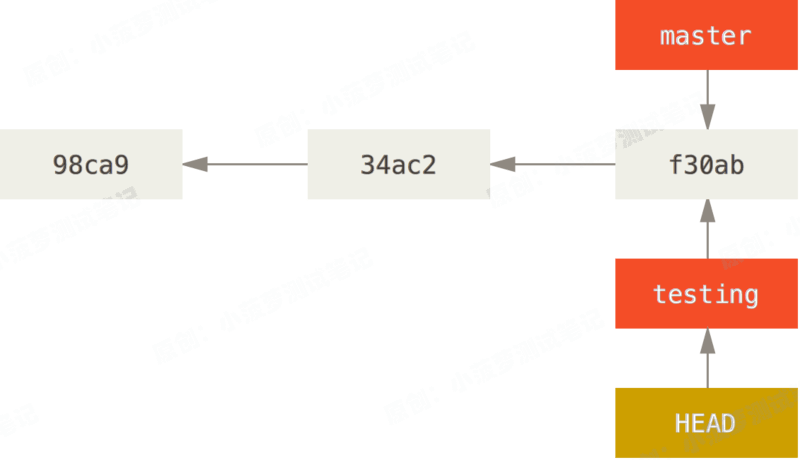
git checkout testing这样 HEAD 就指向 testing 了
polo@B-J5D1MD6R-2312 watermarker % git checkout newtest2
M    test.py
A    test1..3.txt
A    test1.txt
D    test111.txt
A    test3.txt
切换到分支 'newtest2'
polo@B-J5D1MD6R-2312 watermarker % git log
commit 6652c6d6c439cb23ef6aaff79eeccbf3213a9a0b (HEAD -> newtest2, tag: 1.2, origin, newtest3)
切换分支后查看提交历史
可以看到指向最新提交对象的分支有三个:origin、newtest2、newtest3,当前 HEAD 指向的分支是 newtest2,因为刚刚切换到 newtest2 了
HEAD 指向当前所在的分支
那么,这样的实现方式会给我们带来什么好处呢?修改后再 提交一次
vim test.rbgit
commit -a -m 'made a change' 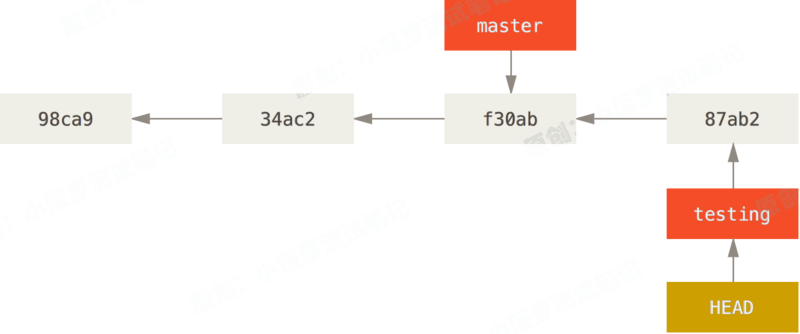
testing 分支会往前移动,但是 master 分支却没有,因为每次 git commit 提交新内容之后,只有 HEAD 指向的分支会自动往前移动,其他分支不会动的
HEAD 分支随着提交操作自动向前移动看看
切换回 master 分支
git checkout master 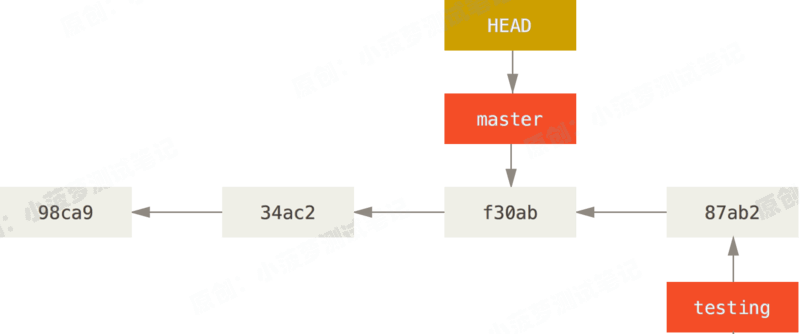
做了两件事
HEAD 指回 master 分支
将工作目录恢复成 master 分支所指向的快照内容(旧内容)
相当于忽略了 testing 分支所做的修改
重点:切换分支会改变工作目录的文件
当 checkout 时,HEAD 跟着动
再次修改并提交
vim test.rbgit
commit -a -m 'made other changes'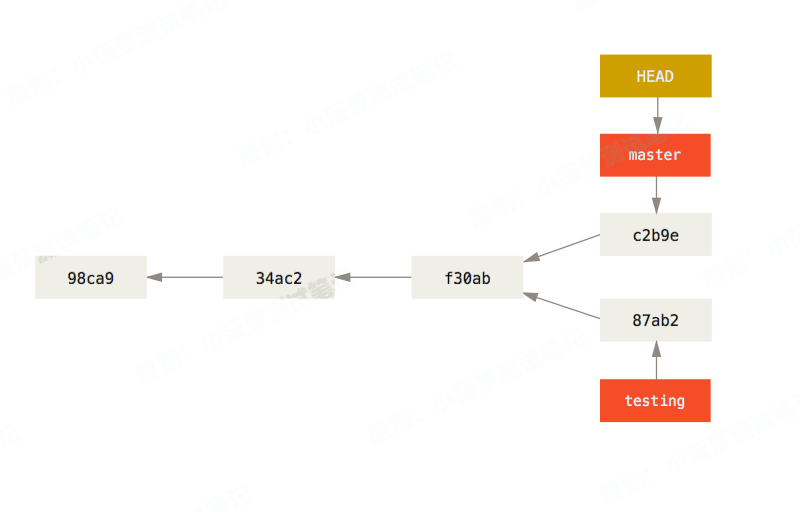
当前项目出现了分支分叉,因为在 master 分支上又提交了一些新内容,所以会产生一个新的提交对象
针对不同的分支,可以在上面工作不同的内容,然后在未来进行合并,合并只需要用到的命令有:branch、checkout、commit
项目分叉历史
git log --oneline --decorate --graph --all 它会输出你的提交历史、各个分支的指向以及项目的分支分叉情况
git log --oneline --decorate --graph --all
* c2b9e (HEAD, master) Made other changes
| * 87ab2 (testing) Made a change
|/
* f30ab Add feature #32 - ability to add new formats to the central interface
* 34ac2 Fix bug #1328 - stack overflow under certain conditions
* 98ca9 initial commit of my project
Git 的分支操作为何这么快?
Git 的分支实质上仅是包含所指对象校验和(长度为 40 的 SHA-1 值字符串)的文件,所以它的创建和销毁都异常高效
创建一个新分支就相当于往一个文件中写入 41 个字节(40 个字符和 1 个换行符),如此的简单能不快吗?
分支的新建与合并
忘了更新 明个继续
分支管理
查看分支列表
$ git branch
  iss53
* mastertesting
注意 master 分支前的 * 字符:它代表现在 checkout 的那一个分支(也就是说,当前 HEAD 指针所指向的分支)
这意味着如果在这时候提交,master 分支将会随着新的工作向前移动
查看每一个分支的最后一次提交
$ git branch -v
  iss53   93b412c fix javascript issue
* master  7a98805 Merge branch 'iss53'
  testing 782fd34 add scott tothe author list inthe readmes
--merged 查看已合并的分支
$ git branch --merged
  iss53
* master
因为之前已经合并了 iss53 分支,所以现在看到它在列表中
在这个列表中分支名字前没有 * 号的分支通常可以使用 git branch -d 删除掉,因为已经将它们的工作整合到了另一个分支,所以并不会失去任何东西
查看所有包含未合并工作的分支
$ git branch --no-merged
  testing
它包含了还未合并的工作,尝试使用 git branch -d 命令删除它时会失败:
$ git branch -d testing
error: The branch 'testing' is not fully merged.
If you are sure you want to delete it, run 'git branch -D testing'.
如果真的想要删除分支并丢掉那些工作,可以使用 -D 选项强制删除它
重点
上面描述的选项 --merged 和 --no-merged 在没有指定提交或分支名作为参数时,分别列出已合并或未合并到 当前 分支的分支。
可以指定分支,来查看它的合并状态而不必 checkout 它们
如:尚未合并到 master 分支的有哪些?
$ git checkout testing
$ git branch --no-merged master
    topicA
    featureB
远程仓库的使用
查看远程仓库:git remote
如果想查看你已经配置的远程仓库服务器,可以运行 git remote 命令,它会列出你指定的每一个远程服务器的名称
如果是刚 clone 下来的自己的库,能看到 origin,这是 Git 起的默认名字
$ git clone https://github.com/schacon/ticgit
Cloning into 'ticgit'...
remote: Reusing existing pack: 1857, done.
remote: Total 1857 (delta 0), reused 0 (delta 0)
Receiving objects: 100% (1857/1857), 374.35 KiB | 268.00 KiB/s, done.
Resolving deltas: 100% (772/772), done.
Checking connectivity... done.
$ cd ticgit
$ git remote
origin
-v 选项
会显示需要读写远程仓库使用的 Git 的 URL和名称(origin)
git remote -v
origin    https://github.com/schacon/ticgit (fetch)
origin    https://github.com/schacon/ticgit (push)
栗子
若远程仓库不止一个,该命令会将它们全部列出
与他人合作,拥有多个远程仓库的仓库
$ cd grit
$ git remote -v
bakkdoor  https://github.com/bakkdoor/grit (fetch)
bakkdoor  https://github.com/bakkdoor/grit (push)
cho45     https://github.com/cho45/grit (fetch)
cho45     https://github.com/cho45/grit (push)
defunkt   https://github.com/defunkt/grit (fetch)
defunkt   https://github.com/defunkt/grit (push)
koke      git://github.com/koke/grit.git (fetch)
koke      git://github.com/koke/grit.git (push)
origin    [email protected]:mojombo/grit.git (fetch)
origin    [email protected]:mojombo/grit.git (push)
添加远程仓库
git remote add<shortname><url>添加一个新的远程 Git 仓库,同时指定一个名称
polo@B-J5D1MD6R-2312 watermarker % git remote -v
origin    [email protected]:poloyy/watermarker.git (fetch)
origin    [email protected]:poloyy/watermarker.git (push)

polo@B-J5D1MD6R-2312 watermarker % git  remote add test  [email protected]:testyy/waterm
arker.git

polo@B-J5D1MD6R-2312 watermarker % git remote -v
origin    [email protected]:poloyy/watermarker.git (fetch)
origin    [email protected]:poloyy/watermarker.git (push)
test    [email protected]:testyy/watermarker.git (fetch)
test    [email protected]:testyy/watermarker.git (push)
可以使用 test 来代替整个 URL:
拉取仓库数据:git fetch
可以运行 git fetch pb,拉取仓库数据
$ git fetch pb
remote: Counting objects: 43, done.
remote: Compressing objects: 100% (36/36), done.
remote: Total 43 (delta 10), reused 31 (delta 5)
Unpacking objects: 100% (43/43), done.
From https://github.com/paulboone/ticgit
 * [new branch]      master     -> pb/master
 * [new branch]      ticgit     -> pb/ticgit
从远程仓库中抓取与拉取:git fetch <remote>
从远程仓库中获得数据,可以执行
git fetch <remote>这个命令会访问远程仓库,从中拉取所有你还没有的数据
执行完成后,你将会拥有那个远程仓库中所有分支的引用,可以随时合并或查看
重点
git clone 命令克隆了一个仓库,Git 会自动将其添加为远程仓库并默认以 “origin” 为名称
git fetch origin这样会抓取仓库里所有新 push 的内容
但它只会将新内容下载到本地,并不会自动合并或修改当前内容,需要手动将新内容合并到本地内容中(git pull)
git pull 初步认识
默认情况下,git clone 命令会自动设置本地 master 分支跟踪 clone 下来的远程仓库的 master 分支(或其它名字的默认分支)
运行 git pull 通常会从最初克隆的服务器上抓取数据并自动尝试合并到当前所在的分支
推送到远程仓库:git push
语法格式
git push <remote><branch>将 master 分支的内容推送到 origin 服务器
git push origin masterremote 默认就是 origin,而 branch 默认是 master,所以等价写法就是
git push重点
如果在你推送前,远程仓库已经有新推送的内容,那么本地需要先拉取最新的内容并合并后,才能将本地的内容重新 push 到远程仓库
# 一般的流程
git fetch
git pull
git add .
git commit -m "update"git push
查看某个远程仓库
git remote show <remote>可以查看远程仓库的更多信息
% git  remote show origin
* 远程 origin
  获取地址:[email protected]:poloyy/watermarker.git
  推送地址:[email protected]:poloyy/watermarker.git
  HEAD 分支:master
  远程分支:
    master 已跟踪
  为 'git pull' 配置的本地分支:
    master 与远程 master 合并
  为 'git push' 配置的本地引用:
    master 推送至 master (可快进)
能获取到的信息
远程仓库的 URL和名称(origin)
跟踪分支的信息
正处于 master 分支
执行 git pull 可以拉取远程仓库的 master 内容,并和本地 master 分支的内容进行合
执行 git push 可以将本地 master 分支内容推送到远程仓库的 master 分支上
一个看到更多信息的栗子
$ git remote show origin
* remote origin
  URL: https://github.com/my-org/complex-project
  Fetch URL: https://github.com/my-org/complex-project
  Push  URL: https://github.com/my-org/complex-project
  HEAD branch: master
  Remote branches:    master                           tracked
    dev-branch                       tracked
    markdown-strip                   tracked
    issue-43new (next fetch will store in remotes/origin)
    issue-45new (next fetch will store in remotes/origin)
    refs/remotes/origin/issue-11     stale (use 'git remote prune'toremove)
  Local branches configured for'git pull':
    dev-branch merges with remote dev-branch
    master     merges with remote master
  Local refs configured for'git push':
    dev-branch                     pushes to dev-branch                     (upto date)
    markdown-strip                 pushes to markdown-strip                 (upto date)
    master                         pushes to master                         (upto date)
包含多个分支的信息
远程仓库的重命名与移除
语法格式
git remote rename <old> <new>小栗子
$ git remote rename pb paul
$ git remote
origin
paul
同时会修改你所有远程跟踪的分支名字,之前引用 pb/master 的现在会引用 paul/master
移除仓库的两种写法
git remote remove
git remote rm
git remote remove paul
$ git remote
origin重点:一旦以这种方式删除了一个远程仓库,那么所有和这个远程仓库相关的远程跟踪分支以及配置信息也会一起被删除
远程分支
远程分支
远程引用是对远程仓库的引用(指针),包括分支、标签等等
你可以通过 git ls-remote <remote> 来显式地获得远程引用的完整列表
polo@B-J5D1MD6R-2312 watermarker % git ls-remote
From [email protected]:poloyy/watermarker.git
3fb14343217ff0725bbf68f9a1b5f36fa650548f    HEAD
3fb14343217ff0725bbf68f9a1b5f36fa650548f    refs/heads/master
7fa175dbc2a1ce3cec03033472abb894f1a94527    refs/tags/testbu
8be5ab723bc931dcae3cd9a2bccaca8b474e962b    refs/tags/v1.19baca61910f4182075c753a4bb9eedba5af8cb02    refs/tags/v1.1
或者通过 git remote show <remote> 获得远程分支的更多信息
polo@B-J5D1MD6R-2312 watermarker % git remote show origin
* 远程 origin
  获取地址:[email protected]:poloyy/watermarker.git
  推送地址:[email protected]:poloyy/watermarker.git
  HEAD 分支:master远程分支:
    master 已跟踪
  为 'git pull' 配置的本地分支:
    master与远程 master 合并
  为 'git push' 配置的本地引用:
    master推送至 master (最新)
远程跟踪分支
远程跟踪分支是远程分支状态的引用
一旦你进行了网络通信, Git 就会为你移动它们以精确反映远程仓库的状态
该分支在远程仓库中的位置就是最后一次连接到它们的位置
命名格式
<remote>/<branch>查看最后一次与远程仓库 origin 通信时 master 分支的状态
origin/master你与同事合作解决一个问题并且他们推送了一个 iss53 分支,你可能有自己的本地 iss53 分支, 然而在服务器上的分支会以 origin/iss53 来表示
为何叫 origin?
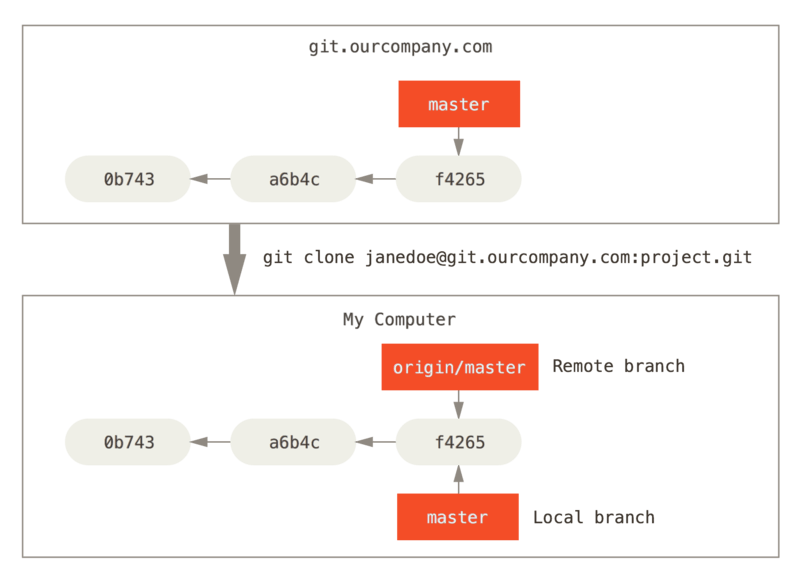
giit clone 命令会给远程仓库默认命名为 origin,然后拉取它的所有数据, 创建一个指向它的 master 分支的指针,并且在本地将其命名为 origin/master【远程分支 origin/master】
Git 也会给你一个与 origin 的 master 分支在指向同一个地方的本地 master 分支,这样你就有工作的基础【本地分支 master】
重点
origin 和 master 一样,没有特殊的含义
只是 git init 时默认的起始分支名字取得就是 master
而 git clone 默认给远程仓库名字取得就是 origin
假设指定远程仓库名字
git clone -o booyah那么默认的远程分支名字就是 booyah/master
克隆之后的远程仓库与本地仓库
有人在 git.ourcompany.com 的 master 分支上 push 了新的提交
而自己在本地的 master 分支上也做了提交但是没有 push
只要本地不拉取最新的数据,那么本地的远程分支(origin/master)还是指向之前的 f4265 节点
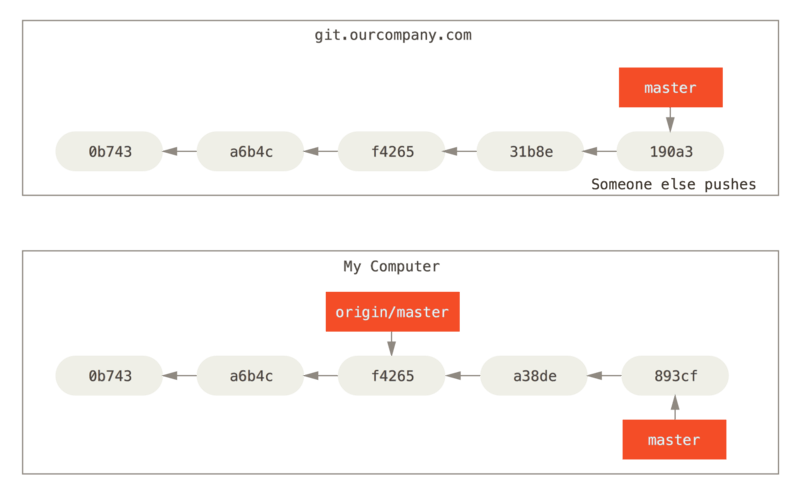
本地与远程的工作可以分叉
将本地的远程仓库和服务器上的远程仓库同步数据
git fetch <remote>
git fetch origin
这个命令查找 “origin” 是哪一个服务器(在本例中,它是 git.ourcompany.com)
从中拉取本地没有的数据,并且更新本地数据库
移动 origin/master 指针到更新之后的位置
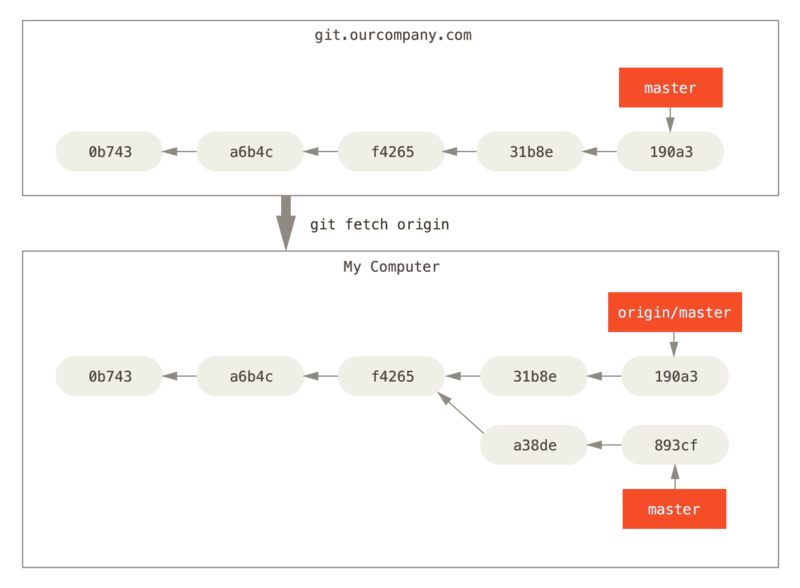
可以看到,因为本地的 master 分支已经有过新的提交,所以和 origin/master 远程分支处于分叉状态
git fetch 更新你的远程跟踪分支
现在有个新的 git 服务器位于 git.team1.ourcompany.com
当有多个远程仓库与远程分支的情况下,要怎么添加新的远程仓库引用到本地项目呢?
git remote add <remote> <git 服务器 url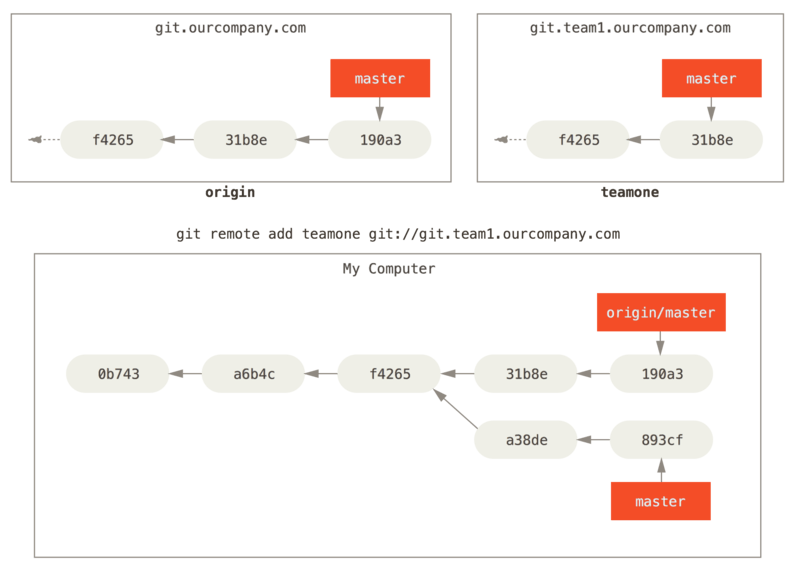
添加另一个远程仓库
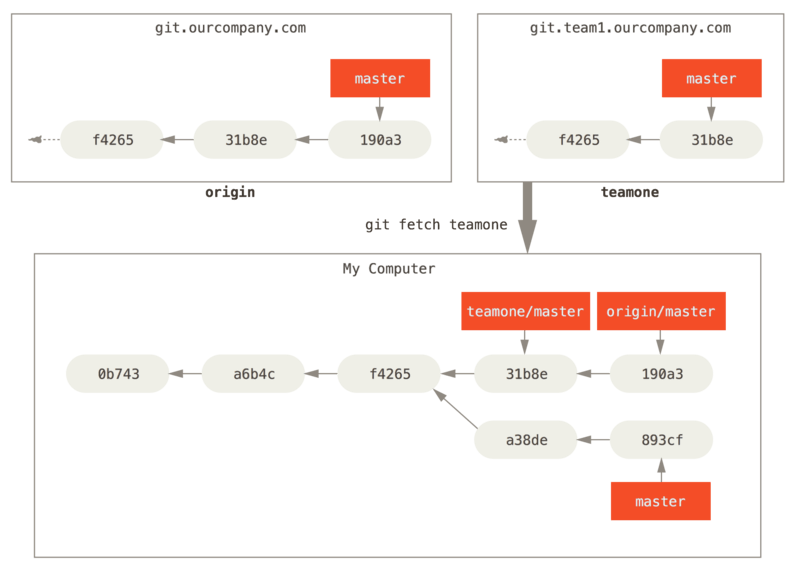
抓取新添加的远程仓库在本地没有的数据
git fetch teamone因为那台服务器上现有的数据是 origin 服务器上的一个子集,
所以 Git 并不会抓取数据而是会设置远程跟踪分支 teamone/master 指向 teamone 的 master 分支。
推送至远程跟踪分支 teamone/master
推送本地指定分支的内容到指定的远程仓库下
git push <remote><branch>:栗子
将本地的 serverfix 分支推送到远程仓库上的 awesomebranch 分支
git push origin serverfix:awesomebranch下一次其他协作者从服务器上拉取数据时,他们会在本地生成一个远程分支 origin/serverfix,指向服务器的 serverfix 分支的引用:
$ git fetch origin
remote: Counting objects:7, done.
remote: Compressing objects:100% (2/2), done.
remote: Total 3 (delta 0), reused 3 (delta 0)
Unpacking objects:100% (3/3), done.
From https://github.com/schacon/simplegit
 * [new branch]      serverfix    -> origin/serverfix
这样操作,本地不会自动新增一个 serverfix 分支,只是有一个不可修改的 origin/serverfix 指针
git merge origin/serverfix 这也是将 origin/serverfix 远程分支下的内容合并到本地当前所在分支
$ git checkout -b serverfix origin/serverfix
Branch serverfix set up to track remote branch serverfix from origin.
Switched toanew branch 'serverfix'
这样可以在本地新建一个 serverfix 分支,并且和 origin/serverfix 远程分支指向同一个提交内容
跟踪分支
从一个远程跟踪分支 checkout 一个本地分支会自动创建所谓的“跟踪tracking分支”(它跟踪的分支叫做“上游 upstream 分支”)
跟踪分支是与远程分支有直接关系的本地分支
如果在一个跟踪分支上输入 git pull,Git 能自动地识别去哪个服务器上抓取、合并到哪个分支
-u 或 --set-upstream-to
将本地分支跟踪一个刚拉取下来的远程分支,或者修改正在跟踪的上游分支
$ git branch -u origin/serverfix
Branch serverfix set up to track remote branch serverfix from origin.
查看设置的所有跟踪分支
这会将所有的本地分支列出来并且包含更多的信息,如每一个分支正在跟踪哪个远程分支与本地分支是否是领先、落后或是都有。
$ git branch -vv
  iss53     7e424c3 [origin/iss53: ahead 2] forgot the brackets
  master    1ae2a45 [origin/master] deploying index fix
* serverfix f8674d9 [teamone/server-fix-good: ahead 3, behind 1] this should do it
  testing   5ea463a trying something new
iss53 分支正在跟踪 origin/iss53 并且 “ahead” 是 2,本地有两个提交还没有推送到服务器上【领先两个提交】
master 分支正在跟踪 origin/master 分支并且是最新的【 [] 里面没有其他提示】
serverfix 分支正在跟踪 teamone 服务器上的 server-fix-good 分支并且领先 3 落后 1,服务器上有一次提交还没有合并入同时本地有三次提交还没有 push
testing 分支并没有跟踪任何远程分支【没有 [] 】
重点注意
git branch -vv 显示的值来自每个服务器最后一次拉取数据(git fetch)
这个命令并没有连接服务器,它显示本地缓存的服务器数据
如果想要统计最新的 ahead 与 behind 数字,可以先拉取所有服务器的最新数据
git fetch--allgit branch -vv拉取
git fetch 命令从服务器上抓取本地没有的数据时,它并不会修改工作目录中的内容,它只会获取数据然后让你自己合并
git pull 命令等价于
git fetch
git merge
删除远程分支
当某个远程分支已经做完所有工作,且把该分支的内容合并到了 master 分支(或其他稳定版本分支),就要删除不再需要的远程分支
$ git push origin --delete serverfix
To https://github.com/schacon/simplegit
 - [deleted]         serverfix
基本上这个命令做的只是从服务器上移除这个指针
Git 服务器通常会保留数据一段时间直到垃圾回收运行,所以如果不小心删除掉了,通常是很容易恢复的