图像处理------图像细化
算法流程参考自:图像处理细化算法
参考博文中没有细化算法的代码实现,只有算法的具体流程,在本文中,使用python实现图像细化的代码实现,但其运行效率没有考虑,只为理解算法原理:
算法原理步骤
对二值图像进行细化,就是骨架提取,删除不需要的轮廓点,保留其骨架点。假设一个像素点,该点为p1,八邻域为p2->p9,通过考虑P1邻域的实际情况,以便决定是否删除P1点。假设处理的图像为二值图形,背景为黑色0,细化的前景为1.

算法流程,分为两步,每步判断四个条件,然后决定像素点的去留。
第一步
1.条件1: 2<=P2+P3+P3+P4+P5+P6+P7+P8+P9 <=6
大于2保证P1不是断电和孤立点,小于6保证P1是一个边界点,等于0时周围没有等于1的像素,P1为孤立点,等于1时周围只有一个等于1的像素,多以P1为端点。(是端点的条件,周围有且只能有一个值为1的像素)
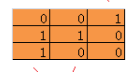
2.P2->P9的排列顺序,如上图的排列顺序,01模式的数量为1,如下图P2P3,P6P7所以改像素的01模式数量为2.
保证01模式数量为1,是要保证删除当前像素点后的连通性。
3.P2P4P6 = 0
4.P4P6P8=0
第一步之后会如果四条全部满足则令P1=0,否则保持不变。第一步之后会删除右下角的边界点。
第二步
对第一步操作后的图像,执行第二步操作:
1.条件1: 2<=P2+P3+P3+P4+P5+P6+P7+P8+P9 <=6
2.P2->P9的排列顺序,如上图的排列顺序,01模式的数量为1,如下图P2P3,P6P7所以改像素的01模式数量为2.
保证01模式数量为1,是要保证删除当前像素点后的连通性。
3.P2P4P8 = 0
4.P2P6P8=0
第二步执行之后会删除左上的边界点。
执行完上述的两个步骤,就完成了一次细化操作,可以通过多次迭代执行,得到最终的骨架图
算法代码实现
主要使用python实现上述的细化流程,封装成为一个函数。
在代码中主要按照第一步的实现来说,第二步和第一步的实现几乎完全相同
    for row in range(h-1):
        for col in range(w-1):
            if img[row][col] == 1:
                flag = 0
                #条件1
                t = img[row-1][col-1] + img[row-1][col] + img[row-1][col+1] + img[row][col-1] + img[row][col+1]
                + img[row+1][col-1] + img[row+1][col] + img[row+1][col+1]
                if t >= 2 and t <= 6:
                    flag += 1
                #条件2
                t = 0
                lis = [img[row-1][col],img[row-1][col+1],img[row][col+1],img[row+1][col+1],img[row+1][col],img[row+1][col-1],img[row][col-1],img[row-1][col-1],img[row-1][col]]
                for i in range(len(lis)-1):
                    if lis[i] == 0 and lis[i+1] ==1:
                        t += 1
                if t == 1:
                    flag += 1
                #条件3
                s = img[row-1][col] * img[row][col+1] * img[row+1][col]
                if s == 0:
                    flag += 1

                #条件4
                s = img[row][col+1] * img[row+1][col] * img[row][col-1]
                if s == 0:
                    flag += 1
                if flag == 4:
                    dst[row][col] = 0
首先,我们判断当前像素值是否为1,如果是再进行以下的四个条件判断,如果不是这直接跳过。
在之前,没有进行这行代码,我迭代6次花费的时间是现在的很多倍
判断成立后设立一个flag用来记录条件成立的个数。
下面就是四个条件的分别判断了,
第一个条件,相对来说比较简单,看一下代码都会懂的。
				t = img[row-1][col-1] + img[row-1][col] + img[row-1][col+1] + img[row][col-1] + img[row][col+1]
                + img[row+1][col-1] + img[row+1][col] + img[row+1][col+1]
                if t >= 2 and t <= 6:
                    flag += 1
第二个条件是四个条件中比较有难度的
编写思路:将P2->P9放置在列表中,通过遍历列表来发现01模式,需要注意的是不要忽略在P9P2可能存在的01模式,所以在列表的最后又加了P2点,
#条件2
t = 0
lis = [img[row-1][col],img[row-1][col+1],img[row][col+1],img[row+1][col+1],img[row+1][col],img[row+1]										[col-1],img[row][col-1],img[row-1][col-1],img[row-1][col]]
for i in range(len(lis)-1):
	if lis[i] == 0 and lis[i+1] ==1:
		t += 1
if t == 1:
	flag += 1
对于条件三和四,就不需要赘述了。
下面是细化函数的完整形式:
def xihua(img):
    h,w = img.shape
    dst = img.copy()
    for row in range(h-1):
        for col in range(w-1):
            if img[row][col] == 1:
                flag = 0
                #条件1
                t = img[row-1][col-1] + img[row-1][col] + img[row-1][col+1] + img[row][col-1] + img[row][col+1]
                + img[row+1][col-1] + img[row+1][col] + img[row+1][col+1]
                if t >= 2 and t <= 6:
                    flag += 1
                #条件2
                t = 0
                lis = [img[row-1][col],img[row-1][col+1],img[row][col+1],img[row+1][col+1],img[row+1][col],img[row+1][col-1],img[row][col-1],img[row-1][col-1],img[row-1][col]]
                for i in range(len(lis)-1):
                    if lis[i] == 0 and lis[i+1] ==1:
                        t += 1
                if t == 1:
                    flag += 1
                #条件3
                s = img[row-1][col] * img[row][col+1] * img[row+1][col]
                if s == 0:
                    flag += 1

                #条件4
                s = img[row][col+1] * img[row+1][col] * img[row][col-1]
                if s == 0:
                    flag += 1
                if flag == 4:
                    dst[row][col] = 0
    temp = dst.copy()
    for row in range(h-1):
        for col in range(w-1):
            if dst[row][col] == 1:
                flag = 0
                # 条件1
                t = dst[row - 1][col - 1] + dst[row - 1][col] + dst[row - 1][col + 1] + dst[row][col - 1] + dst[row][col + 1]
                + dst[row + 1][col - 1] + dst[row + 1][col] + dst[row + 1][col + 1]
                if t >= 2 and t <= 6:
                    flag += 1
                # 条件2
                t = 0
                lis = [dst[row - 1][col], dst[row - 1][col + 1], dst[row][col + 1], dst[row + 1][col + 1],
                       dst[row + 1][col], dst[row + 1][col - 1], dst[row][col - 1], dst[row - 1][col - 1],
                       dst[row - 1][col]]
                for i in range(len(lis) - 1):
                    if lis[i] == 0 and lis[i + 1] == 1:
                        t += 1
                if t == 1:
                    flag += 1
                # 条件3
                s = dst[row - 1][col] * dst[row][col + 1] * dst[row + 1][col]
                if s == 0:
                    flag += 1

                # 条件4
                s = dst[row][col + 1] * dst[row + 1][col] * dst[row][col - 1]
                if s == 0:
                    flag += 1
                if flag == 4:
                    temp[row][col] = 0
    return temp
在最后我对添加优化和未优化的时间做了一下对比:
t = time.time()
xihua_low(imgb)
print('未优化:',time.time()-t)

t = time.time()
xihua(imgb)
print('优化后:',time.time()-t)
输出的结果为:
