系列文章:
SpringBoot + Vue前后端分离项目实战 || 一:Vue前端设计
SpringBoot + Vue前后端分离项目实战 || 二:Spring Boot后端与数据库连接
SpringBoot + Vue前后端分离项目实战 || 三:Spring Boot后端与Vue前端连接
SpringBoot + Vue前后端分离项目实战 || 四:用户管理功能实现
SpringBoot + Vue前后端分离项目实战 || 五:用户管理功能后续
B站视频讲解:2023全网最简单但实用的SpringBoot+Vue前后端分离项目实战
不想看视频可浏览此文章笔记,比较详细
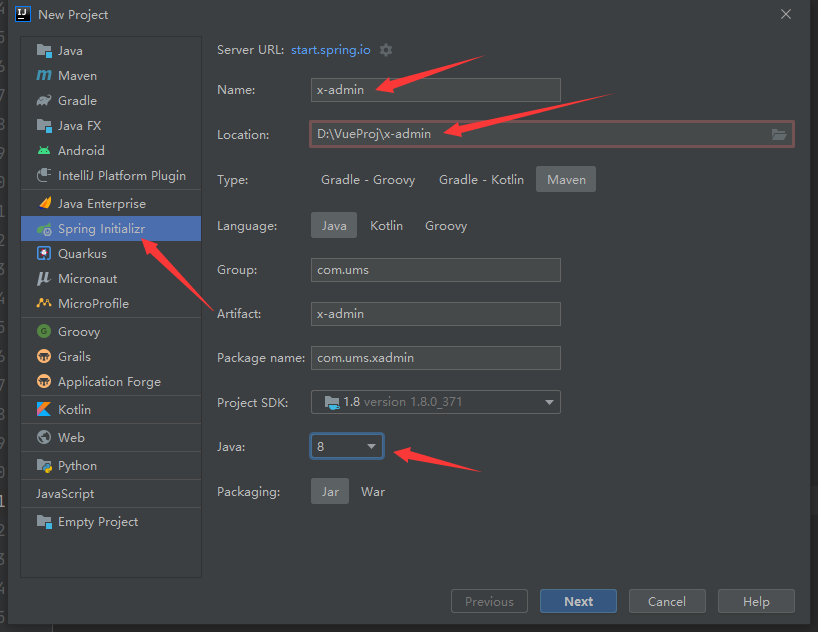
新建Spring后台项目
IDEA file->new->project

选择 Spring Initializr
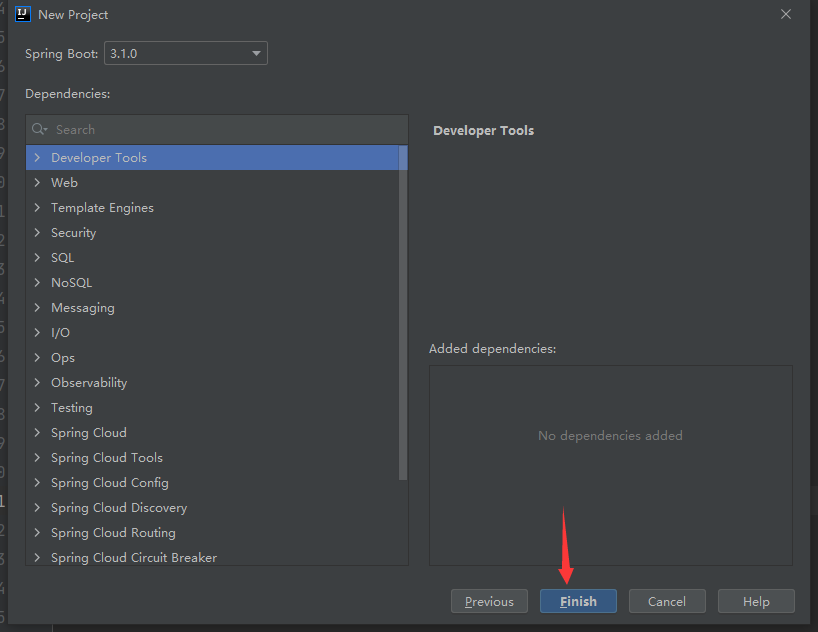
此处不加依赖,直接FINISH
添加依赖
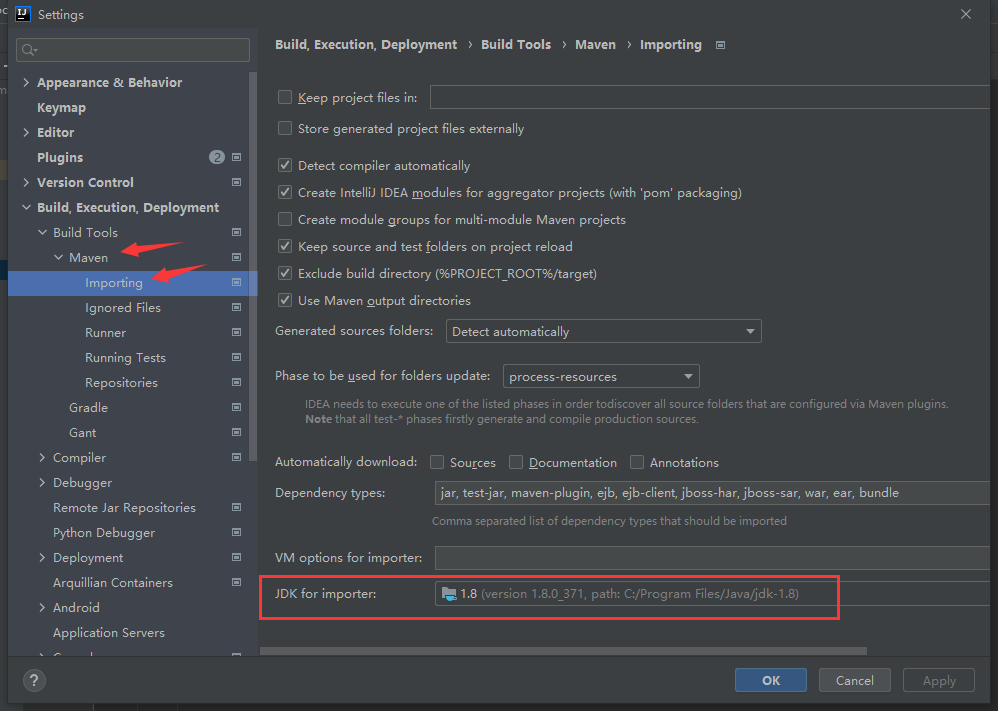
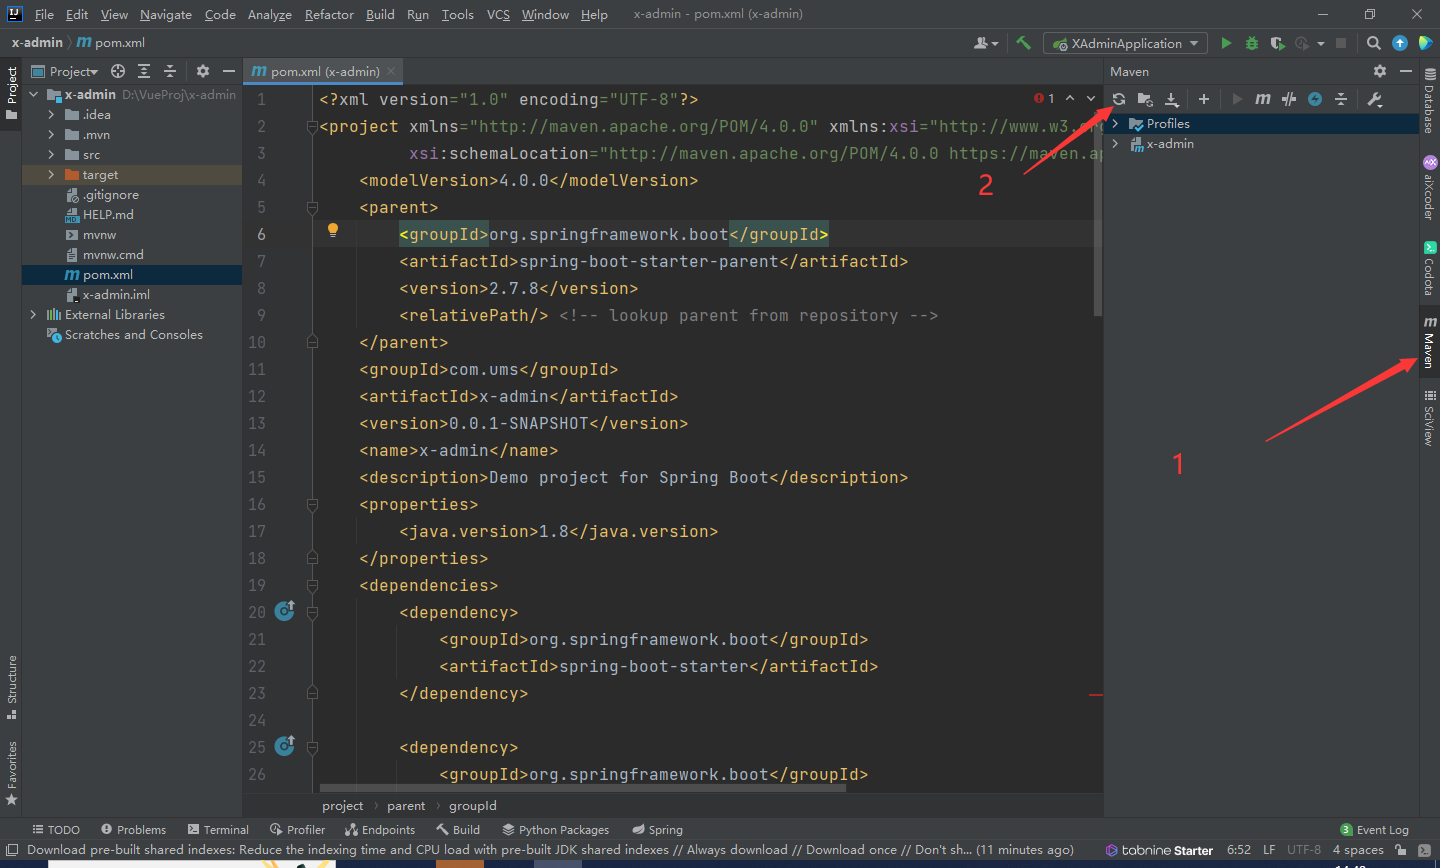
首先确认本地maven已经配置好,点击File -> Settings 查看Maven

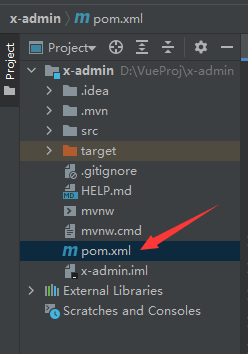
找到pom.xml文件
直接复制此处需要的依赖
<?xml version="1.0" encoding="UTF-8"?>
<project xmlns="http://maven.apache.org/POM/4.0.0" xmlns:xsi="http://www.w3.org/2001/XMLSchema-instance"
         xsi:schemaLocation="http://maven.apache.org/POM/4.0.0 https://maven.apache.org/xsd/maven-4.0.0.xsd">
    <modelVersion>4.0.0</modelVersion>
    <parent>
        <groupId>org.springframework.boot</groupId>
        <artifactId>spring-boot-starter-parent</artifactId>
        <version>2.7.8</version>
        <relativePath/> <!-- lookup parent from repository -->
    </parent>
    <groupId>com.ums</groupId>
    <artifactId>x-admin</artifactId>
    <version>0.0.1-SNAPSHOT</version>
    <name>x-admin</name>
    <description>Demo project for Spring Boot</description>
    <properties>
        <java.version>1.8</java.version>
    </properties>
    <dependencies>
        <dependency>
            <groupId>org.springframework.boot</groupId>
            <artifactId>spring-boot-starter</artifactId>
        </dependency>

        <dependency>
            <groupId>org.springframework.boot</groupId>
            <artifactId>spring-boot-starter-test</artifactId>
            <scope>test</scope>
        </dependency>

        <!-- web -->
        <dependency>
            <groupId>org.springframework.boot</groupId>
            <artifactId>spring-boot-starter-web</artifactId>
        </dependency>
        <!-- mysql -->
        <dependency>
            <groupId>com.mysql</groupId>
            <artifactId>mysql-connector-j</artifactId>
        </dependency>
        <!-- mybatis-plus -->
        <dependency>
            <groupId>com.baomidou</groupId>
            <artifactId>mybatis-plus-boot-starter</artifactId>
            <version>3.5.2</version>
        </dependency>
        <dependency>
            <groupId>com.baomidou</groupId>
            <artifactId>mybatis-plus-generator</artifactId>
            <version>3.5.2</version>
        </dependency>
        <!-- freemarker -->
        <dependency>
            <groupId>org.freemarker</groupId>
            <artifactId>freemarker</artifactId>
        </dependency>
        <!-- lombok -->
        <dependency>
            <groupId>org.projectlombok</groupId>
            <artifactId>lombok</artifactId>
        </dependency>

        <dependency>
            <groupId>org.springframework.boot</groupId>
            <artifactId>spring-boot-starter-data-redis</artifactId>
            <version>2.2.5.RELEASE</version>
        </dependency>

        <!-- fastjson -->
        <dependency>
            <groupId>com.alibaba.fastjson2</groupId>
            <artifactId>fastjson2</artifactId>
            <version>2.0.7</version>
        </dependency>

    </dependencies>

    <build>
        <plugins>
            <plugin>
                <groupId>org.springframework.boot</groupId>
                <artifactId>spring-boot-maven-plugin</artifactId>
            </plugin>
        </plugins>
    </build>

</project>
遇到爆红,点击右侧Maven中刷新按钮,等待IDEA下载依赖即可,多刷新几次,等待
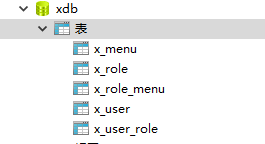
新建数据库
用navicat链接本地数据库,新建一个数据库xdb

新建一个 123.txt 文档,将以下SQL命令复制进去后,改名为123.sql
CREATE TABLE `x_user` (
  `id` int(11) NOT NULL AUTO_INCREMENT,
  `username` varchar(50) NOT NULL,
  `password` varchar(100) DEFAULT NULL,
  `email` varchar(50) DEFAULT NULL,
  `phone` varchar(20) DEFAULT NULL,
  `status` int(1) DEFAULT NULL,
  `avatar` varchar(200) DEFAULT NULL,
   `deleted` INT(1) DEFAULT 0,
  PRIMARY KEY (`id`)
) ENGINE=InnoDB AUTO_INCREMENT=3 DEFAULT CHARSET=utf8;

insert into `x_user` (`id`, `username`, `password`, `email`, `phone`, `status`, `avatar`, `deleted`) values('1','admin','123456','[email protected]','18677778888','1','https://wpimg.wallstcn.com/f778738c-e4f8-4870-b634-56703b4acafe.gif','0');
insert into `x_user` (`id`, `username`, `password`, `email`, `phone`, `status`, `avatar`, `deleted`) values('2','zhangsan','123456','[email protected]','13966667777','1','https://wpimg.wallstcn.com/f778738c-e4f8-4870-b634-56703b4acafe.gif','0');
insert into `x_user` (`id`, `username`, `password`, `email`, `phone`, `status`, `avatar`, `deleted`) values('3','lisi','123456','[email protected]','13966667778','1','https://wpimg.wallstcn.com/f778738c-e4f8-4870-b634-56703b4acafe.gif','0');
insert into `x_user` (`id`, `username`, `password`, `email`, `phone`, `status`, `avatar`, `deleted`) values('4','wangwu','123456','[email protected]','13966667772','1','https://wpimg.wallstcn.com/f778738c-e4f8-4870-b634-56703b4acafe.gif','0');
insert into `x_user` (`id`, `username`, `password`, `email`, `phone`, `status`, `avatar`, `deleted`) values('5','zhaoer','123456','[email protected]','13966667776','1','https://wpimg.wallstcn.com/f778738c-e4f8-4870-b634-56703b4acafe.gif','0');
insert into `x_user` (`id`, `username`, `password`, `email`, `phone`, `status`, `avatar`, `deleted`) values('6','songliu','123456','[email protected]','13966667771','1','https://wpimg.wallstcn.com/f778738c-e4f8-4870-b634-56703b4acafe.gif','0');

CREATE TABLE `x_role` (
  `role_id` int(11) NOT NULL AUTO_INCREMENT,
  `role_name` varchar(50) DEFAULT NULL,
  `role_desc` varchar(100) DEFAULT NULL,
  PRIMARY KEY (`role_id`)
) ENGINE=InnoDB AUTO_INCREMENT=4 DEFAULT CHARSET=utf8mb4;

insert into `x_role` (`role_id`, `role_name`, `role_desc`) values('1','admin','超级管理员');
insert into `x_role` (`role_id`, `role_name`, `role_desc`) values('2','hr','人事专员');
insert into `x_role` (`role_id`, `role_name`, `role_desc`) values('3','normal','普通员工');

CREATE TABLE `x_menu` (
  `menu_id` int(11) NOT NULL AUTO_INCREMENT,
  `component` varchar(100) DEFAULT NULL,
  `path` varchar(100) DEFAULT NULL,
  `redirect` varchar(100) DEFAULT NULL,
  `name` varchar(100) DEFAULT NULL,
  `title` varchar(100) DEFAULT NULL,
  `icon` varchar(100) DEFAULT NULL,
  `parent_id` int(11) DEFAULT NULL,
  `is_leaf` varchar(1) DEFAULT NULL,
  `hidden` tinyint(1) DEFAULT NULL,
  PRIMARY KEY (`menu_id`)
) ENGINE=InnoDB AUTO_INCREMENT=12 DEFAULT CHARSET=utf8mb4;

insert  into `x_menu`(`menu_id`,`component`,`path`,`redirect`,`name`,`title`,`icon`,`parent_id`,`is_leaf`,`hidden`) values (1,'Layout','/user','/user/list','userManage','用户管理','userManage',0,'N',0),(2,'user/user','list',NULL,'userList','用户列表','userList',1,'Y',0),(3,'user/role','role',NULL,'roleList','角色列表','role',1,'Y',0),(4,'user/permission','permission',NULL,'permissionList','权限列表','permission',1,'Y',0);

CREATE TABLE `x_user_role` (
  `id` int(11) NOT NULL AUTO_INCREMENT,
  `user_id` int(11) DEFAULT NULL,
  `role_id` int(11) DEFAULT NULL,
  PRIMARY KEY (`id`)
) ENGINE=InnoDB AUTO_INCREMENT=5 DEFAULT CHARSET=utf8mb4;

insert into `x_user_role` (`id`, `user_id`, `role_id`) values('1','1','1');

CREATE TABLE `x_role_menu` (
  `id` int(11) NOT NULL AUTO_INCREMENT,
  `role_id` int(11) DEFAULT NULL,
  `menu_id` int(11) DEFAULT NULL,
  PRIMARY KEY (`id`)
) ENGINE=InnoDB AUTO_INCREMENT=5 DEFAULT CHARSET=utf8mb4;
右击xdb选择运行SQL文件

找到123.sql文件后运行
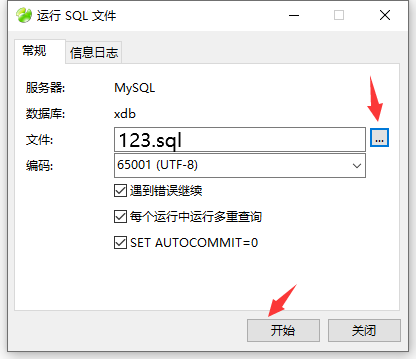
运行成功
IDEA 连接数据库
打开src\main\resources\application.yml,如果没有该文件,只有application.property文件,则直接改其后缀为.yml
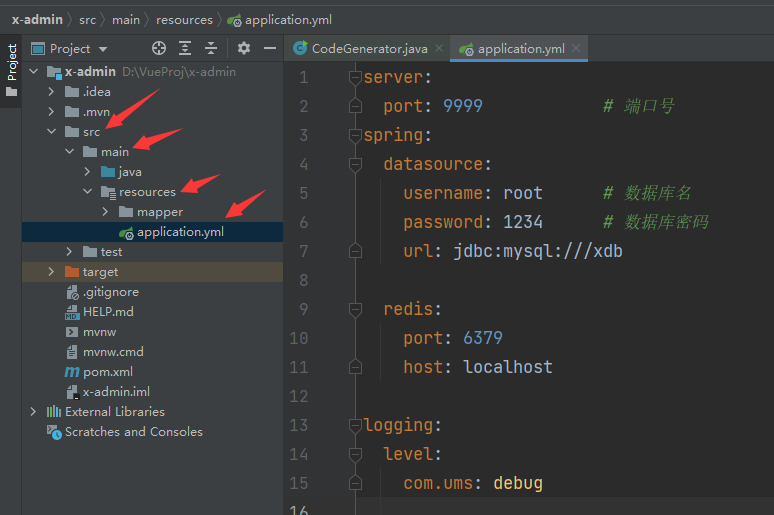
写入代码
server:
  port: 9999            # 端口号
spring:
  datasource:
    username: root      # 数据库名
    password: 1234      # 数据库密码
    url: jdbc:mysql:///xdb

  redis:
    port: 6379
    host: localhost

logging:
  level:
    com.ums: debug
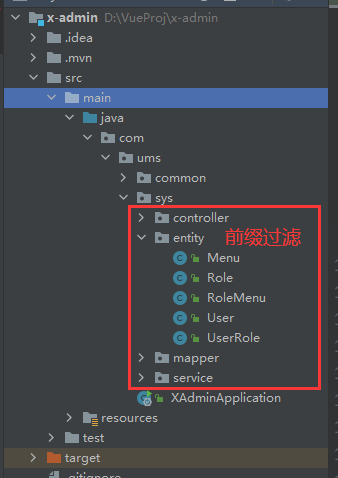
IDEA 自动创建类实体
先新建一个package:sys,空包,生成的代码会放在此处

用Mybatis-plus来自动创建类实体的java代码
在src\test下新建一个java类:CodeGenerator
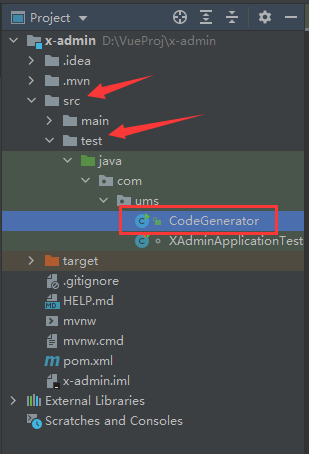
然后写上如下代码,代码中有解释
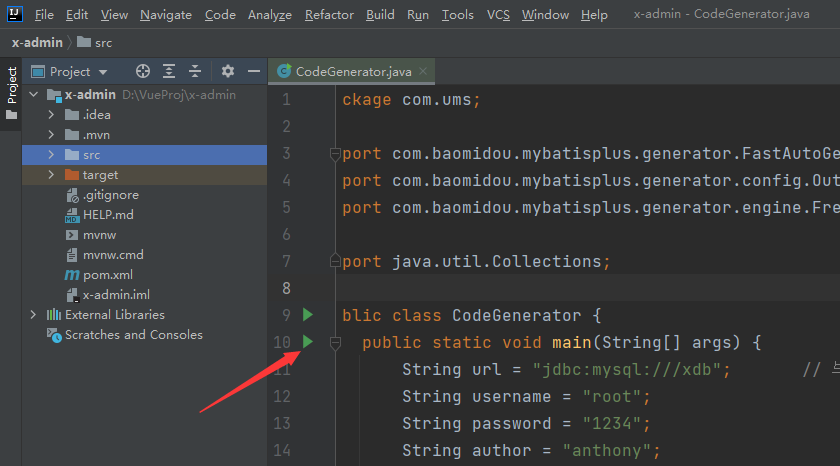
package com.ums;

import com.baomidou.mybatisplus.generator.FastAutoGenerator;
import com.baomidou.mybatisplus.generator.config.OutputFile;
import com.baomidou.mybatisplus.generator.engine.FreemarkerTemplateEngine;

import java.util.Collections;

public class CodeGenerator {


    public static void main(String[] args) {


        String url = "jdbc:mysql:///xdb";       // 与配置文件 一致
        String username = "root";
        String password = "1234";
        String author = "anthony";
        String moduleName = "sys";              // 系统管理的代码包
        String mapperLocation = "D:\\VueProj\\x-admin\\src\\main\\resources\\mapper\\" + moduleName ;
        String tables = "x_menu,x_role,x_role_menu,x_user,x_user_role";     // 与数据库中的表名一致,逗号隔开

        FastAutoGenerator.create(url, username, password)
            .globalConfig(builder -> {


                builder.author(author) // 设置作者
//                        .enableSwagger() // 开启 swagger 模式
//                        .fileOverride() // 覆盖已生成文件
                        .outputDir("D:\\VueProj\\x-admin\\src\\main\\java"); // 指定输出目录
            })

            .packageConfig(builder -> {


                builder.parent("com.ums") // 设置父包名
                        .moduleName(moduleName) // 设置父包模块名
                        .pathInfo(Collections.singletonMap(OutputFile.xml, mapperLocation)); // 设置mapperXml生成路径
            })
            .strategyConfig(builder -> {


                builder.addInclude(tables) // 设置需要生成的表名
                        .addTablePrefix("x_"); // 设置过滤表前缀, x_menu 生成的类实体无 x_ 前缀
            })
            .templateEngine(new FreemarkerTemplateEngine()) // 使用Freemarker引擎模板,默认的是Velocity引擎模板
            .execute();
    }
}
点击run
生成代码
定义数据传递至前端的格式
上一节说过,需要记录下前端登录的响应数据格式
现在,后端来构造此格式
{

    "code":20000,"data":{

    "token":"admin-token"}}
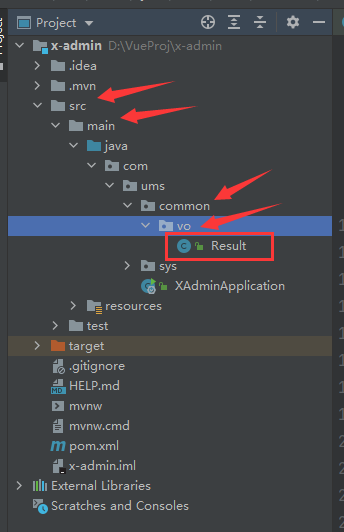
在src\main下新建一个package: common 然后新建package:vo 再新建一个java类Result
写入代码,有注释解释
package com.ums.common.vo;


import lombok.AllArgsConstructor;
import lombok.Data;
import lombok.NoArgsConstructor;

@Data
@NoArgsConstructor
@AllArgsConstructor
public class Result<T> {


    private Integer code;       // 成功失败的代码,此处定义2000为成功,2001为失败
    private String message;     // 消息,里面包含数据data
    private T data;             // 未定义的数据形式

    // 此处重载了四个 success 方法,有些能够返回数据,有的只返回代码或信息
    public static <T> Result<T> success() {


        return new Result<>(20000,"success",null);
    }

    public static <T> Result<T> success(T data) {


        return new Result<>(20000,"success",data);
    }

    public static <T> Result<T> success(T data, String message) {


        return new Result<>(20000,message,data);
    }

    public static <T> Result<T> success(String message) {


        return new Result<>(20000,message,null);
    }

    public static<T>  Result<T> fail(){


        return new Result<>(20001,"fail",null);
    }

    public static<T>  Result<T> fail(Integer code){


        return new Result<>(code,"fail",null);
    }

    public static<T>  Result<T> fail(Integer code, String message){


        return new Result<>(code,message,null);
    }

    public static<T>  Result<T> fail( String message){


        return new Result<>(20001,message,null);
    }
}
测试
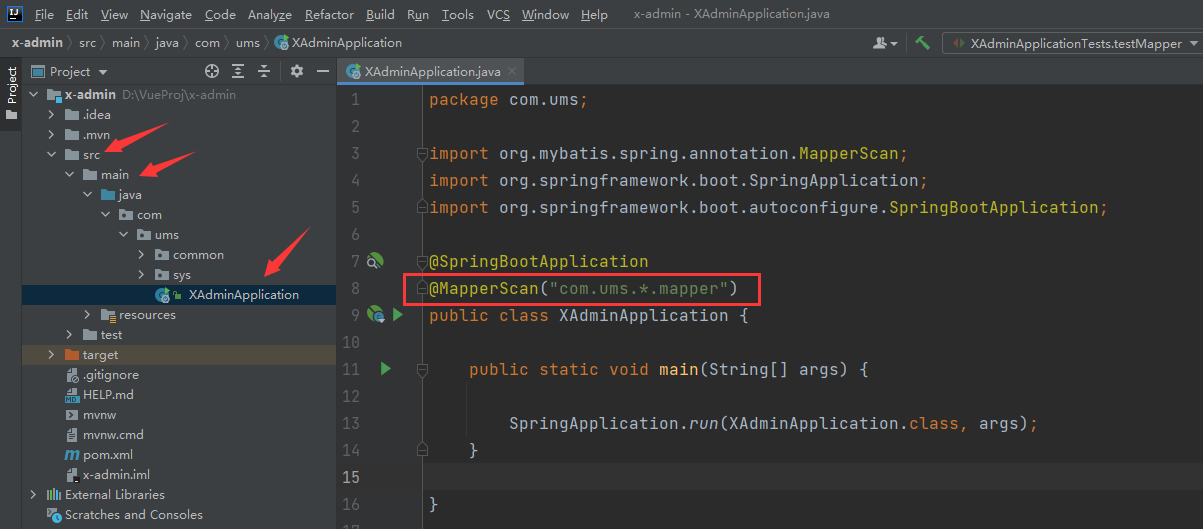
- 先在主程序
src\main\java中的XAdminApplication中加入注解@MapperScan("com.ums.*.mapper")
- 进入
UserController写测试代码

package com.ums.sys.controller; import com.ums.common.vo.Result; import com.ums.sys.entity.User; import com.ums.sys.service.IUserService; import org.springframework.beans.factory.annotation.Autowired; import org.springframework.web.bind.annotation.GetMapping; import org.springframework.web.bind.annotation.RequestMapping; import org.springframework.stereotype.Controller; import org.springframework.web.bind.annotation.RestController; import java.util.List; /** * <p> * 前端控制器 * </p> * * @author anthony * @since 2023-06-16 */ @RestController @RequestMapping("/user") public class UserController { @Autowired private IUserService userService; @GetMapping("/all") public Result<List<User>> getAllUser() { List<User> list = userService.list(); return Result.success(list,"查询成功"); } } - 运行主程序
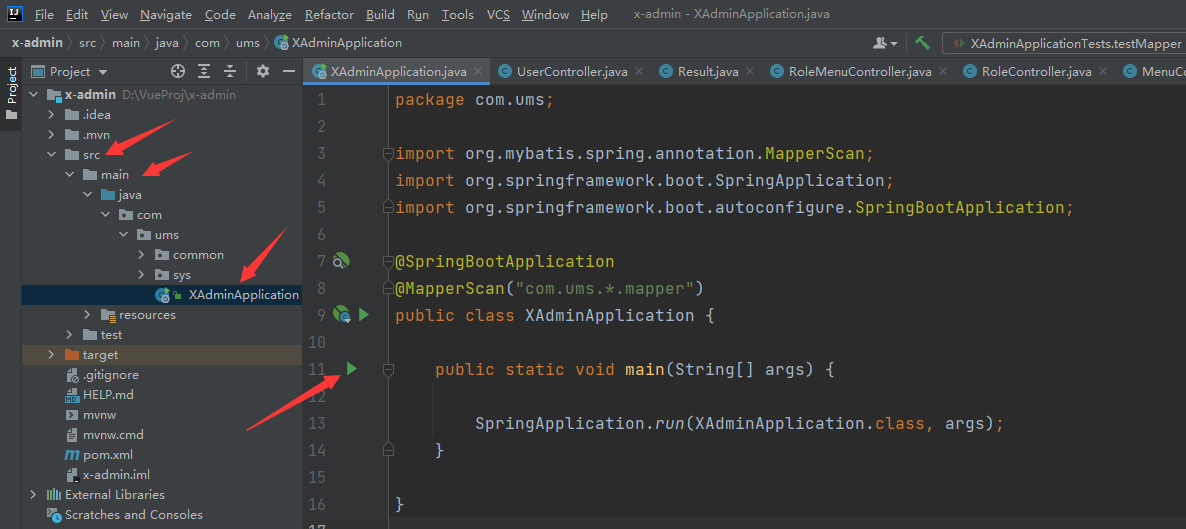
进入浏览器输入http://localhost:9999/user/all显示数据则成功

此处数据格式也与前端对接得上