1. 线性布局管理器:LinearLayout
1.1 知识点
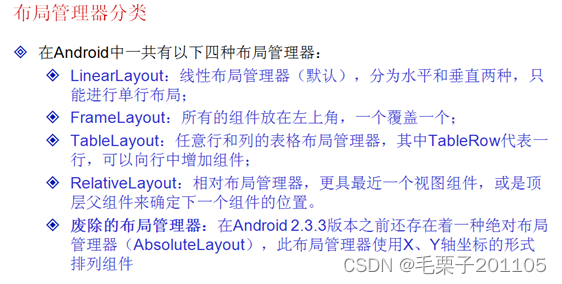
(1)布局管理器简介;
(2)线型布局管理器的配置;
(3)通过Activity程序进行线型布局
1.2 具体内容
在android中,只要定义了组件的话,这个组件就必须放在线性布局管理器中,另外一部分就是组件一般会存在事件处理操作。
先主要讲解线性布局管理器。
<LinearLayout
    xmlns:android=http://schemas.android.com/apk/res/android—布局文件包含的是Android的命名空间
    xmlns:tools=http://schemas.android.com/tools—命名空间的工具
    android:layout_width="match_parent" –此布局宽度为全屏
    android:layout_height="match_parent" – 此布局高度全屏
    android:orientation="vertical"> --此布局中组件垂直码放
</LinearLayout>
线性布局管理器是android中最常用的布局管理器。
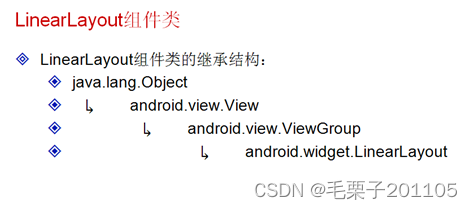
通过类的集成关系可以发现,线性布局管理器是一个特殊的组件,相比之前的组件来说,只是还可以放置其他的组件。
<LinearLayout xmlns:android="http://schemas.android.com/apk/res/android"
    xmlns:tools="http://schemas.android.com/tools"
    android:layout_width="match_parent"
    android:layout_height="match_parent"
    android:orientation="horizontal" >

    <Button
        android:id="@+id/but1"
        android:layout_width="match_parent"
        android:layout_height="wrap_content"
        android:text="爱科技有限公司" />
    <Button
        android:id="@+id/but2"
        android:layout_width="match_parent"
        android:layout_height="wrap_content"
        android:text="www.wanczy.com" />
     <Button
        android:id="@+id/but3"
        android:layout_width="match_parent"
        android:layout_height="wrap_content"
        android:text="毛栗子" />

</LinearLayout>
当然我们也可以通过Activity程序来配置我们的布局管理器,现在就不再使用布局文件了。
package com.example.linearlayoutproject;

import android.app.Activity;
import android.os.Bundle;
import android.widget.Button;
import android.widget.LinearLayout;

public class LinearLayoutActivity extends Activity {
	private LinearLayout layout = null;
	private Button but1 = null;
	private Button but2 = null;
	private Button but3 = null;
    @Override
    protected void onCreate(Bundle savedInstanceState) {
        super.onCreate(savedInstanceState);
        this.layout = new LinearLayout(this);
        LinearLayout.LayoutParams layoutParams =
        		new  LinearLayout.LayoutParams(LinearLayout.LayoutParams.MATCH_PARENT,
        				LinearLayout.LayoutParams.MATCH_PARENT);//准备布局管理器布局参数
        this.layout.setOrientation(LinearLayout.VERTICAL);//设置为垂直码放
        this.layout.setLayoutParams(layoutParams);//设置布局参数
        this.but1 = new Button(this);
        this.but1.setText("爱科技有限公司");
        this.but2 = new Button(this);
        this.but2.setText("www.aikeji.com");
        this.but3 = new Button(this);
        this.but3.setText("毛栗子");
        LinearLayout.LayoutParams butParams =
        		new  LinearLayout.LayoutParams(LinearLayout.LayoutParams.MATCH_PARENT,
        				LinearLayout.LayoutParams.WRAP_CONTENT);//准备按钮布局参数
        this.layout.addView(this.but1,butParams);
        this.layout.addView(this.but2,butParams);
        this.layout.addView(this.but3,butParams);
        super.setContentView(layout);//此Activity程序使用的就是我们定义的布局管理器
    }
}
以上程序就是使用Activity程序完成线性布局,没有使用任何的布局文件,但是在开发中,布局管理器一般都是需要配置在布局文件中。
1.3 小结
(1)线型布局有两种排列方式:水平和垂直
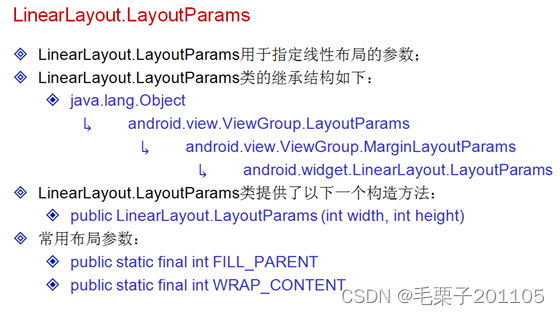
(2)可以通过LinearLayout 类定义线型布局,而布局参数可以使用LinearLayout.LayoutParams类完成。
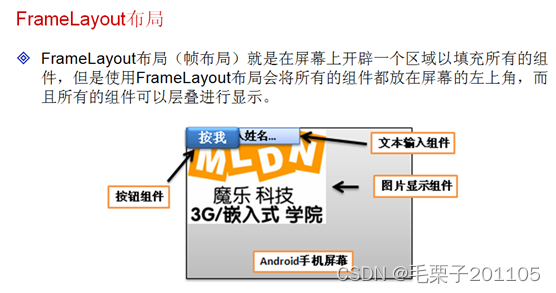
2. 框架布局管理器:FrameLayout
2.1 知识点
(1)掌握框架布局管理器的使用特点;
(2)可以在布局管理器之中使用框架布局进行排列;
(3)可以使用FrameLayout和FrameLayout.LayoutParams类在Activity程序之中动态生成布局。
2.2 具体内容
<FrameLayout
    xmlns:android="http://schemas.android.com/apk/res/android"
    xmlns:tools="http://schemas.android.com/tools"
    android:layout_width="match_parent"
    android:layout_height="match_parent">

    <ImageView
        android:layout_width="wrap_content"
        android:layout_height="wrap_content"
        android:src="@drawable/android02" />
    <EditText
        android:layout_width="wrap_content"
        android:layout_height="wrap_content"
        android:text="请输入您的姓名"
        />
	<Button
	    android:layout_width="wrap_content"
        android:layout_height="wrap_content"
        android:text="你点我呀"
	    />
</FrameLayout>
对于以上的程序来说,我们是感觉不到作用在哪里。

我们现在也可以不使用布局文件,而是直接在Activity程序中生成布局。
package com.example.framelayoutproject;

import android.app.Activity;
import android.os.Bundle;
import android.widget.Button;
import android.widget.EditText;
import android.widget.FrameLayout;
import android.widget.ImageView;

public class FrameLayoutActivity extends Activity {
	private FrameLayout layout = null;
	private ImageView imgView = null;
	private EditText editText = null;
	private Button but = null;

	@Override
	protected void onCreate(Bundle savedInstanceState) {
		super.onCreate(savedInstanceState);
		this.layout = new FrameLayout(this);
		FrameLayout.LayoutParams layoutParams = new FrameLayout.LayoutParams(
				FrameLayout.LayoutParams.MATCH_PARENT,
				FrameLayout.LayoutParams.MATCH_PARENT);// 准备FrameLayout布局参数
		this.layout.setLayoutParams(layoutParams);// 设置FrameLayout布局参数
		this.imgView = new ImageView(this);
		imgView.setImageResource(R.drawable.android02);// 设置图片组件要显示的图片
		this.editText = new EditText(this);
		this.editText.setText("请输入姓名:");
		this.but = new Button(this);
		this.but.setText("你点我呀");
		// 准备组件的布局参数
		FrameLayout.LayoutParams childParams = new FrameLayout.LayoutParams(
				FrameLayout.LayoutParams.WRAP_CONTENT,
				FrameLayout.LayoutParams.WRAP_CONTENT);//准备了组件的布局参数
		this.layout.addView(this.imgView,childParams);
		this.layout.addView(this.editText,childParams);
		this.layout.addView(this.but,childParams);
		setContentView(layout);
	}
}
效果仍然是一样的,但是还是那句话,在以后的开发中,布局还是需要在布局文件中进行。很少写在Activity中。
2.3 小结
(1)框架布局是在一个指定的区域内使用组件进行填充;
(2)可以使用FrameLayout和FrameLayout.LayoutParams类手工配置布局。
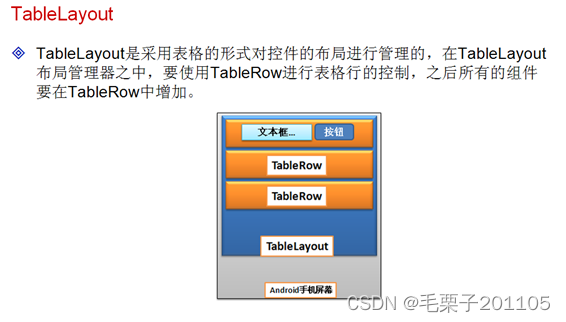
3. 表格布局管理器:TableLayout
3.1 知识点
(1)掌握表格布局管理器的基本使用;
(2)掌握TableLayout和TableRow的操作关系;
(3)掌握表格布局管理器中常见属性的作用。
3.2 具体内容
一般在进行操作的时候,会经常使用到表格对数据进行排版,这样的好处在于阅读数据更加方便及美观。
范例:
<TableLayout
    xmlns:android="http://schemas.android.com/apk/res/android"
    xmlns:tools="http://schemas.android.com/tools"
    android:layout_width="match_parent"
    android:layout_height="match_parent" >
	<TableRow –表示行
	    android:orientation="horizontal"
	    >
		<EditText
		    android:layout_width="wrap_content"
    		    android:layout_height="wrap_content"
		    android:text="请输入检索关键字"
		    />
	    <Button
	        android:layout_width="wrap_content"
    		    android:layout_height="wrap_content"
    		    android:text="检索"
	        />
	</TableRow>
  	<TableRow
	    android:orientation="horizontal"
	    >
		<TextView
		    android:layout_width="wrap_content"
    		    android:layout_height="wrap_content"
		    android:text="请选择编码"
		    />
	   <RadioGroup
	       android:orientation="vertical"
	       android:layout_width="wrap_content"
    	       android:layout_height="wrap_content"
    	       android:checkedButton="@+id/rb2"—默认选中rb2
	       >
	       <RadioButton
	           android:id="@+id/rb1"
	           android:layout_width="wrap_content"
    		       android:layout_height="wrap_content"
    		       android:text="UTF编码"
	           />
	       <RadioButton
	           android:id="@+id/rb2"
	           android:layout_width="wrap_content"
    		   android:layout_height="wrap_content"
    		   android:text="GBK编码"
	           />
	   </RadioGroup>
	</TableRow>
</TableLayout>
以上的程序只是实现了简单的排版,对于表格来说,除了一些基本的排版之外呢,显示数据也是用的比较多的。
<TableLayout
    xmlns:android="http://schemas.android.com/apk/res/android"
    xmlns:tools="http://schemas.android.com/tools"
    android:layout_width="match_parent"
    android:layout_height="match_parent" >
	<TableRow
	    android:orientation="horizontal"
	    android:layout_width="wrap_content"
    	android:layout_height="wrap_content"
	    >
	    <TextView
	        android:layout_column="0"—定义列号
	        android:layout_width="wrap_content"
    		    android:layout_height="wrap_content"
	        android:text="ID"
	        />
	    <TextView
	        android:layout_column="1"
	        android:layout_width="wrap_content"
    		android:layout_height="wrap_content"
	        android:text="姓名"
	        />
	    <TextView
	        android:layout_column="2"
	        android:layout_width="wrap_content"
    		android:layout_height="wrap_content"
	        android:text="Email"
	        />
	    <TextView
	        android:layout_column="3"
	        android:layout_width="wrap_content"
    		android:layout_height="wrap_content"
	        android:text="地址"
	        />
	</TableRow>
	<View –这边是定义一根横线
	    android:layout_height="2px"
	    android:background="#330033"
	    />
	<TableRow
	    android:orientation="horizontal"
	    android:layout_width="wrap_content"
    	android:layout_height="wrap_content"
	    >
	    <TextView
	        android:layout_column="0"
	        android:layout_width="wrap_content"
    		android:layout_height="wrap_content"
	        android:text="Wanczy"
	        />
	    <TextView
	        android:layout_column="1"
	        android:layout_width="wrap_content"
    		android:layout_height="wrap_content"
	        android:text="爱科技"
	        />
	    <TextView
	        android:layout_column="2"
	        android:layout_width="wrap_content"
    		android:layout_height="wrap_content"
	        android:text="[email protected]"
	        />
	    <TextView
	        android:layout_column="3"
	        android:layout_width="wrap_content"
    		android:layout_height="wrap_content"
	        android:text="光明大道1号"
	        />
	</TableRow>
	<TableRow
	    android:orientation="horizontal"
	    android:layout_width="wrap_content"
    	android:layout_height="wrap_content"
	    >
	    <TextView
	        android:layout_column="0"
	        android:layout_width="wrap_content"
    		android:layout_height="wrap_content"
	        android:text="MLZ"
	        />
	    <TextView
	        android:layout_column="1"
	        android:layout_width="wrap_content"
    		android:layout_height="wrap_content"
	        android:text="毛栗子"
	        />
	    <TextView
	        android:layout_column="2"
	        android:layout_width="wrap_content"
    		android:layout_height="wrap_content"
	        android:text="[email protected]"
	        />
	    <TextView
	        android:layout_column="3"
	        android:layout_width="wrap_content"
    		android:layout_height="wrap_content"
	        android:text="光明大道2号"
	        />
	</TableRow>
</TableLayout>
如果屏幕的宽度不够,显示不下,这个时候我们可以设置伸缩列。
<TableLayout
    xmlns:android="http://schemas.android.com/apk/res/android"
    xmlns:tools="http://schemas.android.com/tools"
    android:layout_width="match_parent"
    android:layout_height="match_parent"
    android:shrinkColumns="3">--表示设置第3列为伸缩列
现在是设置了一列为伸缩列,那么想要设置多列呢?
<TableLayout
    xmlns:android="http://schemas.android.com/apk/res/android"
    xmlns:tools="http://schemas.android.com/tools"
    android:layout_width="match_parent"
    android:layout_height="match_parent"
    android:shrinkColumns="0,1,2,3">--设置了4个伸缩列
除了可以设置伸缩列之外,还可以设置隐藏列。
<TableLayout
    xmlns:android="http://schemas.android.com/apk/res/android"
    xmlns:tools="http://schemas.android.com/tools"
    android:layout_width="match_parent"
    android:layout_height="match_parent"
    android:shrinkColumns="3"
    android:collapseColumns="0">--隐藏第0列
为表格设置背景。
<TableLayout
    xmlns:android="http://schemas.android.com/apk/res/android"
    xmlns:tools="http://schemas.android.com/tools"
    android:layout_width="match_parent"
    android:layout_height="match_parent"
    android:shrinkColumns="3"
    android:collapseColumns="0"
    android:background="@drawable/background">--设置背景图片
从整个的代码来看,表格布局是非常灵活的,但是如果想要使用Activity程序去完成表格操作的话,那将是一个非常繁琐的一个过程。
package com.example.tablelayoutproject;

import android.app.Activity;
import android.os.Bundle;
import android.view.ViewGroup;
import android.widget.TableLayout;
import android.widget.TableRow;
import android.widget.TextView;

public class TableLayoutActivity extends Activity {
	private String titleData[][] = new String[][] {
			{ "ID", "姓名", "EMAIL", "地址" },		// 标题头
			{ "爱科技", "[email protected]","光明大道1号" },
			{"毛栗子", "mlz_fc.com", "光明大道2号" } };// 显示数据
		@Override
		public void onCreate(Bundle savedInstanceState) {
			super.onCreate(savedInstanceState);
			TableLayout layout = new TableLayout(this);	// 表格布局
			TableLayout.LayoutParams layoutParam = new TableLayout.LayoutParams(
				ViewGroup.LayoutParams.FILL_PARENT, // 布局管理器宽度为屏幕宽度
				ViewGroup.LayoutParams.FILL_PARENT);// 布局管理器高度为屏幕高度
			layout.setBackgroundResource(R.drawable.background);// 设置背景图片
			for (int x = 0; x < this.titleData.length; x++) {
				TableRow row = new TableRow(this); 	// 定义表格行
				for (int y = 0; y < this.titleData[x].length; y++) {
					TextView text = new TextView(this);// 创建文本组件
					text.setText(this.titleData[x][y]); // 设置文本内容
					row.addView(text, y); 	// 增加组件
				}
				layout.addView(row); 			// 增加表格行
			}
			super.setContentView(layout, layoutParam); 		// 定义组件
		}

}
3.3 小结
(1)表格布局管理器使用TableRow控制表格行;
(2)表格布局的几个属性:
定义伸缩列:android:shrinkColumns="3"
设置不显示列:android:collapseColumns="0,3"
增加背景图片:android:background="@drawable/mldn_logo"
(3)表格布局也可以使用Activity程序动态生成。
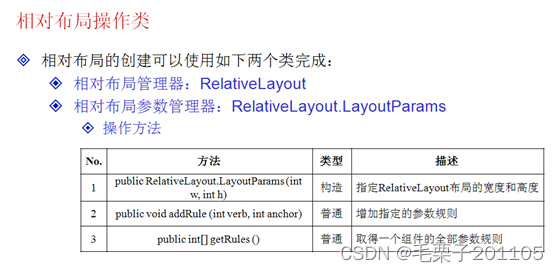
4. 相对布局管理器:RelativeLayout
4.1 知识点
(1)掌握相对布局管理器的主要特点及使用;
(2)可以使用Activity程序动态增加组件。
4.2 具体内容
相对布局管理器对于之前我们将的3种来说,用的会比较少,但是我们还是需要了解,相对布局就是以一个组件作为参照物,放在其上下左右,或者以其为对其方式的参考。

<RelativeLayout
    xmlns:android="http://schemas.android.com/apk/res/android"
    xmlns:tools="http://schemas.android.com/tools"
    android:layout_width="match_parent"
    android:layout_height="match_parent" >
    <TextView
        android:id="@+id/text"
        android:layout_width="wrap_content"
        android:layout_height="wrap_content"
        android:text="这是一个文本显示组件" />
    <Button
        android:id="@+id/but"
        android:layout_width="wrap_content"
        android:layout_height="wrap_content"
        android:text="这是一个按钮"
        android:layout_toRightOf="@+id/text"--放在text组件的右边
        android:layout_below="@+id/text"/>--放在text组件的下边
    <ImageView
        android:id="@+id/img"
        android:layout_width="wrap_content"
        android:layout_height="wrap_content"
        android:src="@drawable/ic_launcher"
        android:layout_toRightOf="@+id/text"—放在text组件的右边
        android:layout_above="@+id/but"—放在but组件的上边
        />
</RelativeLayout>
以上的程序都是通过布局文件进行配置的,当然也可以通过程序控制相对布局管理器。
package com.example.relativelayoutproject;

import android.app.Activity;
import android.os.Bundle;
import android.widget.Button;
import android.widget.RelativeLayout;

public class RelativeLayoutActivity extends Activity {
	private RelativeLayout layout = null;
	private Button but2 = null;

	@Override
	protected void onCreate(Bundle savedInstanceState) {
		super.onCreate(savedInstanceState);
		super.setContentView(R.layout.activity_relative_layout);
		this.layout = (RelativeLayout)super.findViewById(R.id.mylayout);
		this.but2 = new Button(this);
		this.but2.setText("我也是一个按钮");
		RelativeLayout.LayoutParams butParams = new RelativeLayout.LayoutParams(
				RelativeLayout.LayoutParams.WRAP_CONTENT,
				RelativeLayout.LayoutParams.WRAP_CONTENT);//准备组件布局参数
		butParams.addRule(RelativeLayout.LEFT_OF, R.id.img);//添加规则放在text组件的右边
		butParams.addRule(RelativeLayout.BELOW, R.id.text);//添加规则放在text组件的下边
		this.layout.addView(this.but2,butParams);//加入组件
	}
}
4.3 小结
(1)相对布局管理器是以一个组件进行定位的参考;
(2)使用RelativeLayout和RelativeLayout.LayoutParams类可以在Activity程序中动态配置布局管理器。