本来说这是很简单的一个内容,图像旋转只需要使用opencv中自带的旋转函数即可完成,但是最近在做特征点旋转的时候发现使用内置rotate函数给图像旋转90度,再用getRotationMatrix2D得出的旋转矩阵对特征点旋转,画出来的特征点位置全部错误!

这是用gpt生成的代码编写的效果(AI还是不靠谱啊)
这里放出AI的代码:
#这里我只放出核心代码
#旋转图像
rotated_img = cv2.rotate(img, cv2.ROTATE_90_CLOCKWISE)

#旋转特征点
M = cv2.getRotationMatrix2D((cols/2, rows/2), 90, 1)
rotated_keypoints = []
for kp in keypoints:
    x, y = kp.pt
    x -= cols / 2
    y -= rows / 2
    rotated_x = x * M[0, 0] + y * M[0, 1] + cols / 2
    rotated_y = x * M[1, 0] + y * M[1, 1] + rows / 2
    rotated_keypoints.append(cv2.KeyPoint(rotated_x, rotated_y, kp.size, kp.angle - 90, kp.response, kp.octave, kp.class_id))
首先我们先研究一下 rotate这个函数:
dst=cv.rotate(src, rotateCode[, dst])
src输入的图像
rotateCode输入需要旋转的flag
这是opencv4.2.0文档介绍cv.ROTATE_90_CLOCKWISE顺时针旋转90度。
这里 rotate函数是按照原图(0,0)点进行旋转的,AI生成的是按照图像的中心点旋转,肯定没法旋转到制定位置。我们改为按照(0,0)结果还是错误。
再来看一下getRotationMatrix2D函数:

正常来说2D平面的旋转是:

可以看出Opencv得出的旋转矩阵是这个矩阵的转置!因为图像的坐标Y轴是向下的,这和数学中的XY坐标相反。
官方参数介绍:
| center | Center of the rotation in the source image. |
| angle | Rotation angle in degrees. Positive values mean counter-clockwise rotation (the coordinate origin is assumed to be the top-left corner). |
| scale | Isotropic scale factor. |
angle正则表示逆时针,负数表示顺时针。源码应该改为-90度。这样特征点得到矩阵才是正确的。但是这样旋转后的到坐标还是在原来图像坐标系下的点,我们需要还原到旋转后图像的点。
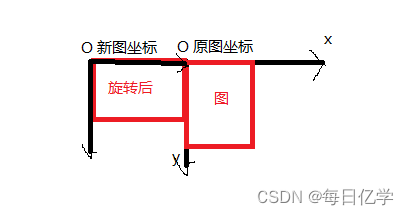
我们旋转后得到的坐标,转换到旋转图像后的坐标需要在X轴加上一个图像行数:
举例子:
原始坐标(1,2)顺时针旋转90度得到坐标(-2,1),这个是在原始坐标系下的坐标。
这个坐标放在新图,位置肯定错误,两个坐标在x轴上相差一个图像的行数(假设图像480*640)
在新图下的坐标为(-2+640,1)=(638,1)。这样我们得到的特征点旋转的坐标才正确。
本文只适应旋转90度这样的类型,如果需要特定角度,这里x,y偏移的坐标需要重新计算。
修改后的源码:
#只需要修改旋转特征点部分
M = cv2.getRotationMatrix2D((0, 0), -90, 1)
rotated_keypoints = []
for kp in keypoints:
    x, y = kp.pt
    rotated_x = x * M[0, 0] + y * M[0, 1] + rows
    rotated_y = x * M[1, 0] + y * M[1, 1]
    rotated_keypoints.append(cv2.KeyPoint(rotated_x, rotated_y, kp.size, kp.angle - 90, kp.response, kp.octave, kp.class_id))
修改源码后的效果:
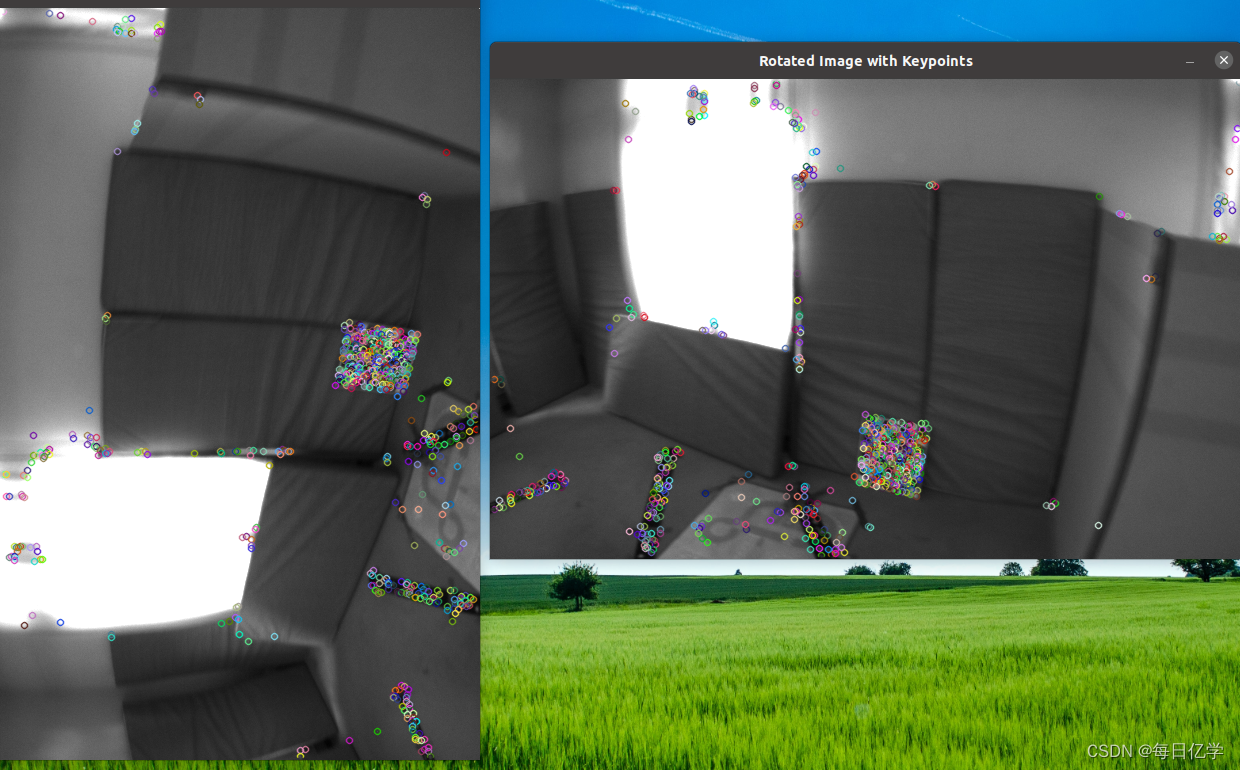
方便大家获取贴出源码,求个关注收藏:
import cv2
import numpy as np

# 读取图像
img = cv2.imread('image.png')

# 使用FAST算法提取特征点
fast = cv2.FastFeatureDetector_create()
keypoints = fast.detect(img, None)

# 旋转图像
rotated_img = cv2.rotate(img, cv2.ROTATE_90_CLOCKWISE)

# 旋转特征点并进行平移
rows, cols = img.shape[:2]
M = cv2.getRotationMatrix2D((0, 0), -90, 1)
rotated_keypoints = []
for kp in keypoints:
    x, y = kp.pt
    rotated_x = x * M[0, 0] + y * M[0, 1] + rows
    rotated_y = x * M[1, 0] + y * M[1, 1]
    rotated_keypoints.append(cv2.KeyPoint(rotated_x, rotated_y, kp.size, kp.angle - 90, kp.response, kp.octave, kp.class_id))

# 绘制特征点
img_with_keypoints = cv2.drawKeypoints(img, keypoints, None)
rotated_img_with_keypoints = cv2.drawKeypoints(rotated_img, rotated_keypoints, None)

# 显示结果
cv2.imshow('Original Image with Keypoints', img_with_keypoints)
cv2.imshow('Rotated Image with Keypoints', rotated_img_with_keypoints)
cv2.waitKey(0)
cv2.destroyAllWindows()
参考文章: