安卓UI的重点之一就是View的绘制流程,经常出现在面试题中。熟悉View的绘制流程,不仅能轻松通过View相关的面试,也可以让我们更加方便的使用自定义View以及官方View。此篇先以常见面试题为切入点,说明自定义View的重要性,然后又以getMeasuredHeight值的获取作为问题点,带着问题从源码角度分析View的绘制流程。
1. 面试题介绍
1.1 Android 基础与底层机制
1. 数据库的操作类型有哪些,如何导入外部数据库?
2. 是否使用过本地广播,和全局广播有什么差别?
3. 是否使用过IntentService,作用是什么,AIDL解决了什么问题?(小米)
4. Activity、Window、View三者的差别,Fragment的特点?(360)
5. 描述一次网络请求的流程(新浪)
6. Handler、Thread和HandlerThread的差别(小米)
7. 低版本SDK实现高版本API(小米)
8. launch mode 应用场景(百度、小米、乐视)
9. touch 事件流程传递(小米)
> 10. view 绘制流程(百度)
11. 什么情况导致内存泄露(美团)
12. ANR定位和修正
13. 什么情况导致OOM (乐视、美团)
14. Android Service 与Activity 之间通信的几种方式
15. Android 各个版本API的区别
16. 如何保证一个后台服务不被杀死,比较省电的方式是什么?(百度)
17. RequestLayout、onLayout、onDraw 、DrawChild 区别与联系(猎豹)
18. Invalidate() 和 postInvalidate() 的区别及使用(百度)
19. Android 动画框架实现原理
2. 不同位置获取 getMeasuredHeight 的值
public class MainActivity extends AppCompatActivity {


    private TextView mTextView;
    private String TAG = "view8";

    @Override
    protected void onCreate(Bundle savedInstanceState) {


        super.onCreate(savedInstanceState);
        setContentView(R.layout.activity_main);
        mTextView = findViewById(R.id.text_view);
        Log.e(TAG, "onCreate: " + "height1 = " + mTextView.getMeasuredHeight());

        mTextView.post(new Runnable() {


            @Override
            public void run() {


                Log.e(TAG, "onCreate: " + "height2 = " + mTextView.getMeasuredHeight());
            }
        });
    }

    @Override
    protected void onResume() {


        super.onResume();
        Log.e(TAG, "onCreate: " + "height3 = " + mTextView.getMeasuredHeight());
    }
}

从上面代码和运行结果可知,在Activity onCreate 和 onResume 的时候都无法获取到 getMeasuredHeight 值,而使用 mTextView.post(new Runnable())方式可以获取到值,为何如此呢?
3. View 的绘制流程
3.1 View的添加流程 (是如何被添加到屏幕窗口上)
3.1.1 创建顶层布局容器DecorView
//View8/app/src/main/java/com/example/view8/MainActivity.java
// 这里主要是以默认继承的 AppCompatActivity 源码分析,如果是继承 Activity,
// 则直接进到PhoneWindow 的 setContentView,但基本流程都差不多
public class MainActivity extends AppCompatActivity {


    protected void onCreate(Bundle savedInstanceState) {


        setContentView(R.layout.activity_main);   // onCreate中主要就是操作了这一行
-------->
//.gradle/caches/modules-2/files-2.1/androidx.appcompat/appcompat/1.6.1/ace9a78b961165396147e8691faa18c1b0e48e20/appcompat-1.6.1-sources.jar!/androidx/appcompat/app/AppCompatActivity.java
    public void setContentView(@LayoutRes int layoutResID) {


        getDelegate().setContentView(layoutResID);
-------->
//.gradle/caches/modules-2/files-2.1/androidx.appcompat/appcompat/1.6.1/ace9a78b961165396147e8691faa18c1b0e48e20/appcompat-1.6.1-sources.jar!/androidx/appcompat/app/AppCompatDelegate.java
    public abstract void setContentView(View v);
-------->
//.gradle/caches/modules-2/files-2.1/androidx.appcompat/appcompat/1.6.1/ace9a78b961165396147e8691faa18c1b0e48e20/appcompat-1.6.1-sources.jar!/androidx/appcompat/app/AppCompatDelegateImpl.java
    public void setContentView(View v) {


        ensureSubDecor();

    private void ensureSubDecor() {


        if (!mSubDecorInstalled) {


            mSubDecor = createSubDecor();

    private ViewGroup createSubDecor() {


        mWindow.getDecorView();  // 这里的mWindow就是PhoneWindow
-------->
//Android/Sdk/sources/android-33/com/android/internal/policy/PhoneWindow.java
    public final @NonNull View getDecorView() {


        if (mDecor == null || mForceDecorInstall) {


            installDecor();

    private void installDecor() {


        if (mDecor == null) {


            mDecor = generateDecor(-1);

    protected DecorView generateDecor(int featureId) {


        return new DecorView(context, featureId, this, getAttributes());   // 在这里new DecorView
3.1.2 在顶层布局中加载基础布局ViewGroup
//Android/Sdk/sources/android-33/com/android/internal/policy/PhoneWindow.java
    private void installDecor() {


        if (mContentParent == null) {


            mContentParent = generateLayout(mDecor);

    protected ViewGroup generateLayout(DecorView decor) {


        int layoutResource;
        // 通过不同的条件(主题),对 layoutResource 进行初始化,然后传入 onResourcesLoaded
            // 假设 layoutResource 走了这个,如果走了其他的,布局中也会有FrameLayout,只是上面的东西不一样
            layoutResource = R.layout.screen_simple;
        mDecor.onResourcesLoaded(mLayoutInflater, layoutResource);

        // ID_ANDROID_CONTENT = com.android.internal.R.id.content,也就是 layoutResource 中的 FrameLayout 布局
        ViewGroup contentParent = (ViewGroup)findViewById(ID_ANDROID_CONTENT);
        return contentParent;  // 将 FrameLayout 布局 返回
-------->
//Android/Sdk/sources/android-33/com/android/internal/policy/DecorView.java
    void onResourcesLoaded(LayoutInflater inflater, int layoutResource) {


        final View root = inflater.inflate(layoutResource, null);
        if (mDecorCaptionView != null) {


            mDecorCaptionView.addView(root,
                    new ViewGroup.MarginLayoutParams(MATCH_PARENT, MATCH_PARENT));
        } else {


            // 解析layoutResource,执行了addView,添加到 mDecor 里
            addView(root, 0, new ViewGroup.LayoutParams(MATCH_PARENT, MATCH_PARENT));
-------->
<!-- Android/Sdk/platforms/android-33/data/res/layout/screen_simple.xml -->
<LinearLayout xmlns:android="http://schemas.android.com/apk/res/android"
    android:layout_width="match_parent"
    android:layout_height="match_parent"
    android:fitsSystemWindows="true"
    android:orientation="vertical">
    <ViewStub android:id="@+id/action_mode_bar_stub"
              android:inflatedId="@+id/action_mode_bar"
              android:layout="@layout/action_mode_bar"
              android:layout_width="match_parent"
              android:layout_height="wrap_content"
              android:theme="?attr/actionBarTheme" />
    <FrameLayout
         android:id="@android:id/content"
         android:layout_width="match_parent"
         android:layout_height="match_parent"
         android:foregroundInsidePadding="false"
         android:foregroundGravity="fill_horizontal|top"
         android:foreground="?android:attr/windowContentOverlay" />
</LinearLayout>
3.1.3 将ContentView添加到基础布局中的FrameLayout中
// 如果 MainActivity extends Activity
//Android/Sdk/sources/android-33/com/android/internal/policy/PhoneWindow.java
    public void setContentView(int layoutResID) {


    // 将我们创建的 R.layout.activity_main 布局,放到 mContentParent 即系统创建的 FrameLayout 布局中
            mLayoutInflater.inflate(layoutResID, mContentParent);

// 如果 MainActivity extends AppCompatActivity
//.gradle/caches/modules-2/files-2.1/androidx.appcompat/appcompat/1.6.1/ace9a78b961165396147e8691faa18c1b0e48e20/appcompat-1.6.1-sources.jar!/androidx/appcompat/app/AppCompatDelegateImpl.java
    public void setContentView(int resId) {


        // 将我们创建的 R.layout.activity_main 布局,放到 mContentParent 即系统创建的 FrameLayout 布局中
        LayoutInflater.from(mContext).inflate(resId, contentParent);
PhoneWindow 是 Window 的唯一实现类,以上操作,只是把我们的布局 R.layout.activity_main加载到 DecorView中。此时还是什么都不会显示的。

3.2 View的绘制流程
上面已经走了一遍View的添加流程,即创建DecorView,然后将我们的布局R.layout.activity_main添加进去,但是还没有走View的测量,所以还是拿不到getMeasuredHeight值的。上节我们已经看了onCreate方法,即ActivityThread#performLaunchActivity,这次就不看了,直接从ActivityThread#handleResumeActivity开始。
//Android/Sdk/sources/android-33/android/app/ActivityThread.java
    public void handleRelaunchActivity(ActivityClientRecord tmp,
            PendingTransactionActions pendingActions) {


        handleRelaunchActivityInner(r, configChanges, tmp.pendingResults, tmp.pendingIntents,
                pendingActions, tmp.startsNotResumed, tmp.overrideConfig, "handleRelaunchActivity");

    private void handleRelaunchActivityInner(ActivityClientRecord r, int configChanges,
            List<ResultInfo> pendingResults, List<ReferrerIntent> pendingIntents,
            PendingTransactionActions pendingActions, boolean startsNotResumed,
            Configuration overrideConfig, String reason) {


        handleLaunchActivity(r, pendingActions, customIntent);

    public Activity handleLaunchActivity(ActivityClientRecord r,
            PendingTransactionActions pendingActions, Intent customIntent) {


        final Activity a = performLaunchActivity(r, customIntent);

    public void handleResumeActivity(ActivityClientRecord r, boolean finalStateRequest,
            boolean isForward, String reason) {


        // 这里的performResumeActivity就会回到 Activity 的 Resume 方法
        if (!performResumeActivity(r, finalStateRequest, reason)) {


            return;
此时,onCreate方法和onResume方法都已经调用了,但是因为没有调用onMeasure方法,所以还是拿不到getMeasuredHeight的值,需要接着往下走。
//Android/Sdk/sources/android-33/android/app/ActivityThread.java
    public void handleResumeActivity(ActivityClientRecord r, boolean finalStateRequest,
            boolean isForward, String reason) {


        // 这里的performResumeActivity就会回到 Activity 的 Resume 方法
        if (!performResumeActivity(r, finalStateRequest, reason)) {


            return;
        }
        if (r.window == null && !a.mFinished && willBeVisible) {


            ViewManager wm = a.getWindowManager();  // 这个 ViewManager 是一个接口,我们需要找这个的实现
            if (a.mVisibleFromClient) {


                if (!a.mWindowAdded) {


                    // 这里的 wm 就是 ViewManager 的 getWindowManager,这个时候才加载到WindowManager里面,才开始View的绘制流程
                    wm.addView(decor, l);
-------->
//Android/Sdk/sources/android-33/android/app/Activity.java
    public WindowManager getWindowManager() {


        return mWindowManager;  // 接着找这个 mWindowManager 在哪里实现
    }

    final void attach(Context context, ActivityThread aThread, ...) {


        mWindowManager = mWindow.getWindowManager();   // 这里是mWindow,我们知道Window的唯一实现类就是PhoneWindow
-------->
//Android/Sdk/sources/android-33/com/android/internal/policy/PhoneWindow.java
        final ViewManager wm = getWindowManager();  // 接着进入 getWindowManager
-------->
//Android/Sdk/sources/android-33/android/view/Window.java
    public WindowManager getWindowManager() {


        return mWindowManager;    // 发现这里又返回了 mWindowManager,我们继续找这个的实现

    public void setWindowManager(WindowManager wm, IBinder appToken, String appName,
            boolean hardwareAccelerated) {


                    // 接着需要进入 WindowManagerImpl ,所以上面的wm 返回的就是 WindowManagerImpl ,接着在这个类里面找 addView
                    mWindowManager = ((WindowManagerImpl)wm).createLocalWindowManager(this);
-------->
//Android/Sdk/sources/android-33/android/view/WindowManagerImpl.java
    public void addView(@NonNull View view, @NonNull ViewGroup.LayoutParams params) {


        applyTokens(params);
        mGlobal.addView(view, params, mContext.getDisplayNoVerify(), mParentWindow,
                mContext.getUserId());  // 发现这里又调用了 mGlobal.addView
    }
-------->
//Android/Sdk/sources/android-33/android/view/WindowManagerGlobal.java
    public void addView(View view, ViewGroup.LayoutParams params,
            Display display, Window parentWindow, int userId) {


        ViewRootImpl root;  // 申明root,之前讲过的 invalidate() 的 ViewRootImpl 就是在这里实例化的

            // 通过 ViewRootImpl 的构造方法,将root实例化
            if (windowlessSession == null) {


                root = new ViewRootImpl(view.getContext(), display);
            } else {


                root = new ViewRootImpl(view.getContext(), display, windowlessSession);
            }
            view.setLayoutParams(wparams);

            mViews.add(view);
            mRoots.add(root);
            mParams.add(wparams);

            try {


                root.setView(view, wparams, panelParentView, userId);  // 将这几个参数关联起来
-------->
//Android/Sdk/sources/android-33/android/view/ViewRootImpl.java
    public void setView(View view, WindowManager.LayoutParams attrs, View panelParentView,
            int userId) {


        synchronized (this) {


            if (mView == null) {


                requestLayout();

    public void requestLayout() {


        if (!mHandlingLayoutInLayoutRequest) {


            scheduleTraversals();

    void scheduleTraversals() {


        if (!mTraversalScheduled) {


            mChoreographer.postCallback(
                    Choreographer.CALLBACK_TRAVERSAL, mTraversalRunnable, null);   // 之前onDraw的源码看过这里

    final TraversalRunnable mTraversalRunnable = new TraversalRunnable();

    final class TraversalRunnable implements Runnable {


        @Override
        public void run() {


            doTraversal();

    void doTraversal() {


        if (mTraversalScheduled) {


            performTraversals();  // 书上和网上,一般从这个方法开始讲
3.2.1 View的测量
//Android/Sdk/sources/android-33/android/view/ViewRootImpl.java
    private void performTraversals() {


        if (mFirst || windowShouldResize || viewVisibilityChanged || params != null
                || mForceNextWindowRelayout) {


            if (!mStopped || mReportNextDraw) {


                if (mWidth != host.getMeasuredWidth() || mHeight != host.getMeasuredHeight()
                        || dispatchApplyInsets || updatedConfiguration) {


                    performMeasure(childWidthMeasureSpec, childHeightMeasureSpec);  // 测量,父类需要多大

        if (didLayout) {


            performLayout(lp, mWidth, mHeight);   // 布局

        if (!isViewVisible) {


        } else {


            if (!performDraw() && mSyncBufferCallback != null) {

       // 绘制
performTraversals测量三大步,包括测量、布局、绘制,先看测量:
//Android/Sdk/sources/android-33/android/view/ViewRootImpl.java
    private void performMeasure(int childWidthMeasureSpec, int childHeightMeasureSpec) {


        try {


            // 这里的mView就是DecorView,MeasureSpec即测量规格,封装了模式和尺寸
            mView.measure(childWidthMeasureSpec, childHeightMeasureSpec);
-------->
/home/xjsd/Android/Sdk/sources/android-33/android/view/View.java
// MeasureSpec 是 32位 int 值,SpecMode(前2位),SpecSize(后30位), MODE_SHIFT = 30;
    // 父容器不对View有任何限制,一般是系统使用
    public static final int UNSPECIFIED = 0 << MODE_SHIFT;     // 0左移30位:00 0000000000 0000000000 0000000000

    // 父容易已经检测出View的大小,即SpecSize,如match、fill、固定值
    public static final int EXACTLY     = 1 << MODE_SHIFT;     // 1左移30位:01 0000000000 0000000000 0000000000

    // 父容器指定一个可用大小,View的大小不超过这个值。 如 wrap_content
    public static final int AT_MOST     = 2 << MODE_SHIFT;     // 2左移30位:10 0000000000 0000000000 0000000000

-------->
//Android/Sdk/sources/android-33/android/view/View.java
    public final void measure(int widthMeasureSpec, int heightMeasureSpec) {


        if (forceLayout || needsLayout) {


            if (cacheIndex < 0 || sIgnoreMeasureCache) {


                // 测量从这里开始,即调用了DecorView的onMeasure方法。如果这里的布局是LinerLayout,则看LinerLayout#onMeasure,如果是RelativeLayout,则看RelativeLayout#onMeasure方法
                onMeasure(widthMeasureSpec, heightMeasureSpec);
-------->
//Android/Sdk/sources/android-33/com/android/internal/policy/DecorView.java
    protected void onMeasure(int widthMeasureSpec, int heightMeasureSpec) {


        // 这之前做了一些判断,再调用到super.onMeasure方法,即FrameLayout#onMeasure方法。
        super.onMeasure(widthMeasureSpec, heightMeasureSpec);
-------->
//Android/Sdk/sources/android-33/android/widget/FrameLayout.java
    protected void onMeasure(int widthMeasureSpec, int heightMeasureSpec) {


        // 递归对所有的子控件进行测量
        for (int i = 0; i < count; i++) {


            final View child = getChildAt(i);
            if (mMeasureAllChildren || child.getVisibility() != GONE) {


                measureChildWithMargins(child, widthMeasureSpec, 0, heightMeasureSpec, 0);  // 会先遍历,对子控件进行测量
-------->
/Android/Sdk/sources/android-33/android/view/ViewGroup.java
    protected void measureChildWithMargins(View child,
            int parentWidthMeasureSpec, int widthUsed,
            int parentHeightMeasureSpec, int heightUsed) {


        final MarginLayoutParams lp = (MarginLayoutParams) child.getLayoutParams();

        final int childWidthMeasureSpec = getChildMeasureSpec(parentWidthMeasureSpec,
                mPaddingLeft + mPaddingRight + lp.leftMargin + lp.rightMargin
                        + widthUsed, lp.width);
        final int childHeightMeasureSpec = getChildMeasureSpec(parentHeightMeasureSpec,
                mPaddingTop + mPaddingBottom + lp.topMargin + lp.bottomMargin
                        + heightUsed, lp.height);

        child.measure(childWidthMeasureSpec, childHeightMeasureSpec);
    }

    // spec 父容器测量规格; padding,父容易已经使用的padding; 子控件的宽或高
    // MATCH_PARENT = -1; WRAP_CONTENT = -2;
    public static int getChildMeasureSpec(int spec, int padding, int childDimension) {


        switch (specMode) {


        case MeasureSpec.EXACTLY:
            if (childDimension >= 0) {


                resultSize = childDimension;  // 传过来的子控件需要的size
                resultMode = MeasureSpec.EXACTLY;
            } else if (childDimension == LayoutParams.MATCH_PARENT) {


                resultSize = size;           // 对应父容器的size,即specSize - padding
                resultMode = MeasureSpec.EXACTLY;
            } else if (childDimension == LayoutParams.WRAP_CONTENT) {


                resultSize = size;          // 由于给的是wrap,不能确定最终的值,所以暂时给它父容器的size
                resultMode = MeasureSpec.AT_MOST;
            }
            break;
        case MeasureSpec.AT_MOST:
            ···
        case MeasureSpec.UNSPECIFIED:
            ···
        return MeasureSpec.makeMeasureSpec(resultSize, resultMode);
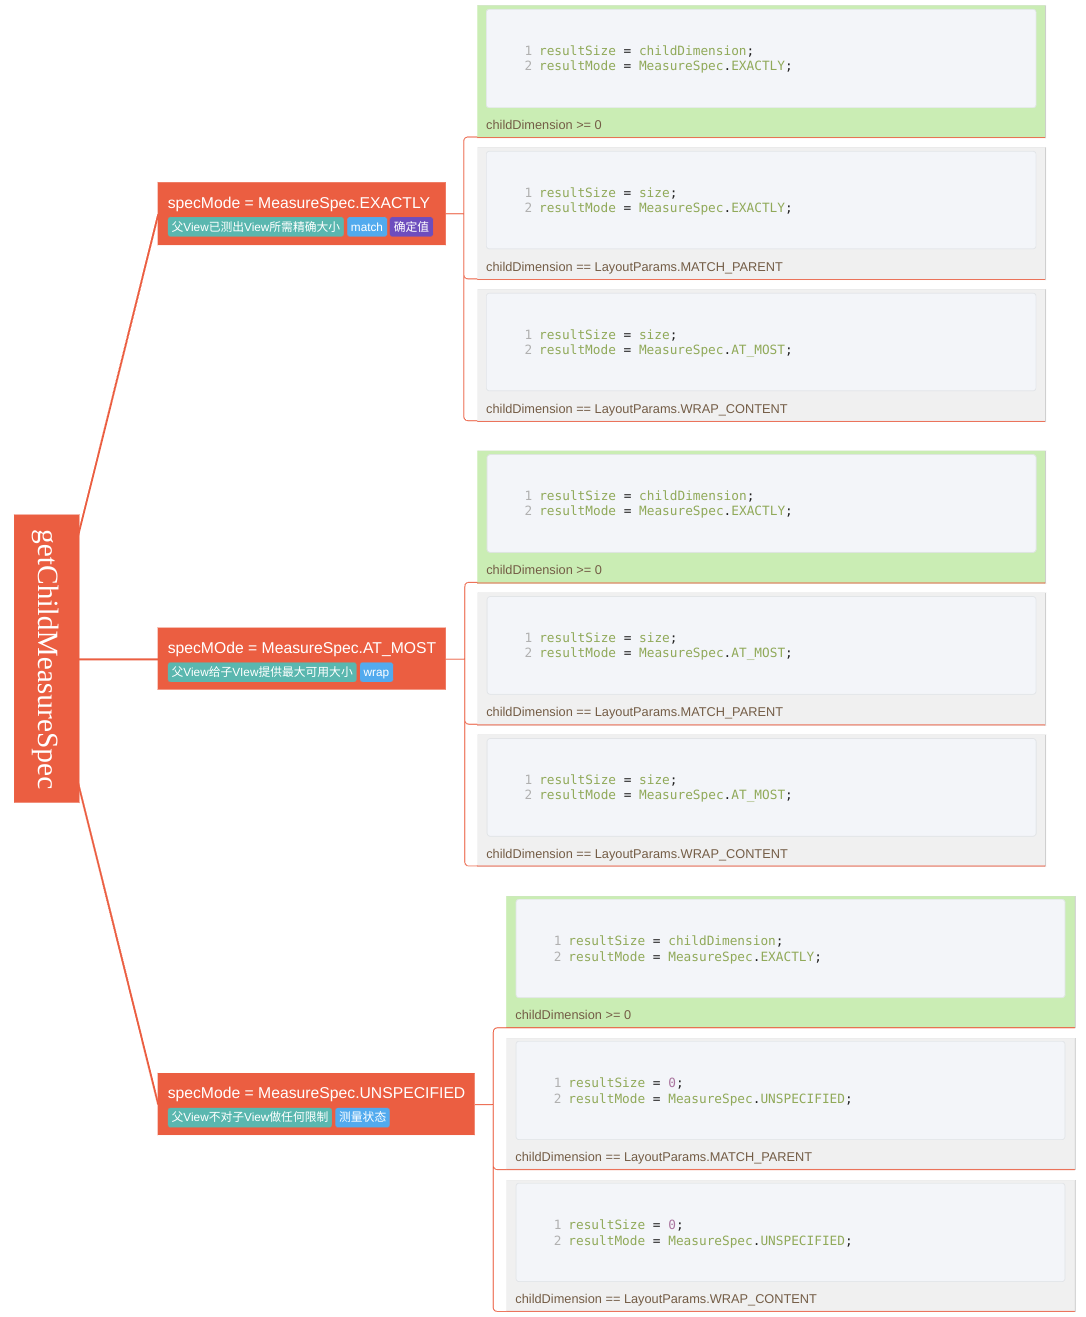
View的MeasureSpec由父容器的MeasureSpec和自身的LayoutParams决定
| childLayoutParams/parenrSpecMode | EXACTLY | AT_MOST | UNSPECIFIED |
|---|---|---|---|
| dp/dx | EXACTLY childSize | EXACTLY childSize | EXACTLY childSize |
| match_parent | EXACTLY parentSize | AT_MOST parentSize | UNSPECIFIED 0 |
| wrap_content | AT_MOST parentSize | AT_MOST parentSize | UNSPECIFIED 0 |
3.2.1.1 获取View的高
通过上面一系列测量之后,最终设置控件的宽高。此时,就能成功获取getMeasuredHeight的值了。
//Android/Sdk/sources/android-33/android/widget/FrameLayout.java
        for (int i = 0; i < count; i++) {


            final View child = getChildAt(i);
            if (mMeasureAllChildren || child.getVisibility() != GONE) {


                measureChildWithMargins(child, widthMeasureSpec, 0, heightMeasureSpec, 0);  // 循环获取子控件测量规格

        setMeasuredDimension(resolveSizeAndState(maxWidth, widthMeasureSpec, childState),
                resolveSizeAndState(maxHeight, heightMeasureSpec,
                        childState << MEASURED_HEIGHT_STATE_SHIFT));  // 先获取的确定最大宽高,再设置自身的宽高
3.2.1.2 为何不重写onMeasure方法时设置wrap和match效果一样
在之前的自定义View中,如果直接设置自定义View的值为wrap_content,不重写onMeasure,那么显示的效果和match_parent一样,这是为何呢?
//Android/Sdk/sources/android-33/android/view/View.java
    public final void measure(int widthMeasureSpec, int heightMeasureSpec) {


        if (forceLayout || needsLayout) {


            if (cacheIndex < 0 || sIgnoreMeasureCache) {


                onMeasure(widthMeasureSpec, heightMeasureSpec);    // 测量从这里开始,即调用了DecorView的onMeasure方法

    protected void onMeasure(int widthMeasureSpec, int heightMeasureSpec) {


        setMeasuredDimension(getDefaultSize(getSuggestedMinimumWidth(), widthMeasureSpec),
                getDefaultSize(getSuggestedMinimumHeight(), heightMeasureSpec));
    }

    public static int getDefaultSize(int size, int measureSpec) {


        int result = size;
        int specMode = MeasureSpec.getMode(measureSpec);
        int specSize = MeasureSpec.getSize(measureSpec);

        switch (specMode) {


        case MeasureSpec.UNSPECIFIED:
            result = size;
            break;
        case MeasureSpec.AT_MOST:
        case MeasureSpec.EXACTLY:
            // 从这里可知,默认的size情况下,不管是AT_MOST还是EXACTLY,返回的都是父布局的大小
            result = specSize;
            break;
        }
        return result;
    }
3.2.2 View的布局
在 3.2.1.1 我们已经知道了getMeasuredHeight在什么时候可以拿到,也就解决了一开始的疑问。从 3.2.1 代码来看,不止有View的测量,还有View的布局和View的绘制,我们接着往下看,借getMeasuredHeight问题,搞明白View的绘制流程。
View的布局相比View的测量,要简单不少。调用view.layout确定自身的位置,即left、top、right、bottom。
//Android/Sdk/sources/android-33/android/view/ViewRootImpl.java
    private void performTraversals() {


        if (didLayout) {


            performLayout(lp, mWidth, mHeight);   // 布局:lp,顶层容器(DecorView)的布局属性;mWidth/mHeight,顶层布局的宽高

    private void performLayout(WindowManager.LayoutParams lp, int desiredWindowWidth,
            int desiredWindowHeight) {


         try {


            host.layout(0, 0, host.getMeasuredWidth(), host.getMeasuredHeight());
-------->
//Android/Sdk/sources/android-33/android/view/View.java
    public void layout(int l, int t, int r, int b) {


        int oldL = mLeft;
        int oldT = mTop;
        int oldB = mBottom;
        int oldR = mRight;

        boolean changed = isLayoutModeOptical(mParent) ?
                setOpticalFrame(l, t, r, b) : setFrame(l, t, r, b);  // 在setFrame中给,左上下右赋值

    protected boolean setFrame(int left, int top, int right, int bottom) {


            mLeft = left;
            mTop = top;
            mRight = right;
            mBottom = bottom;
            mRenderNode.setLeftTopRightBottom(mLeft, mTop, mRight, mBottom);  // 该方法会根据left、top、right、bottom更新用于渲染的View。
这个layout#onLayout值得注意,这是一个空实现,如果我们自定义的View的话用不上,但是如果要自定义ViewGroup,那么可以用这个方法来确定子View的位置。
//Android/Sdk/sources/android-33/android/view/View.java
    public void layout(int l, int t, int r, int b) {


        if (changed || (mPrivateFlags & PFLAG_LAYOUT_REQUIRED) == PFLAG_LAYOUT_REQUIRED) {


            onLayout(changed, l, t, r, b);

    protected void onLayout(boolean changed, int left, int top, int right, int bottom) {


    }
可以以FrameLayout#onLayout为例
//Android/Sdk/sources/android-33/android/widget/FrameLayout.java
    protected void onLayout(boolean changed, int left, int top, int right, int bottom) {


        layoutChildren(left, top, right, bottom, false /* no force left gravity */);
    }

    void layoutChildren(int left, int top, int right, int bottom, boolean forceLeftGravity) {


        for (int i = 0; i < count; i++) {


                // for循环确定left、top、right、bottom位置,并调用child.layout,属于是嵌套使用了
                child.layout(childLeft, childTop, childLeft + width, childTop + height);
            }
        }
3.2.3 View的绘制
这个流程在《自定义View(2)onMeasure、onDraw》 的4.1 中讲过,这里再跟一遍。从源码开头就可以看出,一共分成七步。
        /*
         * Draw traversal performs several drawing steps which must be executed
         * in the appropriate order:
         *
         *      1. Draw the background
         *      2. If necessary, save the canvas' layers to prepare for fading
         *      3. Draw view's content
         *      4. Draw children
         *      5. If necessary, draw the fading edges and restore layers
         *      6. Draw decorations (scrollbars for instance)
         *      7. If necessary, draw the default focus highlight
         */
        绘制遍历执行几个绘制步骤,这些步骤必须按照适当的顺序执行:
        1、绘制背景
        2、如有必要,请保存画布的图层,为淡入淡出
        3、做准备。绘制视图的内容
        4、画孩子
        5、如有必要,绘制渐变边并恢复层
        6、绘制装饰(例如滚动条)
        7、如有必要,绘制默认的焦点高亮显示
//Android/Sdk/sources/android-33/android/view/ViewRootImpl.java
        if (!isViewVisible) {


        } else {


            if (!performDraw() && mSyncBufferCallback != null) {

       // 绘制

    private boolean performDraw() {


        try {


            boolean canUseAsync = draw(fullRedrawNeeded, usingAsyncReport && mSyncBuffer);

    private boolean draw(boolean fullRedrawNeeded, boolean forceDraw) {


        if (!dirty.isEmpty() || mIsAnimating || accessibilityFocusDirty) {


            if (isHardwareEnabled()) {


            } else {


                if (!drawSoftware(surface, mAttachInfo, xOffset, yOffset,
                        scalingRequired, dirty, surfaceInsets)) {


    private boolean drawSoftware(Surface surface, AttachInfo attachInfo, int xoff, int yoff,
            boolean scalingRequired, Rect dirty, Rect surfaceInsets) {


        try {


            mView.draw(canvas);   // 这个mView就是DecorView
-------->
//Android/Sdk/sources/android-33/android/view/View.java
    public void draw(Canvas canvas) {


        // Step 1, draw the background, if needed
        int saveCount;
        drawBackground(canvas);

        // skip step 2 & 5 if possible (common case)

        if (!verticalEdges && !horizontalEdges) {


            // Step 3, draw the content
            onDraw(canvas);

            // Step 4, draw the children
            dispatchDraw(canvas);

            // Step 6, draw decorations (foreground, scrollbars)
            onDrawForeground(canvas);

            // Step 7, draw the default focus highlight
            drawDefaultFocusHighlight(canvas);