vue基础
1.介绍
为什么会有Vuex ?
Vuex 是一个专为 Vue.js 应用程序开发的状态管理模式。它采用集中式存储管理应用的所有组件的状态,并以相应的规则保证状态以一种可预测的方式发生变化。
-
vuex是采用集中式管理组件依赖的共享数据的一个工具,可以解决不同组件数据共享问题。
-
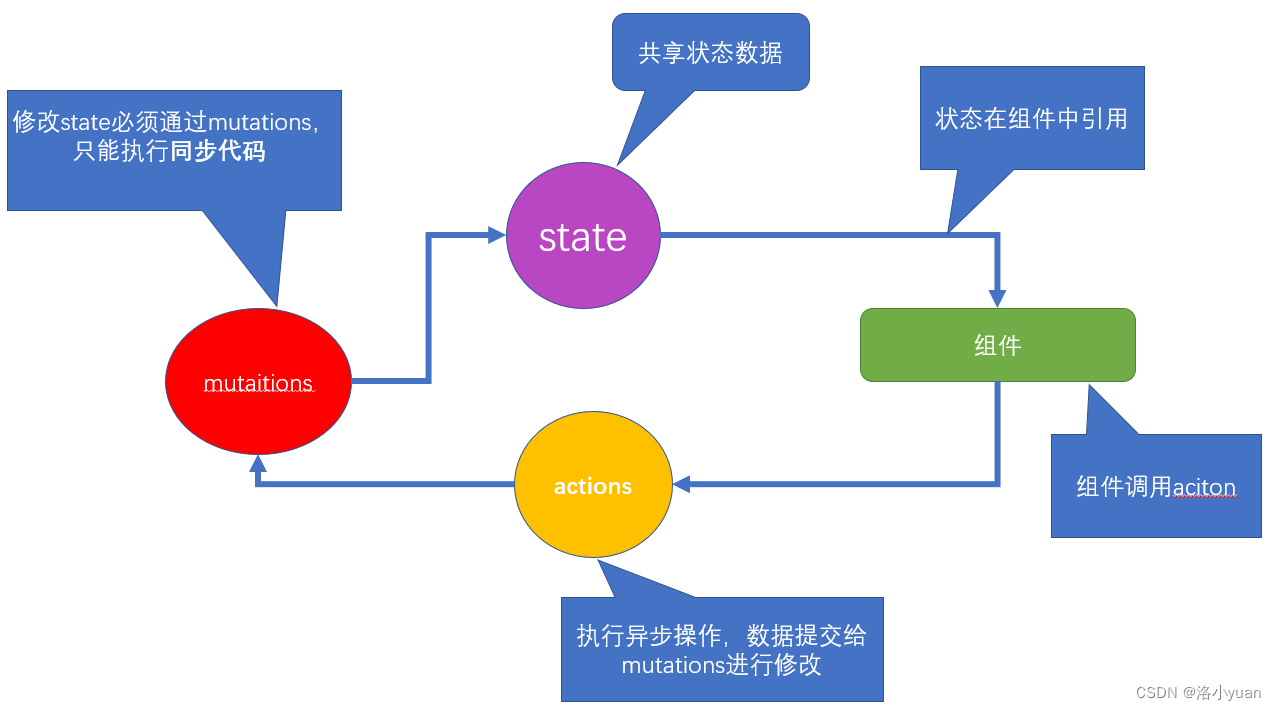
结论
- 修改state状态必须通过
mutations mutations只能执行同步代码,类似ajax,定时器之类的代码不能在mutations中执行- 执行异步代码,要通过actions,然后将数据提交给mutations才可以完成
- state的状态即共享数据可以在组件中引用
- 组件中可以调用action
2.初始化功能
建立一个新的脚手架项目, 在项目中应用vuex
vue create demo初始化:
-
第一步:
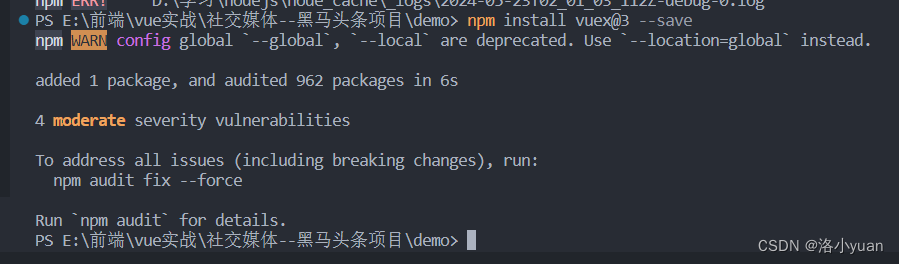
npm i vuex --save=> 安装到运行时依赖=> 项目上线之后依然使用的依赖 ,开发时依赖 => 开发调试时使用 -
-
遇到以下问题是因为发生了版本不兼容得问题,vue是2.7.16得版本应该下载vuex3得版本
-

开发时依赖 就是开开发的时候,需要的依赖,运行时依赖,项目上线运行时依然需要的
- 第二步: 在main.js中
import Vuex from 'vuex' - 第三步:在main.js中
Vue.use(Vuex)=> 调用了 vuex中的 一个install方法 - 第四步:
const store = new Vuex.Store({...配置项}) - 第五步:在根实例配置 store 选项指向 store 实例对象
import Vue from 'vue'
import App from './App.vue'
import Vuex from 'vuex'

Vue.config.productionTip = false
Vue.use(Vuex) //注册Vuex得功能 vue.use得方法实际上是调用了vuex中得一个install方法
const store = new Vuex.Store()  //实例化一个vuex
new Vue({
  render: h => h(App),
  store //Es6写法
}).$mount('#app')
3.state
state是放置所有公共状态的属性,如果你有一个公共状态数据 , 你只需要定义在 state对象中
定义state
import Vue from 'vue'
import App from './App.vue'
import Vuex from 'vuex'
Vue.config.productionTip = false
Vue.use(Vuex) //注册Vuex得功能 vue.use得方法实际上是调用了vuex中得一个install方法
const store = new Vuex.Store({
// 实例化vuex得构造参数 state mutations actions
state:{
// 存储状态:
count:0
}
}) //实例化一个vuex
new Vue({
render: h => h(App),
store //Es6写法
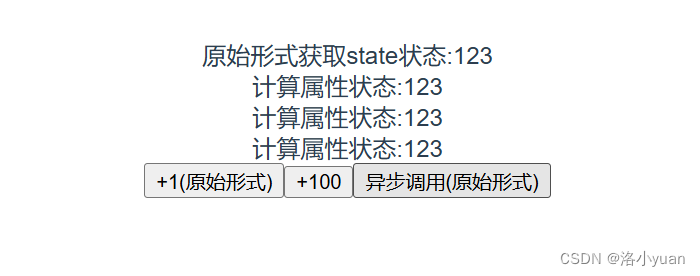
}).$mount('#app')如何在组件中获取count?
原始形式- 插值表达式
App.vue
组件中可以使用 this.$store 获取到vuex中的store对象实例,可通过state属性属性获取count, 如下:
<template>
  <div id="app">
    <!-- 原始形式应用 -->
    <div>原始形式获取state状态:{

   { $store.state.count }}</div>
  </div>
</template>

<script>
  export default {
    name:'App',
  }
</script>

<style>
#app {
  font-family: Avenir, Helvetica, Arial, sans-serif;
  -webkit-font-smoothing: antialiased;
  -moz-osx-font-smoothing: grayscale;
  text-align: center;
  color: #2c3e50;
  margin-top: 60px;
}
</style>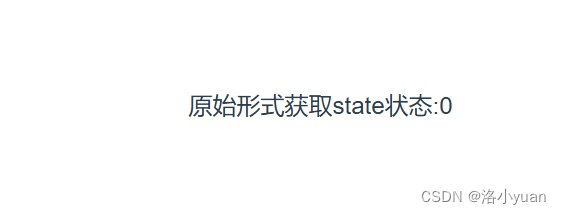
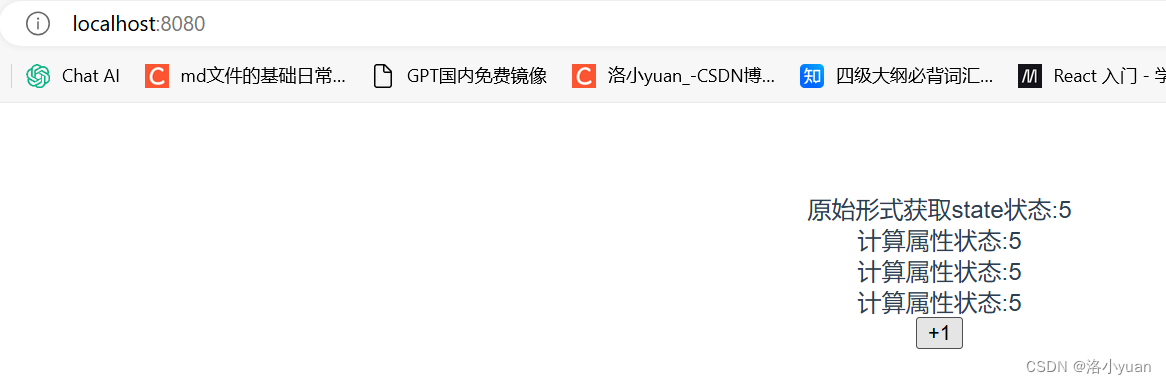
计算属性 - 将state属性定义在计算属性中
<template>
  <div id="app">
    <!-- 原始形式应用 -->
    <div>原始形式获取state状态:{

   { $store.state.count }}</div>
    <div>计算属性状态:{

   { count }}</div>
    <div>计算属性状态:{

   { count }}</div>
    <div>计算属性状态:{

   { count }}</div>
  </div>
</template>

<script>
  export default {
    name:'App',
    computed:{
      count(){
        // 来源于vuex
        return this.$store.state.count
      }
    }
  }
</script>

<style>
#app {
  font-family: Avenir, Helvetica, Arial, sans-serif;
  -webkit-font-smoothing: antialiased;
  -moz-osx-font-smoothing: grayscale;
  text-align: center;
  color: #2c3e50;
  margin-top: 60px;
}
</style>
辅助函数 - mapState
mapState是辅助函数,帮助我们把store中的数据映射到 组件的计算属性中, 它属于一种方便用法
<template>
  <div id="app">
    <!-- 原始形式应用 -->
    <div>原始形式获取state状态:{

   { $store.state.count }}</div>
    <div>计算属性状态:{

   { count }}</div>
    <div>计算属性状态:{

   { count }}</div>
    <div>计算属性状态:{

   { count }}</div>
  </div>
</template>

<script>
import {mapState} from 'vuex'
  export default {
    name:'App',
    computed:{
      // count(){
      //   // 来源于vuex
      //   return this.$store.state.count
      // }
      ...mapState(['count'])
    }
  }
</script>

<style>
#app {
  font-family: Avenir, Helvetica, Arial, sans-serif;
  -webkit-font-smoothing: antialiased;
  -moz-osx-font-smoothing: grayscale;
  text-align: center;
  color: #2c3e50;
  margin-top: 60px;
}
</style>
4.mutations
state数据的修改只能通过mutations,并且mutations必须是同步更新,目的是形成
数据快照
数据快照:一次mutation的执行,立刻得到一种视图状态,因为是立刻,所以必须是同步
定义mutation
<template>
  <div id="app">
    <!-- 原始形式应用 -->
    <div>原始形式获取state状态:{

   { $store.state.count }}</div>
    <div>计算属性状态:{

   { count }}</div>
    <div>计算属性状态:{

   { count }}</div>
    <div>计算属性状态:{

   { count }}</div>
    <!-- <ChildA /> -->
    <child-a />
  </div>
</template>

<script>
import {mapState} from 'vuex'
import ChildA from './components/child-a.vue'
  export default {
    components:{
      ChildA
    },
    name:'App',
    computed:{
      // count(){
      //   // 来源于vuex
      //   return this.$store.state.count
      // }
      ...mapState(['count'])
    }
  }
</script>

<style>
#app {
  font-family: Avenir, Helvetica, Arial, sans-serif;
  -webkit-font-smoothing: antialiased;
  -moz-osx-font-smoothing: grayscale;
  text-align: center;
  color: #2c3e50;
  margin-top: 60px;
}
</style>原始形式-$store
新建组件child-a.vue,内容为一个button按钮,点击按钮调用mutations
<template>
    <button @click="addCount">+1</button>
</template>

<script>
export default {
    methods: {
        //   调用方法
        addCount() {
            // 调用store中的mutations 提交给muations
            // commit('muations名称', 2)
            this.$store.commit('addCount', 10)  // 直接调用mutations
        }
    }
}
</script>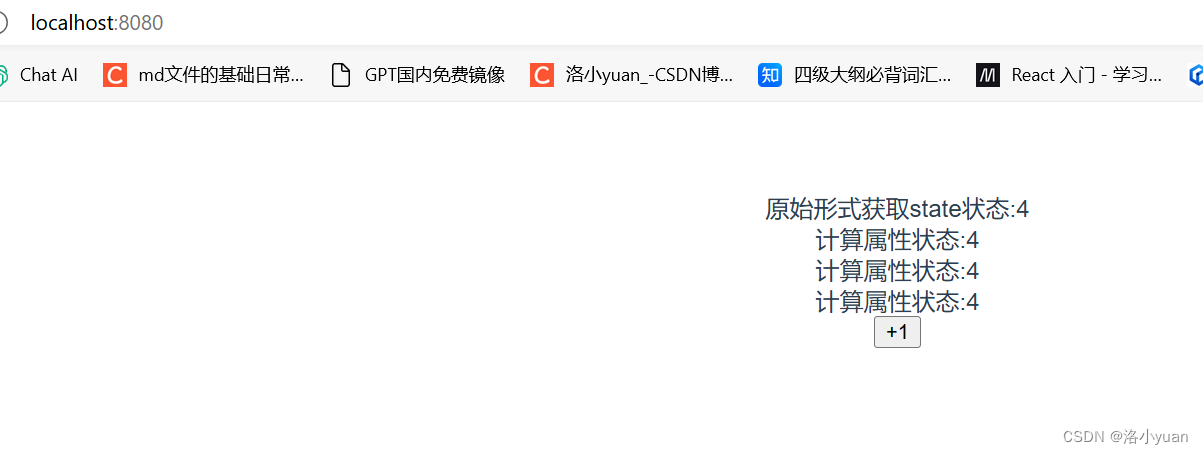
带参数的传递
child-a.vue
<template>
    <button @click="addCount">+1(原始形式)</button>
</template>

<script>
export default {
    methods: {
        // 原始形式得调用
        //   调用方法
        addCount() {
            // 调用store中的mutations 提交给muations
            // commit('muations名称', 2)
            // 给mutation传值
            // commit得第二个参数就是要传递得载荷payload
            this.$store.commit('addCount', 10)  // 直接调用mutations
        }
    }
}
</script>
main.js
import Vue from 'vue'
import App from './App.vue'
import Vuex from 'vuex'

Vue.config.productionTip = false
Vue.use(Vuex) //注册Vuex得功能 vue.use得方法实际上是调用了vuex中得一个install方法
const store = new Vuex.Store({
  // 实例化vuex得构造参数 state mutations actions
  state:{
    // 存储状态:
    count:0
  },
  // 修改state必须通过mutations
  mutations:{
    // 修改state得mutation方法
    // 方法里参数 第一个参数是当前store的state属性
    // payload 载荷 运输参数 调用mutaiions的时候 可以传递参数 传递载荷
    addCount(state, payload) {
      state.count += payload
    }

  }
})  //实例化一个vuex
new Vue({
  render: h => h(App),
  store //Es6写法
}).$mount('#app')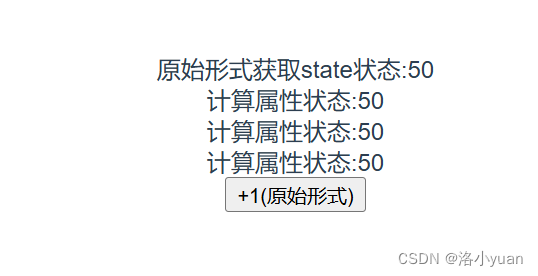
辅助函数 - mapMutations
mapMutations和mapState很像,它把位于mutations中的方法提取了出来,我们可以将它导入
child-a.vue
<template>
<div>
        <button @click="test">+1(原始形式)</button>
        <!-- vue方法得默认第一个参数 事件参数 -->
        <button @click="addCount(100)">+100</button>
</div>
</template>

<script>
import { mapMutations } from 'vuex'
export default {
    methods: {
        // 原始形式得调用
        //   调用方法
        test() {
            // 调用store中的mutations 提交给muations
            // commit('muations名称', 2)
            // 给mutation传值
            // commit得第二个参数就是要传递得载荷payload
            this.$store.commit('addCount', 1)  // 直接调用mutations
        },
        ...mapMutations(['addCount']) //此时组件方法中就会拥有一个对应的addCount方法
    }
}
</script>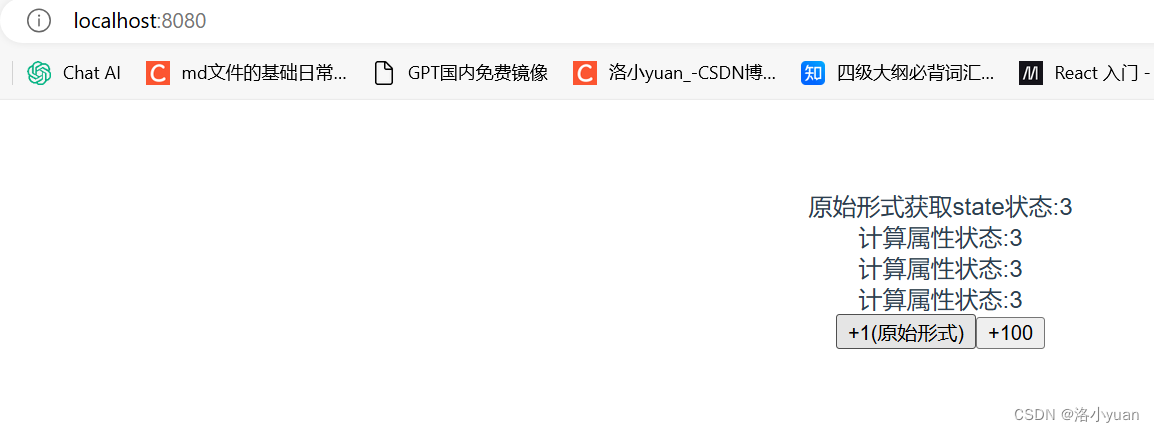
但是请注意: Vuex中mutations中要求不能写异步代码,如果有异步的ajax请求,应该放置在actions中
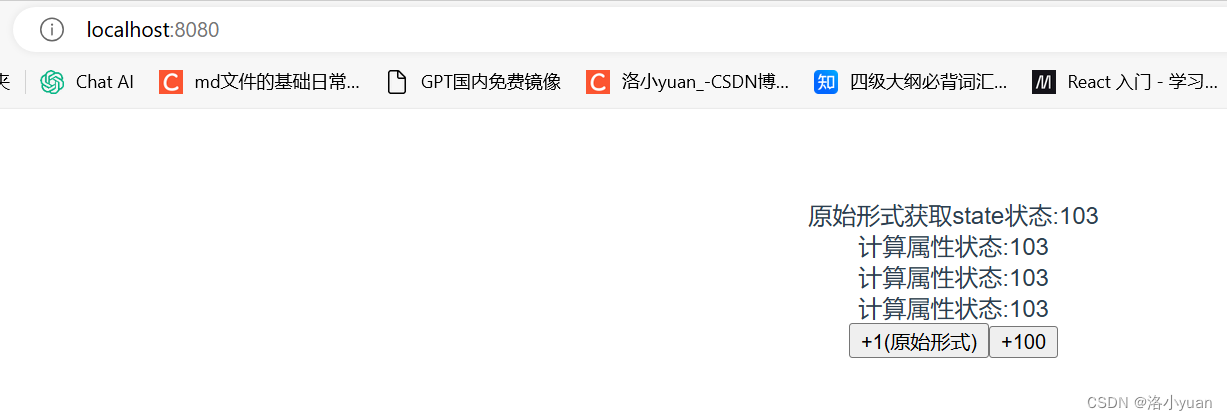
5.actions
state是存放数据的,mutations是同步更新数据,actions则负责进行异步操作
定义actions
在文件main.js文件中去定义actions
// 原始调用
actions: {
  //  获取异步的数据 context表示当前的store的实例 可以通过 context.state 获取状态 也可以通过context.commit 来提交mutations, 也可以 context.diapatch调用其他的action
    getAsyncCount (context) {
      setTimeout(function(){
        // 一秒钟之后 要给一个数 去修改state
        context.commit('addCount', 123)
      }, 1000)
    }
 }


// 传参调用
actions: {
    //  获取异步的数据 context表示当前的store的实例 可以通过 context.state 获取状态 也可以通过context.commit 来提交mutations, 也可以 context.diapatch调用其他的action
    getAsyncCount(context,params) {
      setTimeout(function () {
        // 一秒钟之后 要给一个数 去修改state
        context.commit('addCount', params)
      }, 1000)
    }
  }
原始调用-$store
 addAsyncCount () {
     this.$store.dispatch('getAsyncCount')
 }
传参调用
test1(){
    // 原始形式
    // commit是提交mutations
    // dispatch调用action
    // dispatch(action名称,传递参数)
    // 传递参数
          this.$store.dispatch("getAsyncCount",111)
     },
辅助函数 -mapActions
actions也有辅助函数,可以将action导入到组件中
child-a.vue
<template>
<div>
        <button @click="test">+1(原始形式)</button>
        <!-- vue方法得默认第一个参数 事件参数 -->
        <!-- 事件参数对象$event -->
        <button @click="addCount(100)">+100</button>
        <button @click="test1">异步调用(原始形式)</button>
        <button @click="getAsyncCount(111)">异步调用(辅助函数)</button>
</div>
</template>

<script>
import { mapMutations,mapActions } from 'vuex'
export default {
    methods: {
        // 原始形式得调用
        //   调用方法
        test() {
            // 调用store中的mutations 提交给muations
            // commit('muations名称', 2)
            // 给mutation传值
            // commit得第二个参数就是要传递得载荷payload
            this.$store.commit('addCount', 1)  // 直接调用mutations
        },
        test1(){
            // 原始形式
            // commit是提交mutations
            // dispatch调用action
            // dispatch(action名称,传递参数)
            // 传递参数
            this.$store.dispatch("getAsyncCount",111)
        },
        ...mapMutations(['addCount']), //此时组件方法中就会拥有一个对应的addCount方法
        ...mapActions(['getAsyncCount']), //引入异步得action
    }
}
</script>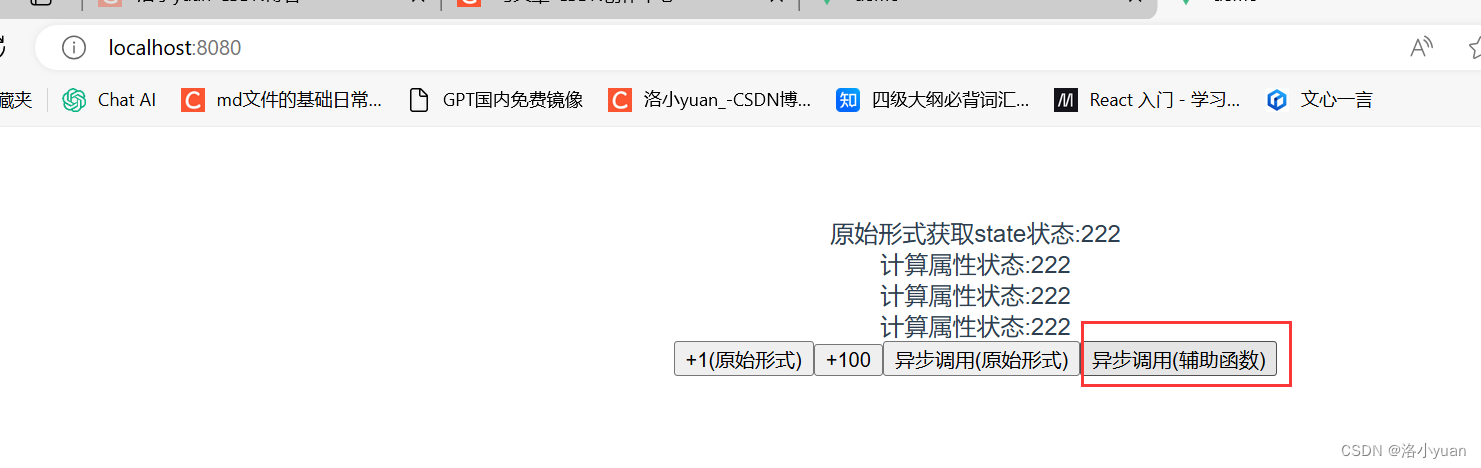
6.getters
除了state之外,有时我们还需要从state中派生出一些状态,这些状态是依赖state的,此时会用到getters
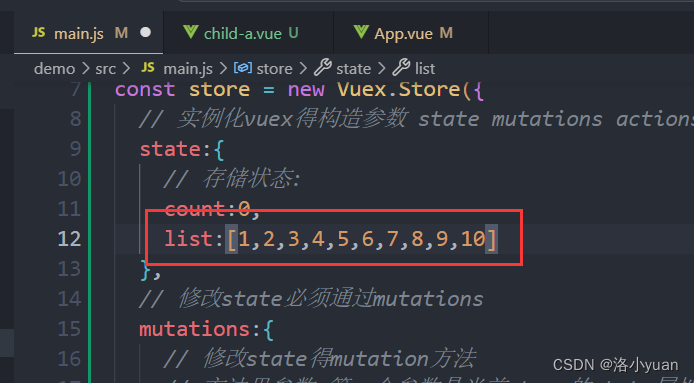
例如,state中定义了list,为1-10的数组,
组件中,需要显示所有大于5的数据,正常的方式,是需要list在组件中进行再一步的处理,但是getters可以帮助我们实现它
定义getters
  getters: {
    // getters函数的第一个参数是 state
    // 必须要有返回值
     filterList:  state =>  state.list.filter(item => item > 5)
  }
使用getters
原始方式 -$store
<div>{

   { $store.getters.filterList }}</div>
辅助函数 - mapGetters
<template>
<div>
        <button @click="test">+1(原始形式)</button>
        <!-- vue方法得默认第一个参数 事件参数 -->
        <!-- 事件参数对象$event -->
        <button @click="addCount(100)">+100</button>
        <button @click="test1">异步调用(原始形式)</button>
        <button @click="getAsyncCount(111)">异步调用(辅助函数)</button>
        <div>
            原始形式getters: {

   { $store.getters.filterList }}
        </div>
         <div>
            辅助形式getters:{

   { filterList }}
        </div>
</div>
</template>

<script>
import { mapMutations,mapActions,mapGetters } from 'vuex'
export default {
    computed: {
        // 将getters中得计算属性导入到组件得计算属性中
        ...mapGetters(['filterList'])
    },
    methods: {
        // 原始形式得调用
        //   调用方法
        test() {
            // 调用store中的mutations 提交给muations
            // commit('muations名称', 2)
            // 给mutation传值
            // commit得第二个参数就是要传递得载荷payload
            this.$store.commit('addCount', 1)  // 直接调用mutations
        },
        test1(){
            // 原始形式
            // commit是提交mutations
            // dispatch调用action
            // dispatch(action名称,传递参数)
            // 传递参数
            this.$store.dispatch("getAsyncCount",111)
        },
        ...mapMutations(['addCount']), //此时组件方法中就会拥有一个对应的addCount方法
        ...mapActions(['getAsyncCount']), //引入异步得action
    }
}
</script> 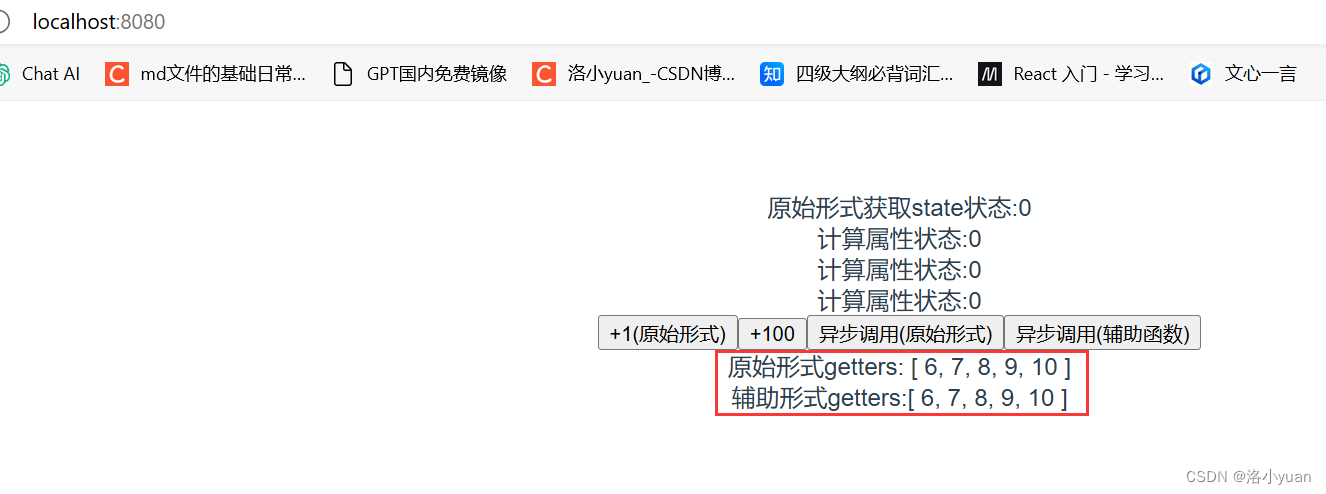
Vuex中的模块化-Module
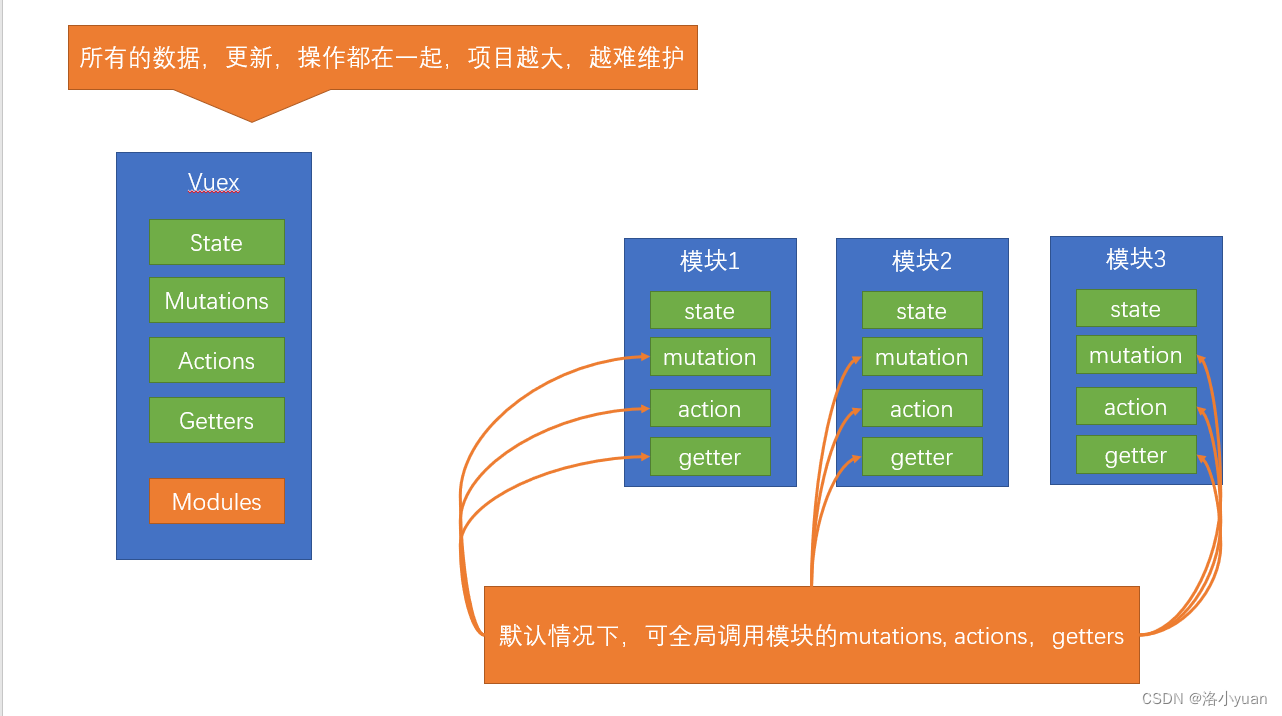
为什么会有模块化?
由于使用单一状态树,应用的所有状态会集中到一个比较大的对象。当应用变得非常复杂时,store 对象就有可能变得相当臃肿。这句话的意思是,如果把所有的状态都放在state中,当项目变得越来越大的时候,Vuex会变得越来越难以维护
由此,又有了Vuex的模块化
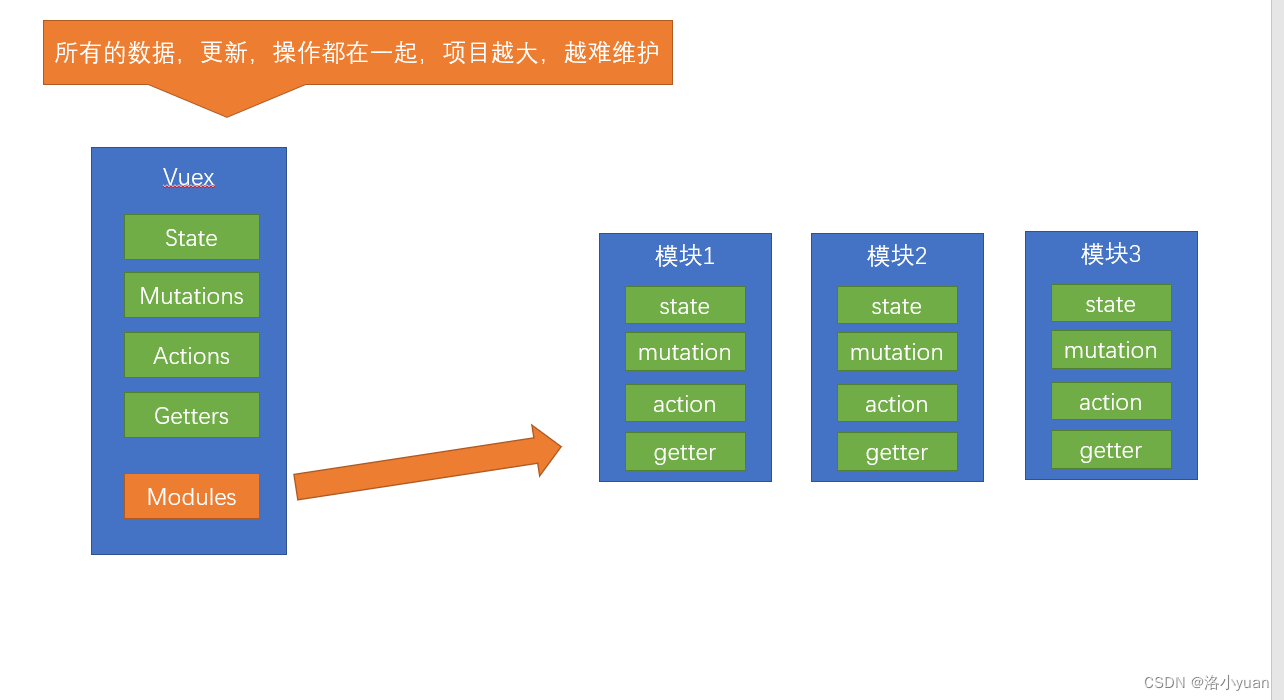
模块化的简单应用
应用
定义两个模块 user 和 setting
user中管理用户的状态 token
setting中管理 应用的名称 name
在main.js中进行设置
import Vue from 'vue'
import App from './App.vue'
import Vuex from 'vuex'

Vue.config.productionTip = false
Vue.use(Vuex) //注册Vuex得功能 vue.use得方法实际上是调用了vuex中得一个install方法
const store = new Vuex.Store({
  // 实例化vuex得构造参数 state mutations actions
  state:{
    // 存储状态:
    count:0,
    list:[1,2,3,4,5,6,7,8,9,10]
  },
  // 修改state必须通过mutations
  mutations:{
    // 修改state得mutation方法
    // 方法里参数 第一个参数是当前store的state属性
    // payload 载荷 运输参数 调用mutaiions的时候 可以传递参数 传递载荷
    addCount(state, payload) {
      state.count += payload
    }

  },
  // 异步动作
  // 从后端获取一个数,更新到state得count中
  actions: {
    //  获取异步的数据 context表示当前的store的实例 可以通过 context.state 获取状态 也可以通过context.commit 来提交mutations, 也可以 context.diapatch调用其他的action
    getAsyncCount(context,params) {
      setTimeout(function () {
        // 一秒钟之后 要给一个数 去修改state
        context.commit('addCount', params)
      }, 1000)
    }
  },

  getters:{
    // 放置得所有得vuex得计算属性
    // getters函数的第一个参数是 state
    // 必须要有返回值
    filterList: state => state.list.filter(item => item > 5)
  },
  modules:{
    // 放置子模块得属性
    user:{
      state:{
        token: '12345'
      },
    },
    setting:{
      state:{
        name:'Vue实例'
      },
    }
  }
})  //实例化一个vuex
new Vue({
  render: h => h(App),
  store //Es6写法
}).$mount('#app')
定义child-b组件,分别显示用户的token和应用名称name
首先要在APP.vue中去调用它
<template>
  <div id="app">
    <!-- 原始形式应用 -->
    <div>原始形式获取state状态:{

   { $store.state.count }}</div>
    <div>计算属性状态:{

   { count }}</div>
    <div>计算属性状态:{

   { count }}</div>
    <div>计算属性状态:{

   { count }}</div>
    <!-- <ChildA /> -->
    <child-a />
    <child-b />
  </div>
</template>

<script>
import {mapState} from 'vuex'
import ChildA from './components/child-a.vue'
import ChildB from './components/child-b.vue'
  export default {
    components:{
      ChildA,
      ChildB
    },
    name:'App',
    computed:{
      // count(){
      //   // 来源于vuex
      //   return this.$store.state.count
      // }
      ...mapState(['count'])
    }
  }
</script>

<style>
#app {
  font-family: Avenir, Helvetica, Arial, sans-serif;
  -webkit-font-smoothing: antialiased;
  -moz-osx-font-smoothing: grayscale;
  text-align: center;
  color: #2c3e50;
  margin-top: 60px;
}
</style>
child-b.vue
<template>
    <div>
        <!-- 用户得token得应用名称name -->
        <div>用户token: {

   { $store.state.user.token }}</div>
        <div>网站名称:{

   { $store.state.setting.name }}</div>
    </div>
</template>

<script>
    export default {
        data(){
            return {

            }
        },
        methods: {

        }
    }
</script>

<style>

</style> 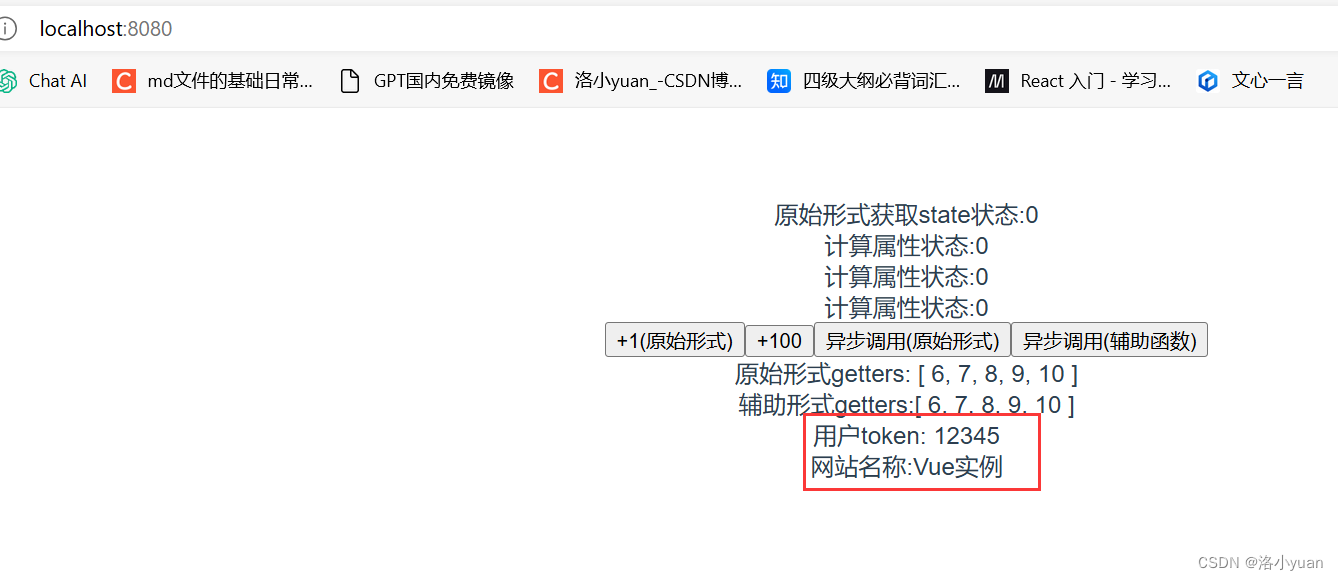
请注意: 此时要获取子模块的状态 需要通过 $store.state.模块名称.属性名 来获取
看着获取有点麻烦,我们可以通过之前学过的getters来改变一下
通过mapGetters引用
<template>
    <div>
        <!-- 用户得token得应用名称name -->
        <div>用户token: {

   { $store.state.user.token }}</div>
        <div>网站名称:{

   { $store.state.setting.name }}</div>
    </div>
</template>

<script>
import { mapGetters } from 'vuex';
    export default {
        computed:{
            ...mapGetters(["token,name"])
        }
    }
</script>

<style>

</style>
模块化中的命名空间
命名空间 namespaced
这里注意理解
默认情况下,模块内部的 action、mutation 和 getter 是注册在全局命名空间的——这样使得多个模块能够对同一 mutation 或 action 作出响应。
这句话的意思是 刚才的user模块还是setting模块,它的 action、mutation 和 getter 其实并没有区分,都可以直接通过全局的方式调用 如
  user: {
       state: {
         token: '12345'
       },
       mutations: {
        //  这里的state表示的是user的state
         updateToken (state) {
            state.token = 678910
         }
       }
    },
通过mapMutations调用
 methods: {
       ...mapMutations(['updateToken'])
  }
 <button @click="updateToken">修改token</button>
但是,如果我们想保证内部模块的高封闭性,我们可以采用namespaced来进行设置
高封闭性?可以理解成 一家人如果分家了,此时,你的爸妈可以随意的进出分给你的小家,你觉得自己没什么隐私了,我们可以给自己的房门加一道锁(命名空间 namespaced),你的父母再也不能进出你的小家了
如
  user: {
       namespaced: true,
       state: {
         token: '12345'
       },
       mutations: {
        //  这里的state表示的是user的state
         updateToken (state) {
            state.token = 678910
         }
       }
    },
使用带命名空间的模块 action/mutations
方案1:直接调用-带上模块的属性名路径
test () {
   this.$store.dispatch('user/updateToken') // 直接调用方法
}方案2:辅助函数-带上模块的属性名路径
methods: {
...mapMutations(['user/updateToken']),
test () {
this['user/updateToken']()
}
}
<button @click="test">修改token</button>
方案3: createNamespacedHelpers 创建基于某个命名空间辅助函数
import { mapGetters, createNamespacedHelpers } from 'vuex'
const { mapMutations } = createNamespacedHelpers('user')
<button @click="updateToken">修改token2</button>
child-b.vue
<template>
    <div>
        <!-- 显示用户的token的网站的名称 -->
        <div>用户的token: {

   { $store.state.user.token }}</div>
        <div>getters快捷访问:{

   { token }}</div>
        <div>网站的名称:{

   { $store.state.setting.name }}</div>
        <div>getters快捷访问:{

   { name }}</div>
        <button @click="updateToken">更新子模块的token</button>
        <!-- <button @click="test">调用子模块的mutations</button> -->
    </div>
</template>

<script>
import { mapGetters, createNamespacedHelpers } from 'vuex'
const { mapMutations } = createNamespacedHelpers('user')
export default {
    computed: {
        ...mapGetters(['token', 'name'])
    },
    methods: {
          updateToken () {
            //   采用路径形式调用
              this.$store.commit('user/updateToken')
          },
        //   ...mapMutations(['user/updateToken']),
        //   第二种方案
        //   test () {
        //       this['user/updateToken']()
        //   },
        ...mapMutations(['updateToken'])
    }
}
</script>

<style></style>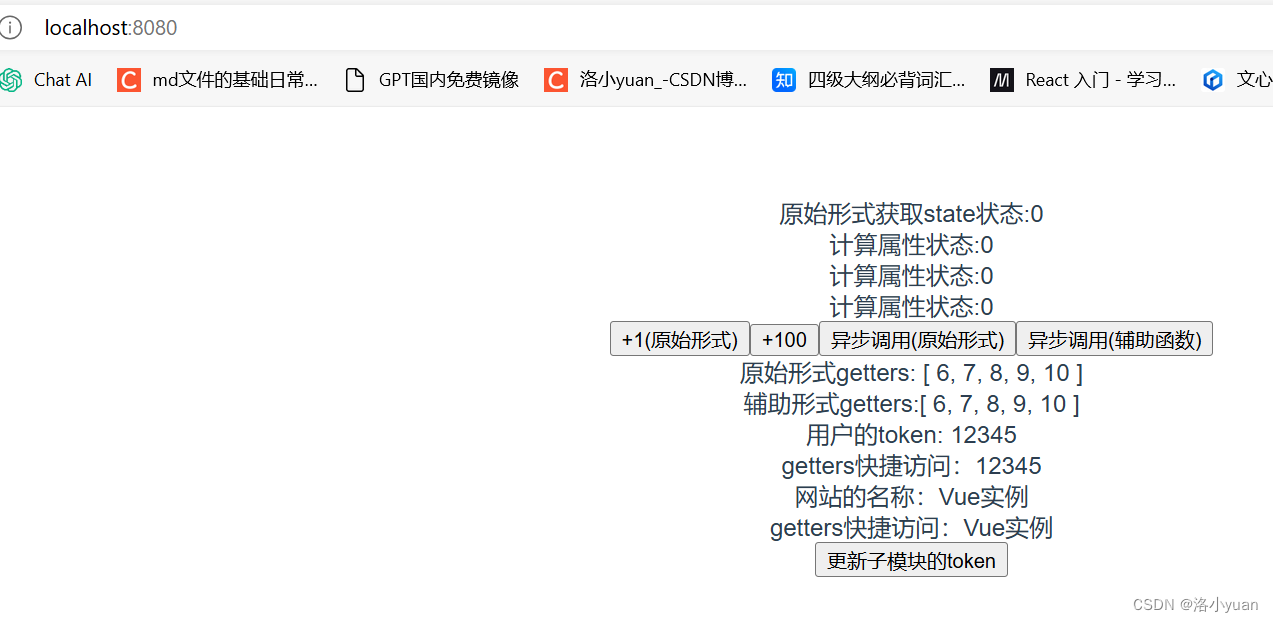
vuex案例-搭建黑马头条项目
接下来,通过一个案例来使用Vuex介入我们的数据管理
通过vue-cli脚手架搭建项目
$ vue create toutiao #创建项目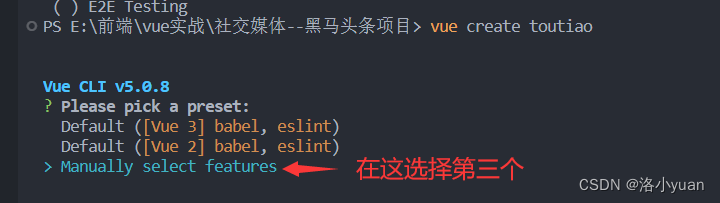
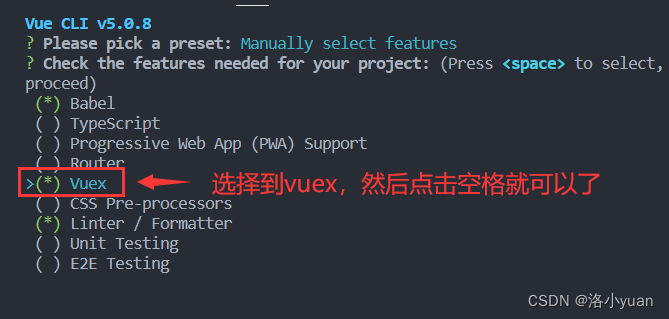
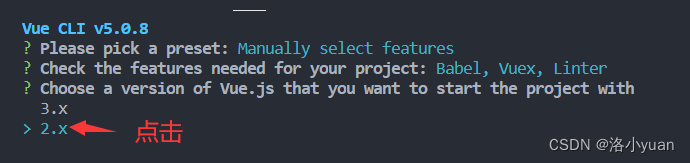
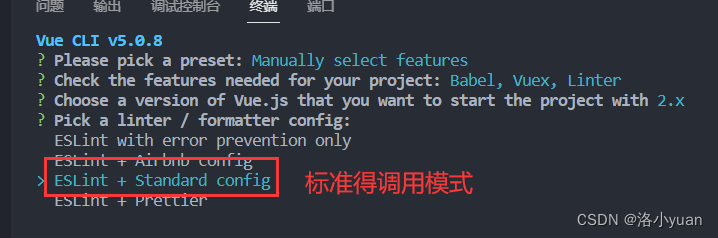
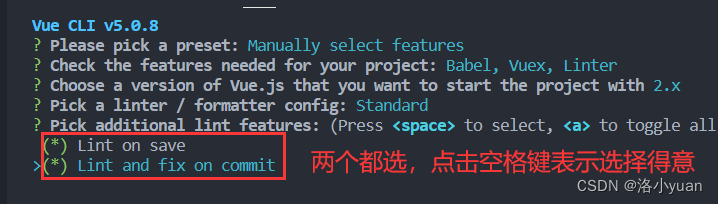
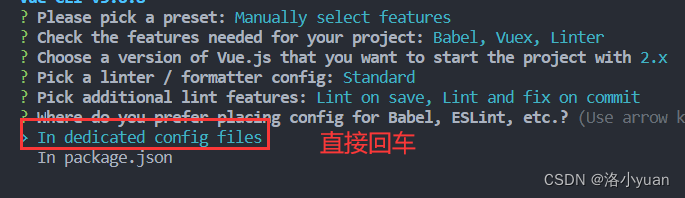
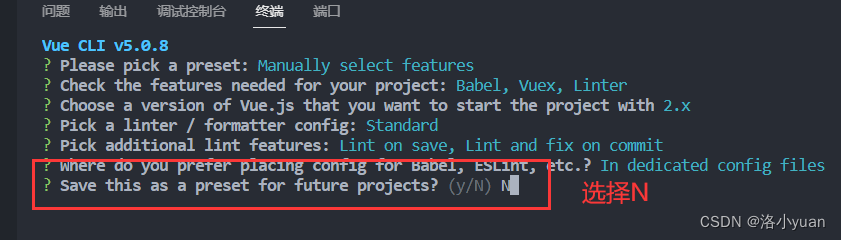
选择 vuex / eslint(stanadard) / pre-cssprocesser (less) 确定
在main.js中引入样式(该样式在资源/vuex样式中,拷贝到styles目录下)
import './styles/index.css'index.css
body {
    margin: 0;
    padding: 0;
  }
  *,
  *:before,
  *:after {
    box-sizing: inherit;
  }

  li {
    list-style: none;
  }
  dl,
  dd,
  dt,
  ul,
  li {
    margin: 0;
    padding: 0;
  }

  .no-padding {
    padding: 0px !important;
  }

  .padding-content {
    padding: 4px 0;
  }

  a:focus,
  a:active {
    outline: none;
  }

  a,
  a:focus,
  a:hover {
    cursor: pointer;
    color: inherit;
    text-decoration: none;
  }

  b {
    font-weight: normal;
  }

  div:focus {
    outline: none;
  }

  .fr {
    float: right;
  }

  .fl {
    float: left;
  }

  .pr-5 {
    padding-right: 5px;
  }

  .pl-5 {
    padding-left: 5px;
  }

  .block {
    display: block;
  }

  .pointer {
    cursor: pointer;
  }

  .inlineBlock {
    display: block;
  }
  .catagtory  {
    display: flex;
    overflow: hidden;
    overflow-x: scroll;
    background-color: #f4f5f6;
    width: 100%;
    position: fixed;
    top: 0;
    left: 0;
    z-index: 999;
}
.catagtory li {
    padding: 0 15px;
    text-align: center;
    line-height: 40px;
    color:#505050;
    cursor: pointer;
    z-index: 99;
    white-space: nowrap;
}
.catagtory li.select {
    color: #f85959
}
.list {
    margin-top:60px;
}
.article_item {
    padding: 0 10px;
}
.article_item   .img_box{
    display: flex;
    justify-content: space-between;

  }
  .article_item   .img_box .w33{
    width: 33%;
    height: 90px;
    display: inline-block;
  }
  .article_item   .img_box .w100{
    width: 100%;
    height: 180px;
    display: inline-block;

  }
  .article_item  h3{
    font-weight: normal;
    line-height: 2;
  }
  .article_item   .info_box{
    color: #999;
    line-height: 2;
    position: relative;
    font-size: 12px;

  }
  .article_item   .info_box span{
    padding-right: 10px;

  }
  .article_item   .info_box span.close{
    border: 1px solid #ddd;
    border-radius: 2px;
    line-height: 15px;
    height: 12px;
    width: 16px;
    text-align: center;
    padding-right: 0;
    font-size: 8px;
    position: absolute;
    right: 0;
    top: 7px;
  }
拷贝图片资源到assets目录下

在App.vue中拷贝基本结构
<template>
  <div id="app">
    <ul class="catagtory">
      <li class='select'>开发者资讯</li>
      <li>ios</li>
      <li>c++</li>
      <li>android</li>
      <li>css</li>
      <li>数据库</li>
      <li>区块链</li>
      <li>go</li>
      <li>产品</li>
      <li>后端</li>
      <li>linux</li>
      <li>人工智能</li>
      <li>php</li>
      <li>javascript</li>
      <li>架构</li>
      <li>前端</li>
      <li>python</li>
      <li>java</li>
      <li>算法</li>
      <li>面试</li>
      <li>科技动态</li>
      <li>js</li>
      <li>设计</li>
      <li>数码产品</li>
      <li>html</li>
      <li>软件测试</li>
      <li>测试开发</li>
    </ul>
    <div class="list">
      <div class="article_item">
        <h3 class="van-ellipsis">python数据预处理 :数据标准化</h3>
        <div class="img_box">
          <img src="@/assets/back.jpg" class="w100" />
        </div>
        <!---->
        <div class="info_box">
          <span>13552285417</span>
          <span>0评论</span>
          <span>2018-11-29T17:02:09</span>
        </div>
      </div>
    </div>
  </div>
</template>

<script>
export default {

}
</script>

<style></style>
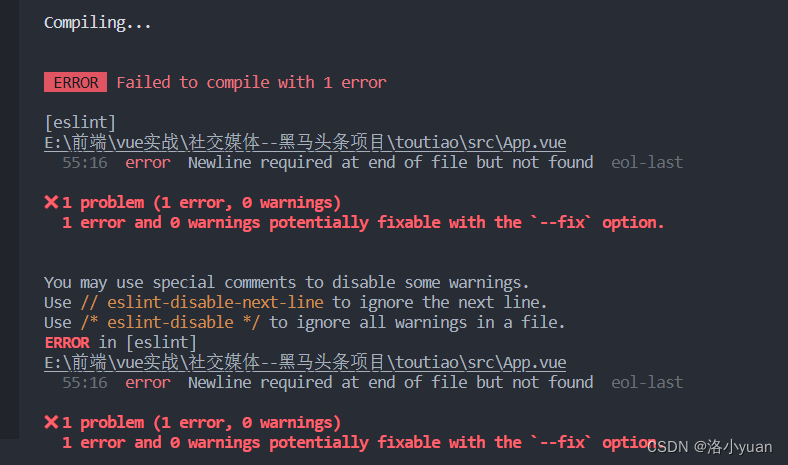
可能在创建文件得时候对文件空格缩进非常严格,记得在文件得最后添加一行空格行哦
1.封装分类组件和频道组件
为了更好的区分组件之间的职责,我们将上方的频道和下方的列表封装成不同的组件
components/catagtory.vue
<template>
   <ul class="catagtory">
        <li class='select'>开发者资讯</li>
        <li>ios</li>
        <li>c++</li>
        <li>android</li>
        <li>css</li>
        <li>数据库</li>
        <li>区块链</li>
        <li>go</li>
        <li>产品</li>
        <li>后端</li>
        <li>linux</li>
        <li>人工智能</li>
        <li>php</li>
        <li>javascript</li>
        <li>架构</li>
        <li>前端</li>
        <li>python</li>
        <li>java</li>
        <li>算法</li>
        <li>面试</li>
        <li>科技动态</li>
        <li>js</li>
        <li>设计</li>
        <li>数码产品</li>
        <li>html</li>
        <li>软件测试</li>
        <li>测试开发</li>
      </ul>
</template>
components/new-list.vue
<template>
  <div class="list">
        <div class="article_item">
          <h3 class="van-ellipsis">python数据预处理 :数据标准化</h3>
          <div class="img_box">
             <img src="@/assets/back.jpg"
            class="w100" />
          </div>
          <!---->
          <div class="info_box">
            <span>13552285417</span>
            <span>0评论</span>
            <span>2018-11-29T17:02:09</span>
          </div>
        </div>
      </div>
</template>
在App.vue中引入并使用
<template>
<!-- app.vue是根组件 -->
<div id="app">
<catagtory />
<new-list />
</div>
</template>
<script>
import Catagtory from './components/catagtory'
import NewList from './components/new-list'
export default {
components: {
Catagtory, NewList
}
}
</script>2.在vuex中加载分类和频道数据
设计categtory和newlist的vuex模块
安装请求数据的工具 axios
$ npm i axios3.接口
获取频道列表
http://ttapi.research.itcast.cn/app/v1_0/channels
获取频道头条
http://ttapi.research.itcast.cn/app/v1_1/articles?channel_id=频道id×tamp=时间&with_top=1
我们采用模块化的管理模式,建立一个专门的模块来管理分类和新闻数据
在store目录下新建目录modules, 新建 catagtory.js和newlist.js
模块结构
export default {
  namespaced: true,
  state: {},
  mutations: {},
  actions: {}
}
在store/index.js中引入定义的两个模块
import catagtory from './modules/catagtory'
import newlist from './modules/newlist'
 export default new Vuex.Store({
  state: {
  },
  mutations: {
  },
  actions: {
  },
  modules: {
    catagtory,
    newlist
  }
})
分类模块下设置分类数组和当前激活分类
在catagtory的 state中定义分类频道列表和当前激活
state: {
    catagtory: [],
    currentCatagtory: ''
}
定义更新频道列表的mutations
mutations: {
  updateCatagtory (state, payload) {
      state.catagtory = payload // 更新分类数据
   },
   updateCurrentCatagtory (state, payload) {
      state.currentCatagtory = payload
   }
}
通过getters建立对于分类数据和当前分类的快捷访问
export default new Vuex.Store({
  state: {
  },
  mutations: {
  },
  actions: {
  },
  modules: {
    catagtory,
    newlist
  },
  getters: {
    catagtory: state => state.catagtory.catagtory, // 建立快捷访问
    currentCatagtory: state => state.catagtory.currentCatagtory
  }
})
遍历分类数据并判断激活class
分类组件遍历vuex数据
import { mapGetters } from 'vuex'
computed: {
    ...mapGetters(['catagtory', 'currentCatagtroy'])
},
 <ul class="catagtory">
    <li :class="{ select: currentCatagtory === item.id }" v-for="item in catagtory"  :key="item.id">{

   { item.name }}</li>
 </ul>
封装调用获取分类action,激活第一个分类
定义获取频道列表的action, 将第一个频道激活
  actions: {
    async  getCatagtory (context) {
      const { data: { data: { channels } } } = await                  axios.get('http://ttapi.research.itcast.cn/app/v1_0/channels')
      context.commit('updateCatagtory', channels)
      context.commit('updateCurrentCatagtory', channels[0].id)
    }
  }
初始化catagtory时调用action
import { mapGetters } from 'vuex'
export default {
computed: {
...mapGetters(['catagtory'])
},
created () {
this.$store.dispatch('catagtory/getCatagtory')
}
}点击分类时,触发分类切换
 <li @click="$store.commit('catagtory/updateCurrentCatagtory', item.id)" :class="{ select: currentCatagtroy === item.id }" v-for="item in catagtory"  :key="item.id">{

   { item.name }}</li>
定义新闻数据,并封装获取新闻的Action
在newlist.js中定义获取头条内容的数据
state: {
   allData: {}
}
定义更新头条内容的mutations
  mutations: {
    // payload 载荷  { 1: [], 2: [], 3: [], 4}
    updateList (state, { currentCatagtory, list }) {
      // 不是响应式的
      // state.allData[currentCatagtory] = list // 这样做事大错特错第  感觉不到变化 就不会通知组件
      state.allData = { ...state.allData, [currentCatagtory]: list }
      // 这句代码的含义 就相当于 在一个新的对象后面追加了一个属性  更新某个属性的内容
    }
  },
定义根据分类标识获取新闻的action
actions: {
// 获取新闻列表数据
// 分类id只能通过传递的方式传进来
async getNewList (context, cataId) {
const { data: { data: { results } } } = await axios.get(`http://ttapi.research.itcast.cn/app/v1_1/articles?channel_id=${cataId}×tamp=${Date.now()}&with_top=1`)
// results是新闻列表
context.commit('updateList', { currentCatagtory: cataId, list: results })
}
}监听激活分类,触发获取新闻Action
在new-list组件中,引入当前分类的id,监视其改变,一旦改变,触发获取新闻的action
import { mapGetters } from 'vuex'
export default {
  computed: {
    ...mapGetters(['currentCatagtroy'])
  },
  watch: {
    currentCatagtory (newValue) {
      this.$store.dispatch('newlist/getNewList', newValue)
    }
  }
}
处理显示新闻内容的数据
定义当前显示列表的getters
getters: {
    currentList: state => state.newlist.allData[state.catagtory.currentCatagtory] || []
}
修改new-list内容
<template>
<div class="list">
<div class="article_item" v-for="item in currentList" :key="item.art_id">
<h3 class="van-ellipsis">{
{ item.title }}</h3>
<div class="img_box" v-if="item.cover.type === 1">
<img :src="item.cover.images[0]"
class="w100" />
</div>
<div class="img_box" v-else-if="item.cover.type === 3">
<img :src="item.cover.images[0]"
class="w33" />
<img :src="item.cover.images[1]"
class="w33" />
<img :src="item.cover.images[2]"
class="w33" />
</div>
<!---->
<div class="info_box">
<span>{
{ item.aut_name }}</span>
<span>{
{ item.comm_count }}评论</span>
<span>{
{ item.pubdate }}</span>
</div>
</div>
</div>
</template>
<script>
// 引入当前激活的分类id
import { mapGetters } from 'vuex'
export default {
computed: {
...mapGetters(['currentCatagtory', 'currentList'])
},
watch: {
currentCatagtory (newValue) {
// newValue是当前最新的激活的id
this.$store.dispatch('newlist/getNewList', newValue)
}
}
}
</script>
<style>
</style>