公司Android app遇到这个bug,遂开始一番探寻。
问题
先来看下错误日志:
2018-02-25 17:38:38 java.lang.ClassCastException: android.support.v7.widget.TintContextWrapper cannot be cast to com.xx.mobile.basecore.activity.BaseActivity
at com.xx.agent.yy.store.event.UploadQRCodeEvent.upload(UploadQRCodeEvent.java:61)
at com.xx.agent.yy.databinding.ActivityUploadQrCodeBinding._internalCallbackOnClick(ActivityUploadQrCodeBinding.java:313)
at android.databinding.generated.callback.OnClickListener.onClick(OnClickListener.java:11)
at android.view.View.performClick(View.java:4457)
at android.view.View$PerformClick.run(View.java:18496)
at android.os.Handler.handleCallback(Handler.java:733)
at android.os.Handler.dispatchMessage(Handler.java:95)
at android.os.Looper.loop(Looper.java:136)
at android.app.ActivityThread.main(ActivityThread.java:5291)
at java.lang.reflect.Method.invokeNative(Native Method)
at java.lang.reflect.Method.invoke(Method.java:515)
at com.android.internal.os.ZygoteInit$MethodAndArgsCaller.run(ZygoteInit.java:849)
at com.android.internal.os.ZygoteInit.main(ZygoteInit.java:665)
at dalvik.system.NativeStart.main(Native Method)

版本:10.3.0
机型:CHM-TL00H
系统:android 4.4.2发现在系统版本为Android4.4.2的设备上出现了android.support.v7.widget.TintContextWrapper cannot be cast to com.xx.mobile.basecore.activity.BaseActivity类型转换失败的问题。
这里的BaseActivity是我们公司核心类库中的基类,溯源而上继承的就是v7包中提供的AppCompatActivity。
然而经过测试发现问题只会出现在系统版本为Android5.0以下的设备上。
Why?
AppCompatActivity
查看v7包中AppCompatActivity的源码
public class AppCompatActivity extends FragmentActivity implements AppCompatCallback,
TaskStackBuilder.SupportParentable, ActionBarDrawerToggle.DelegateProvider 这是AppCompatActivity的继承关系,最终它就是继承自我们熟知的Activity,并且实现了各种接口,这里稍作了解。
以下是AppCompatActivity中的部分方法,重写自Activity的重要方法:
    @Override
    public void setContentView(@LayoutRes int layoutResID) {
        getDelegate().setContentView(layoutResID);
    }

    @Override
    protected void onPostResume() {
        super.onPostResume();
        getDelegate().onPostResume();
    }

    @Override
    protected void onStart() {
        super.onStart();
        getDelegate().onStart();
    }

    @Override
    protected void onStop() {
        super.onStop();
        getDelegate().onStop();
    }

    @Override
    protected void onDestroy() {
        super.onDestroy();
        getDelegate().onDestroy();
}发现都通过getDelegate()去对Activity的方法进行了代理。
看到getDelegate():
    private AppCompatDelegate mDelegate;

    /**
     * @return The {@link AppCompatDelegate} being used by this Activity.
     */
    @NonNull
    public AppCompatDelegate getDelegate() {
        if (mDelegate == null) {
            mDelegate = AppCompatDelegate.create(this, this);
        }
        return mDelegate;
}其实就是去获取了一个类型为AppCompatDelegate的代理。然后Activity的方法被调用的时候,就会走这个代理类AppCompatDelegate对应的方法。
AppCompatDelegate
首先看下它的继承体系,是一个自上而下层层继承的关系:
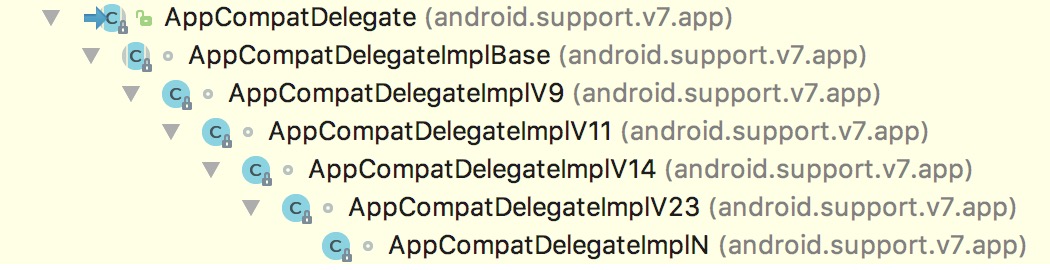
AppCompatDelegate和AppCompatDelegateImplBase都是抽象类,第一个实现类是AppCompatDelegateImplV9,其中有setContentView():
    @Override
    public void setContentView(int resId) {
        ensureSubDecor();
        ViewGroup contentParent = (ViewGroup) mSubDecor.findViewById(android.R.id.content);
        contentParent.removeAllViews();
        LayoutInflater.from(mContext).inflate(resId, contentParent);
        mOriginalWindowCallback.onContentChanged();
}它代理了Activity的setContentView(),其中调用LayoutInflater的inflate()去填充布局。
LayoutInflater
查看LayoutInflater的源码我们发现,它的inflate()中会去解析XML文件,最终会调用它的createViewFromTag()去创建XML中对应的View:
    /**
     * Convenience method for calling through to the five-arg createViewFromTag
     * method. This method passes {@code false} for the {@code ignoreThemeAttr}
     * argument and should be used for everything except {@code >include>}
     * tag parsing.
     */
    private View createViewFromTag(View parent, String name, Context context, AttributeSet attrs) {
        return createViewFromTag(parent, name, context, attrs, false);
}接着去调用createViewFromTag()的另一个重载方法,其中有这样一段代码:
            View view;
            if (mFactory2 != null) {
                view = mFactory2.onCreateView(parent, name, context, attrs);
            } else if (mFactory != null) {
                view = mFactory.onCreateView(name, context, attrs);
            } else {
                view = null;
            }

            if (view == null && mPrivateFactory != null) {
                view = mPrivateFactory.onCreateView(parent, name, context, attrs);
}大概的意思就是去调用mFactory2,mFactory,mPrivateFactory的onCreateView()去生成View,
如果生成不了View就会走接下来默认的方法,此处省略了。
总结成一句话,就是去拦截创建View的操作。
看一下这三个成员变量的定义:
    private Factory mFactory;
    private Factory2 mFactory2;
private Factory2 mPrivateFactory;大概看一下Factory和Factory2的定义:
    public interface Factory {
        /**
         * Hook you can supply that is called when inflating from a LayoutInflater.
         * You can use this to customize the tag names available in your XML
         * layout files.
         *
         * <p>
         * Note that it is good practice to prefix these custom names with your
         * package (i.e., com.coolcompany.apps) to avoid conflicts with system
         * names.
         *
         * @param name Tag name to be inflated.
         * @param context The context the view is being created in.
         * @param attrs Inflation attributes as specified in XML file.
         *
         * @return View Newly created view. Return null for the default
         *         behavior.
         */
        public View onCreateView(String name, Context context, AttributeSet attrs);
    }

    public interface Factory2 extends Factory {
        /**
         * Version of {@link #onCreateView(String, Context, AttributeSet)}
         * that also supplies the parent that the view created view will be
         * placed in.
         *
         * @param parent The parent that the created view will be placed
         * in; <em>note that this may be null</em>.
         * @param name Tag name to be inflated.
         * @param context The context the view is being created in.
         * @param attrs Inflation attributes as specified in XML file.
         *
         * @return View Newly created view. Return null for the default
         *         behavior.
         */
        public View onCreateView(View parent, String name, Context context, AttributeSet attrs);
}接口Factory继承自接口Factory2。
这时候,我们再回头看AppCompatDelegateImplV9的定义:
class AppCompatDelegateImplV9 extends AppCompatDelegateImplBase
implements MenuBuilder.Callback, LayoutInflater.Factory2发现AppCompatDelegateImplV9就是一个Factory2!
可以猜想是不是mFactory2,mFactory,mPrivateFactory的类型就是AppCompatDelegateImplV9。
顺着这个猜想我在AppCompatDelegateImplV9中发现了installViewFactory():
    @Override
    public void installViewFactory() {
        LayoutInflater layoutInflater = LayoutInflater.from(mContext);
        if (layoutInflater.getFactory() == null) {
            LayoutInflaterCompat.setFactory2(layoutInflater, this);
        } else {
            if (!(layoutInflater.getFactory2() instanceof AppCompatDelegateImplV9)) {
                Log.i(TAG, "The Activity's LayoutInflater already has a Factory installed"
                        + " so we can not install AppCompat's");
            }
        }
}其中我们关注LayoutInflaterCompat.setFactory2(layoutInflater, this);跟进一连串函数调用链,最终来到LayoutInflaterCompat的静态内部类LayoutInflaterCompatBaseImpl中的setFactory2(),其中就调用了LayoutInflater的setFactory2():
    /**
     * Like {@link #setFactory}, but allows you to set a {@link Factory2}
     * interface.
     */
    public void setFactory2(Factory2 factory) {
        if (mFactorySet) {
            throw new IllegalStateException("A factory has already been set on this LayoutInflater");
        }
        if (factory == null) {
            throw new NullPointerException("Given factory can not be null");
        }
        mFactorySet = true;
        if (mFactory == null) {
            mFactory = mFactory2 = factory;
        } else {
            mFactory = mFactory2 = new FactoryMerger(factory, factory, mFactory, mFactory2);
        }
}在这里给mFactory和mFactory2赋值了。
哪里调用了AppCompatDelegateImplV9的installViewFactory()呢?发现在AppCompatActivity的onCreate()中调用了:
    @Override
    protected void onCreate(@Nullable Bundle savedInstanceState) {
        final AppCompatDelegate delegate = getDelegate();
        delegate.installViewFactory();
        delegate.onCreate(savedInstanceState);
        if (delegate.applyDayNight() && mThemeId != 0) {
            // If DayNight has been applied, we need to re-apply the theme for
            // the changes to take effect. On API 23+, we should bypass
            // setTheme(), which will no-op if the theme ID is identical to the
            // current theme ID.
            if (Build.VERSION.SDK_INT >= 23) {
                onApplyThemeResource(getTheme(), mThemeId, false);
            } else {
                setTheme(mThemeId);
            }
        }
        super.onCreate(savedInstanceState);
}至此我们知道了创建View的过程是调用了AppCompatDelegateImplV9的onCreateView():
    /**
     * From {@link LayoutInflater.Factory2}.
     */
    @Override
    public final View onCreateView(View parent, String name, Context context, AttributeSet attrs) {
        // First let the Activity's Factory try and inflate the view
        final View view = callActivityOnCreateView(parent, name, context, attrs);
        if (view != null) {
            return view;
        }

        // If the Factory didn't handle it, let our createView() method try
        return createView(parent, name, context, attrs);
}通过注释知道,如果Activity默认的工厂不去处理(具体的原因我没去分析了),就去调用onCreateView()另一个重载方法:
    @Override
    public View createView(View parent, final String name, @NonNull Context context,
            @NonNull AttributeSet attrs) {
        if (mAppCompatViewInflater == null) {
            mAppCompatViewInflater = new AppCompatViewInflater();
        }

        boolean inheritContext = false;
        if (IS_PRE_LOLLIPOP) {
            inheritContext = (attrs instanceof XmlPullParser)
                    // If we have a XmlPullParser, we can detect where we are in the layout
                    ? ((XmlPullParser) attrs).getDepth() > 1
                    // Otherwise we have to use the old heuristic
                    : shouldInheritContext((ViewParent) parent);
        }

        return mAppCompatViewInflater.createView(parent, name, context, attrs, inheritContext,
                IS_PRE_LOLLIPOP, /* Only read android:theme pre-L (L+ handles this anyway) */
                true, /* Read read app:theme as a fallback at all times for legacy reasons */
                VectorEnabledTintResources.shouldBeUsed() /* Only tint wrap the context if enabled */
        );
}这里调用了一个类型为AppCompatViewInflater的成员变量mAppCompatViewInflater的createView()。
AppCompatViewInflater
看到AppCompatViewInflater的createView():
    public final View createView(View parent, final String name, @NonNull Context context,
            @NonNull AttributeSet attrs, boolean inheritContext,
            boolean readAndroidTheme, boolean readAppTheme, boolean wrapContext) {
        final Context originalContext = context;

        // We can emulate Lollipop's android:theme attribute propagating down the view hierarchy
        // by using the parent's context
        if (inheritContext && parent != null) {
            context = parent.getContext();
        }
        if (readAndroidTheme || readAppTheme) {
            // We then apply the theme on the context, if specified
            context = themifyContext(context, attrs, readAndroidTheme, readAppTheme);
        }
        if (wrapContext) {
            context = TintContextWrapper.wrap(context);
        }

        View view = null;

        // We need to 'inject' our tint aware Views in place of the standard framework versions
        switch (name) {
            case "TextView":
                view = new AppCompatTextView(context, attrs);
                break;
            case "ImageView":
                view = new AppCompatImageView(context, attrs);
                break;
            case "Button":
                view = new AppCompatButton(context, attrs);
                break;
            case "EditText":
                view = new AppCompatEditText(context, attrs);
                break;
            case "Spinner":
                view = new AppCompatSpinner(context, attrs);
                break;
            case "ImageButton":
                view = new AppCompatImageButton(context, attrs);
                break;
            case "CheckBox":
                view = new AppCompatCheckBox(context, attrs);
                break;
            case "RadioButton":
                view = new AppCompatRadioButton(context, attrs);
                break;
            case "CheckedTextView":
                view = new AppCompatCheckedTextView(context, attrs);
                break;
            case "AutoCompleteTextView":
                view = new AppCompatAutoCompleteTextView(context, attrs);
                break;
            case "MultiAutoCompleteTextView":
                view = new AppCompatMultiAutoCompleteTextView(context, attrs);
                break;
            case "RatingBar":
                view = new AppCompatRatingBar(context, attrs);
                break;
            case "SeekBar":
                view = new AppCompatSeekBar(context, attrs);
                break;
        }

        if (view == null && originalContext != context) {
            // If the original context does not equal our themed context, then we need to manually
            // inflate it using the name so that android:theme takes effect.
            view = createViewFromTag(context, name, attrs);
        }

        if (view != null) {
            // If we have created a view, check its android:onClick
            checkOnClickListener(view, attrs);
        }

        return view;
}发现在AppCompatViewInflater的createView()中对于一些View进行了包装,例如:把TextView包装成了AppCompatTextView。
看一下AppCompatTextView的构造方法:
    public AppCompatTextView(Context context, AttributeSet attrs) {
        this(context, attrs, android.R.attr.textViewStyle);
    }

    public AppCompatTextView(Context context, AttributeSet attrs, int defStyleAttr) {
        super(TintContextWrapper.wrap(context), attrs, defStyleAttr);

        mBackgroundTintHelper = new AppCompatBackgroundHelper(this);
        mBackgroundTintHelper.loadFromAttributes(attrs, defStyleAttr);

        mTextHelper = AppCompatTextHelper.create(this);
        mTextHelper.loadFromAttributes(attrs, defStyleAttr);
        mTextHelper.applyCompoundDrawablesTints();
}发现调用了TintContextWrapper的wrap()对原来的context进行了包装。
TintContextWrapper
TintContextWrapper的wrap():
    public static Context wrap(@NonNull final Context context) {
        if (shouldWrap(context)) {
            synchronized (CACHE_LOCK) {
                if (sCache == null) {
                    sCache = new ArrayList<>();
                } else {
                    // This is a convenient place to prune any dead reference entries
                    for (int i = sCache.size() - 1; i >= 0; i--) {
                        final WeakReference<TintContextWrapper> ref = sCache.get(i);
                        if (ref == null || ref.get() == null) {
                            sCache.remove(i);
                        }
                    }
                    // Now check our instance cache
                    for (int i = sCache.size() - 1; i >= 0; i--) {
                        final WeakReference<TintContextWrapper> ref = sCache.get(i);
                        final TintContextWrapper wrapper = ref != null ? ref.get() : null;
                        if (wrapper != null && wrapper.getBaseContext() == context) {
                            return wrapper;
                        }
                    }
                }
                // If we reach here then the cache didn't have a hit, so create a new instance
                // and add it to the cache
                final TintContextWrapper wrapper = new TintContextWrapper(context);
                sCache.add(new WeakReference<>(wrapper));
                return wrapper;
            }
        }
        return context;
}这里先调用shouldWrap()去判断是否可以包装:
    private static boolean shouldWrap(@NonNull final Context context) {
        if (context instanceof TintContextWrapper
                || context.getResources() instanceof TintResources
                || context.getResources() instanceof VectorEnabledTintResources) {
            // If the Context already has a TintResources[Experimental] impl, no need to wrap again
            // If the Context is already a TintContextWrapper, no need to wrap again
            return false;
        }
        return Build.VERSION.SDK_INT < 21 || VectorEnabledTintResources.shouldBeUsed();
    }
很显然系统版本小于5.0就允许去包装。
TintContextWrapper继承自ContextWrapper,把原来的Context包装了一层,包装操作就是把原来的Context存储到了TintContextWrapper的成员变量mBase中。
到这里终于明白报类型转换异常的原因了,在系统版本为Android5.0以下时我们在AppCompatActivity中创建View的时候传递的Context并不是我们的Acitvity而是包裹了Acitvity的TintContextWrapper,所以我们通过view.getContext()获取的自然不是Acitvity了。
解决问题的方法
提供一段官方源码作为参考,MediaRouteButton的getActivity():
    private Activity getActivity() {
        // Gross way of unwrapping the Activity so we can get the FragmentManager
        Context context = getContext();
        while (context instanceof ContextWrapper) {
            if (context instanceof Activity) {
                return (Activity)context;
            }
            context = ((ContextWrapper)context).getBaseContext();
        }
        throw new IllegalStateException("The MediaRouteButton's Context is not an Activity.");
}所做的很简单,就是拆开包装。
但是这里为什么要用while循环呢?
回到AppCompatViewInflater的createView(),看其中一段代码:
        if (wrapContext) {
            context = TintContextWrapper.wrap(context);
}它出现在将各种View包装成AppcompatView的操作之前,这样的话就有可能发生对原来的context包装多次的情况,也就解释了为什么要用while循环来拆包。
参考:
2.Android 从 View 中获取 Activity 时遇到 TintContextWrapper cannot be cast to 的问题