一、关于 Kubekey 工具
1.1、Kubekey 概念相关
-
KubeKey 是北京青云科技股份有限公司(青云QingCloud)开源、KubeSphere 社区用 Go 语言开发的 一个 Kubernetes 集群自动化部署工具。
-
KubeKey 能够帮助企业一键在公有云或数据中心快速搭建 Kubernetes 集群,提供单节点、多节点、集群相关插件安装,以及集群升级与运维。
-
KubeKey 支持安装 Kubernetes、KubeSphere 及相关插件,安装过程简单而友好。KubeKey 不仅能帮助用户在线创建集群,还能作为离线安装解决方案。
-
KubeKey 用 Go 语言开发,支持多种安装模式,可以分别安装 Kubernetes 和 KubeSphere 或二者同时安装,既方便又高效,为用户提供了灵活的安装选择。
1.2、Kubekey 的使用场景
-
仅安装 Kubernetes 集群
-
使用一个命令同时安装 Kubernetes 和 Kubephere
-
扩缩 Kubernetes 集群
-
升级 Kubernetes 集群
-
安装 Kubernetes 相关的插件(Registry、Chart、YAML )
1.3、KubeKey 的主要特点
- 多平台支持:可以在Linux、macOS和Windows等操作系统上使用。
- 多场景支持:支持单节点、多节点、高可用、离线等多种部署场景。
- 安全可靠:采用最佳实践进行部署,保证集群的安全性和可靠性。
- 可扩展性:支持通过插件的方式扩展功能,用户可以根据需求自定义插件。
- 安装简单:使用Go语言开发,相比其它安装程序,确保其安装的成功率。
- 简单易用:采用YAML文件进行配置,编写简单的YAML文件即可进行集群部署。
二、Kubekey 的安装相关
2.1、Kubekey 的安装选项
- 最小安装:只安装 Kubernetes 集群
- 同时安装:安装 Kubernetes 和 KubeSphere 一条命令完成
- 离线安装:在无法访问外部网络的环境中安装 Kubernetes 或 KubeSphere
- 高可用安装:安装具有多个控制平面节点和 etcd 节点的高可用 Kubernetes 集群
2.2、Kubekey 安装集群的方式
- 命令行的方式:使用 KK 命令得到配置文件后进行编辑,引用配置文件进行安装,安装包是 “kubekey-v3.X.X-linux-amd64.tar.gz” 格式
- 图形化的方式:使用 KK 命令后调用出图形化的界面后根据提示操作,安装包是 “kubekey-v3.X-alpha.1-console-linux-amd64.tar.gz” 格式
三、Kubekey 命令行方式部署K8S集群
3.1、系统环境准备
# 1、 系统的基本初始化部 ( 所有主机节点 )

[root@localhost ~]# echo -e "nameserver  114.114.114.114  \nnameserver 202.96.209.5"  >> /etc/resolv.conf
[root@localhost ~]# echo -e "192.168.10.201  node201\n192.168.10.202  node202\n192.168.10.203  node203\n"  >> /etc/hosts
[root@localhost ~]# curl -o /etc/yum.repos.d/CentOS-Base.repo http://mirrors.aliyun.com/repo/Centos-7.repo
[root@localhost ~]# yum -y install epel-release net-tools sysstat vim gcc gcc-c++ curl wget git telnet ntp zip unzip

[root@localhost ~]# setenforce 0
[root@localhost ~]# sed -i 's/enforcing/disabled/' /etc/selinux/config
[root@localhost ~]# systemctl stop firewalld && systemctl disable firewalld

[root@localhost ~]# systemctl start ntpd && systemctl enable ntpd
[root@localhost ~]# timedatectl set-timezone "Asia/Shanghai"
[root@localhost ~]# ntpdate time1.aliyun.com


# 2、安装容器的依赖 ( 所有主机节点 )

[root@localhost ~]# swapoff -a
[root@localhost ~]# sed -ri 's/.*swap.*/#&/' /etc/fstab

[root@localhost ~]# echo "net.ipv4.ip_forward = 1" >> /etc/sysctl.conf
[root@localhost ~]# sysctl -p

[root@localhost ~]# modprobe br_netfilter
[root@localhost ~]# lsmod | grep br_netfilter
[root@localhost ~]# sysctl --system

[root@localhost ~]# echo "net.bridge.bridge-nf-call-ip6tables = 1" >> /etc/sysctl.conf
[root@localhost ~]# echo "net.bridge.bridge-nf-call-iptables = 1" >> /etc/sysctl.conf
[root@localhost ~]# echo "net.ipv4.ip_forward = 1" >> /etc/sysctl.conf
[root@localhost ~]# sysctl -p

[root@localhost ~]# yum -y install ipset ipvsadm
[root@localhost ~]# cat > /etc/sysconfig/modules/ipvs.modules
modprobe -- ip_vs
modprobe -- ip_vs_rr
modprobe -- ip_vs_wrr
modprobe -- ip_vs_sh
modprobe -- nf_conntrack
EOF

[root@localhost ~]# chmod +x /etc/sysconfig/modules/ipvs.modules
[root@localhost ~]# /bin/bash /etc/sysconfig/modules/ipvs.modules
[root@localhost ~]# lsmod | grep -e ip_vs -e nf_conntrack

[root@localhost ~]# yum -y install conntrack socat


# 3、SSH 免密操作 ( 只在Master主机节点 )

[root@node201 ~]# ssh-keygen -t rsa -P '' -f ~/.ssh/id_rsa
[root@node201 ~]# ssh-copy-id node202
[root@node201 ~]# ssh-copy-id node203
- 1.
- 2.
- 3.
- 4.
- 5.
- 6.
- 7.
- 8.
- 9.
- 10.
- 11.
- 12.
- 13.
- 14.
- 15.
- 16.
- 17.
- 18.
- 19.
- 20.
- 21.
- 22.
- 23.
- 24.
- 25.
- 26.
- 27.
- 28.
- 29.
- 30.
- 31.
- 32.
- 33.
- 34.
- 35.
- 36.
- 37.
- 38.
- 39.
- 40.
- 41.
- 42.
- 43.
- 44.
- 45.
- 46.
- 47.
- 48.
- 49.
- 50.
- 51.
- 52.
- 53.
- 54.
- 55.
- 56.
3.2、安装包相关准备
### 1、获取安装包相关


# 1.1、第一种方式:(受限于网络,有时需要执行多次)

执行下载命令,获取最新版的 kk
[root@localhost ~]# curl -sfL https://get-kk.kubesphere.io | sh -

指定具体版本的命令
[root@localhost ~]# curl -sfL https://get-kk.kubesphere.io | VERSION=v3.0.13 sh -


# 1.2、直接下载二进制包 (推进方式)

下载地址:https://github.com/kubesphere/kubekey/tags

[root@node201 ~]# tar -zxvf kubekey-v3.0.13-linux-amd64.tar.gz


### 2、KK 命令相关使用

[root@node201 ~]# mv kk /usr/local/bin

[root@node201 ~]# kk -h
Deploy a Kubernetes or KubeSphere cluster efficiently, flexibly and easily. There are three scenarios to use KubeKey.
1. Install Kubernetes only
2. Install Kubernetes and KubeSphere together in one command
3. Install Kubernetes first, then deploy KubeSphere on it using https://github.com/kubesphere/ks-installer

Usage:
  kk [command]

Available Commands:
  add         Add nodes to kubernetes cluster
  alpha       Commands for features in alpha
  artifact    Manage a KubeKey offline installation package
  certs       cluster certs
  completion  Generate shell completion scripts
  create      Create a cluster or a cluster configuration file
  delete      Delete node or cluster
  help        Help about any command
  init        Initializes the installation environment
  plugin      Provides utilities for interacting with plugins
  upgrade     Upgrade your cluster smoothly to a newer version with this command
  version     print the client version information

Use "kk [command] --help" for more information about a command.
- 1.
- 2.
- 3.
- 4.
- 5.
- 6.
- 7.
- 8.
- 9.
- 10.
- 11.
- 12.
- 13.
- 14.
- 15.
- 16.
- 17.
- 18.
- 19.
- 20.
- 21.
- 22.
- 23.
- 24.
- 25.
- 26.
- 27.
- 28.
- 29.
- 30.
- 31.
- 32.
- 33.
- 34.
- 35.
- 36.
- 37.
- 38.
- 39.
- 40.
- 41.
- 42.
- 43.
- 44.
- 45.
- 46.
- 47.
- 48.
- 49.
- 50.
- 51.
3.3、具体的安装过程
3.3.1、配置文件说明
# 1、 查看下支持的 K8S 的版本
[root@node201 ~]# ./kk version --show-supported-k8s
v1.19.0
v1.19.8
v1.19.9
... ...
v1.26.5
v1.27.0
v1.27.1
v1.27.2


# 2、创建K8S集群配置文件
[root@node201 ~]# ./kk create config -f k8s-v12315.yaml --with-kubernetes v1.23.15

说明:
1、配置文件的名字随便定义 ,格式 xxxxx.yaml
2、(./kk create config --with-kubesphere v3.3.2 --with-kubernetes v1.23.15 -f config-k8s12315.yaml (同时安装方式的配置文件))


# 3、配置文件编辑及说明
[root@node201 ~]# cat k8s-v12315.yaml
apiVersion: kubekey.kubesphere.io/v1alpha2
kind: Cluster
metadata:
  name: sample
spec:
  hosts:
  - {

         name: node201, address: 192.168.10.201, internalAddress: 192.168.10.201, user: root, password: "123456"}
  - {

         name: node202, address: 192.168.10.202, internalAddress: 192.168.10.202, user: root, password: "123456"}
  - {

         name: node203, address: 192.168.10.203, internalAddress: 192.168.10.203, user: root, password: "123456"}
  roleGroups:
    etcd:
    - node201
    control-plane:
    - node201
    worker:
    - node201
    - node202
    - node203
  controlPlaneEndpoint:
    ## Internal loadbalancer for apiservers
    # internalLoadbalancer: haproxy

     test.k8s.local
    address: ""
    port: 6443
  kubernetes:
    version: v1.23.15
    clusterName: cluster.local
    autoRenewCerts: true
    containerManager: docker
  etcd:
    type: kubekey
  network:
    plugin: calico
    kubePodsCIDR: 10.244.0.0/16
    kubeServiceCIDR: 10.96.0.0/16
    ## multus support. https://github.com/k8snetworkplumbingwg/multus-cni
    multusCNI:
      enabled: false
  registry:
    privateRegistry: ""
    namespaceOverride: ""
    registryMirrors: []
    insecureRegistries: []
  addons: []


  ###  配置文件的说明:

  1、hosts 那一部分
  1.1、 这里定义要作为K8S集群的所有节点,Kekukey所在主机必须是主节点
  1.2、 “user” 和“password” 可以不使用,改成为主机配置的SSH密钥

  2、roleGroups 部分:
     etcd、control-plane、worker: 即充当K8S集群角色的主机,这个就不需要说明了

  3、controlPlaneEndpoint --- domain: 可改可不改,结合实际情况吧

  4、kubernetes --- containerManager:此版本默认的是Docker作为容器运行时,可更改为别的

  5、network --- kubePodsCIDR 和 kubeServiceCIDR: 可根据自己使用习惯更改,也可不更改

  6、registry: 支持一并安装容器镜像仓库,根据自身实际情况有选择性使用(一般情况不会使用此功能)
- 1.
- 2.
- 3.
- 4.
- 5.
- 6.
- 7.
- 8.
- 9.
- 10.
- 11.
- 12.
- 13.
- 14.
- 15.
- 16.
- 17.
- 18.
- 19.
- 20.
- 21.
- 22.
- 23.
- 24.
- 25.
- 26.
- 27.
- 28.
- 29.
- 30.
- 31.
- 32.
- 33.
- 34.
- 35.
- 36.
- 37.
- 38.
- 39.
- 40.
- 41.
- 42.
- 43.
- 44.
- 45.
- 46.
- 47.
- 48.
- 49.
- 50.
- 51.
- 52.
- 53.
- 54.
- 55.
- 56.
- 57.
- 58.
- 59.
- 60.
- 61.
- 62.
- 63.
- 64.
- 65.
- 66.
- 67.
- 68.
- 69.
- 70.
- 71.
- 72.
- 73.
- 74.
- 75.
- 76.
- 77.
- 78.
- 79.
- 80.
- 81.
- 82.
- 83.
- 84.
- 85.
- 86.
- 87.
- 88.
3.3.2、具体进行安装
[root@node201 ~]# export KKZONE=cn    ### 很重要,主要是国内外网络情况的原因

[root@node201 ~]# ./kk create cluster -f k8s-v12315.yaml


 _   __      _          _   __
| | / /     | |        | | / /
| |/ / _   _| |__   ___| |/ /  ___ _   _
|    \| | | | '_ \ / _ \    \ / _ \ | | |
| |\  \ |_| | |_) |  __/ |\  \  __/ |_| |
\_| \_/\__,_|_.__/ \___\_| \_/\___|\__, |
                                    __/ |
                                   |___/

11:51:38 CST [GreetingsModule] Greetings
11:51:38 CST message: [node203]
Greetings, KubeKey!
11:51:38 CST message: [node201]
Greetings, KubeKey!
11:51:38 CST message: [node202]
Greetings, KubeKey!
11:51:38 CST success: [node203]
11:51:38 CST success: [node201]
11:51:38 CST success: [node202]
11:51:38 CST [NodePreCheckModule] A pre-check on nodes
11:51:38 CST success: [node201]
11:51:38 CST success: [node203]
11:51:38 CST success: [node202]
11:51:38 CST [ConfirmModule] Display confirmation form
+---------+------+------+---------+----------+-------+-------+---------+-----------+--------+--------+------------+------------+-------------+------------------+--------------+
| name    | sudo | curl | openssl | ebtables | socat | ipset | ipvsadm | conntrack | chrony | docker | containerd | nfs client | ceph client | glusterfs client | time         |
+---------+------+------+---------+----------+-------+-------+---------+-----------+--------+--------+------------+------------+-------------+------------------+--------------+
| node201 | y    | y    | y       | y        | y     | y     | y       | y         | y      |        |            |            |             |                  | CST 11:51:38 |
| node202 | y    | y    | y       | y        | y     | y     | y       | y         | y      |        |            |            |             |                  | CST 11:51:38 |
| node203 | y    | y    | y       | y        | y     | y     | y       | y         | y      |        |            |            |             |                  | CST 11:51:38 |
+---------+------+------+---------+----------+-------+-------+---------+-----------+--------+--------+------------+------------+-------------+------------------+--------------+

This is a simple check of your environment.
Before installation, ensure that your machines meet all requirements specified at
https://github.com/kubesphere/kubekey#requirements-and-recommendations

Continue this installation? [yes/no]: yes     ###
- 1.
- 2.
- 3.
- 4.
- 5.
- 6.
- 7.
- 8.
- 9.
- 10.
- 11.
- 12.
- 13.
- 14.
- 15.
- 16.
- 17.
- 18.
- 19.
- 20.
- 21.
- 22.
- 23.
- 24.
- 25.
- 26.
- 27.
- 28.
- 29.
- 30.
- 31.
- 32.
- 33.
- 34.
- 35.
- 36.
- 37.
- 38.
- 39.
- 40.
- 41.
- 42.
- 43.
- 44.
下载安装相关的组件 (部分的输出省略 。。。)
Continue this installation?[yes/no]: yes
11:53:55 CST success: [LocalHost]
11:53:55 CST [NodeBinariesModule] Download installation binaries
11:53:55 CST message: [localhost]
downloading amd64 kubeadm v1.23.15 ...
  % Total    % Received % Xferd  Average Speed   Time    Time     Time  Current
                                 Dload  Upload   Total   Spent    Left  Speed
100 43.1M  100 43.1M    0     0   898k      0  0:00:49  0:00:49 --:--:-- 1023k
11:54:45 CST message: [localhost]
downloading amd64 kubelet v1.23.15 ...
  % Total    % Received % Xferd  Average Speed   Time    Time     Time  Current
                                 Dload  Upload   Total   Spent    Left  Speed
100  118M  100  118M    0     0  1021k      0  0:01:58  0:01:58 --:--:-- 1054k
11:56:45 CST message: [localhost]

downloading amd64 kubectl v1.23.15 ...
downloading amd64 helm v3.9.0 ...
downloading amd64 kubecni v1.2.0 ...
downloading amd64 crictl v1.24.0 ...
downloading amd64 etcd v3.4.13 ...
downloading amd64 docker 24.0.6 ...
downloading amd64 calicoctl v3.26.1 ...
- 1.
- 2.
- 3.
- 4.
- 5.
- 6.
- 7.
- 8.
- 9.
- 10.
- 11.
- 12.
- 13.
- 14.
- 15.
- 16.
- 17.
- 18.
- 19.
- 20.
- 21.
- 22.
- 23.
- 24.
进行各主机节点的优化 (部分的输出省略 。。。)
12:00:41 CST stdout: [node202]   ###
setenforce: SELinux is disabled
Disabled
net.ipv4.ip_forward = 1
net.bridge.bridge-nf-call-ip6tables = 1
net.bridge.bridge-nf-call-iptables = 1
net.bridge.bridge-nf-call-arptables = 1
net.ipv4.ip_local_reserved_ports = 30000-32767
net.core.netdev_max_backlog = 65535
net.core.rmem_max = 33554432
net.core.wmem_max = 33554432
net.core.somaxconn = 32768
net.ipv4.tcp_max_syn_backlog = 1048576
net.ipv4.neigh.default.gc_thresh1 = 512
net.ipv4.neigh.default.gc_thresh2 = 2048
net.ipv4.neigh.default.gc_thresh3 = 4096
net.ipv4.tcp_retries2 = 15
net.ipv4.tcp_max_tw_buckets = 1048576
net.ipv4.tcp_max_orphans = 65535
net.ipv4.udp_rmem_min = 131072
net.ipv4.udp_wmem_min = 131072
net.ipv4.conf.all.rp_filter = 1
net.ipv4.conf.default.rp_filter = 1
net.ipv4.conf.all.arp_accept = 1
net.ipv4.conf.default.arp_accept = 1
net.ipv4.conf.all.arp_ignore = 1
net.ipv4.conf.default.arp_ignore = 1
vm.max_map_count = 262144
vm.swappiness = 0
vm.overcommit_memory = 0
fs.inotify.max_user_instances = 524288
fs.inotify.max_user_watches = 524288
fs.pipe-max-size = 4194304
fs.aio-max-nr = 262144
kernel.pid_max = 65535
kernel.watchdog_thresh = 5
kernel.hung_task_timeout_secs = 5

12:00:41 CST stdout: [node203]
......
12:00:41 CST stdout: [node201]
......
- 1.
- 2.
- 3.
- 4.
- 5.
- 6.
- 7.
- 8.
- 9.
- 10.
- 11.
- 12.
- 13.
- 14.
- 15.
- 16.
- 17.
- 18.
- 19.
- 20.
- 21.
- 22.
- 23.
- 24.
- 25.
- 26.
- 27.
- 28.
- 29.
- 30.
- 31.
- 32.
- 33.
- 34.
- 35.
- 36.
- 37.
- 38.
- 39.
- 40.
- 41.
- 42.
- 43.
- 44.
拉取相关的容器镜像操作 (部分的输出省略。。。)
12:00:47 CST [PullModule] Start to pull images on all nodes
12:00:49 CST message: [node203]
downloading image: registry.cn-beijing.aliyuncs.com/kubesphereio/kube-proxy:v1.23.15

... ...

12:05:28 CST message: [node201]
downloading image: registry.cn-beijing.aliyuncs.com/kubesphereio/node:v3.26.1
12:06:23 CST message: [node201]
downloading image: registry.cn-beijing.aliyuncs.com/kubesphereio/pod2daemon-flexvol:v3.26.1
- 1.
- 2.
- 3.
- 4.
- 5.
- 6.
- 7.
- 8.
- 9.
- 10.
- 11.
- 12.
中间省略掉大部分的输出 … …
### 从下面的输出不难看出,Kubekey 是封装了 kubeadm 工具的一个新集群部署工具

Your Kubernetes control-plane has initialized successfully!

To start using your cluster, you need to run the following as a regular user:

  mkdir -p $HOME/.kube
  sudo cp -i /etc/kubernetes/admin.conf $HOME/.kube/config
  sudo chown $(id -u):$(id -g) $HOME/.kube/config

Alternatively, if you are the root user, you can run:

  export KUBECONFIG=/etc/kubernetes/admin.conf

You should now deploy a pod network to the cluster.
Run "kubectl apply -f [podnetwork].yaml" with one of the options listed at:
  https://kubernetes.io/docs/concepts/cluster-administration/addons/

You can now join any number of control-plane nodes by copying certificate authorities
and service account keys on each node and then running the following as root:

  kubeadm join test.k8s.local:6443 --token 8pr0d3.xcxgwbdzjllysv2k \
        --discovery-token-ca-cert-hash sha256:6f348b01044cb36b0e6d7669f6f6cabef31521eab519314892e46f61f91229d7 \
        --control-plane

Then you can join any number of worker nodes by running the following on each as root:

kubeadm join test.k8s.local:6443 --token 8pr0d3.xcxgwbdzjllysv2k \
        --discovery-token-ca-cert-hash sha256:6f348b01044cb36b0e6d7669f6f6cabef31521eab519314892e46f61f91229d7


12:07:30 CST [ChownModule] Chown user $HOME/.kube dir
12:07:30 CST success: [node203]
12:07:30 CST success: [node202]
12:07:30 CST success: [node201]
12:07:30 CST [AutoRenewCertsModule] Generate k8s certs renew script
12:07:30 CST success: [node201]
12:07:30 CST [AutoRenewCertsModule] Generate k8s certs renew service
12:07:31 CST success: [node201]
12:07:31 CST [AutoRenewCertsModule] Generate k8s certs renew timer
12:07:31 CST success: [node201]
12:07:31 CST [AutoRenewCertsModule] Enable k8s certs renew service
12:07:31 CST success: [node201]
12:07:31 CST [SaveKubeConfigModule] Save kube config as a configmap
12:07:31 CST success: [LocalHost]
12:07:31 CST [AddonsModule] Install addons
12:07:31 CST success: [LocalHost]
12:07:31 CST Pipeline[CreateClusterPipeline] execute successfully
Installation is complete.

Please check the result using the command:

        kubectl get pod -A                    ####  看到此行,整个安装就顺利的结束了,集群其它节点不需要进行任何的操作
- 1.
- 2.
- 3.
- 4.
- 5.
- 6.
- 7.
- 8.
- 9.
- 10.
- 11.
- 12.
- 13.
- 14.
- 15.
- 16.
- 17.
- 18.
- 19.
- 20.
- 21.
- 22.
- 23.
- 24.
- 25.
- 26.
- 27.
- 28.
- 29.
- 30.
- 31.
- 32.
- 33.
- 34.
- 35.
- 36.
- 37.
- 38.
- 39.
- 40.
- 41.
- 42.
- 43.
- 44.
- 45.
- 46.
- 47.
- 48.
- 49.
- 50.
- 51.
- 52.
- 53.
- 54.
- 55.
4.3、进行安装验证
[root@node201 ~]# kubectl get pod -A
NAMESPACE     NAME                                       READY   STATUS    RESTARTS   AGE
kube-system   calico-kube-controllers-67fbf89557-msq76   1/1     Running   0          97s
kube-system   calico-node-52bfv                          1/1     Running   0          97s
kube-system   calico-node-lbtkg                          1/1     Running   0          97s
kube-system   calico-node-tml7p                          1/1     Running   0          97s
kube-system   coredns-757cd945b-54gn9                    1/1     Running   0          104s
kube-system   coredns-757cd945b-s9kp8                    1/1     Running   0          104s
kube-system   kube-apiserver-node201                     1/1     Running   0          2m
kube-system   kube-controller-manager-node201            1/1     Running   0          119s
kube-system   kube-proxy-4v4gz                           1/1     Running   0          103s
kube-system   kube-proxy-gj6qc                           1/1     Running   0          103s
kube-system   kube-proxy-s4smt                           1/1     Running   0          104s
kube-system   kube-scheduler-node201                     1/1     Running   0          119s
kube-system   nodelocaldns-smbbw                         1/1     Running   0          103s
kube-system   nodelocaldns-tkbtp                         1/1     Running   0          104s
kube-system   nodelocaldns-w4n2r                         1/1     Running   0          103s

[root@node201 ~]# kubectl get node
NAME      STATUS   ROLES                         AGE    VERSION
node201   Ready    control-plane,master,worker   2m8s   v1.23.15
node202   Ready    worker                        110s   v1.23.15
node203   Ready    worker                        110s   v1.23.15
- 1.
- 2.
- 3.
- 4.
- 5.
- 6.
- 7.
- 8.
- 9.
- 10.
- 11.
- 12.
- 13.
- 14.
- 15.
- 16.
- 17.
- 18.
- 19.
- 20.
- 21.
- 22.
- 23.
- 24.
- 25.
四、Kubekey 图形化的方式部署K8S集群
4.1、系统环境的准备
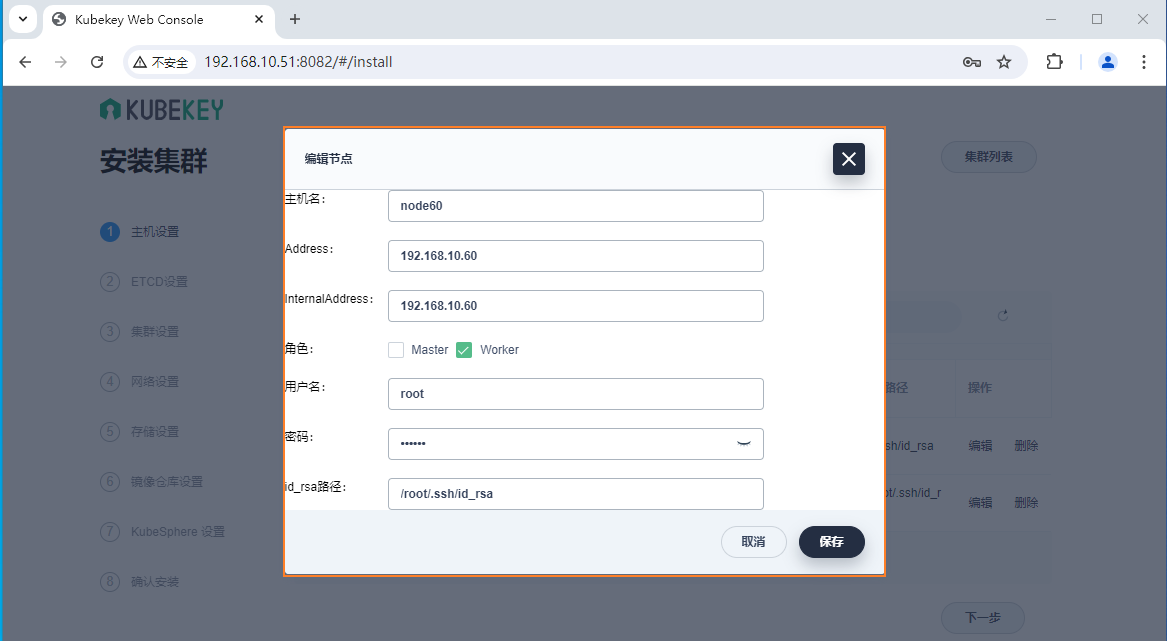
具体参照上面的 3.1 章节 ( 本实验使用的是两个全新的节点 “node51(Master、Worker)”、“node60(Worker)” )
4.2、安装包相关准备
4.3、具体的安装过程
浏览器打开界面如下,选择 “安装集群” ,来到下面第二副图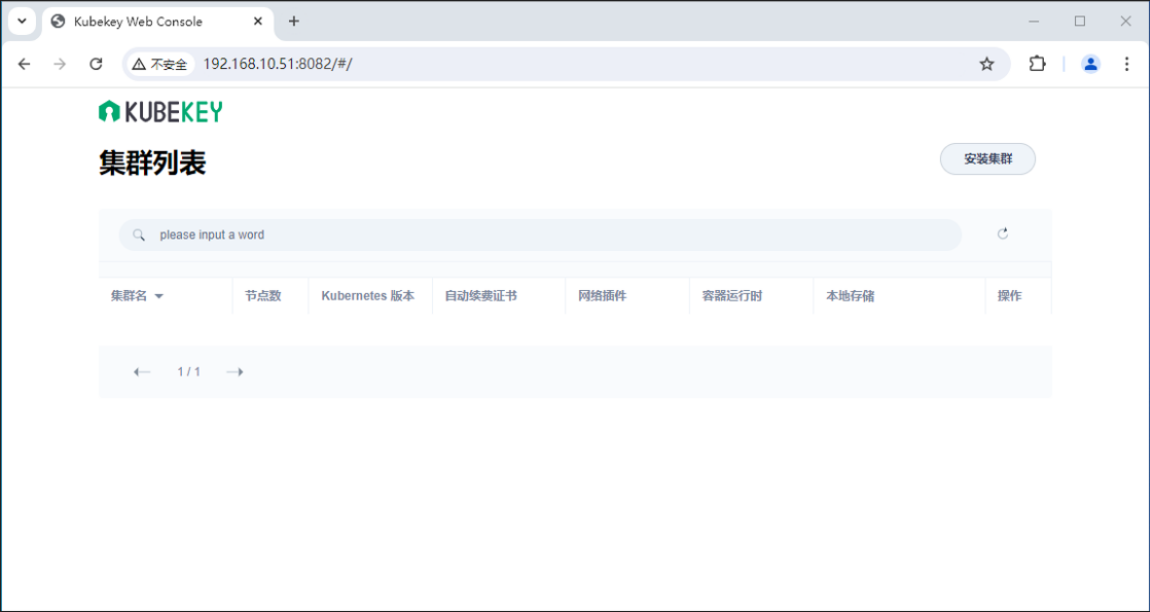
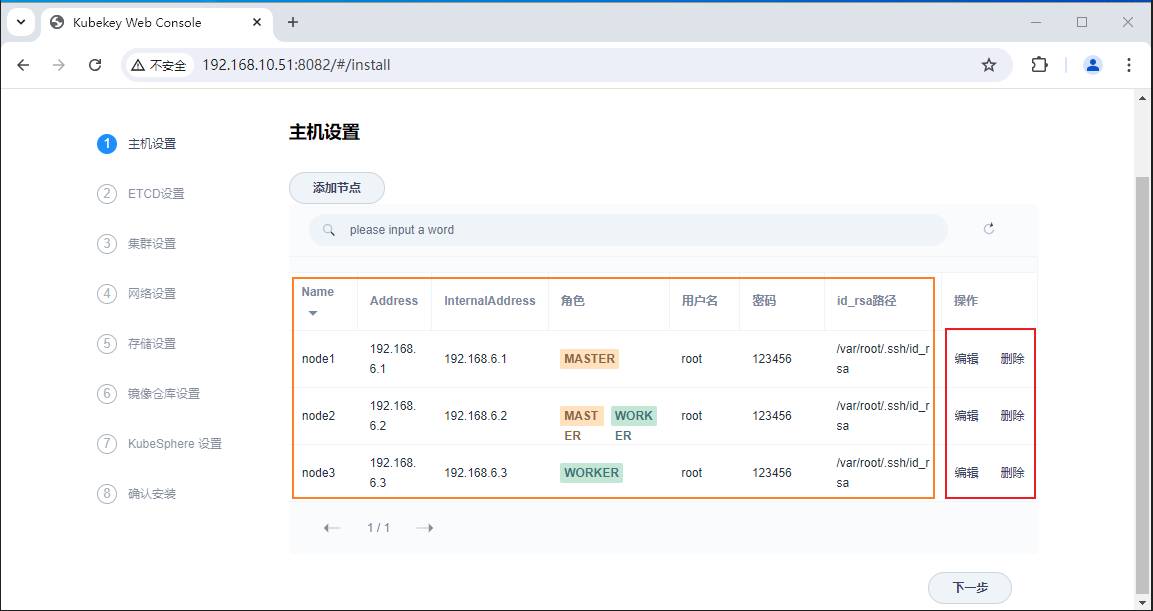
上面看到的是集群内部自带的集群选项,按照下面的操作,将三个节点都 “删除”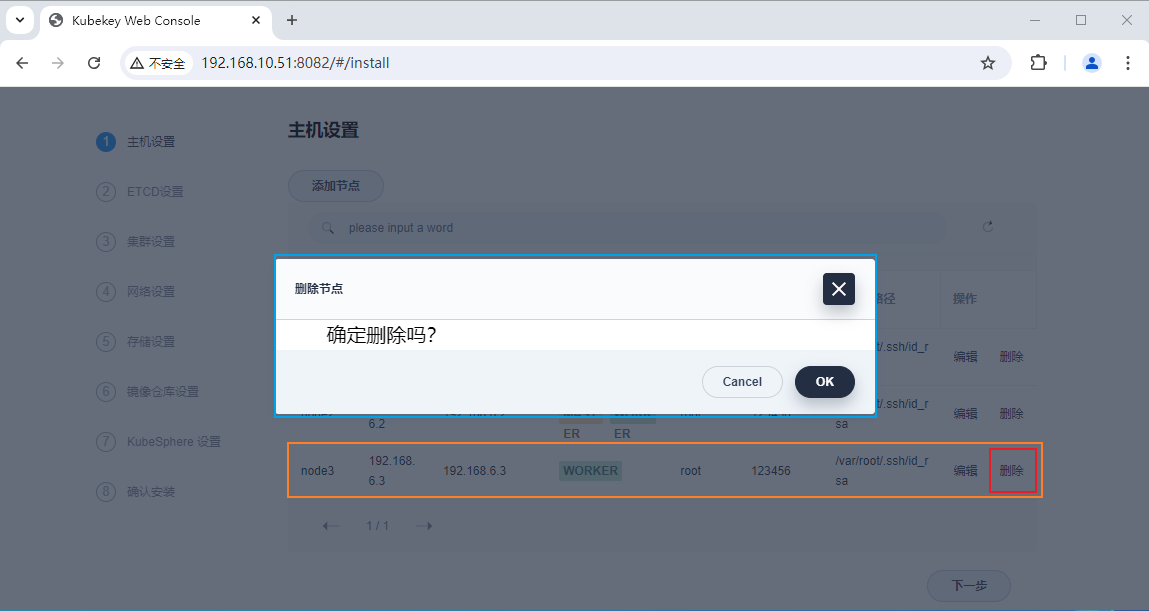
添加两个节点(node51、node60) ,并选择对应的集群角色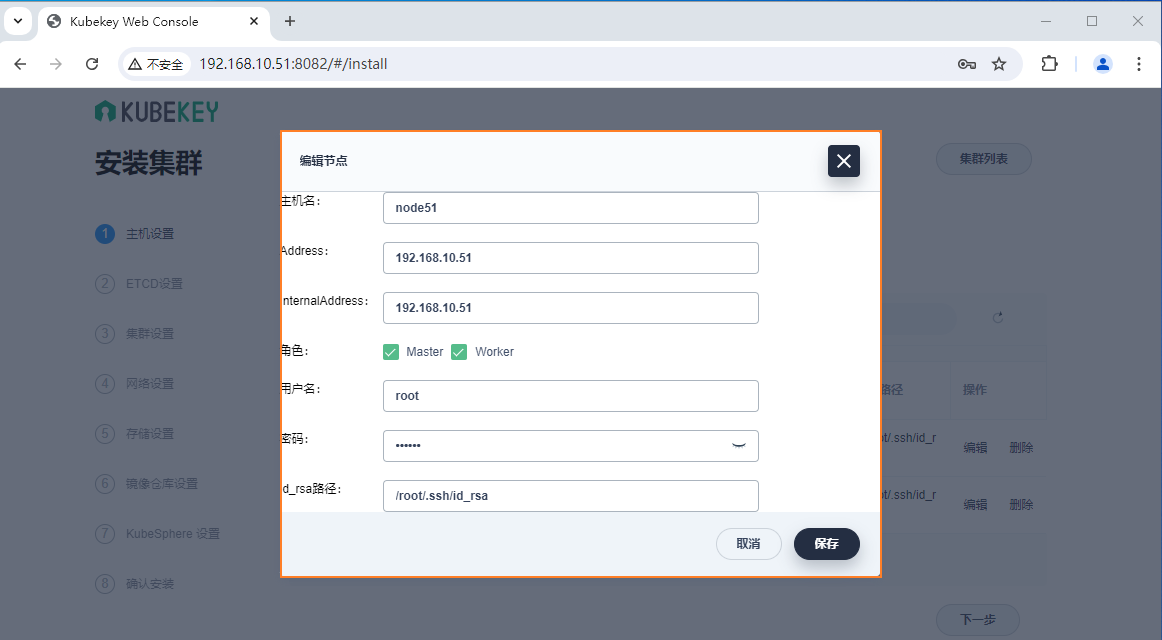
ETCD 的设置,选择 节点 node51 为部署 Etcd 的节点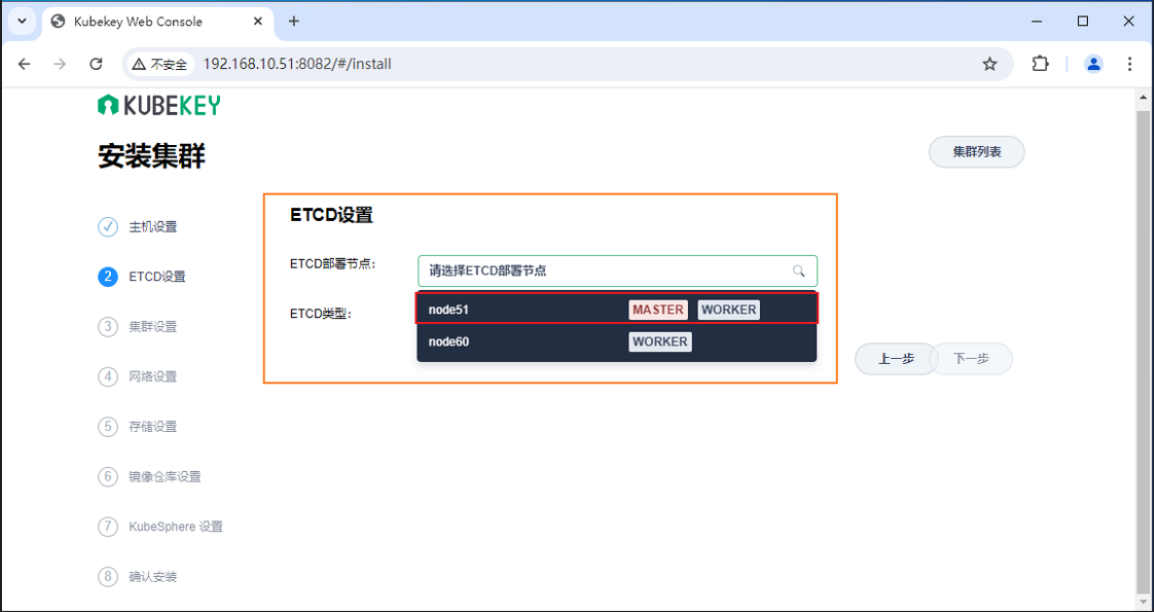
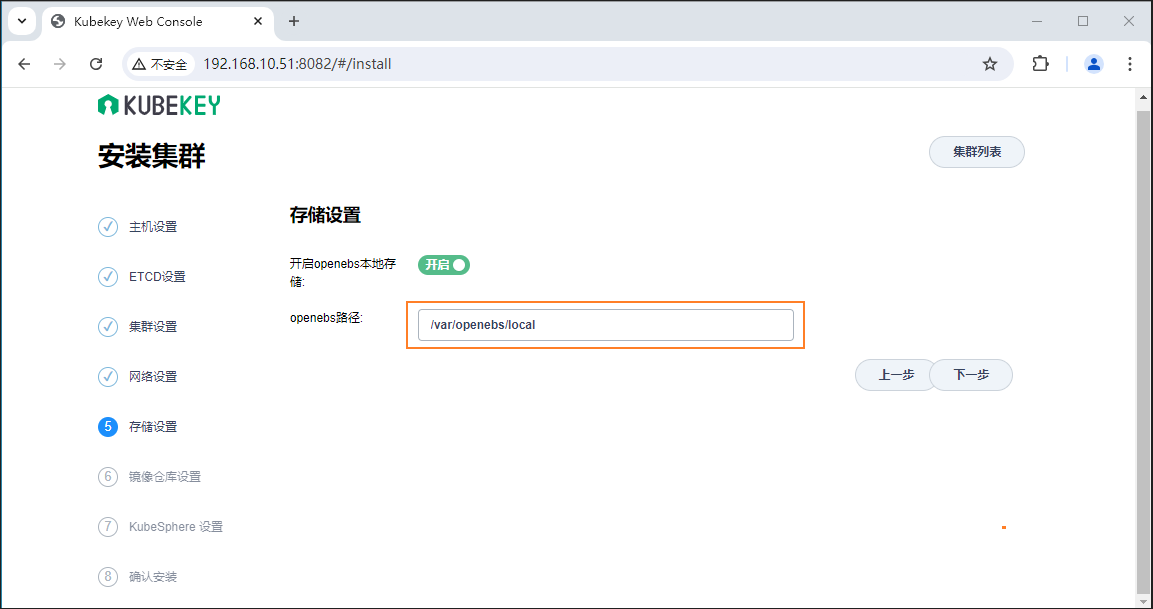
有关 K8S集群版本、容器运行时、网络选项、数据存储目录 等相关项的设置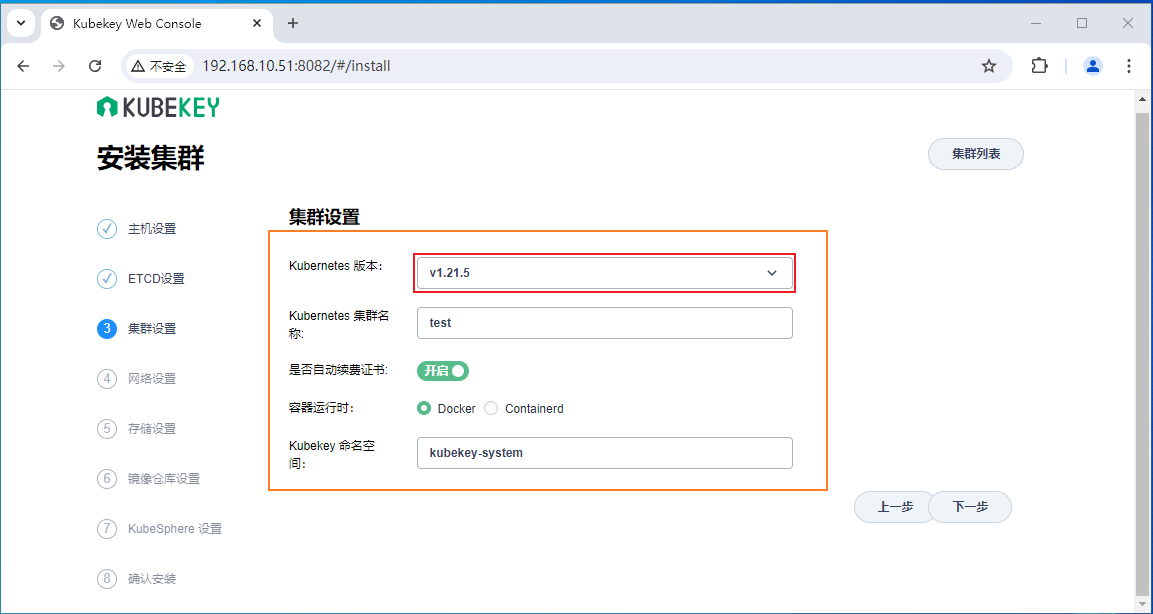

本次忽略(不进行) 有关 “Registry” 、“KubeSphere” 的安装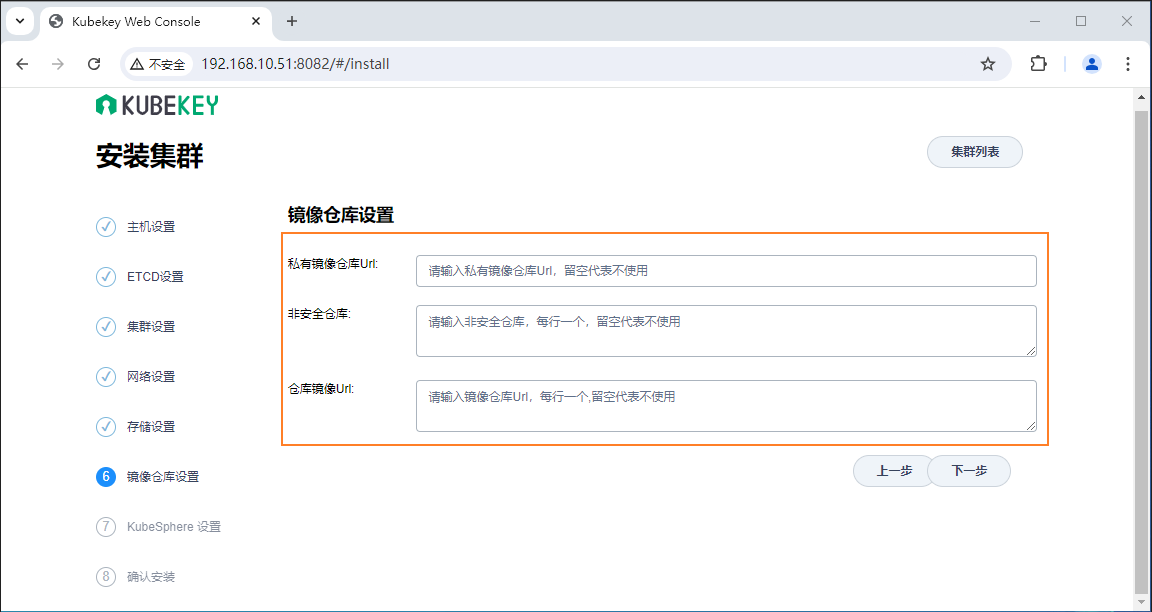

各种安装选项进行选择和设置后,开始进行安装的具体过程,稍加等待即可完全集群的安装了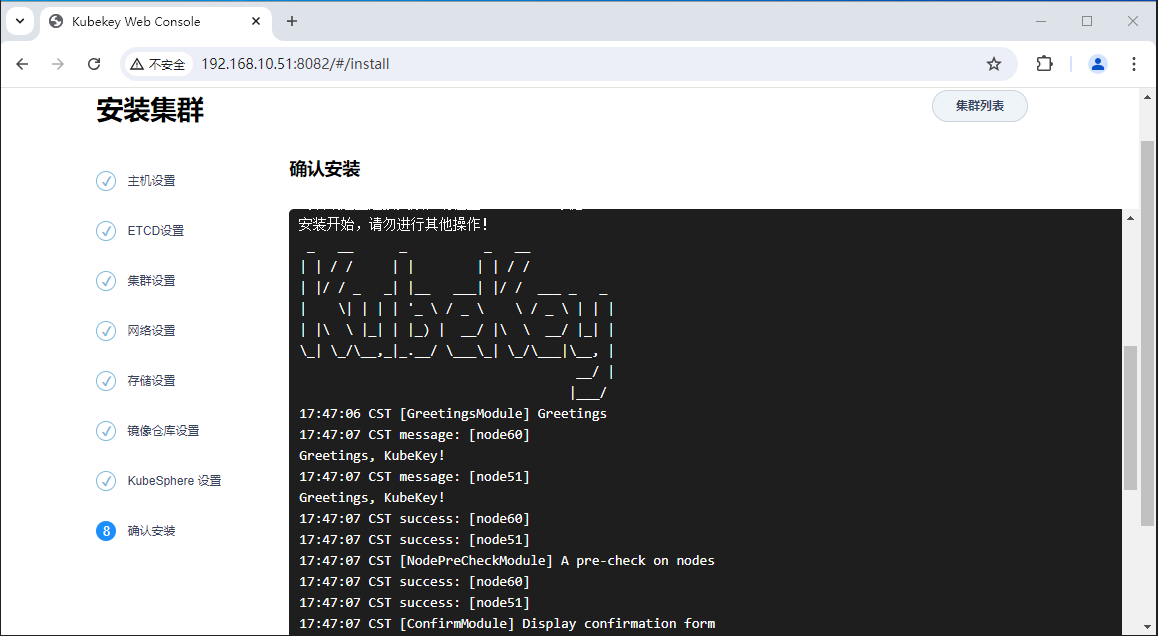
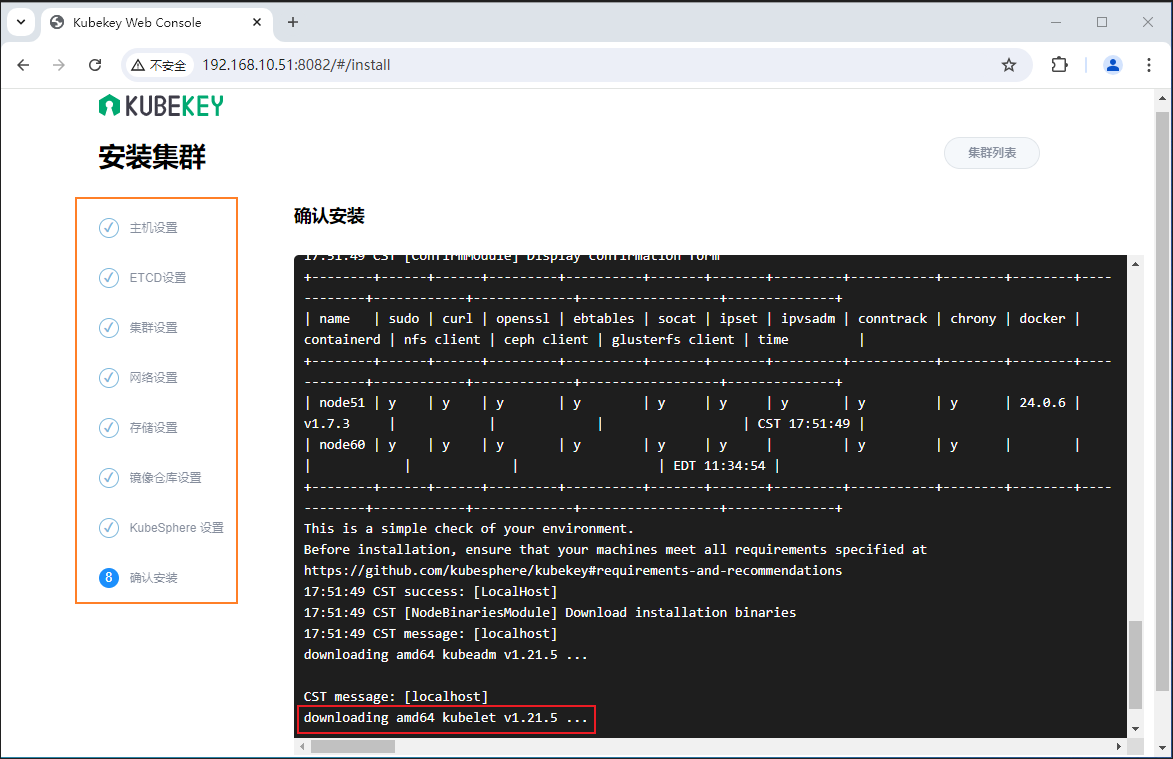
说明: 从上面的输出可以看到,这里开始了正在的安装操作,而上面的选择过程,其实等同于命令行安装里面,生成并编辑集群配置文件的操作部分
五、集群安装部署后续
5.1、集群的节点相关操作
5.2、集群的证书期限问题
由于 Kubekey 是封装的 Kubeadm 工具进行的K8S集群的安装,所以也会存在着集群证书更新的问题
1、# 证书期限查看

[root@node201 ~]# kubeadm certs check-expiration
[check-expiration] Reading configuration from the cluster...
[check-expiration] FYI: You can look at this config file with 'kubectl -n kube-system get cm kubeadm-config -o yaml'
W1031 22:01:11.670008    6723 utils.go:69] The recommended value for "clusterDNS" in "KubeletConfiguration" is: [10.96.0.10]; the provided value is: [169.254.25.10]

CERTIFICATE                EXPIRES                  RESIDUAL TIME   CERTIFICATE AUTHORITY   EXTERNALLY MANAGED
admin.conf                 Oct 31, 2025 04:07 UTC   364d            ca                      no
apiserver                  Oct 31, 2025 04:07 UTC   364d            ca                      no
apiserver-kubelet-client   Oct 31, 2025 04:07 UTC   364d            ca                      no
controller-manager.conf    Oct 31, 2025 04:07 UTC   364d            ca                      no
front-proxy-client         Oct 31, 2025 04:07 UTC   364d            front-proxy-ca          no
scheduler.conf             Oct 31, 2025 04:07 UTC   364d            ca                      no

CERTIFICATE AUTHORITY   EXPIRES                  RESIDUAL TIME   EXTERNALLY MANAGED
ca                      Oct 29, 2034 04:07 UTC   9y              no
front-proxy-ca          Oct 29, 2034 04:07 UTC   9y              no


2、# 自定义一个时间
[root@node201 ~]# date
Thu Oct 31 15:13:53 CST 2024

[root@node201 ~]# date -s 2025-10-30
Thu Oct 30 00:00:00 CST 2025


3、# 再次证书期限查看
[root@node201 ~]# kubeadm certs check-expiration
[check-expiration] Reading configuration from the cluster...
[check-expiration] FYI: You can look at this config file with 'kubectl -n kube-system get cm kubeadm-config -o yaml'
W1030 00:00:36.661833   47170 utils.go:69] The recommended value for "clusterDNS" in "KubeletConfiguration" is: [10.96.0.10]; the provided value is: [169.254.25.10]

CERTIFICATE                EXPIRES                  RESIDUAL TIME   CERTIFICATE AUTHORITY   EXTERNALLY MANAGED
admin.conf                 Oct 31, 2025 14:46 UTC   1d              ca                      no
apiserver                  Oct 31, 2025 14:46 UTC   1d              ca                      no
apiserver-kubelet-client   Oct 31, 2025 14:46 UTC   1d              ca                      no
controller-manager.conf    Oct 31, 2025 14:46 UTC   1d              ca                      no
front-proxy-client         Oct 31, 2025 14:46 UTC   1d              front-proxy-ca          no
scheduler.conf             Oct 31, 2025 14:46 UTC   1d              ca                      no

CERTIFICATE AUTHORITY   EXPIRES                  RESIDUAL TIME   EXTERNALLY MANAGED
ca                      Oct 29, 2034 04:07 UTC   9y              no
front-proxy-ca          Oct 29, 2034 04:07 UTC   9y              no

#  日期更改后,发现证书的有效期限只有 1 天了,下面使用命令进行更新


4、# 进行证书更新
[root@node201 ~]#  kubeadm certs renew all
[renew] Reading configuration from the cluster...
[renew] FYI: You can look at this config file with 'kubectl -n kube-system get cm kubeadm-config -o yaml'
W1030 00:01:00.852034   47497 utils.go:69] The recommended value for "clusterDNS" in "KubeletConfiguration" is: [10.96.0.10]; the provided value is: [169.254.25.10]

certificate embedded in the kubeconfig file for the admin to use and for kubeadm itself renewed
certificate for serving the Kubernetes API renewed
certificate for the API server to connect to kubelet renewed
certificate embedded in the kubeconfig file for the controller manager to use renewed
certificate for the front proxy client renewed
certificate embedded in the kubeconfig file for the scheduler manager to use renewed

Done renewing certificates. You must restart the kube-apiserver, kube-controller-manager, kube-scheduler and etcd, so that they can use the new certificates.         #  提醒要重启这四个服务才生效


5、# 重启相关的服务
[root@node201 ~]# kubectl get pod -n kube-system | grep 201
kube-apiserver-node201                     1/1     Running   0          6h29m
kube-controller-manager-node201            1/1     Running   0          6h29m
kube-scheduler-node201                     1/1     Running   0          6h29m

[root@node201 ]# kubectl delete -n kube-system pod kube-apiserver-node201
pod "kube-apiserver-node201" deleted
[root@node201 ~]# kubectl delete -n kube-system pod kube-controller-manager-node201
pod "kube-controller-manager-node201" deleted
[root@node201 ~]#kubectl delete -n kube-system pod kube-scheduler-node201
pod "kube-scheduler-node201" deleted

[root@node201 ~]# systemctl restart etcd
[root@node201 ~]#  systemctl status etcd


6、# 更新后查看证书期限
[root@node201 ~]# kubeadm certs check-expiration
[check-expiration] Reading configuration from the cluster...
[check-expiration] FYI: You can look at this config file with 'kubectl -n kube-system get cm kubeadm-config -o yaml'
W1030 00:01:04.424376   47583 utils.go:69] The recommended value for "clusterDNS" in "KubeletConfiguration" is: [10.96.0.10]; the provided value is: [169.254.25.10]

CERTIFICATE                EXPIRES                  RESIDUAL TIME   CERTIFICATE AUTHORITY   EXTERNALLY MANAGED
admin.conf                 Oct 29, 2026 16:01 UTC   364d            ca                      no
apiserver                  Oct 29, 2026 16:01 UTC   364d            ca                      no
apiserver-kubelet-client   Oct 29, 2026 16:01 UTC   364d            ca                      no
controller-manager.conf    Oct 29, 2026 16:01 UTC   364d            ca                      no
front-proxy-client         Oct 29, 2026 16:01 UTC   364d            front-proxy-ca          no
scheduler.conf             Oct 29, 2026 16:01 UTC   364d            ca                      no

CERTIFICATE AUTHORITY   EXPIRES                  RESIDUAL TIME   EXTERNALLY MANAGED
ca                      Oct 29, 2034 04:07 UTC   9y              no
front-proxy-ca          Oct 29, 2034 04:07 UTC   9y              no


### 更新后,证书一年的期限又重新开始计算了,还有 364 天
- 1.
- 2.
- 3.
- 4.
- 5.
- 6.
- 7.
- 8.
- 9.
- 10.
- 11.
- 12.
- 13.
- 14.
- 15.
- 16.
- 17.
- 18.
- 19.
- 20.
- 21.
- 22.
- 23.
- 24.
- 25.
- 26.
- 27.
- 28.
- 29.
- 30.
- 31.
- 32.
- 33.
- 34.
- 35.
- 36.
- 37.
- 38.
- 39.
- 40.
- 41.
- 42.
- 43.
- 44.
- 45.
- 46.
- 47.
- 48.
- 49.
- 50.
- 51.
- 52.
- 53.
- 54.
- 55.
- 56.
- 57.
- 58.
- 59.
- 60.
- 61.
- 62.
- 63.
- 64.
- 65.
- 66.
- 67.
- 68.
- 69.
- 70.
- 71.
- 72.
- 73.
- 74.
- 75.
- 76.
- 77.
- 78.
- 79.
- 80.
- 81.
- 82.
- 83.
- 84.
- 85.
- 86.
- 87.
- 88.
- 89.
- 90.
- 91.
- 92.
- 93.
- 94.
- 95.
- 96.
- 97.
- 98.
- 99.
- 100.
- 101.
- 102.
- 103.
- 104.
- 105.