| 数据科学、数据分析、人工智能、数学建模必备知识汇总-----主目录-----持续更新(进不去说明我没写完):https://blog.csdn.net/grd_java/article/details/140174015 |
|---|
文章目录
一、简介
| 为什么使用Numpy |
|---|
- Numpy是专门处理数值运算的第三方库,不仅使用了python,还大量使用C或C++优化计算性能
- 对于同样的数值计算任务,使用的Numpy比直接使用Python原生代码更加方便高效
- 代码更加简洁:Numpy直接以数组、矩阵为粒度计算并支撑大量数学函数,而python需要for循环从底层实现
- 性能更加高效:Numpy的数组存储效率和输入输出计算性能,比Python使用List或嵌套List好很多
- Numpy的数据存储和Python原生List不一样
- Numpy大部分代码使用C语言实现,是Numpy比纯Python代码高效的原因
- Numpy是Python各种数据科学类库的基础库:例如Scipy,Scikit_Learn,TensorFlow,Pandas等
| 特点 |
|---|
- 数组算术计算方面,NumPy提供了大量的数学函数(统计相关、线性代数、财经相关,随机抽样等)
- Numpy的底层主要用C(最贴近底层的高级语言,目前比它更底层的只有汇编,再底层一点就是机器语言了),对数组进行高效数学运算
- 多维向量的描述和快速高效计算能力,让数组和矩阵的使用更加自然。
- 大量实用的数学函数,支撑复杂的线性代数、随机数生成以及傅里叶变换函数
- 同样的数值计算任务,使用NumPy要比直接编写原生Python代码更加便捷
| 安装 |
|---|
- 选择Anaconda,下载地址:https://www.anaconda.com/。
这是开源的Python发行版,目前应用比较广泛。但是为了更加底层一点,就不用这个了,因为它集成了很多包,我们都不需要自己安装,一旦遇到不能使用Anaconda的开发环境,很多人就两眼一黑,连Numpy都不知道怎么安装了。
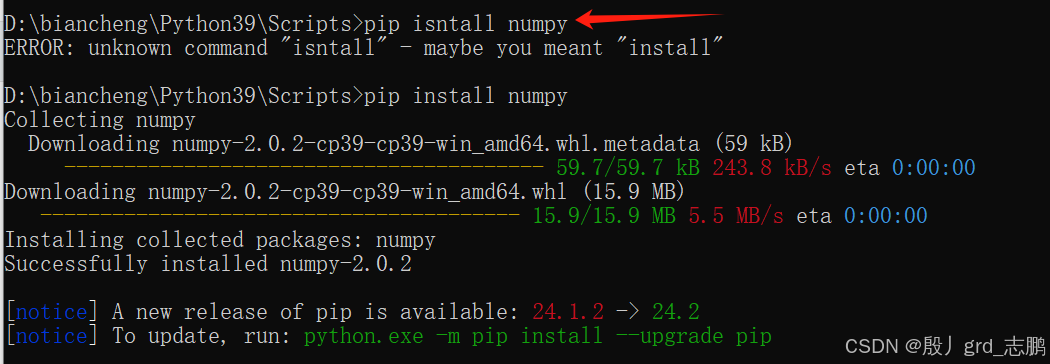
- 自己手动安装
- 下载好python后,进入安装目录的Scripts文件夹,在此文件夹进入cmd命令窗口
- 输入命令pip install numpy
- 如果使用pycharm的话,发现安装成功后,依然报错显示没有numpy,则需要配置一下才能使用
- 进入settings,选择Project:项目名,点击add interpreter,选择add local interpreter
- 选择existing,配置interpreter为我们使用的python的python.exe,刚刚我们就是将lxml安装到了这个python版本的scripts中,所以选择这个版本python的python.exe. 然后要点击apply后再点击ok


二、安装jupyter
jupyter是一个展示代码运行结果比较方便的,和自己在Pycharm写代码没什么不同,但是jupyter展示起来更加方便。
本质上,pycharm适合我们开发大型项目,而做小案例,包括探索、试验、数据分析都需要我们进行展示,而且代码量通常不多,使用pycharm展示起来不方便。
- 通过pip安装jupyter,命令pip install jupyter
- 而运行起来也很方便,只需要进入我们小项目文件夹,然后cmd运行
jupyter notebook即可
- 它会给我们一个访问url,将其复制到浏览器地址栏中,进入jupyter notebook


因此,我们代码依然会用pycharm中的正常python代码给出。但是我们结果展示会用jupyter给出,因为用pycharm给展示结果,无非就是底下的黑窗口一堆白字罢了,真的不好看。
三、ndarray
1. 创建
1.1 通过array()函数创建
NumPy定义了一个n维数组对象,简称ndarray对象,是一个一系列相同类型元素组成的数组集合。数组中每个元素都占有大小相同的内存块
采用了数组的索引机制,将数组中的每个元素映射到内存块上,并且按照一定布局对内存块进行排列(行或列)

| 创建数组 |
|---|
- 对于参数1,object,可以传输的类型有非常多

'''导包(start)'''
import numpy as np
'''导包(end)'''

def test_numpy():
    arr = np.array([1,2,3,4,5])#用列表作为参数
    print("用列表作为参数",arr)
    arr = np.array((1,2,3,4,5))#用元组作为参数
    print("用元组作为参数", arr)
    arr1 = np.array(arr)#用numpy的数组作为参数
    print("用numpy的数组作为参数", arr1)
    arr = np.array(range(10))#用迭代对象作为参数
    print("用迭代对象作为参数", arr)
    arr = np.array([i**2 for i in range(10)])#用生成器作为参数
    print("用生成器作为参数", arr)

if __name__ == '__main__':
    test_numpy()
- 通过dtype参数指定数组类型

'''导包(start)'''
import numpy as np
'''导包(end)'''

def test_numpy():
    arr = np.array([1,2,3,4,5])#用列表作为参数
    print("用列表作为参数",arr)
    arr = np.array(arr,dtype=float)#将类型设置为float
    print("将类型设置为float", arr)

if __name__ == '__main__':
    test_numpy()
可以将float的通过dtype转为int型。但是会取整,而不是四舍五入。因为本质上还是强制转换操作,float转换为int型,本能就是取整,四舍五入是通过专门的函数round()进行的。

- 通过copy参数,指定对另一个数组,是真拷贝,还是假拷贝

'''导包(start)'''
import numpy as np
'''导包(end)'''

def test_numpy():
    arr = np.array([i for i in range(1, 6)])
    print("原数组arr为:", arr)
    copy1 = np.array(arr,copy=False)
    print("拷贝数组copy1", copy1)
    copy2 = np.array(arr,copy=True)
    print("拷贝数组copy2", copy2)
    copy1[1] = 10
    copy2[2] = 20
    print("假拷贝,修改拷贝数组copy1[1]=10,原数组arr也会改变")
    print("原数组arr为:", arr)
    print("拷贝数组copy1", copy1)
    print("真拷贝,copy2是完全独立的,与原数组arr不是引用关系")
    print("原数组arr为:", arr)
    print("拷贝数组copy2", copy2)

if __name__ == '__main__':
    test_numpy()
- 通过subok指定是否沿用原数据类型,false时,表示使用ndarray类型。而true时,表示创建ndarray时通过什么类型数据创建,我最终就是什么类型,而不是统一都使用默认的ndarray类型

'''导包(start)'''
import numpy as np
'''导包(end)'''

def test_numpy():
    # 创建一个矩阵
    a = np.mat([1, 2, 3, 4])
    # 输出矩阵
    print(type(a))

    # 复制一份,但是保持源类型,就需要将subok设置为true
    copy1 = np.array(a,subok=True)
    # 默认类型是ndarray,subok默认为false,代表会将类型统一为ndarray
    copy2 = np.array(a,subok=False)
    print(type(copy1))
    print(type(copy2))
    print(id(copy1), id(copy2))

if __name__ == '__main__':
    test_numpy()
1.2. arange()生成区间数组
n u m p y . a r a n g e ( s t a r t , s t o p , s t e p , d t y p e ) numpy.arange(start,stop,step,dtype) numpy.arange(start,stop,step,dtype):根据start与stop指定的范围以及step设定的步长,生成一个ndarray
扫描二维码关注公众号,回复: 17482478 查看本文章
- start:起始值,默认为0
- stop:终止值(不包含)
- step:步长,默认为1
- dtype:指定最终返回的ndarray的数据类型,如果没有指定,会使用输入数据的类型

'''导包(start)'''
import numpy as np
'''导包(end)'''

def test_numpy():
    arr = np.arange(10); # 直接调用arange(10)就是0开始的步长为1的序列
    print("np.arange(10):",arr)
    # 如果是一个小数,那么就会给出0.0开始的步长为1.0的float序列
    # 注意,这是numpy特有的arange(),python直接调用range(3.1)是会报错了
    arr = np.arange(3.1)
    print("np.arange(3.1):",arr)
    arr = np.arange(5,dtype=float)# 当然亦可以直接指定为float类型
    print("np.arange(5,dtype=float):",arr)
    '''设置起始值、终止值和步长'''
    arr = np.arange(start=10,stop=20,step=1,dtype=int)
    print("np.arange(start=10,stop=20,step=1,dtype=int):",arr)
    print("数组长度len(arr):",len(arr))
if __name__ == '__main__':
    test_numpy()
1.3 基础数组
- 创建长度为2的全为0的float型数值

'''导包(start)'''
import numpy as np
'''导包(end)'''

def test_numpy():
    arr = np.zeros(2)  # 创建长度为2的全为0的float型数值
    print(arr)
    arr = np.array([0.0,0.])
    print(arr)
if __name__ == '__main__':
    test_numpy()
- 还可以创建长度为20的全为1的float型数值

arr = np.ones(20) # 创建长度为20的全为1的float型数值
print(arr)
- 还可以将一个区间分成若干份,例如0到10平均分成6份

arr = np.linspace(start=0,stop=10,num=6) # 创建长度为20的全为1的float型数值
print(arr)
- 还可以指定类型生成,例如通过ones函数生成int类型的3行3列的数组

arr = np.ones(shape=(2,3),dtype=int)
print(arr)
2. 基本属性和操作
2.1 基本属性
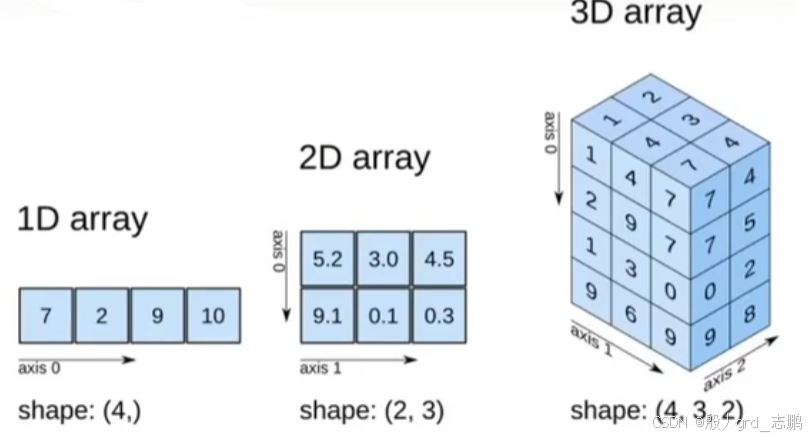
- ndim:返回数组的维度
- shape:返回数组形状,也就是几行几列
- size:返回数组的元素个数
- dtype:返回数组的元素类型


2.2 排序操作
| 1. 经典快速排序 |
|---|

'''导包(start)'''
import numpy as np
'''导包(end)'''

def test_numpy():
    arr = np.array([22,4,55,7,1,2,5,10])
    print(arr)
    # 注意排序后会返回全新的数组,而不是原数组(具体原因可以参考经典排序算法“快速排序”的源码)
    arr = np.sort(arr)
    print(arr)
if __name__ == '__main__':
    test_numpy()
2.3 合并操作
| 1. 普通拼接 |
|---|

a = np.arange(1, 6)
print("a:",a)
b = np.arange(5, 11)
print("b:",b)
a_and_b = np.concatenate((a, b))
print("a_and_b:",a_and_b)
| 2. 垂直拼接 |
|---|
拼接时,两个数组维度必须一样,例如其中一个是二维数组,那么其它都得是二维数组。第二个,列数必须一致,因为是垂直向下拼接的,列不一致就没法拼接了

def test_numpy():
    a = np.array([
        [1, 2, 3],
        [4, 5, 6],
    ]) # 2维数组
    print("a:\n", a)
    b = np.array([[7,8,9]]) # 必须维度一样,都是2维才可以
    print("b:\n", b)
    a_axis0_b = np.concatenate((a,b), axis=0) #axis=0表示垂直拼接
    print("a_axis0_b:\n", a_axis0_b)

if __name__ == '__main__':
    test_numpy()
| 3. 水平拼接 |
|---|
和上面垂直拼接时差不多,只不过这个要求水平行数一致

def test_numpy():
    a = np.array([
        [1, 2, 3],
        [4, 5, 6],
    ]) # 2维数组
    print("a:\n", a)
    b = np.array([[7,8,9],
                  [10,11,12]]) # 必须维度一样,都是2维才可以
    print("b:\n", b)
    a_axis0_b = np.concatenate((a,b), axis=1) #axis=1表示水平拼接
    print("a_axis0_b:\n", a_axis0_b)

if __name__ == '__main__':
    test_numpy()
2.4 reshape操作
对于一个确定形状的数组(例如3个3行4列所组成的三维数组),如何修改其shape呢?
- 将一维数组转换为2行3列的二维数组,
必须保证变换后的size和原来一样(元素个数一样),否则会失败

'''导包(start)'''
import numpy as np
'''导包(end)'''
def test_numpy():
    a = np.arange(6)
    print("a:\n",a)
    print("a.shape:",a.shape)
    b = a.reshape(2, 3)
    print("b:\n",b)
    print("b.shape:",b.shape)
if __name__ == '__main__':
    test_numpy()
- 2行3列转为1行,或转为3行2列

'''导包(start)'''
import numpy as np
'''导包(end)'''
def test_numpy():
    a = np.array([
        [1,2,3],
        [4,5,6]
    ])# 2行3列
    print("a:\n",a)
    print("a.shape:",a.shape)
    b = a.reshape(6) # 转为1行
    print("b:\n",b)
    print("b.shape:",b.shape)
    b = a.reshape(3,2)# 转为2行3列
    print("b:\n",b)
    print("b.shape:",b.shape)
if __name__ == '__main__':
    test_numpy()
还有一种写法,效果相同

a = np.array([
    [1,2,3],
    [4,5,6]
])# 2行3列
print("a:\n",a)
print("a.shape:",a.shape)
b = np.reshape(a,newshape=(3,2),order='C')# 转为3行2列
print("b:\n", b)
print("b.shape:", b.shape)
2.5 维度增加

'''导包(start)'''
import numpy as np
'''导包(end)'''
def test_numpy():
    a = np.array([1, 2, 3])  # 一维数组
    print("a[:]:",a[:]);  # 返回所有元素
    b = a[np.newaxis, :]  # 在行的方向增加一维
    print("在a[:]行的方向增加一维:\n",b[:])
    b = a[:, np.newaxis]  # 在列的方向增加一维
    print("在a[:]列的方向增加一维:\n",b[:])
if __name__ == '__main__':
    test_numpy()
也可以使用reshape来达到相同效果

a = np.array([1,2,3])# 一维数组
print(a[:])# 返回所有元素
print(a.reshape((1,a.size)))
print(a.reshape((a.size,1)))
还有一种方法是通过固定函数expand_dims来进行

a = np.array([1,2,3,4,5,6])# 一维数组
print("a[:]",a[:])# 返回所有元素
print("a.shape",a.shape)
b = np.expand_dims(a,axis=1) # shape下标为1的位置(因为axis=1)插入一个维度
print("b[:]:\n",b[:])# 返回所有元素
print("b.shape",b.shape)
b = np.expand_dims(a,axis=0) # shape下标为0的位置(因为axis=0)插入一个维度
print("b[:]:\n",b[:])# 返回所有元素
print("b.shape",b.shape)
2.6 数组的索引
ndarray和python的索引切片操作是差不多的


'''导包(start)'''
import numpy as np
'''导包(end)'''
def test_numpy():
    data = np.array([1, 2, 3])  # 一维数组
    print("data:",data)
    print("data[0]",data[0]);
    print("data[0:2]",data[0:2]);
    print("data[1:]",data[1:]);
    print("data[-2:]",data[-2:]);
    print("data[:-1]",data[:-1]);
if __name__ == '__main__':
    test_numpy()
和逻辑判断有关的,可以方便我们筛选数组中元素

'''导包(start)'''
import numpy as np
'''导包(end)'''
def test_numpy():
data = np.array([[1, 2, 7,8],[3,6,9,10],[4,15,11,12]]) # 一维数组
print("data:\n",data)
# 返回数组中小于7的值
print("data[data<7]\n",data[data<7]);
# 这里可以看到,返回data中>=5的条件five_up,是返回一个boolean型数组,标记了data中每个元素是否满足条件
five_up = (data>=5);
print("five_up:\n",five_up)
print("data[five_up]\n",data[five_up]);
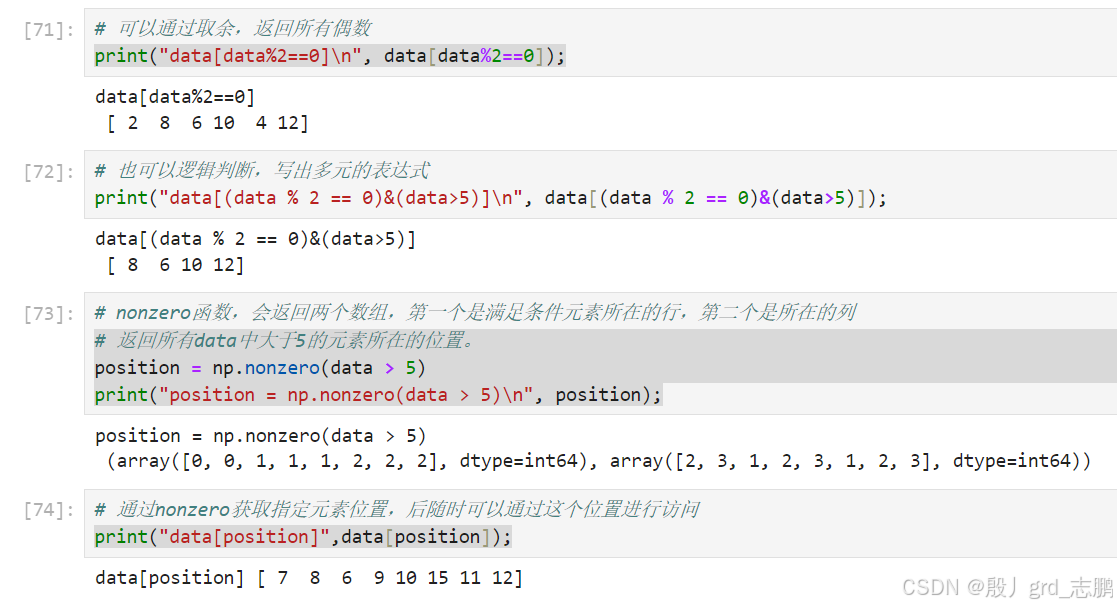
# 可以通过取余,返回所有偶数
print("data[data%2==0]\n", data[data%2==0]);
# 也可以逻辑判断,写出多元的表达式
print("data[(data % 2 == 0)&(data>5)]\n", data[(data % 2 == 0)&(data>5)]);
# nonzero函数,会返回两个数组,第一个是满足条件元素所在的行,第二个是所在的列
# 返回所有data中大于5的元素所在的位置。
position = np.nonzero(data > 5)
print("position = np.nonzero(data > 5)\n", position);
# 通过nonzero获取指定元素位置,后随时可以通过这个位置进行访问
print("data[position]",data[position]);
if __name__ == '__main__':
test_numpy()
2.7 如何从已有数据创建数组
涉及切片和索引,以及np.vstack(), np.hstack(), np.hsplit(), .view(), copy()
要注意每个方式是浅拷贝还是深拷贝,浅拷贝是可以通过copy方法变为深拷贝的,浅拷贝的关键是速度快,我们可以通过浅拷贝的方法快速将数组截取成我们想要的样子,最后再由深拷贝方法变为深拷贝
| 浅拷贝与深拷贝 |
|---|


# You can use the view method to create a new array object that looks at the same data as the original array (a shallow copy).
# 你可以使用view()函数去创建一个新的数组对象,它查看相同的数据,没错就是与原数组相同的(这表明它是一个浅拷贝)
'''
    Views are an important NumPy concept!
    NumPy functions, as well as operations like indexing and slicing, will return views whenever possible.
    This saves memory and is faster (no copy of the data has to be made).
    However it’s important to be aware of this - modifying data in a view also modifies the original array!
    Views(浅拷贝) 是 NumPy 的一个很重要的概念!
    NumPy 函数们,当然还有操作(一些语法)们,比如indexing和slicing(索引和切片),将尽可能返回Views。
    这玩意存储内存地址,并且更快(无需拷贝必须制作的数据).
    无论如何意识到这一点很重要-在view(浅拷贝)修改数据同样会修改原数组
'''
# Let’s say you create this array: 假设你有如下数组:
a = np.array([[1, 2, 3, 4], [5, 6, 7, 8], [9, 10, 11, 12]])
print(a)
# Now we create an array b1 by slicing a and modify the first element of b1.
# This will modify the corresponding element in a as well!
# 现在我们通过对a数组进行切片操作创建一个数组b1,并且修改b1的第一个元素
# 当然这将修改a中相应的元素
b1 = a[0, :]
print("b1 = a[0, :]:\n",b1)
b1[0] = 99
print("b1[0] = 99:\n",b1)
print("a:\n",a)
# Using the copy method will make a complete copy of the array and its data (a deep copy). To use this on your array, you could run:
# 使用copy方法将创造一个数组的完全拷贝包括它的数据(一个深拷贝)。将这个用到你的数组上,你可以运行:
b2 = a.copy()
print("b2 = a.copy():\n",b2)
b2[0]=1
print("b2[0]=1:\n",b2)
print("a:\n",a)# 可以发现虽然b2修改了元素,但是原数组没有被修改
| 通过切片操作,从已有数组中取一部分创建新数组(浅拷贝) |
|---|
注意这个操作返回的数组是浅拷贝,对它的修改会影响原数组

#You can easily create a new array from a section of an existing array.
#你可以从一个已存在数组的一部分轻松的创建一个新数组
#Let’s say you have this array:
#比如说你有这个数组
a = np.array([1,  2,  3,  4,  5,  6,  7,  8,  9, 10])
print(a)
# You can create a new array from a section of your array any time by specifying where you want to slice your array.
# 通过明确规定你想分隔数组的位置你可以随时从你数组的一部分创建一个新数组
arr1 = a[3:8]
print(arr1)
arr1[0]=1
print(arr1)
print(a) # 可见对切片修改,原数组也会被影响
| 通过vstack和hstack两个函数,将已存在的两个随着垂直或水平堆叠到一起,并生成全新数组(深拷贝) |
|---|
注意这种方法返回的新数组与原来的两个数组完全没有任何关系了,是全新的数组。无论对谁修改,都对另一个无法产生影响

# You can also stack two existing arrays, both vertically and horizontally. Let’s say you have two arrays, a1 and a2:
# 你也可以将两个已存在数组堆起来,垂直和水平方向都行. 假设你有两个数组,a1和a2:
a1 = np.array([[1, 1],
               [2, 2]])

a2 = np.array([[3, 3],
               [4, 4]])
# You can stack them vertically with vstack:
# 你可以利用vstack()函数,垂直地将他们堆起来
np.vstack((a1, a2))
# Or stack them horizontally with hstack:
# 或者用hstack()函数将他们水平地堆起来
np.hstack((a1, a2))
| 均等平分一个数组,或为数组建立分割线,沿着分割线进行分割。这是一个浅拷贝 |
|---|
这种方式也是浅拷贝

# You can split an array into several smaller arrays using hsplit.
# 你可以使用hsplit()函数将一个数组分成若干个更小的数组
#You can specify either the number of equally shaped arrays to return or the columns after which the division should occur.
# 你可以明确规定返回均等形状数组的数量(将数组根据你给出的数字,均等地分成若干份),也可以指定分割线应该发生的具体某一列的后面(指定一列,在这一列后面设置分隔线的发生点)
# Let’s say you have this array: 假设你有如下数组
x = np.arange(1, 25).reshape(2, 12)
print(x)
# If you wanted to split this array into three equally shaped arrays, you would run:
# 如果你想将这个数组分成3个均等形状的数组,你应该运行:
np.hsplit(x, 3)
# If you wanted to split your array after the third and fourth column, you’d run:
# 如果你想将这个数组在第三和第四列后面进行分割(创建分隔线),你应该运行:
np.hsplit(x, (3, 4)) # 可见沿着分割线将数组分为3块
3. 基本数组运算
3.1 基本数学
This section covers addition, subtraction, multiplication, division, and more
这一小节包含加法,减法,乘法,除法,和更多其它操作
| 加法 |
|---|
Once you’ve created your arrays, you can start to work with them. Let’s say, for example, that you’ve created two arrays, one called “data” and one called “ones”
一旦你创建了你的数组,你就可以与它们一起行动了。假如,你创建了两个数组,一个叫data另一个叫ones


# You can add the arrays together with the plus sign.
# 你可以使用符合“+”将两个数组加到一起
data = np.array([1, 2])
ones = np.ones(2, dtype=int)
print("np.array([1, 2]):\n",data)
print("np.ones(2, dtype=int):\n",ones)
print("data + ones:\n",data + ones)
| 其余操作 |
|---|


# You can, of course, do more than just addition!
# 当然你可以做更多操作而不止加法
print("data - ones:\n",data - ones)
print("data * data:\n",data * data)
print("data / data:\n",data / data)
| 元素求和 |
|---|

# Basic operations are simple with NumPy. NumPy基础操作非常简单
#If you want to find the sum of the elements in an array, you’d use sum(). 如果你想找到一个数组中元素的和,你需要使用sum()
#This works for 1D arrays, 2D arrays, and arrays in higher dimensions. 它可用于1D,2D,包括更高维的数组
a = np.array([1, 2, 3, 4])
a.sum()

# To add the rows or the columns in a 2D array, you would specify the axis.
# 在2D 数组中添加一行或一列,你需要明确指定轴
# If you start with this array: 如果你从这个数组开始:
b = np.array([[1, 1], [2, 2]])
print("b:\n",b)
# You can sum over the axis of rows with: 你可以在横轴上求和
print("b.sum(axis=0):\n",b.sum(axis=0))# axis=0表示横轴,可以理解为所有元素都加到第一行
# You can sum over the axis of columns with: 你可以在纵轴上求和
print("b.sum(axis=1):\n",b.sum(axis=1))# axis=1表示纵轴,可以理解为所有元素都加到第一列,但返回结果依然会降维给出
3.2 广播

'''
    There are times when you might want to carry out an operation between an array and a single number
    (also called an operation between a vector and a scalar) or between arrays of two different sizes.
    For example, your array (we’ll call it “data”) might contain information about distance in miles
    but you want to convert the information to kilometers. You can perform this operation with:
    可能你常常想要在一个数组和一个简单数之间进行一个操作(也可以称为在一个矢量和一个标量之间的操作),或者两个不同size的数组之间。
    例如,你的数组(我们将称为"data")可能包含关于以英里为单位的距离信息,但是你想要将这些信息转换为公里。
    你可以执行接下来的操作
'''
data = np.array([1.0, 2.0])
data * 1.6
- NumPy understands that the multiplication should happen with each cell.
NumPy知道这种乘法应该与每个元素发生
- That concept is called broadcasting. Broadcasting is a mechanism that allows NumPy to perform operations on arrays of different shapes.
这个概念被称为广播。广播是一个允许NumPy对不同形状的数组执行操作的途径(机械装载)
- The dimensions of your array must be compatible, for example, when the dimensions of both arrays are equal or when one of them is 1.
你的数组的维度必须兼容,例如,两个数组维度相等或其中一个是1
- If the dimensions are not compatible, you will get a ValueError.
如果维度不兼容,你将得到一个ValueError(报错:值错误)
3.3 其它的一些还蛮有用的操作
This section covers maximum, minimum, sum, mean, product, standard deviation, and more
这一小节包含最大值,最小值,求和,平均值,乘积,标准差以及更多

'''
    NumPy also performs aggregation functions.
    In addition to min, max, and sum, you can easily run mean to get the average,
    prod to get the result of multiplying the elements together, std to get the standard deviation, and more.
    NumPy也可以执行集合函数
    除了min,max和sum,你可以轻松的执行mean从而得到平均数
    prod(product的缩写)可以得到元素们相乘到一起的结果,std可以得到标准差
'''
data = np.array([1,2,3])
print("data:\n",data)
print("data.max():\n",data.max())
print("data.min():\n",data.min())
print("data.sum():\n",data.sum())

# Let’s start with this array, called “a” 我们从a数组开始
a = np.array([[0.45053314, 0.17296777, 0.34376245, 0.5510652],
              [0.54627315, 0.05093587, 0.40067661, 0.55645993],
              [0.12697628, 0.82485143, 0.26590556, 0.56917101]])
print("a:\n",a)
'''
    It’s very common to want to aggregate along a row or column.
    By default, every NumPy aggregation function will return the aggregate of the entire array.
    To find the sum or the minimum of the elements in your array, run:
    想要沿着行或列进行聚合是很平常的
    默认的,每个NumPy聚合函数将返回整个数组的聚合
    找到你的数组的和或最小值,可以执行
'''
print("a.sum():\n",a.sum())
print("a.min():\n",a.min())
# You can specify on which axis you want the aggregation function to be computed.
# For example, you can find the minimum value within each column by specifying axis=0.
# 你可以指定那个轴,是你想聚合函数被计算的
# 例如,你可以通过指定axis=0,来找到在每一列中的最小值
print("a.min(axis=0):\n",a.min(axis=0))
3.4 创建矩阵

# You can pass Python lists of lists to create a 2-D array (or “matrix”) to represent them in NumPy.
# 你可以通过Python的列表创建一个2-D数组(或者说“矩阵matrix”)在NumPy中表示
data = np.array([[1, 2], [3, 4], [5, 6]])
print("data:\n",data)

# Indexing and slicing operations are useful when you’re manipulating matrices:
# 索引和切片操作也是有效的,当你操纵矩阵时
print("data[0, 1]:\n",data[0, 1])
print("data[1:3]:\n",data[1:3])
print("data[0:2, 0]:\n",data[0:2, 0])

# you can aggregate matrices the same way you aggregated vectors:
# 你可以向聚合向量一样聚合矩阵
print("data.max():\n",data.max())
print("data.min():\n",data.min())
print("data.sum():\n",data.sum())

'''
    You can aggregate all the values in a matrix and you can aggregate them across columns or rows using the axis parameter.
    To illustrate this point, let’s look at a slightly modified dataset:
    你可以聚合矩阵中的所有值并且通过使用axis参数跨行或跨列
    阐明这一点,让我们看一个稍微改良的数据集
'''
data = np.array([[1, 2], [5, 3], [4, 6],[7,8]])
print("data:\n",data)
print("data.max(axis=0):\n",data.max(axis=0)) # axis=0表示列
print("data.max(axis=1):\n",data.max(axis=1)) # axis=1表示行

# Once you’ve created your matrices, you can add and multiply them using arithmetic operators if you have two matrices that are the same size.
# 你创建了你的矩阵之后,如果你有两个相同size的矩阵,你可以使用算术运算加并且乘它们
data = np.array([[1, 2], [3, 4]])
ones = np.array([[1, 1], [1, 1]])
print("data:\n",data)
print("ones:\n",ones)
data + ones
print("data + ones:\n",data + ones)

# You can do these arithmetic operations on matrices of different sizes,
# but only if one matrix has only one column or one row. In this case, NumPy will use its broadcast rules for the operation.
# 你可以在不同size的矩阵上做这些算术运算,但是只有在一个矩阵只有一行或一列的情况下
# 在这种情况下NumPy将为此操作而使用它的广播规则
data = np.array([[1, 2], [3, 4], [5, 6]])
ones_row = np.array([[1, 1]])
data + ones_row
print("data:\n",data)
print("ones_row:\n",ones_row)
print("data + ones_row:\n",data + ones_row)

# Be aware that when NumPy prints N-dimensional arrays, the last axis is looped over the fastest while the first axis is the slowest. For instance:
# 注意当NumPy打印N维数组时,最后一个轴是被循环最快的,同时第一个轴的循环速度是最慢的
np.ones((4, 3, 2))

'''
    There are often instances where we want NumPy to initialize the values of an array.
    NumPy offers functions like ones() and zeros(), and the random.Generator class for random number generation for that.
    All you need to do is pass in the number of elements you want it to generate:
    通常情况下,我们想NumPy去初始化数组的一些值
    NumPy提供了例如ones()和zeros()的函数,以及random.Generator类去参数随机数
    你只需要传入你想生成的元素数量
'''
print("np.ones(3):\n",np.ones(3))
print("np.zeros(3):\n",np.zeros(3))
rng = np.random.default_rng()  # the simplest way to generate random numbers 最简单的生产随机数的方式
print("rng.random(3) :\n",rng.random(3) )

# You can also use ones(), zeros(), and random() to create a 2D array if you give them a tuple describing the dimensions of the matrix:
# 你也可以使用ones(),zeros(),以及 random()去创造2d数组,如果你给他们一个元组描述矩阵的维度
print("np.ones((3, 2)):\n",np.ones((3, 2)))
print("np.zeros((3, 2)):\n",np.zeros((3, 2)))
print("rng.random((3, 2)) :\n",rng.random((3, 2)))
3.5 生成随机数
- The use of random number generation is an important part of the configuration and evaluation of many numerical and machine learning algorithms.
随机数生成器的使用是许多数值和机器学习算法配置和评估的重要组成部分
- Whether you need to randomly initialize weights in an artificial neural network, split data into random sets, or randomly shuffle your dataset, being able to generate random numbers (actually, repeatable pseudo-random numbers) is essential.
无论是你需要在一个人工神经网络随机初始化权重,将数据分成随机集,还是随机打乱(洗牌)你的数据集,能够生产随机数(实际上,是可重复的伪-随机数)是必不可少的。
- With
Generator.integers, you can generate random integers from low (remember that this is inclusive with NumPy) to high (exclusive).使用Generator.integers,你可以从低(记住,这是包含的,在NumPy)到高(不包含)生产随机整型数
- You can set
endpoint=Trueto make the high number inclusive.你可以设置endpoint=True以包含那个"高"数字

# You can generate a 2 x 4 array of random integers between 0 and 4 with:
# 你可以在0-4之间生成一个 2 × 4 的随机整型随机数数组
rng = np.random.default_rng() # 必须先创建
print(rng.integers(5, size=(2, 4)))
3.6 如何获取非重复元素和计数
This section covers
np.unique()这一小节包含np.unique()
You can find the unique elements in an array easily with np.unique.
你可以使用np.unique轻松的在一个数组中找到独一无二的元素们(去重操作)

# For example, if you start with this array:
# 假设你从如下数组开始
a = np.array([11, 11, 12, 13, 14, 15, 16, 17, 12, 13, 11, 14, 18, 19, 20])
print("a:\n",a)
# you can use np.unique to print the unique values in your array:
# 你可以使用np.unique打印你数组中非重复值
unique_values = np.unique(a)
print(unique_values)

'''
    To get the indices of unique values in a NumPy array (an array of first index positions of unique values in the array),
    just pass the return_index argument in np.unique() as well as your array.
    在一个NumPy数组中获取非重复数的索引(在数组中的非重复值的第一个索引下标的一个数组)
    只需要传入return_index参数到np.unique()中,当然还有你的数组
'''
unique_values, indices_list = np.unique(a, return_index=True)
print(indices_list)
You can pass the
return_countsargument innp.unique()along with your array to get the frequency count of unique values in a NumPy array.你可以一起将return_counts参数和你的数组传入到np.unique()中,以获得一个NumPy数组中非重复元素的出现频率

unique_values, occurrence_count = np.unique(a, return_counts=True)
print(occurrence_count)
This also works with 2D arrays! If you start with this array:
对于2D数组也是有效的!假设你从下面这个数组开始:

a_2d = np.array([[1, 2, 3, 4], [5, 6, 7, 8], [9, 10, 11, 12], [1, 2, 3, 4]])
print(a_2d)
You can find unique values with:
你可以通过以下方式发现非重复元素

unique_values = np.unique(a_2d)
print(unique_values)
If the axis argument isn’t passed, your 2D array will be flattened.
如果axis参数没有被传入,你的2D数组将被平展
If you want to get the unique rows or columns, make sure to pass the
axisargument. To find the unique rows, specifyaxis=0and for columns, specifyaxis=1.如果你想得到非重复行或列,确保传入axis参数。找到非重复行,规定axis=0,而对于列来说,指定axis=1.

unique_rows = np.unique(a_2d, axis=0)
print(unique_rows)
To get the unique rows, index position, and occurrence count, you can use:
获取唯一行,索引下标,和出现次数,你可以使用:

unique_rows, indices, occurrence_count = np.unique(
     a_2d, axis=0, return_counts=True, return_index=True)
print(unique_rows)
print(indices)
print(occurrence_count)
3.7 矩阵的转置和重塑
This section covers
arr.reshape(),arr.transpose(),arr.T这一小节包含This section covers arr.reshape(), arr.transpose(), arr.T
It’s common to need to transpose your matrices. NumPy arrays have the property T that allows you to transpose a matrix.
想要转置你的矩阵是稀松平常的。NumPy数组有一个属性T,允许你转置你的数组


data = np.array([
    [1,2],[3,4],[5,6]
])
print("data:\n",data)
print("data.T:\n",data.T)
# You can also use .transpose() to reverse or change the axes of an array according to the values you specify.
# 你也可以使用.transpose()去根据你指定的值去逆转或改变一个数组的轴线
print("data.transpose():\n",data.transpose())
接下来是改变形状操作,注意这个和转置有本质上的区别,转置是线性代数中的概念,而改变形状只是改变了形状,不是转置,改出来的形状也很难满足转置的定义


'''
    You may also need to switch the dimensions of a matrix.
    This can happen when, for example, you have a model that expects a certain input shape that is different from your dataset.
    This is where the reshape method can be useful.
    You simply need to pass in the new dimensions that you want for the matrix.
    你可能还需要变换一个矩阵的维度
    这可能发生在,例如,你有一个模块,期望不同于你的数据集的特定的输入形状
    这是reshape方法的用武之地
    你只需简单地传入你想要的矩阵的新维度
'''
print("data:\n",data)
print("data.reshape(2, 3):\n",data.reshape(2, 3))
print("data.reshape(3, 2):\n",data.reshape(3, 2))
3.8 如何逆转数组
This section covers
np.flip()这一小节包含
np.flip()
- NumPy’s
np.flip()function allows you to flip, or reverse, the contents of an array along an axis.NumPy的np.flip()函数允许你去翻转或逆转沿着数轴的数组内容
- When using
np.flip(), specify the array you would like to reverse and the axis. If you don’t specify the axis, NumPy will reverse the contents along all of the axes of your input array.当使用np.flip()时,指定你想要反转的数组和轴。如果你不指定axis轴,NumPy将沿着你输入的数组的所有轴反转内容
| Reversing a 1D array,反转1D数组 |
|---|

# If you begin with a 1D array like this one:
arr = np.array([1, 2, 3, 4, 5, 6, 7, 8])
print("arr:\n",arr)
# You can reverse it with: 你可以使用如下方式进行反转
reversed_arr = np.flip(arr)
print("np.flip(arr):\n",reversed_arr)
| Reversing a 2D array,反转2D(2维)数组 |
|---|
A 2D array works much the same way. 2维数组的工作原理大致相同


#If you start with this array:
arr_2d = np.array([[1, 2, 3, 4], [5, 6, 7, 8], [9, 10, 11, 12]])
print("arr_2d:\n",arr_2d)
# You can reverse the content in all of the rows and all of the columns with:
# 你可以使用如下代码反转在所有行和列的内容
print("arr_2d:\n",arr_2d)
reversed_arr = np.flip(arr_2d)
print("reversed_arr:\n",reversed_arr)
# You can easily reverse only the rows with: 你可以使用如下命令轻松地根据行进行反转
print("arr_2d:\n",arr_2d)
reversed_arr_rows = np.flip(arr_2d, axis=0)
print("np.flip(arr_2d, axis=0):\n",np.flip(arr_2d, axis=0))
# Or reverse only the columns with: 或者仅根据列反转
print("arr_2d:\n",arr_2d)
reversed_arr_columns = np.flip(arr_2d, axis=1)
print("np.flip(arr_2d, axis=1):\n",reversed_arr_columns)
# You can also reverse the contents of only one column or row. For example,
# you can reverse the contents of the row at index position 1 (the second row):
# 你也可以仅对1列或1行反转内容
# 例如,你可以对索引下标为1(第二行)的行反转内容
print("arr_2d:\n",arr_2d)
arr_2d[1] = np.flip(arr_2d[1])
print("np.flip(arr_2d[1]):\n",arr_2d)
# You can also reverse the column at index position 1 (the second column):
# 你也可以仅对下标为1的列进行反转(第二列)
print("arr_2d:\n",arr_2d)
arr_2d[:,1] = np.flip(arr_2d[:,1])
print("np.flip(arr_2d[:,1]):\n",arr_2d)
3.9 重塑和平面化多维数组
This section covers
.flatten(),ravel()
- There are two popular ways to flatten an array:
.flatten()and.ravel().有两个常用方法平面化一个数组:
.flatten()and.ravel()
- The primary difference between the two is that the new array created using
ravel()is actually a reference to the parent array (i.e., a “view”).它俩主要不同之处在于被ravel创建的新数组实际上是父数组的引用
- This means that any changes to the new array will affect the parent array as well.
这意味着对于新数组的任何改变都将影响父数组
- Since
raveldoes not create a copy, it’s memory efficient.虽然ravel不创建copy,但它内存效率高

# If you start with this array:
x = np.array([[1 , 2, 3, 4], [5, 6, 7, 8], [9, 10, 11, 12]])
print("X:\n",x)
# You can use flatten to flatten your array into a 1D array.
# 你可以使用flatten平面化你的数组为一个一维数组
print("X:\n",x)
print("x.flatten():\n",x.flatten())
# When you use flatten, changes to your new array won’t change the parent array.
# 当你使用flatten,改变你的新数组将不会改变父数组(深拷贝)
a1 = x.flatten()
a1[0] = 99
print(x)  # Original array
print(a1)  # New array
# But when you use ravel, the changes you make to the new array will affect the parent array.
# 但是当你使用ravel,你对新数组做的改变将影响父数组
a2 = x.ravel()
a2[0] = 98
print(x)  # Original array
print(a2)  # New array
4. 如何保存和加载NumPy对象
This section covers
np.save,np.savez,np.savetxt,np.load,np.loadtxt
- You will, at some point, want to save your arrays to disk and load them back without having to re-run the code.
有时,你会想要在不重新运行代码的情况下,保存你的数组到硬盘和把它们加载回来
- Fortunately, there are several ways to save and load objects with NumPy.
幸运的是,这里有几种方法用NumPy保存和加载对象
- The ndarray objects can be saved to and loaded from the disk files with
loadtxtandsavetxtfunctions that handle normal text files,loadandsavefunctions that handle NumPy binary files with a .npy file extension, and asavezfunction that handles NumPy files with a .npz file extension.通过使用savetext和loadtxt函数,ndarray对象可以被保存到磁盘文件或从磁盘加载出来,用于处理普通文本文件。load和save函数用于处理.npy后缀的NumPy二进制文件,savez函数处理.npz后缀的NumPy文件
- The .npy and .npz files store data, shape, dtype, and other information required to reconstruct the ndarray in a way that allows the array to be correctly retrieved, even when the file is on another machine with different architecture.
.npy和.npz文件存储数据data,形状shape,数据类型dtype,还有其它的一些以某种方式重建ndarry所必需的信息,这些信息允许数组被正确地恢复,即使文件是在其它不同体系结构的机器上
- If you want to store a single ndarray object, store it as a .npy file using
np.save. If you want to store more than one ndarray object in a single file, save it as a .npz file usingnp.savez. You can also save several arrays into a single file in compressed npz format with savez_compressed.如果你想存储单个ndarray对象,使用np.save存储为.npy文件.如果你想存储比单个ndarray对象更多的数据到单个文件,使用np.savez存储为.npz文件。你也可以使用savez_compressed以压缩npz形式存储几个数组到一个单一文件


# It’s easy to save and load an array with np.save(). 使用np.save()可以方便的存储和加载一个数组
# Just make sure to specify the array you want to save and a file name. 确保指定你想存储的数组和文件名
# For example, if you create this array: 例如,你创建如下数组
a = np.array([1, 2, 3, 4, 5, 6])
# You can save it as “filename.npy” with: 你可以用如下代码将它存储为filemane.npy
np.save('filename', a)
# You can use np.load() to reconstruct your array. 你可以使用np.load()重新构建你的数组
b = np.load('filename.npy')

# You can save a NumPy array as a plain text file like a .csv or .txt file with np.savetxt.
# 你可以使用保存一个NumPy数组为一个纯文本文件比如一个.csv或者.text文件
# For example, if you create this array:例如,你创建如下数组
csv_arr = np.array([1, 2, 3, 4, 5, 6, 7, 8])
# You can easily save it as a .csv file with the name “new_file.csv” like this:
# 你可以使用如下代码轻松保存它为一个名字为“new_file.csv”的.csv文件
np.savetxt('new_file.csv', csv_arr)
# You can quickly and easily load your saved text file using loadtxt():
# 你可以使用loadtext()轻松且快速地加载你保存的文本文件
np.loadtxt('new_file.csv')
- The
savetxt()andloadtxt()functions accept additional optional parameters such as header, footer, and delimiter.savetxt()和loadtxt()函数接收额外可选的参数例如header,footer和界定符delimiter
- While text files can be easier for sharing, .npy and .npz files are smaller and faster to read.
虽然text文件可以更轻松的分享,但.npy和.npz文件更小且读取速度更快
- If you need more sophisticated handling of your text file (for example, if you need to work with lines that contain missing values), you will want to use the
genfromtxtfunction.如果你需要更先进的处理text文件的手段(例如,如果你需要处理包含缺失值的行),你将想要使用genfromtxt函数