一、创建单元测试文件夹和文件。
1. 打开 Test Runner 窗口
按照 Window -》General -》Test Runner 打开 Test Runner 窗口。

2. 创建单元测试文件夹
创建步骤如下图所示:
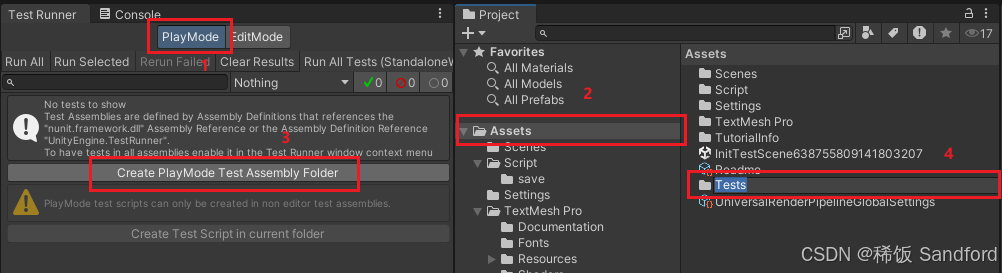
- 选中对应的模式(不同的模式功能可参考 Unity 基础 之 简单介绍与使用 单元测试 Test Runner(NUnit) / Assert 基于 2019.3.x)。
- 选中对应的父文件夹(此处选择Assets)。
- 点击按钮创建 Assembly 文件。
- 对新建的文件进行命名(注意,如果此时按照默认命名,同时后续再重命名文件,需要去该文件夹下的
Tests.asmdef文件中修改对应的名称,如下图所示)

Tests.asmdef文件中的 “name” 项的名称需要与文件夹的名称一致。
3. 创建测试脚本文件
创建步骤如下图所示:

- 选中对应的
Tests.asmdef文件(PlayMode 对应 PlayMode 的 Tests 文件,Editor 则对应 Editor 的 Tests 文件) - 此时在 Test Runner 面板下的 PlayMode 页签下,可以找到
Create Test Script ...的相关按钮(如果选中 Tests 后没反应可以多等一会)。点击该按钮即可创建测试脚本文件。 - 对新建的测试文件进行命名,即可看到测试用例(下图 a 处)。

二、编写测试用例
1. 编写用例代码
下方代码主要功能为点击按钮可增加点击次数,并在文本框中显示。
using System.Collections;
using System.Collections.Generic;
using TMPro;
using UnityEngine;
using UnityEngine.UI;

namespace MyTestClass
{


    public class UIStudyUnitTest : MonoBehaviour
    {


        public Button btn;
        public TextMeshProUGUI txt;
        int counter = 0;
        // Start is called before the first frame update
        void Start()
        {


            this.btn.onClick.AddListener(this.on_btn_clicked);
            this.txt.text = counter.ToString();
        }

        void on_btn_clicked()
        {


            this.counter++;
            Debug.Log($"{

      this.counter}");
            this.txt.text = counter.ToString();
        }
    }
}
2. 编写测试用例代码
using System.Collections;
using System.Collections.Generic;
using MyTestClass;
using NUnit.Framework;
using UnityEngine;
using UnityEngine.SceneManagement;
using UnityEngine.TestTools;

public class MyPlayModeTest
{


    GameObject studyText;
    UIStudyUnitTest uiStudyText;

    [UnityTest]
    public IEnumerator MyPlayModeTestWithEnumeratorPasses()
    {


    	// 加载场景
        SceneManager.LoadScene("SampleScene");
        yield return null;

		// 获取场景中的游戏对象
        this.studyText = GameObject.Find("StudyTest");
        Assert.IsNotNull(this.studyText, "studyText should be found in the scene");

		// 获取场景中的对象上的脚步
        this.uiStudyText = this.studyText.GetComponent<UIStudyUnitTest>(); // Fix the component initialization
        Assert.IsNotNull(this.uiStudyText, "uiStudyText should be found in the game_object");

		// 模拟按钮点击,并判断是否相等。
        for (int i = 0; i < 10; i++)
        {


            Assert.AreEqual(i.ToString(), this.uiStudyText.txt.text, $"测试结果应该为{

      i}");
            uiStudyText.btn.onClick.Invoke();
        }
        yield return null;
    }
}
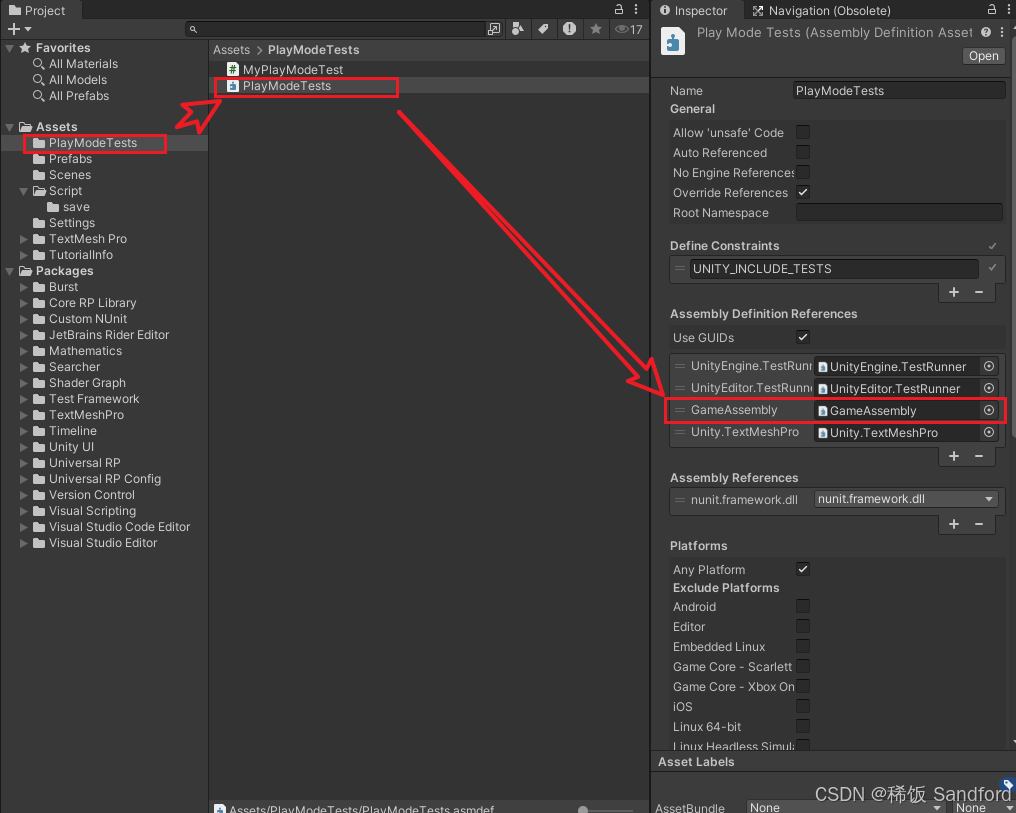
3. 引用丢失问题解决
如果在编写测试用例时,发现无法引用到游戏的相关脚本类,问题在于编译的依赖文件需要手动调整,则可进行如下操作:
- 在脚步文件夹下新建 Assembly Definition 文件。
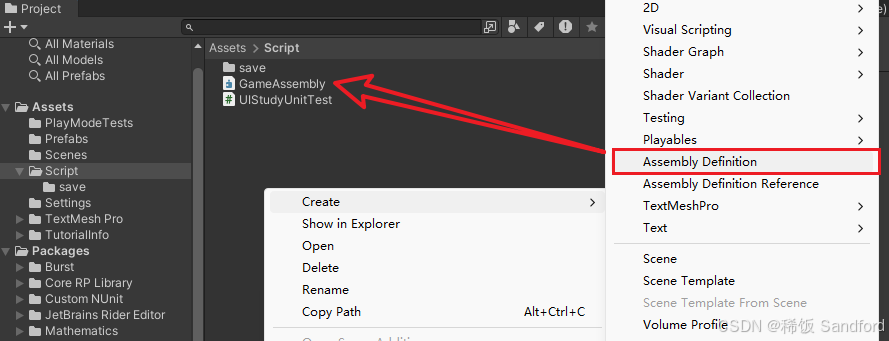
- 在测试脚本文件夹下的
.asmdef文件下,添加游戏脚本的 Assembly Definition 文件的引用即可。
4. 编写测试用例代码(无需加载场景)
采用直接实例化 Prefab 的方法,无需加载场景。
using MyTestClass;
using NUnit.Framework;
using TMPro;
using UnityEngine;

public class TestGoFromPrefab
{


    GameObject studyText;
    UIStudyUnitTest uiStudyText;

    [SetUp]
    public void setup()
    {


	    // 直接实例化 Prefab
        this.studyText = MonoBehaviour.Instantiate(Resources.Load<GameObject>("StudyTest"));
        Assert.IsNotNull(this.studyText);

        this.uiStudyText = this.studyText.GetComponent<UIStudyUnitTest>(); // Fix the component initialization
        Assert.IsInstanceOf<TextMeshProUGUI>(this.uiStudyText.txt);
    }

    [TearDown]
    public void teardown()
    {


        UnityEngine.Object.DestroyImmediate(this.studyText);
    }

    [Test]
    public void test_add()
    {


        for (int i = 0; i < 10; i++)
        {


            Assert.AreEqual(i.ToString(), this.uiStudyText.txt.text,
                $"测试结果应该为{

      i}");
            uiStudyText.btn.onClick.Invoke();
        }
    }
}
注意:使用 Resources.Load 进行加载时,Prefab 资源必须放在 Assets 文件夹下的 Resources 文件夹中。
三、执行测试用例
在 Test Runner 面板双击对应的测试用例即可执行。
