使用 Ollama、LangChain、LangGraph (无 GPU,无 APIKEY)

使用 Python 的 GenAI:从头开始构建代理(完整教程)_AI悦创编程一对一教学

简介

你好,我是悦创。

提示工程(Prompt Engineering)是设计和优化提示(文本输入)以提升大型语言模型(LLMs)表现的实践。其目标是通过精心设计指令,使模型输出期望的答案。最常用的提示技术包括:

  • 思维链(Chain-of-Thought):通过生成逐步的推理过程来得出结论。模型被引导“开口思考”,明确展示通向最终答案的逻辑步骤。
  • ReAct(Reason+Act):将推理与行动相结合。模型不仅对问题进行思考,还会基于推理采取相应的行动,从而实现更交互的过程——在推理步骤与行动之间交替迭代。基本上,这是一个“思考”、“行动”、“观察”的循环。

举个例子:假设让 AI “寻找 1000 美元以下的最佳笔记本电脑”。

  • 普通回答: “联想 Thinkpad”。
  • 思维链回答: “我需要考虑性能、电池续航和做工等因素。接着,我会查看哪些笔记本电脑的价格低于 1000 美元。根据我的知识库,联想 Thinkpad 是最佳选择”。
  • ReAct 回答: 与思维链回答相同,再加上执行网络搜索“2024 年 1000 美元以下最佳笔记本电脑”并分析结果的动作(结果可能不会是“联想 Thinkpad”)。

代理(Agent)是基于 ReAct 技术创建的,因此与传统 LLM 的主要区别在于其 具备采取行动的能力。代理是一种能够处理连续推理并在 LLM 通用知识不足时执行外部工具(例如数据库查询、网络搜索)的 AI 系统。简单来说,当普通聊天机器人在不知道如何回答问题时会生成随机文本,而代理会激活其工具来填补信息空缺,给出更具体的答案。

在本教程中,我将从零开始构建一个多代理系统,并引入“人工参与”(Human-in-the-Loop)的概念。我会展示一些有用的 Python 代码,这些代码可以轻松应用于其他类似场景(复制、粘贴、运行即可),并逐行讲解代码,帮助你复现这一示例(完整代码见下方链接)。

 https://github.com/AndersonHJB/BornforthisData

具体来说,我将涵盖以下内容:

  • 环境与 LLM 的搭建
  • 使用 LangChain 构建工具
  • 使用 Ollama 进行决策
  • 使用 Pydantic 构建代理结构
  • 使用 LangGraph 构建图形工作流
  • 多代理协作与人工参与
环境搭建

目前市场上有两个主要的 LLM 及代理库,它们正试图成为主流框架:

  •  LangChain —— 非常适合构建需要复杂交互和工作流的大规模 LLM 应用。它提供了一整套工具,专注于构建复杂工作流。其基于“组件链”理念,允许不同处理步骤,每个步骤都可涉及不同的 LLM。此外,LangChain 还为复杂的多代理系统提供了专门的模块: LangGraph
  •  LLamaIndex —— 适用于那些更侧重搜索和检索能力的应用,尤其是针对大数据集。它侧重于摄取、结构化以及访问特定领域的数据,从而优化 LLM 对数据的消费。其设计目标是高速且精准的数据检索,适合需要快速访问大量数据的应用。同时,LlamaIndex 也提供了自己的代理模块: Llama-Agents

我将采用前者,因为它更灵活。通过安装 LangChain(pip install langchain)你可以使用所有  模块

  1. langchain: 包含链、代理以及检索策略的主包
  2. langchain-core: 包含 langchain 使用的基本抽象(如 LLM、向量存储、检索器)
  3. langchain-community: 由社区维护的第三方集成
  4. langchain-experimental: 包含较为“危险”的内容(例如允许代理执行代码的工具)
  5. 合作包如 langchain-openailangchain-anthropic
  6. 部署工具如  LangServe LangSmith

另外,我还会安装 LangGraph(pip install langgraph)来构建基于节点—边工作流的代理。

扫描二维码关注公众号,回复: 17548819 查看本文章

使用 Python 的 GenAI:从头开始构建代理(完整教程)_python_02

我将使用  Ollama 在本地运行 LLM(pip install ollama),并选择 Meta 的  Llama 3.1,因为这是在无 GPU 条件下可运行的最智能 LLM。

import ollama

llm = "llama3.1"
q = '''who died on September 9, 2024?'''

res = ollama.chat(model=llm, 
                  messages=[{"role":"system", "content":""},
                            {"role":"user", "content":q}])
res
  • 1.
  • 2.
  • 3.
  • 4.
  • 5.
  • 6.
  • 7.
  • 8.
  • 9.

使用 Python 的 GenAI:从头开始构建代理(完整教程)_python_03

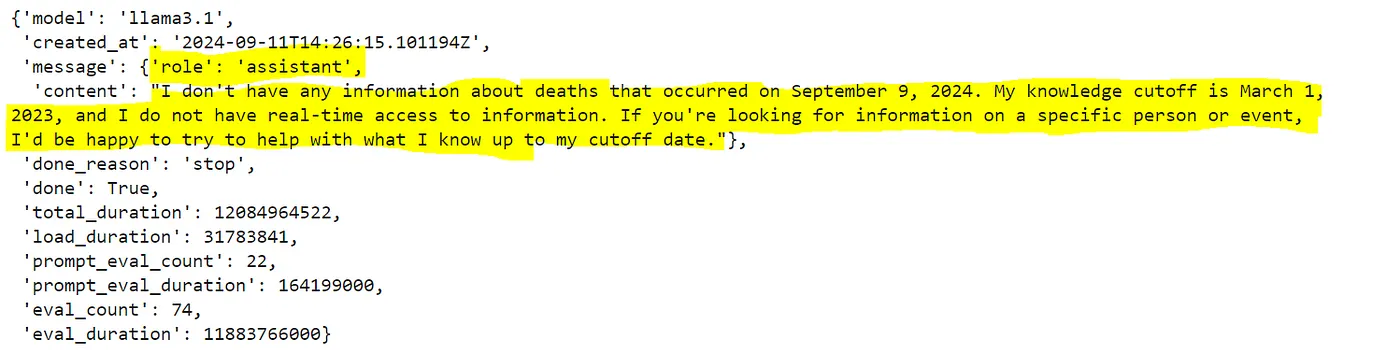
正如预期,LLM 的知识仅限于其最近一次训练的日期。请注意,与 LLM 聊天机器人的交互包含以下 3 种角色

  • “role”:“system” —— 用于向模型传递如何进行对话的核心指令
  • “role”:“user” —— 用于传递用户提问
  • “role”:“assistant” —— 模型的回复
工具

最常见的工具之一是 搜索互联网 的能力。在 Python 中,最简单的实现方式是使用著名的私有浏览器  DuckDuckGo(pip install duckduckgo-search)。

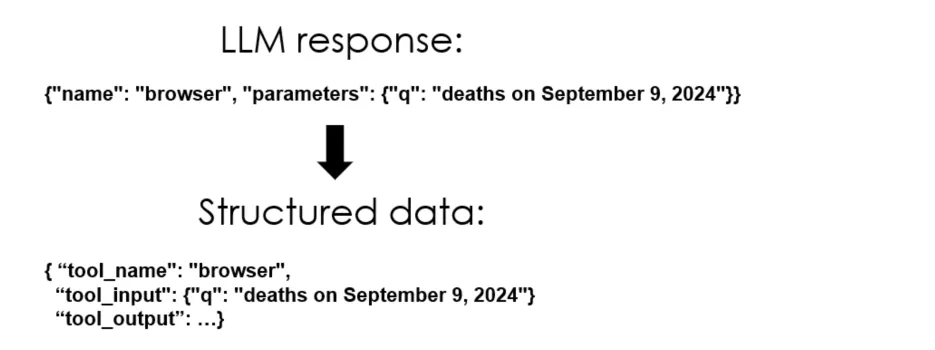
由于我使用的是 Ollama,创建工具有两种方式。第一种方式是使用 LangChain 提供的标准装饰器(这是最常用的方法)。

from langchain_core.tools import tool
from langchain_community.tools import DuckDuckGoSearchRun

@tool("tool_browser")
def tool_browser(q: str) -> str:
    """Search on DuckDuckGo browser by passing the input `q`"""
    return DuckDuckGoSearchRun().run(q)

# test
print( tool_browser(q) )
  • 1.
  • 2.
  • 3.
  • 4.
  • 5.
  • 6.
  • 7.
  • 8.
  • 9.
  • 10.

使用 Python 的 GenAI:从头开始构建代理(完整教程)_json_04

第二种方式是创建一个普通函数,并通过  Semantic Router(pip install semantic-router)将其转换为 Ollama 模式下的 schema,这个库简化了工具的制作过程。

from semantic_router.utils.function_call import FunctionSchema

def browser(q:str) -> str:
    """Search on DuckDuckGo browser by passing the input `q`"""
    return DuckDuckGoSearchRun().run(q)

tool_browser = FunctionSchema(browser).to_ollama()
tool_browser
  • 1.
  • 2.
  • 3.
  • 4.
  • 5.
  • 6.
  • 7.
  • 8.

使用 Python 的 GenAI:从头开始构建代理(完整教程)_json_05

在众多工具中,我们还将包含 最终答案 工具:在每次用户提问后,代理必须决定是使用工具还是直接给出最终答案。请注意,描述答案结构越具体,效果越好。

@tool("final_answer")
def final_answer(text:str) -> str:
    """Returns a natural language response to the user by passing the input `text`. 
    You should provide as much context as possible and specify the source of the information.
    """
    return text
  • 1.
  • 2.
  • 3.
  • 4.
  • 5.
  • 6.
决策过程

我们需要进行一些 提示工程 来定义代理需要执行的操作和方式。

prompt = """
You know everything, you must answer every question from the user, you can use the list of tools provided to you.
Your goal is to provide the user with the best possible answer, including key information about the sources and tools used.

Note, when using a tool, you provide the tool name and the arguments to use in JSON format. 
For each call, you MUST ONLY use one tool AND the response format must ALWAYS be in the pattern:
```json
{"name":"<tool_name>", "parameters": {"<tool_input_key>":<tool_input_value>}}
```
Remember, do NOT use any tool with the same query more than once.
Remember, if the user doesn't ask a specific question, you MUST use the `final_answer` tool directly.

Every time the user asks a question, you take note of some keywords in the memory.
Every time you find some information related to the user's question, you take note of some keywords in the memory.

You should aim to collect information from a diverse range of sources before providing the answer to the user. 
Once you have collected plenty of information to answer the user's question use the `final_answer` tool.
"""
  • 1.
  • 2.
  • 3.
  • 4.
  • 5.
  • 6.
  • 7.
  • 8.
  • 9.
  • 10.
  • 11.
  • 12.
  • 13.
  • 14.
  • 15.
  • 16.
  • 17.
  • 18.

使用 Ollama,我们可以立刻测试代理的决策过程。我们需要告知代理哪些工具可供使用。

dic_tools = {"tool_browser":tool_browser, 
             "final_answer":final_answer}

str_tools = "\n".join([str(n+1)+". `"+str(v.name)+"`: "+str(v.description) for n,v in enumerate(dic_tools.values())])

prompt_tools = f"You can use the following tools:\n{str_tools}"
print(prompt_tools)
  • 1.
  • 2.
  • 3.
  • 4.
  • 5.
  • 6.
  • 7.

使用 Python 的 GenAI:从头开始构建代理(完整教程)_AI悦创编程一对一教学_06

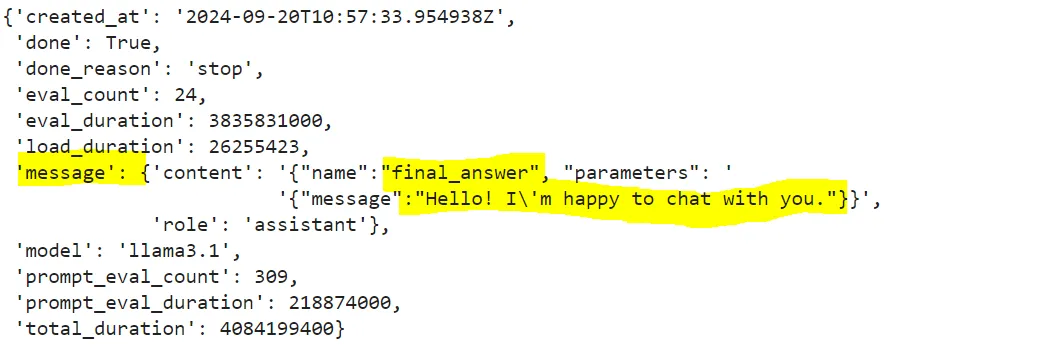
提示、工具和 LLM 共同构成了代理的核心。此时,如果我没有提出具体问题,AI 应该直接使用 final_answer 工具给出回答。

# LLM deciding what tool to use
from pprint import pprint

llm_res = ollama.chat(
    model=llm,
    messages=[{"role":"system", "content":prompt+"\n"+prompt_tools},
              {"role":"user", "content":"hello"}
             ], format="json")

pprint(llm_res)
  • 1.
  • 2.
  • 3.
  • 4.
  • 5.
  • 6.
  • 7.
  • 8.
  • 9.
  • 10.

使用 Python 的 GenAI:从头开始构建代理(完整教程)_Python一对一教学_07

相反,当我提出具体问题时,代理应使用网络搜索工具,并基于我的请求生成查询输入。

# LLM deciding what tool to use (output format = json)
llm_res = ollama.chat(
    model=llm,
    messages=[{"role":"system", "content":prompt+"\n"+prompt_tools},
              {"role":"user", "content":q}
             ], format="json")

llm_res["message"]["content"]
  • 1.
  • 2.
  • 3.
  • 4.
  • 5.
  • 6.
  • 7.
  • 8.

使用 Python 的 GenAI:从头开始构建代理(完整教程)_json_08

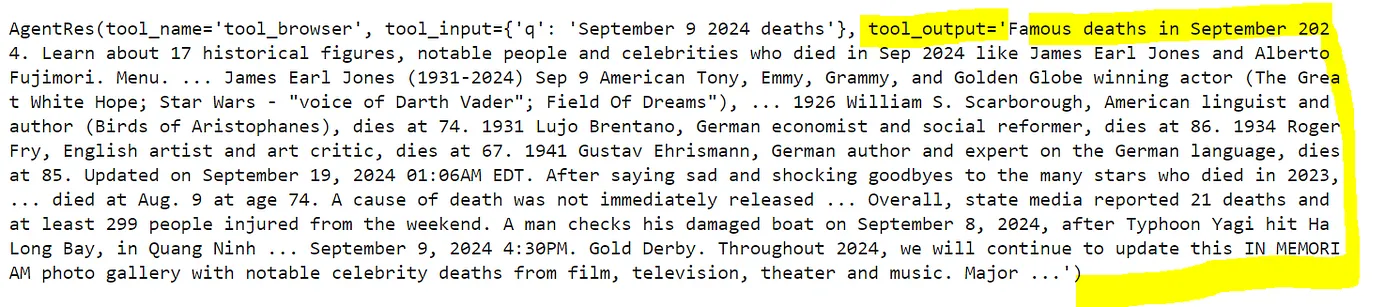
我们可以测试代理如何处理查询结果,将其作为上下文传递给 LLM。

# LLM with context
import json

tool_input = json.loads(llm_res["message"]["content"])["parameters"]["q"]

context = tool_browser(tool_input)
print("tool output:\n", context)

llm_output = ollama.chat(
    model=llm,
    messages=[{"role":"system", "content":"Give the most accurate answer using the folling information:\n"+context},
              {"role":"user", "content":q}
             ])

print("\nllm output:\n", llm_output["message"]["content"])
  • 1.
  • 2.
  • 3.
  • 4.
  • 5.
  • 6.
  • 7.
  • 8.
  • 9.
  • 10.
  • 11.
  • 12.
  • 13.
  • 14.
  • 15.

使用 Python 的 GenAI:从头开始构建代理(完整教程)_开发语言_09

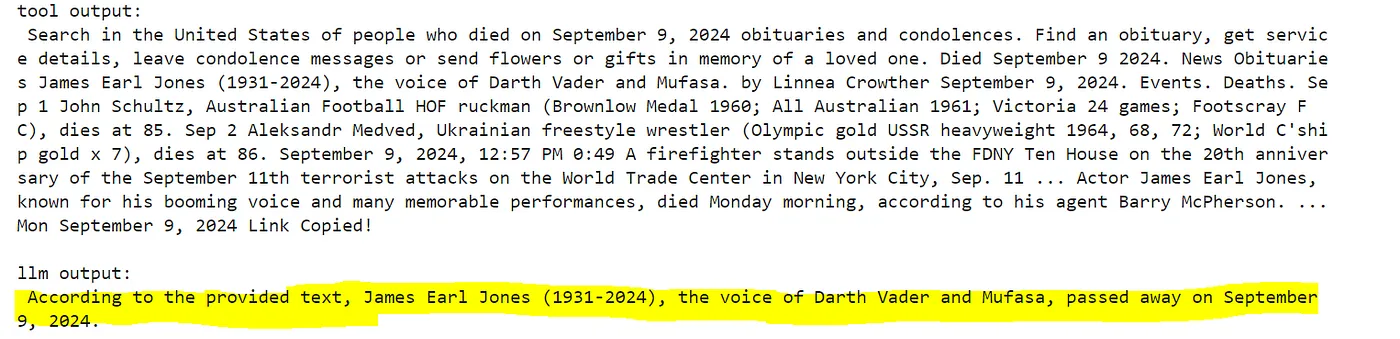
可以看到,核心模型运作正常。但有时 LLM 会生成错误或不一致的信息(所谓“幻觉”),因此通常需要指定模型必须遵循的数据结构。

代理结构

通常,LLM 通过 API 调用工作,因此输入与输出都必须遵循特定的 数据结构。在 Python 中,最常用的数据验证库是  Pydantic,它能确保程序使用的信息格式正确且数值符合预期。

基本上,目标是将 LLM 的响应(不稳定的)转换成结构化且经过验证的代理响应对象。

使用 Python 的 GenAI:从头开始构建代理(完整教程)_Python一对一教学_10

首先,你需要创建一个类来描述你所期望的数据,包括数据类型和必须遵循的规则。Pydantic 会检查数据是否正确,如果不正确,会提供明确的错误信息。这对于应对 LLM 每次运行时响应的变化非常有用。

from pydantic import BaseModel #this is the standard class

# Taking for example the last LLM response, I want this structure:
# {tool_name: 'tool_browser', 
#  tool_input: {'q':'September 9 2024 deaths'}, 
#  tool_output: str( tool_browser({'q':'September 9 2024 deaths'})) }

class AgentRes(BaseModel):
    tool_name: str  #<--must be a string = 'tool_browser'
    tool_input: dict #<--must be a dictionary = {'q':'September 9 2024 deaths'}
    tool_output: str | None = None #can be a string or None, default = None
    
    @classmethod
    def from_llm(cls, res:dict): #<--return the class itself
        try:
            out = json.loads(res["message"]["content"])
            return cls(tool_name=out["name"], tool_input=out["parameters"])
        except Exception as e:
            print(f"Error from Ollama:\n{res}\n")
            raise e

# test
agent_res = AgentRes.from_llm(llm_res)
print("from\n", llm_res["message"]["content"], "\nto")
agent_res
  • 1.
  • 2.
  • 3.
  • 4.
  • 5.
  • 6.
  • 7.
  • 8.
  • 9.
  • 10.
  • 11.
  • 12.
  • 13.
  • 14.
  • 15.
  • 16.
  • 17.
  • 18.
  • 19.
  • 20.
  • 21.
  • 22.
  • 23.
  • 24.
  • 25.

使用 Python 的 GenAI:从头开始构建代理(完整教程)_Python一对一教学_11

工具输出可以这样添加:

# test the tool output
AgentRes(tool_name = "tool_browser", 
         tool_input = {'q':'September 9 2024 deaths'}, 
         tool_output = str( tool_browser({'q':'September 9 2024 deaths'})) )
  • 1.
  • 2.
  • 3.
  • 4.

使用 Python 的 GenAI:从头开始构建代理(完整教程)_json_12

模型已经能够判断何时使用工具,但我们可以通过加入 记忆系统 让它变得更智能。记忆系统会包含聊天历史中与用户问题相关的信息以及原始请求的提醒。

'''
Messages in Memory will have this structure:
[{'role':'assistant', 'content':'{"name":"final_answer", "parameters":{"text":"How can I assist you today?"}}'},
 {'role':'user', 'content':None}]
'''

def save_memory(lst_res:list[AgentRes], user_q:str) -> list:
    ## create
    memory = []
    for res in [res for res in lst_res if res.tool_output is not None]:
        memory.extend([
            ### assistant message
            {"role": "assistant", "content": json.dumps({"name":res.tool_name, "parameters":res.tool_input})},
            ### user message
            {"role":"user", "content":res.tool_output}
        ])
    
    ## add a reminder of the original goal
    if memory:
        memory += [{"role":"user", "content":(f'''
                This is just a reminder that my original query was `{user_q}`.
                Only answer to the original query, and nothing else, but use the information I gave you. 
                Provide as much information as possible when you use the `final_answer` tool.
                ''')}]
    return memory
  • 1.
  • 2.
  • 3.
  • 4.
  • 5.
  • 6.
  • 7.
  • 8.
  • 9.
  • 10.
  • 11.
  • 12.
  • 13.
  • 14.
  • 15.
  • 16.
  • 17.
  • 18.
  • 19.
  • 20.
  • 21.
  • 22.
  • 23.
  • 24.
  • 25.

对于聊天历史,我还会添加一段模拟对话,以确保代理理解我的意图。
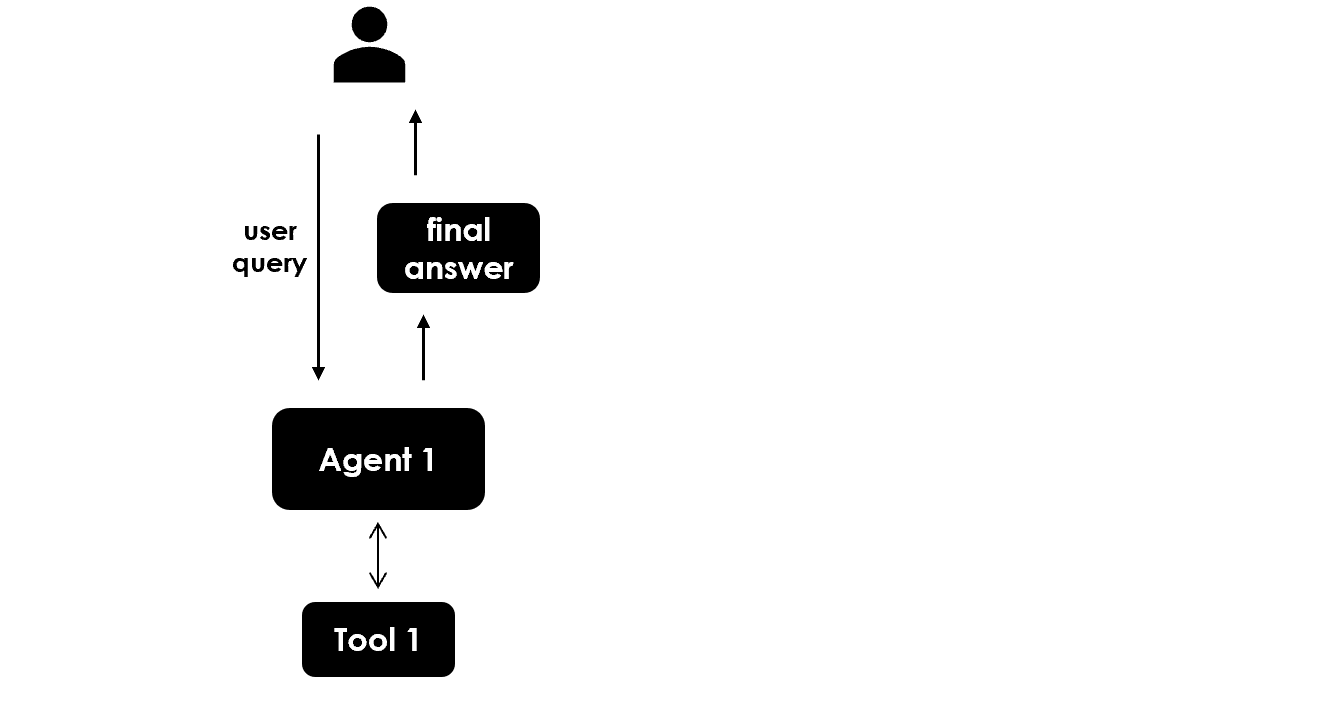
history=[{"role": "user", "content": "hi there, how are you?"},
         {"role": "assistant", "content": "I'm good, thanks!"},
         {"role": "user", "content": "I have a question"},
         {"role": "assistant", "content": "tell me"}]
  • 1.
  • 2.
  • 3.
  • 4.

现在,我们可以将所有内容组合起来 创建代理

def run_agent(user_q:str, chat_history:list[dict], lst_res:list[AgentRes], lst_tools:list) -> AgentRes:
    ## start memory
    memory = save_memory(lst_res=lst_res, user_q=user_q)
    
    ## track used tools
    if memory:
        tools_used = [res.tool_name for res in lst_res]
        if len(tools_used) >= len(lst_tools):
            memory[-1]["content"] = "You must now use the `final_answer` tool."
        
    ## messages
    messages = [{"role":"system", "content":prompt+"\n"+prompt_tools},
                *chat_history,
                {"role":"user", "content":user_q},
                *memory]
    pprint(messages) #<--print to see prompt + tools + chat_history
    
    ## output
    llm_res = ollama.chat(model=llm, messages=messages, format="json")
    return AgentRes.from_llm(llm_res)


# test
agent_res = run_agent(user_q=q, chat_history=chat_history, lst_res=[], lst_tools=dic_tools.keys())
print("\nagent_res:", agent_res)
  • 1.
  • 2.
  • 3.
  • 4.
  • 5.
  • 6.
  • 7.
  • 8.
  • 9.
  • 10.
  • 11.
  • 12.
  • 13.
  • 14.
  • 15.
  • 16.
  • 17.
  • 18.
  • 19.
  • 20.
  • 21.
  • 22.
  • 23.
  • 24.
  • 25.

使用 Python 的 GenAI:从头开始构建代理(完整教程)_Python一对一教学_13

如你所见,我们的代理已通过 prompt、可用工具以及聊天历史启动。

图形工作流

LangGraph 是一个编排框架,它能让你对代理工作流有更精细的控制。其中一个关键概念是 状态:每次执行都会创建一个字典,该字典在图的各节点间传递,并在每次节点执行时更新其输出。

我们使用  Typing 定义初始状态,这是一个处理数据类型的 Python 库。

import typing

class State(typing.TypedDict):
    user_q: str
    chat_history: list 
    lst_res: list[AgentRes]
    output: dict

# test
state = State({"user_q":q, "chat_history":chat_history, "lst_res":[agent_res], "output":{}})
state
  • 1.
  • 2.
  • 3.
  • 4.
  • 5.
  • 6.
  • 7.
  • 8.
  • 9.
  • 10.
  • 11.

使用 Python 的 GenAI:从头开始构建代理(完整教程)_json_14

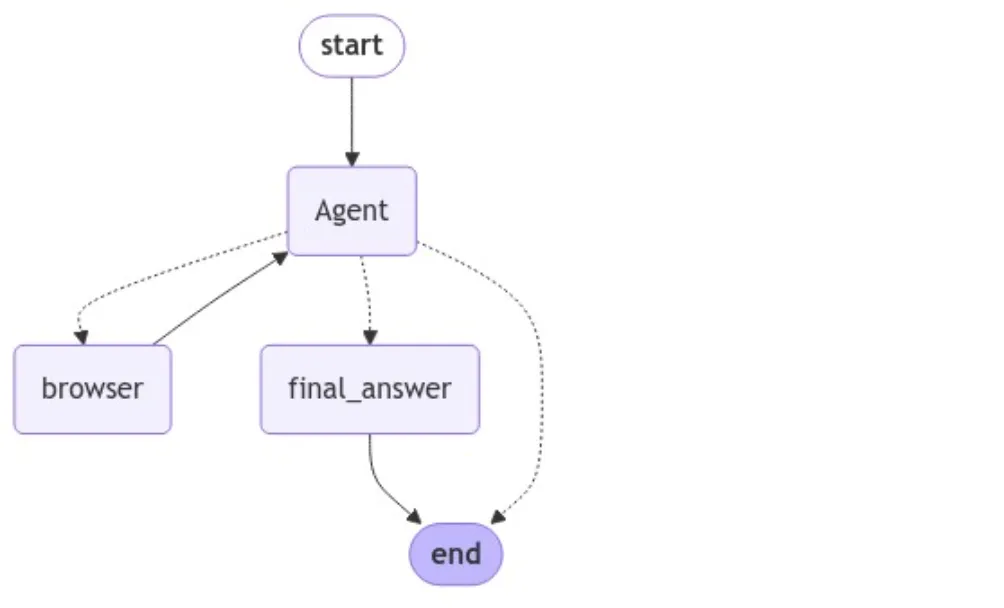
对于每个节点(代理和工具)以及每条边(动作),我们需要编写一个函数来定义模型的行为。让我们从 代理节点 开始(目前只有一个):

# Agent
def node_agent(state):
    print("--- node_agent ---")
    agent_res = run_agent(prompt=prompt, 
                          dic_tools={k:v for k,v in dic_tools.items() if k in ["tool_browser","final_answer"]},
                          user_q=state["user_q"], 
                          chat_history=state["chat_history"], 
                          lst_res=state["lst_res"])
    print(agent_res)
    return {"lst_res":[agent_res]} #<--must return a the list of agent_res

# test
node_agent(state)
  • 1.
  • 2.
  • 3.
  • 4.
  • 5.
  • 6.
  • 7.
  • 8.
  • 9.
  • 10.
  • 11.
  • 12.
  • 13.

使用 Python 的 GenAI:从头开始构建代理(完整教程)_AI悦创编程一对一教学_15

接下来,我们为 工具节点 编写类似的函数:

def node_tool(state):
    print("--- node_tool ---")
    res = state["lst_res"][-1]
    print(f"{res.tool_name}(input={res.tool_input})")
    
    agent_res = AgentRes(tool_name=res.tool_name, 
                         tool_input=res.tool_input, 
                         tool_output=str(dic_tools[res.tool_name](res.tool_input)) )
    
    return {"output":agent_res} if res.tool_name == "final_answer" else {"lst_res":[agent_res]}

# test
node_tool(state)
  • 1.
  • 2.
  • 3.
  • 4.
  • 5.
  • 6.
  • 7.
  • 8.
  • 9.
  • 10.
  • 11.
  • 12.
  • 13.

使用 Python 的 GenAI:从头开始构建代理(完整教程)_Python一对一教学_16

这里有两种边类型:

  • 条件边 —— 调用函数判断下一步应转向哪个节点(例如,从代理节点判断是否使用工具)
  • 普通边 —— 直接从一个节点传递到下一个节点(例如,从工具节点的输出返回给代理节点)
def conditional_edges(state):
    print("--- conditional_edges ---")
    last_res = state["lst_res"][-1]
    next_node = last_res.tool_name if isinstance(state["lst_res"], list) else "final_answer"
    print("next_node:", next_node)
    return next_node #<--must return the next node to go

# test
conditional_edges(state)
  • 1.
  • 2.
  • 3.
  • 4.
  • 5.
  • 6.
  • 7.
  • 8.
  • 9.

使用 Python 的 GenAI:从头开始构建代理(完整教程)_Python一对一教学_17

最后,我们可以创建工作流并可视化图形。

from langgraph.graph import StateGraph, END

## start the graph
workflow = StateGraph(State)

## add Agent node
workflow.add_node(node="Agent", action=node_agent) 
workflow.set_entry_point(key="Agent")  #<--user query

## add Tools nodes
for k in dic_tools.keys():
    workflow.add_node(node=k, action=node_tool)

## conditional_edges from Agent
workflow.add_conditional_edges(source="Agent", path=conditional_edges)

## normal_edges to Agent
for k in dic_tools.keys():
    if k != "final_answer":
        workflow.add_edge(start_key=k, end_key="Agent")

## end the graph
workflow.add_edge(start_key="final_answer", end_key=END)
g = workflow.compile()

## plot
from IPython.display import Image, display
from langchain_core.runnables.graph import MermaidDrawMethod

display(Image(
    g.get_graph().draw_mermaid_png(draw_method=MermaidDrawMethod.API)
))
  • 1.
  • 2.
  • 3.
  • 4.
  • 5.
  • 6.
  • 7.
  • 8.
  • 9.
  • 10.
  • 11.
  • 12.
  • 13.
  • 14.
  • 15.
  • 16.
  • 17.
  • 18.
  • 19.
  • 20.
  • 21.
  • 22.
  • 23.
  • 24.
  • 25.
  • 26.
  • 27.
  • 28.
  • 29.
  • 30.
  • 31.
  • 32.

使用 Python 的 GenAI:从头开始构建代理(完整教程)_AI悦创编程一对一教学_18

启动工作流时,必须传入初始状态。你可以通过两种方式 运行代理

state = {'user_q':q,
         'chat_history':chat_history, 
         'lst_res':[], 
         'output':{} }

## 1) invoke function
out = g.invoke(input=state)
agent_out = out['output'].tool_output

## 2) stream function
steps = g.stream(input=state) 
for n,step in enumerate(steps):
    print("--- step", n, "---")
    print(step)
  • 1.
  • 2.
  • 3.
  • 4.
  • 5.
  • 6.
  • 7.
  • 8.
  • 9.
  • 10.
  • 11.
  • 12.
  • 13.
  • 14.

使用 Python 的 GenAI:从头开始构建代理(完整教程)_Python一对一教学_19

以上便是热身阶段。现在,真正的游戏开始了。

多代理与人工参与

单一代理通常能通过使用工具有效运作,但在同时处理多个工具时可能效果不佳。解决复杂任务的一种方法是采用“分而治之”策略:为每个任务创建专门的代理,从而实现 多代理工作流

此外,实际工作流往往需要人工反馈。人工参与(Human-in-the-Loop)指的是在决策过程中,人类操作员与 AI 系统共同参与,充当类似其他工具的角色(常被称为“人工工具”)。这种方法结合了 AI 的速度与效率以及人类直觉和对复杂语境的理解能力。
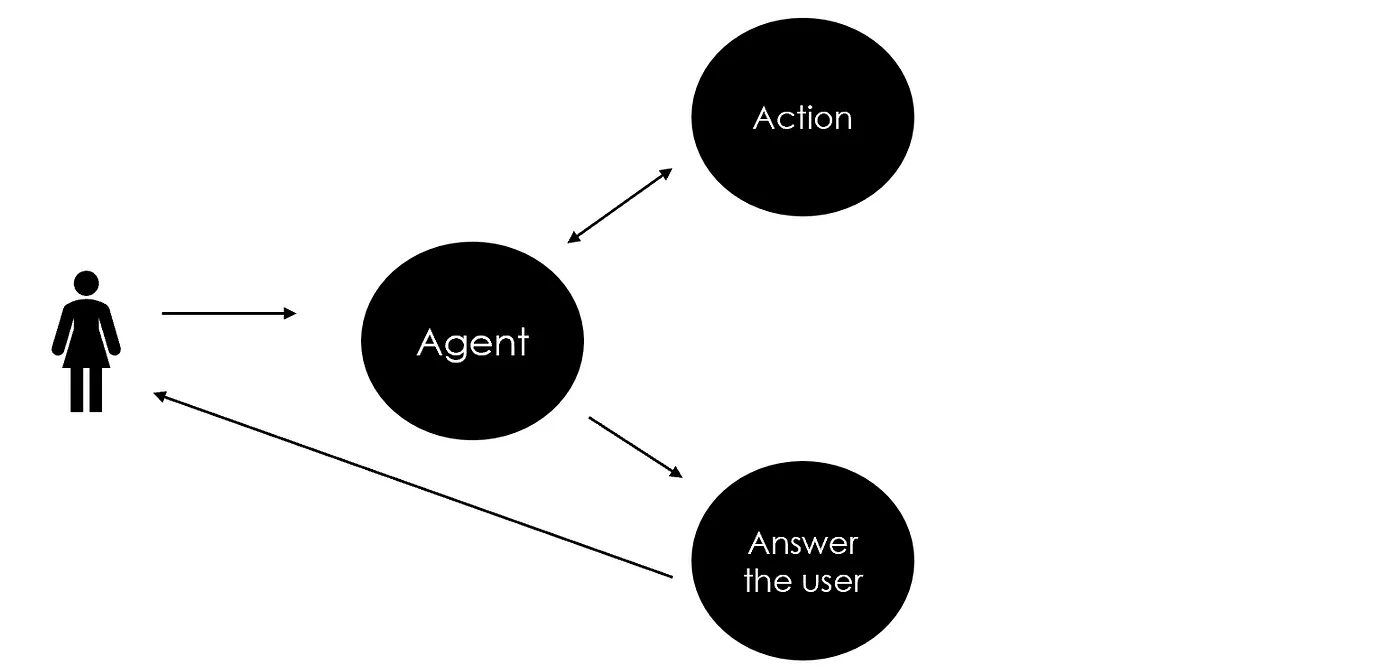
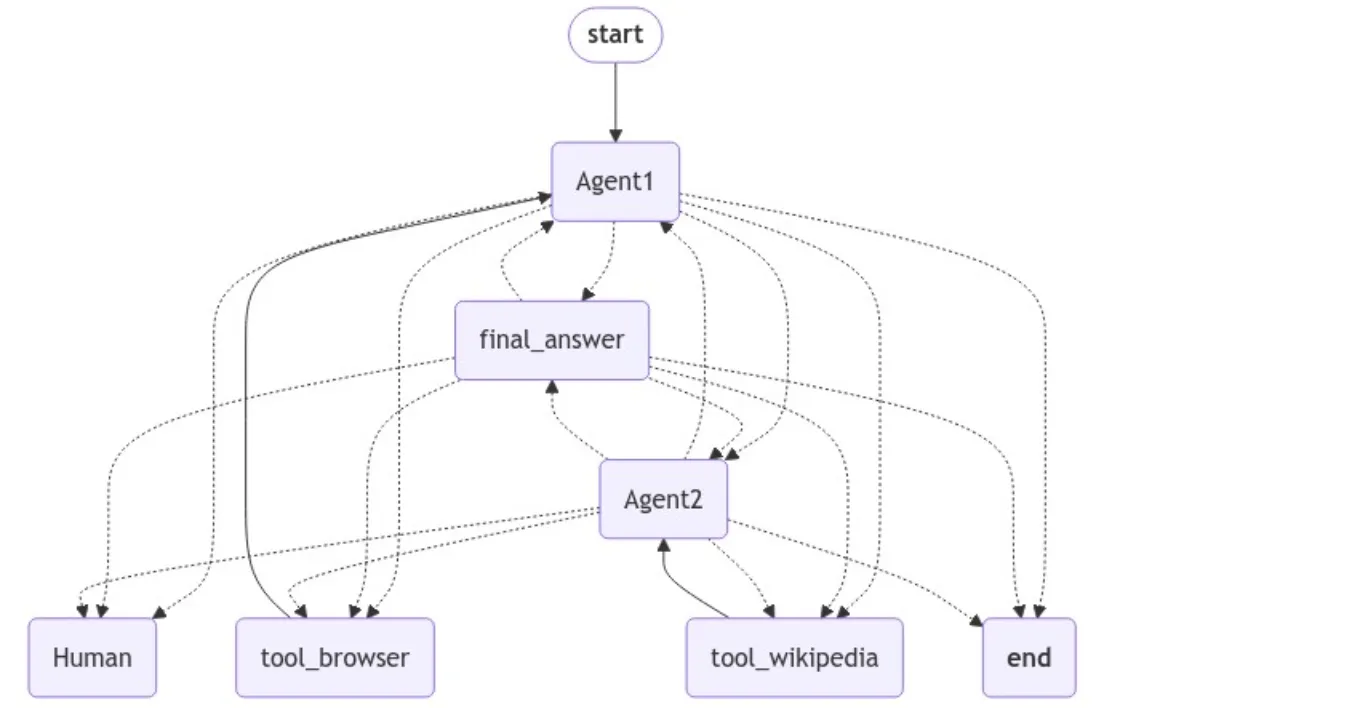
本工作流如下:

  1. 用户提问后,第一代理使用其工具给出最终答案(即前面所实现的过程)。
  2. 在给出最终答案后,系统询问用户返回的信息是否足够(人工参与)。
  3. 如果不足,第二代理激活,使用其工具进一步丰富最终答案(多代理协作)。

使用 Python 的 GenAI:从头开始构建代理(完整教程)_python_20

第二个代理将引入一个新工具:Wikipedia

from langchain_community.tools import WikipediaQueryRun
from langchain_community.utilities import WikipediaAPIWrapper

@tool("tool_wikipedia")
def tool_wikipedia(q:str) -> str:
    """Search on Wikipedia by passing the input `q`.
       The input `q` must be short keywords, not a long text"""
    return WikipediaQueryRun(api_wrapper=WikipediaAPIWrapper()).run(q)

# test
print( tool_wikipedia(agent_out) )

# update the tools
dic_tools = {"tool_browser":tool_browser,
             "final_answer":final_answer,
             "tool_wikipedia":tool_wikipedia}
  • 1.
  • 2.
  • 3.
  • 4.
  • 5.
  • 6.
  • 7.
  • 8.
  • 9.
  • 10.
  • 11.
  • 12.
  • 13.
  • 14.
  • 15.
  • 16.

使用 Python 的 GenAI:从头开始构建代理(完整教程)_python_21

与之前类似,新代理节点需要一个函数来运行,其中指定了新的提示和工具。

prompt_2 = """
Your goal is to use the `tool_wikipedia` ONLY ONCE to enrich the information already available.
Note, when using a tool, you provide the tool name and the arguments to use in JSON format. 
For each call, you MUST ONLY use one tool AND the response format must ALWAYS be in the pattern:
```json
{"name":"<tool_name>", "parameters": {"<tool_input_key>":<tool_input_value>}}
```
Once you have collected plenty of information to answer the user's question use the `final_answer` tool.
"""

def node_agent_2(state):
    print("--- node_agent 2 ---")
    agent_res = run_agent(prompt=prompt_2, 
                          dic_tools={k:v for k,v in dic_tools.items() if k in ["tool_wikipedia","final_answer"]},
                          user_q=state["output"].tool_output, #<--changed user_q to the last output
                          chat_history=state["chat_history"], 
                          lst_res=state["lst_res"])
    print(agent_res)
    return {"lst_res":[agent_res]}
  • 1.
  • 2.
  • 3.
  • 4.
  • 5.
  • 6.
  • 7.
  • 8.
  • 9.
  • 10.
  • 11.
  • 12.
  • 13.
  • 14.
  • 15.
  • 16.
  • 17.
  • 18.
  • 19.

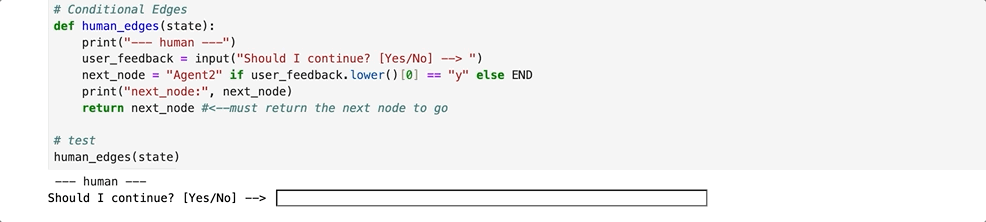
关于 人工参与,我们需要创建一个“虚拟”节点以及处理用户反馈的逻辑。

# Node
def human_node(state):
    pass

# Conditional Edges
def human_edges(state):
    print("--- human ---")
    user_feedback = input("Should I continue? [Yes/No] --> ")
    next_node = "Agent2" if user_feedback.lower()[0] == "y" else END
    print("next_node:", next_node)
    return next_node

# test
human_edges(state)
  • 1.
  • 2.
  • 3.
  • 4.
  • 5.
  • 6.
  • 7.
  • 8.
  • 9.
  • 10.
  • 11.
  • 12.
  • 13.
  • 14.

使用 Python 的 GenAI:从头开始构建代理(完整教程)_开发语言_22

最后,我们构建 新图形工作流

## start the graph
workflow = StateGraph(State)

########################## Agent 1 ##########################
## add Agent node
workflow.add_node(node="Agent1", action=node_agent) 
workflow.set_entry_point(key="Agent1") #<--user query

## add Tools nodes
workflow.add_node(node="tool_browser", action=node_tool)
workflow.add_node(node="final_answer", action=node_tool)

## normal_edges to Agent
workflow.add_edge(start_key="tool_browser", end_key="Agent1")

## conditional_edges from Agent
workflow.add_conditional_edges(source="Agent1", path=conditional_edges)

########################## Human ##########################
## add Human node
workflow.add_node(node="Human", action=human_node)

## conditional_edges from Human
workflow.add_conditional_edges(source="final_answer", path=human_edges)

########################## Agent 2 ##########################
## add Agent node
workflow.add_node(node="Agent2", action=node_agent_2) 

## add Tools nodes
workflow.add_node(node="tool_wikipedia", action=node_tool)

## normal_edges to Agent
workflow.add_edge(start_key="tool_wikipedia", end_key="Agent2")

## conditional_edges from Agent
workflow.add_conditional_edges(source="Agent2", path=conditional_edges)

########################## End ##########################
## end the graph
g2 = workflow.compile()

## plot
display(Image(
    g2.get_graph().draw_mermaid_png(draw_method=MermaidDrawMethod.API)
))
  • 1.
  • 2.
  • 3.
  • 4.
  • 5.
  • 6.
  • 7.
  • 8.
  • 9.
  • 10.
  • 11.
  • 12.
  • 13.
  • 14.
  • 15.
  • 16.
  • 17.
  • 18.
  • 19.
  • 20.
  • 21.
  • 22.
  • 23.
  • 24.
  • 25.
  • 26.
  • 27.
  • 28.
  • 29.
  • 30.
  • 31.
  • 32.
  • 33.
  • 34.
  • 35.
  • 36.
  • 37.
  • 38.
  • 39.
  • 40.
  • 41.
  • 42.
  • 43.
  • 44.
  • 45.
  • 46.

使用 Python 的 GenAI:从头开始构建代理(完整教程)_json_23

如常,你可以通过传入初始状态来运行工作流。

g2.invoke(input=state) #<--passing the same input state as before
  • 1.

使用 Python 的 GenAI:从头开始构建代理(完整教程)_Python一对一教学_24

结论

本文是一篇教程,演示了 如何从零开始构建代理。利用 LangChainOllama,我们创建了工具和代理,接着使用 LangGraph 定义了工作流逻辑,最终构建了一个结合人工反馈的多代理系统。

总之,生成式 AI 社区正迅速发展,诸如 LangChainLlamaIndex 等库也在不断变化。这主要归因于当前 LLM 领域尚无市场领导者,从而使得新工具和平台不断涌现。

希望你喜欢这篇教程!如有问题、反馈或想分享你的有趣项目,请随时联系我。