Clion下使用Vcpkg安装GDAL(还有部分错误解决办法,其他库可能也适用)
写在前面
此贴用来记录我在Clion中使用Vcpkg安装GDAL时遇到的各种问题,希望能够帮到你。
配置CMake
如果你报了类似的错:
CMake Error at scripts/cmake/vcpkg_execute_build_process.cmake:134 (message):
    Command failed: D:/Software/Inviwo/vcpkg/downloads/tools/msys2/09133458fed80fcb/usr/bin/make.exe -j 9 --trace -f Makefile all
    Working Directory: D:/Software/Inviwo/vcpkg/buildtrees/libiconv/x64-windows-dbg/
    See logs for more information:
      D:\Software\Inviwo\vcpkg\buildtrees\libiconv\build-x64-windows-dbg-out.log
      D:\Software\Inviwo\vcpkg\buildtrees\libiconv\build-x64-windows-dbg-err.log

Call Stack (most recent call first):
  scripts/cmake/vcpkg_build_make.cmake:136 (vcpkg_execute_build_process)
  scripts/cmake/vcpkg_install_make.cmake:2 (vcpkg_build_make)
  buildtrees/versioning_/versions/libiconv/4226589d5d658f4d96df83f8539de54dc57a5996/portfile.cmake:39 (vcpkg_install_make)
  scripts/ports.cmake:170 (include)
那么就是路径的问题了;
首先得自己下载一个CMake,因为在后面Vcpkg编译GDAL的时候会有一个Bug,不能使用Clion自带的CMake,原因是Clion的安装路径中带有空格,我去Vcpkg的GitHub上找问题,开发团队说是CMake的安装路径中不能有空格,我的Clion安装路径 D:\dev\intellij\clion\CLion 2023.3.3\ ,太坑了;
CMake下载链接 : Download CMake 找一个适合的版本下载,并安装,记住安装位置;
我除了自己安装了CMake以外,还安装了MinGW,给个下载地址吧:Releases · niXman/mingw-builds-binaries (github.com) 在GitHub上,
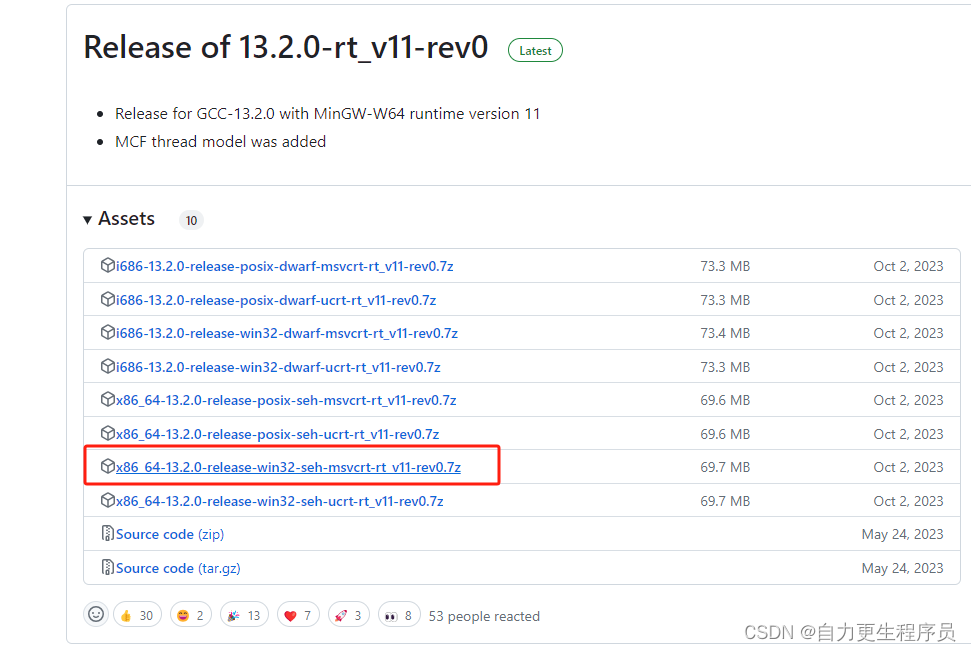
记得下 x86_64 win32格式的,我这个是v11版本,你们可以根据喜好的版本选择格式类似的就行了,这是一个二进制文件,是编译好的,直接解压就能用了;
安装完MinGw、CMake后,到Clion中进行配置,对了,我的Clion是装了中文包的:
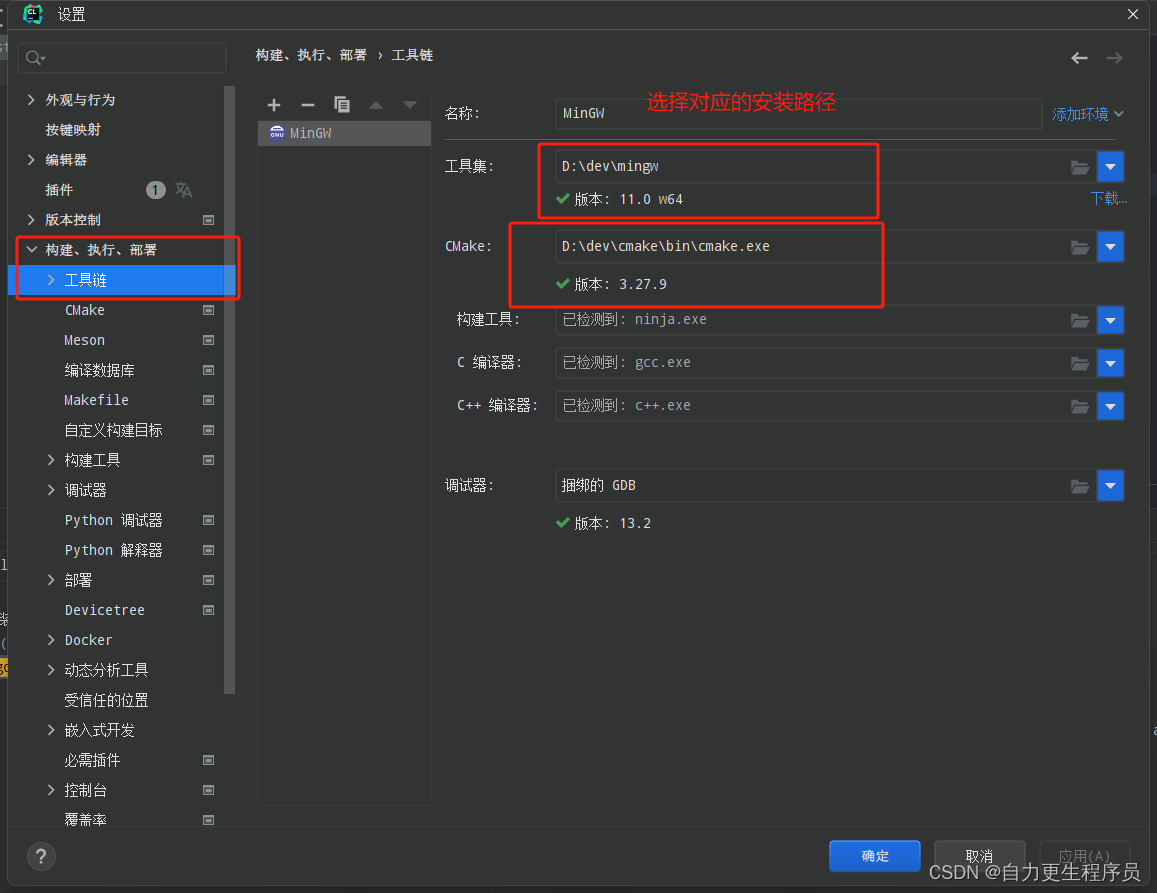
其他不用管,就改CMake、MinGW就行;

安装Vcpkg
Clion新建项目后在窗口的最底下应该有一个Vcpkg的选项:
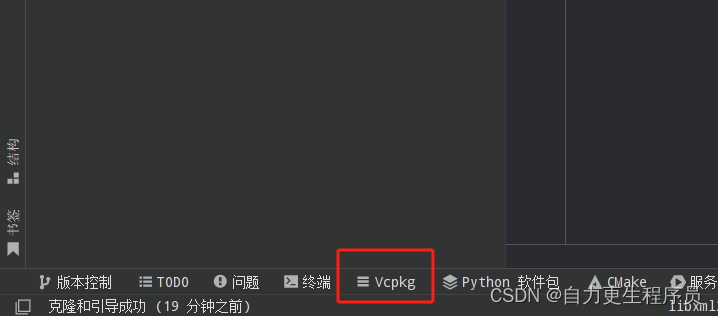
点击它,再点上面的+号:
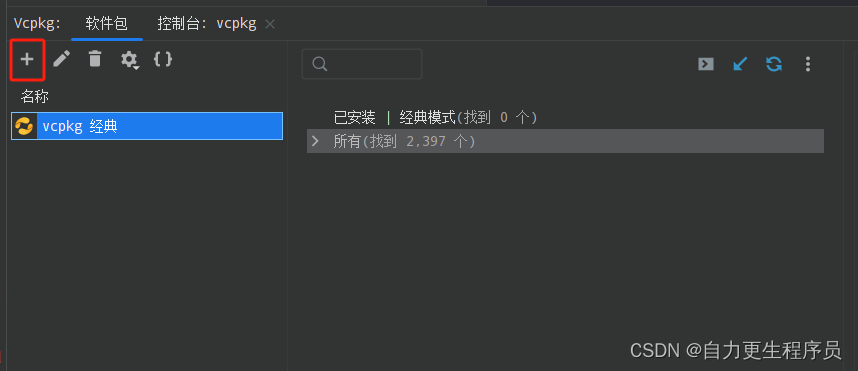
会弹出这么一个对话框:
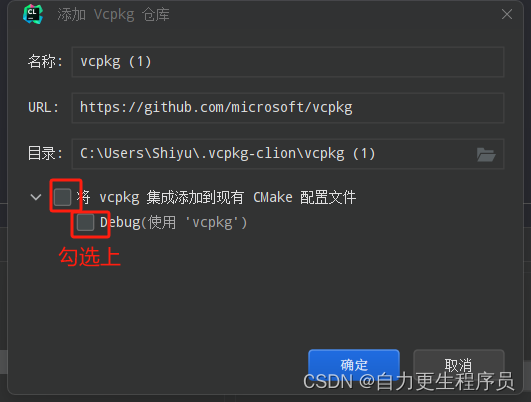
记得一定要勾选上;确定后会从GitHub上拉取,这一步没有科学上网的会稍慢,耐心等待;
安装完成后会出现:

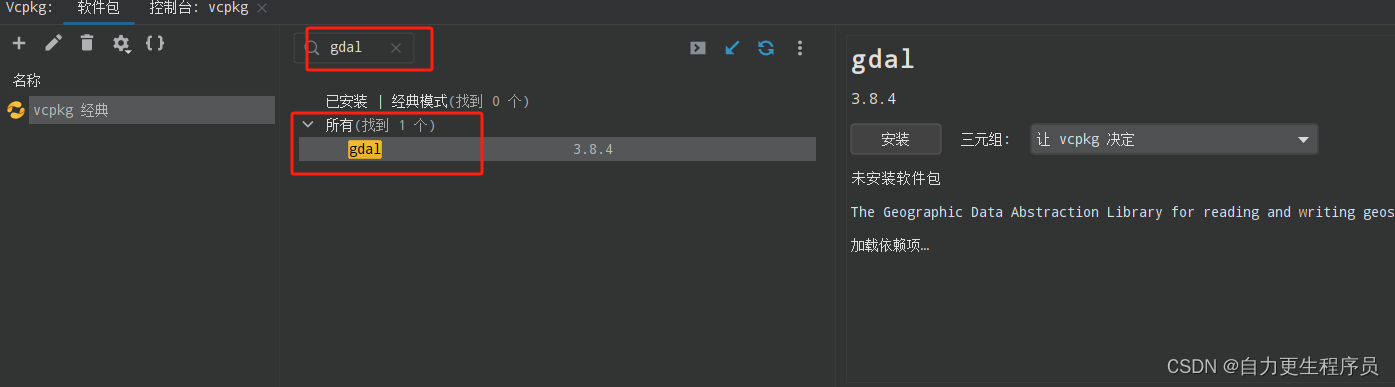
搜索gdal:
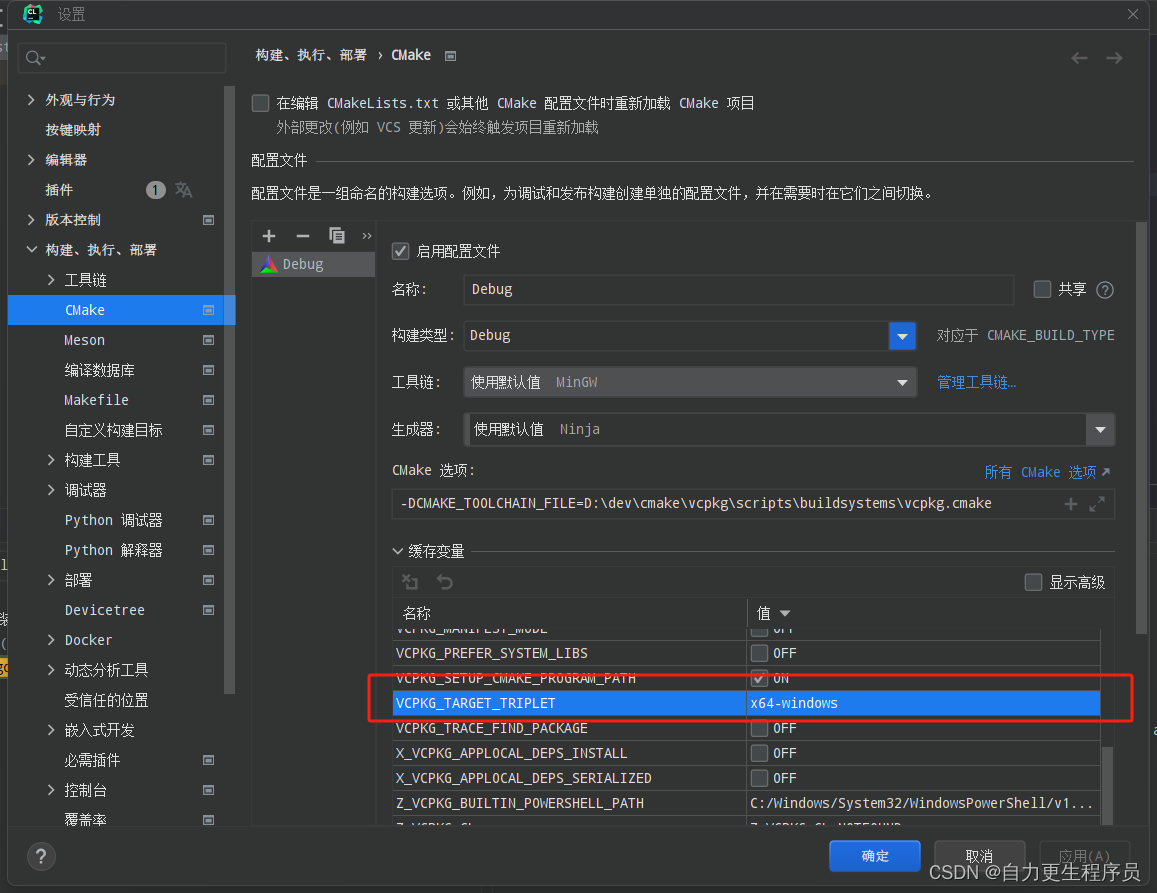
关键的一步来了,在三元组这里一定要选择 x64-windows,不能让vcpkg决定,不然可能会下载 x64-mingw-dynamic版本,那么后续就算成功安装,也无法在CMakeLists里面引入
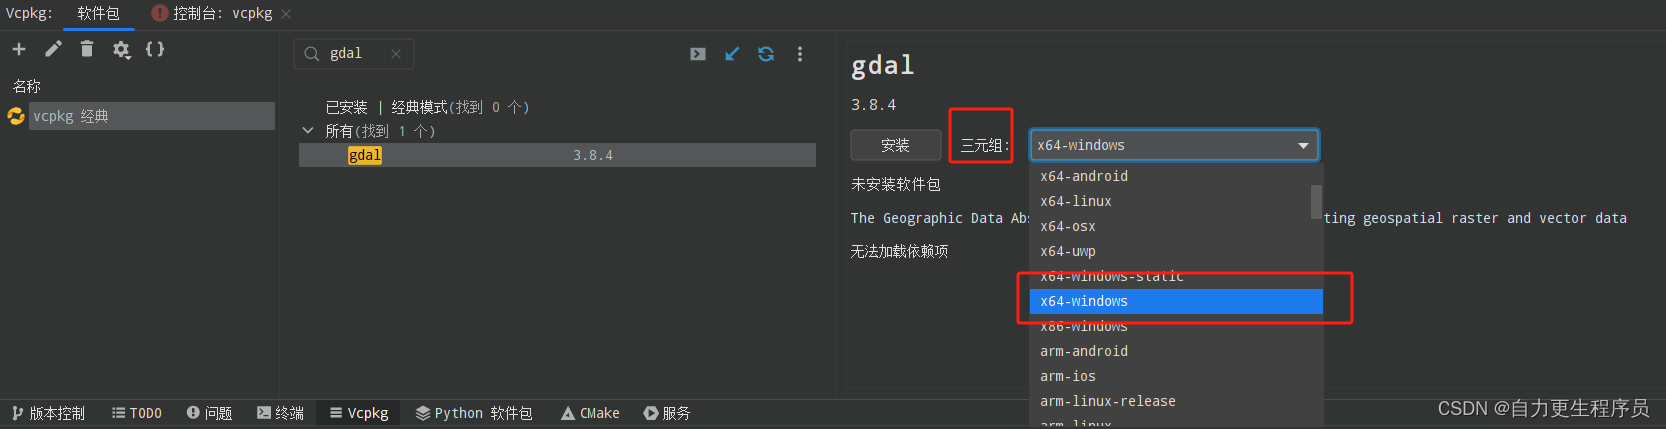
我之前就是让Vcpkg决定,然后在CMakeLists中一直无法引入GDAL,后来在CMake的 VCPKG_TARGET_TRIPLET参数中发现是 x64-windows
因为我一开始下载的三元组是 x86-mingw-dynamic我尝试过在CMakeLists中加入
set(VCPKG_TARGET_TRIPLET x64-mingw-dynamic CACHE STRING "")
来和我安装时选的三元组一样,但是不生效;总之就是要让这里的 VCPKG_TARGET_TRIPLET和三元组里面选择的一样就行了;
最后选择安装,这里的时间较长,耐心等待,只要没有停下来并且报错,就一直等,因为是上GitHub上下载源,我开启了科学上网,安装过程大约在二十分钟至四十分钟左右;
最终如果出现:
-- Performing post-build validation
Stored binaries in 1 destinations in 2.9 s.
Elapsed time to handle gdal:x64-windows: 2.6 min
gdal:x64-windows package ABI: f058557b94360b0e8cd6481205a8c62381eb7e19cfa97786cef7ab7de434dcee
Total install time: 11 min
The package GDAL provides CMake targets:

    find_package(GDAL CONFIG REQUIRED)
    target_link_libraries(main PRIVATE GDAL::GDAL)
代表安装成功
如果出现:
CMake Error at scripts/cmake/vcpkg_download_distfile.cmake:32 (message):

      Failed to download file with error: 1
      If you are using a proxy, please check your proxy setting. Possible causes are:

      1. You are actually using an HTTP proxy, but setting HTTPS_PROXY variable
         to `https://address:port`. This is not correct, because `https://` prefix
         claims the proxy is an HTTPS proxy, while your proxy (v2ray, shadowsocksr
         , etc..) is an HTTP proxy. Try setting `http://address:port` to both
         HTTP_PROXY and HTTPS_PROXY instead.

      2. If you are using Windows, vcpkg will automatically use your Windows IE Proxy Settings
         set by your proxy software. See https://github.com/microsoft/vcpkg-tool/pull/77
         The value set by your proxy might be wrong, or have same `https://` prefix issue.

      3. Your proxy's remote server is out of service.

      If you've tried directly download the link, and believe this is not a temporary
      download server failure, please submit an issue at https://github.com/Microsoft/vcpkg/issues
      to report this upstream download server failure.


Call Stack (most recent call first):
  scripts/cmake/vcpkg_download_distfile.cmake:270 (z_vcpkg_download_distfile_show_proxy_and_fail)
  ports/libspatialite/portfile.cmake:1 (vcpkg_download_distfile)
  scripts/ports.cmake:170 (include)


error: building libspatialite:x64-windows failed with: BUILD_FAILED
Elapsed time to handle libspatialite:x64-windows: 11 min
Please ensure you're using the latest port files with `git pull` and `vcpkg update`.
Then check for known issues at:
  https://github.com/microsoft/vcpkg/issues?q=is%3Aissue+is%3Aopen+in%3Atitle+libspatialite
You can submit a new issue at:
  https://github.com/microsoft/vcpkg/issues/new?title=[libspatialite]+Build+error+on+x64-windows&body=Copy+issue+body+from+D%3A%2Fdev%2Fcmake%2Fvcpkg%2Finstalled%2Fvcpkg%2Fissue_body.md
再点击一次安装,这里是网络的问题,重新安装不会从头再来,只会从失败的地方继续;
如果是:
command:
"D:\dev\cmake\bin\cmake.exe" -DVCPKG_ROOT_DIR=D:/dev/cmake/vcpkg -DPACKAGES_DIR=D:/dev/cmake/vcpkg/packages -DBUILDTREES_DIR=D:/dev/cmake/vcpkg/buildtrees -D_VCPKG_INSTALLED_DIR=D:/dev/cmake/vcpkg/installed -DDOWNLOADS=D:/dev/cmake/vcpkg/downloads -DVCPKG_MANIFEST_INSTALL=OFF -P "D:\dev\cmake\vcpkg\buildtrees\0.vcpkg_dep_info.cmake"
failed with the following results:
CMake Error: Error processing file: D:\dev\cmake\vcpkg\buildtrees\0.vcpkg_dep_info.cmake
e\vcpkg\buildtrees\0.vcpkg_dep_info.cmake"
failed with the following results:
CMake Error: Error processing file: D:\dev\cmake\vcpkg\buildtrees\0.vcpkg_dep_info.cmake
同样的也是重新安装;
最后
打开 CMakeLists.txt加入:
find_package(GDAL CONFIG REQUIRED)
target_link_libraries(gdal_test PRIVATE GDAL::GDAL)
就可以了;
测试:
#include <iostream>
#include "gdal.h"

int main() {
    std::cout << "Hello, World!" << std::endl;
    return 0;
}
没报错就ok;
大概就是这样,如果之后遇到其他问题,我会继续更新这篇博客,如果你遇到的问题和我的不一样,请在评论区留言,我尽量帮;