【1】引言
前序学习进程中,已经掌握了人脸检测的基本技巧,相关文章的学习链接为:
python学opencv|读取图像(七十一)使用cv2.CascadeClassifier()函数+detectMultiScale()函数实现图像中的人脸检测-CSDN博客
既然可以检测人脸,自然也会想到检测动物脸,本次学习的目标就是检测猫脸,为实现这个目标,需要在cv2.CascadeClassifier()函数+detectMultiScale()函数中调用新的级联分类器。
【2】级联分类器说明
为识别猫脸,需要使用的级联分类器有两个:
haarcascade_frontalcatface.xml
haarcascade_frontalcatface_extended.xml
【3】代码检测
实际上,和人脸检测一样,猫脸检测就是更换了级联分类器。
首先引入模块和图像:
import cv2 as cv  # 引入cv2模块
import numpy as np  # 引入numpy模块
import os  # 引入os模块

# 读取原始图像
src = cv.imread('mcat.png')  # 请替换为你的实际图像文件名
if src is None:
    print("无法读取图像,请检查图像路径。")
    exit()
之后定义参数矩阵:
# 定义不同的级联分类器文件路径
cascade_files = [
    r"D:\python\pythonworkspace\pythonProject2\cascades\haarcascade_frontalcatface.xml",
    r"D:\python\pythonworkspace\pythonProject2\cascades\haarcascade_frontalcatface_extended.xml",
    r"D:\python\pythonworkspace\pythonProject2\cascades\haarcascade_fullbody.xml"
    # 可以添加更多的级联分类器文件路径
]

#定义不同的缩放因子
scaleFactors=[1.15,1.5,1.8]
#定义图像存储矩阵
result_images = []
然后就通过cv2.CascadeClassifier()函数+detectMultiScale()函数中调用新的级联分类器进行猫脸检测:
# 遍历每个级联分类器文件
for cascade_file,scaleFactor in zip(cascade_files,scaleFactors):
    # 检查文件是否存在
    if not os.path.exists(cascade_file):
        print(f"级联分类器文件不存在: {cascade_file}")
        continue
    # 加载级联分类器
    facecascade = cv.CascadeClassifier(cascade_file)
    # 检查级联分类器是否成功加载
    if facecascade.empty():
        print(f"无法加载级联分类器文件: {cascade_file}")
        continue
    # 进行目标检测
    faces = facecascade.detectMultiScale(src, scaleFactor=scaleFactor)
    print(f"使用 {cascade_file} 检测到的目标数量: {len(faces)}")

    # 复制原始图像,避免修改原始图像
    result = src.copy()
    # 在检测到的目标周围绘制矩形框
    for (x, y, w, h) in faces:
        cv.rectangle(result, (x, y), (x + w, y + h), (200, 200, 55), 2)
之后给每个检测图像添加名称:
    # 获取文件名
    file_name = os.path.basename(cascade_file)

    # 在图像上方添加文件名
    text_height = int(0.1 * result.shape[0])  # 文本高度
    text_width = result.shape[1]  # 文本宽度
    text_image = np.zeros((text_height, text_width, 3), dtype=np.uint8)
    cv.putText(text_image, file_name, (int(0.2 * text_width), int(0.6 * text_height)), cv.FONT_HERSHEY_SIMPLEX, 0.58,
               (155, 100, 155), 2)
    result_with_text = cv.vconcat([text_image, result])
    result_images.append(result_with_text)
之后检测图像数量,如果是奇数个图像,就增加一个纯黑图,目的是凑成两行图像:
# 拼接所有检测结果图像
if result_images:
    num_images = len(result_images)
    if num_images % 2 != 0:
        num_images += 1
        print('num_images=', num_images)
        blank_image = np.zeros_like(src)

        # 在空白图像上方添加 "none" 文字
        text_height = int(0.1 * blank_image.shape[0])
        text_width = blank_image.shape[1]
        text_image = np.zeros((text_height, text_width, 3), dtype=np.uint8)
        cv.putText(text_image, "none", (int(0.2 * text_width), int(0.6 * text_height)), cv.FONT_HERSHEY_SIMPLEX, 0.58,
                   (155, 100, 155), 2)
        blank_image_with_text = cv.vconcat([text_image, blank_image])
        result_images.append(blank_image_with_text)

    print('num_images=', num_images)
然后进行图像拼接和显示:
    # 图像拼接
    first_row = result_images[:int(0.5 * num_images)]
    second_row = result_images[int(0.5 * num_images):num_images]

    # 水平拼接每行的图像
    h_concat_first_row = cv.hconcat(first_row)
    h_concat_second_row = cv.hconcat(second_row)

    # 垂直拼接两行的图像
    final_image = cv.vconcat([h_concat_first_row, h_concat_second_row])

    # 显示拼接后的大图
    cv.imshow('Combined Results', final_image)
    cv.imwrite('Combined Results-named.png', final_image)
    # 等待按键事件
    cv.waitKey(0)
    # 关闭所有窗口
    cv.destroyAllWindows()
else:
    print("没有有效的检测结果。")
代码运行相关的图像有:
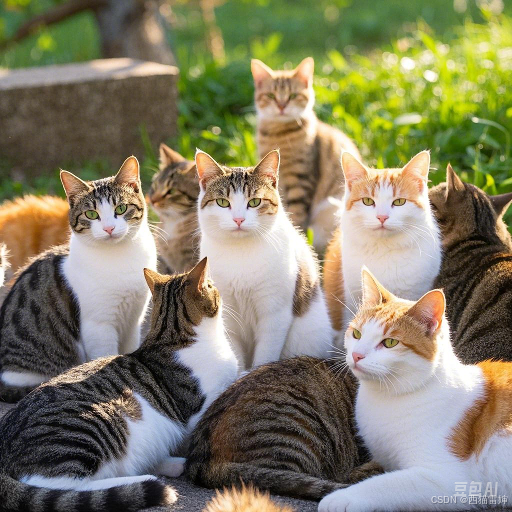
图1 初始图像
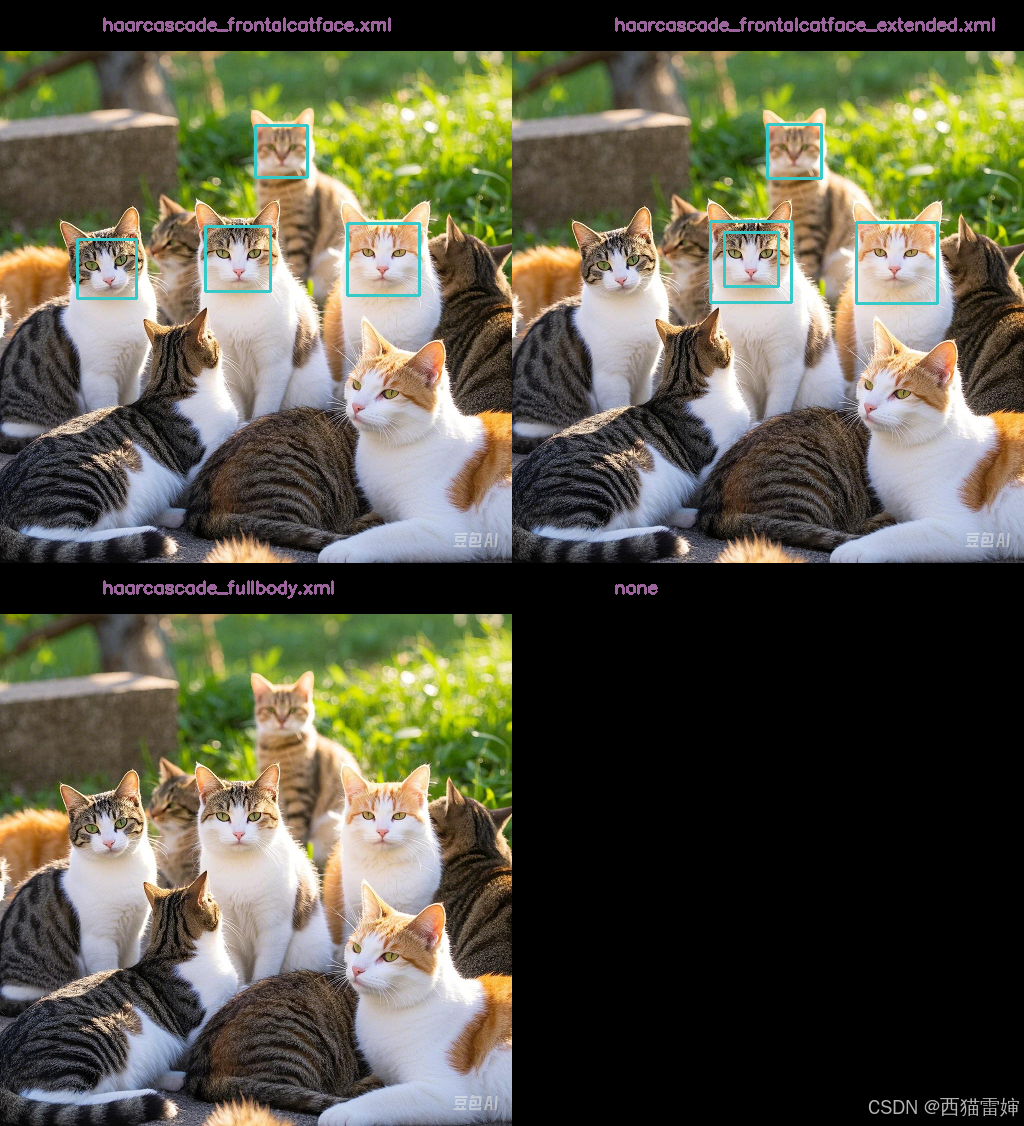
图2 猫脸检测图像
由图2可见,猫脸检测的效果随着级联分类器的不同和图像缩放因子的不同而变化。
此时具体的级联分类器和对应的图像缩放因子分别为:
| 级联分类器 | 缩放因子 |
| haarcascade_frontalcatface.xml | 1.15 |
| haarcascade_frontalcatface_extended.xml | 1.5 |
| haarcascade_fullbody.xml | 1.8 |
此时的完整代码为:
import cv2 as cv  # 引入cv2模块
import numpy as np  # 引入numpy模块
import os  # 引入os模块

# 读取原始图像
src = cv.imread('mcat.png')  # 请替换为你的实际图像文件名
if src is None:
    print("无法读取图像,请检查图像路径。")
    exit()

# 定义不同的级联分类器文件路径
cascade_files = [
    r"D:\python\pythonworkspace\pythonProject2\cascades\haarcascade_frontalcatface.xml",
    r"D:\python\pythonworkspace\pythonProject2\cascades\haarcascade_frontalcatface_extended.xml",
    r"D:\python\pythonworkspace\pythonProject2\cascades\haarcascade_fullbody.xml"
    # 可以添加更多的级联分类器文件路径
]

#定义不同的缩放因子
scaleFactors=[1.15,1.5,1.8]
#定义图像存储矩阵
result_images = []


# 遍历每个级联分类器文件
for cascade_file,scaleFactor in zip(cascade_files,scaleFactors):
    # 检查文件是否存在
    if not os.path.exists(cascade_file):
        print(f"级联分类器文件不存在: {cascade_file}")
        continue
    # 加载级联分类器
    facecascade = cv.CascadeClassifier(cascade_file)
    # 检查级联分类器是否成功加载
    if facecascade.empty():
        print(f"无法加载级联分类器文件: {cascade_file}")
        continue
    # 进行目标检测
    faces = facecascade.detectMultiScale(src, scaleFactor=scaleFactor)
    print(f"使用 {cascade_file} 检测到的目标数量: {len(faces)}")

    # 复制原始图像,避免修改原始图像
    result = src.copy()
    # 在检测到的目标周围绘制矩形框
    for (x, y, w, h) in faces:
        cv.rectangle(result, (x, y), (x + w, y + h), (200, 200, 55), 2)

    # 获取文件名
    file_name = os.path.basename(cascade_file)

    # 在图像上方添加文件名
    text_height = int(0.1 * result.shape[0])  # 文本高度
    text_width = result.shape[1]  # 文本宽度
    text_image = np.zeros((text_height, text_width, 3), dtype=np.uint8)
    cv.putText(text_image, file_name, (int(0.2 * text_width), int(0.6 * text_height)), cv.FONT_HERSHEY_SIMPLEX, 0.58,
               (155, 100, 155), 2)
    result_with_text = cv.vconcat([text_image, result])
    result_images.append(result_with_text)

# 拼接所有检测结果图像
if result_images:
    num_images = len(result_images)
    if num_images % 2 != 0:
        num_images += 1
        print('num_images=', num_images)
        blank_image = np.zeros_like(src)

        # 在空白图像上方添加 "none" 文字
        text_height = int(0.1 * blank_image.shape[0])
        text_width = blank_image.shape[1]
        text_image = np.zeros((text_height, text_width, 3), dtype=np.uint8)
        cv.putText(text_image, "none", (int(0.2 * text_width), int(0.6 * text_height)), cv.FONT_HERSHEY_SIMPLEX, 0.58,
                   (155, 100, 155), 2)
        blank_image_with_text = cv.vconcat([text_image, blank_image])
        result_images.append(blank_image_with_text)

    print('num_images=', num_images)

    # 图像拼接
    first_row = result_images[:int(0.5 * num_images)]
    second_row = result_images[int(0.5 * num_images):num_images]

    # 水平拼接每行的图像
    h_concat_first_row = cv.hconcat(first_row)
    h_concat_second_row = cv.hconcat(second_row)

    # 垂直拼接两行的图像
    final_image = cv.vconcat([h_concat_first_row, h_concat_second_row])

    # 显示拼接后的大图
    cv.imshow('Combined Results', final_image)
    cv.imwrite('Combined Results-named.png', final_image)
    # 等待按键事件
    cv.waitKey(0)
    # 关闭所有窗口
    cv.destroyAllWindows()
else:
    print("没有有效的检测结果。")
【4】细节优化
为了进一步优化图像效果,在图像上显示具体的缩放因子,需要添加一行代码:
    # 拼接文件名和 scaleFactor 信息
    info_text = f"{file_name} (sF={scaleFactor})"
此时运行后,获得图像上会标注具体的图像的缩放因子:

图3 猫脸检测图像-带图像缩放因子
然后继续修改一下图像缩放因子,修改后:
| 级联分类器 | 缩放因子 |
| haarcascade_frontalcatface.xml | 1.5 |
| haarcascade_frontalcatface_extended.xml | 1.1 |
| haarcascade_fullbody.xml | 1.6 |
此时的图像输出效果为:
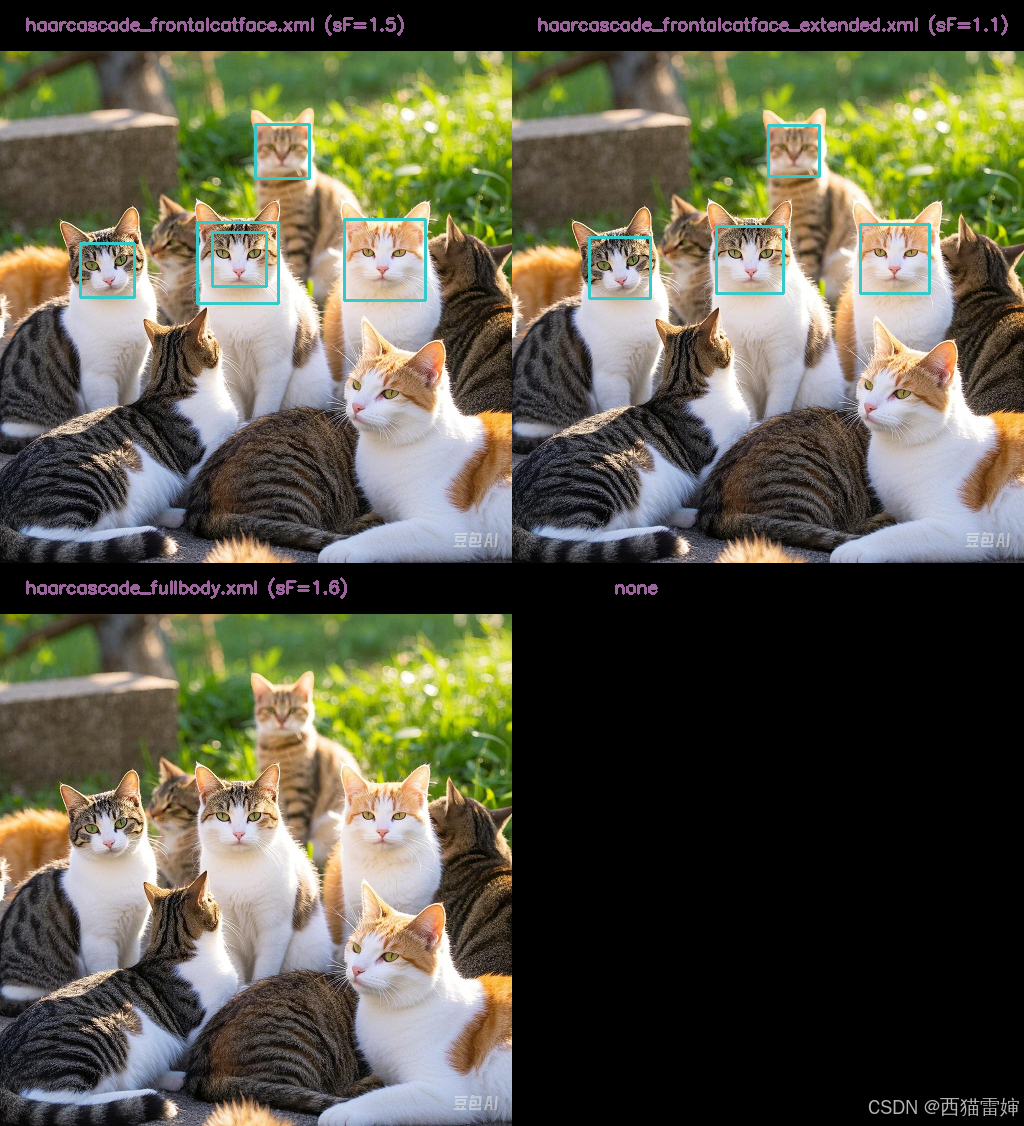
图4 猫脸检测图像-带图像缩放因子-新
根据图3和图4的猫脸检测效果,继续修改缩放因子:
| 级联分类器 | 缩放因子 |
| haarcascade_frontalcatface.xml | 1.15 |
| haarcascade_frontalcatface_extended.xml | 1.1 |
| haarcascade_fullbody.xml | 1.6 |
此时的图像输出效果为:

图5 猫脸检测图像-带图像缩放因子-更新
由图5可见,新的缩放因子下,猫脸效果检测效果较好。
经过豆包AI咨询,认为:
haarcascade_frontalcatface.xml 是基础的猫脸检测级联分类器;
haarcascade_frontalcatface_extended.xml是更高级的猫脸检测分类器,对姿态、角度更敏感。
此时的完整代码为:
import cv2 as cv  # 引入cv2模块
import numpy as np  # 引入numpy模块
import os  # 引入os模块

# 读取原始图像
src = cv.imread('mcat.png')  # 请替换为你的实际图像文件名
if src is None:
    print("无法读取图像,请检查图像路径。")
    exit()

# 定义不同的级联分类器文件路径
cascade_files = [
    r"D:\python\pythonworkspace\pythonProject2\cascades\haarcascade_frontalcatface.xml",
    r"D:\python\pythonworkspace\pythonProject2\cascades\haarcascade_frontalcatface_extended.xml",
    r"D:\python\pythonworkspace\pythonProject2\cascades\haarcascade_fullbody.xml"
    # 可以添加更多的级联分类器文件路径
]

#定义不同的缩放因子
scaleFactors=[1.15,1.1,1.6]
#定义图像存储矩阵
result_images = []


# 遍历每个级联分类器文件
for cascade_file,scaleFactor in zip(cascade_files,scaleFactors):
    # 检查文件是否存在
    if not os.path.exists(cascade_file):
        print(f"级联分类器文件不存在: {cascade_file}")
        continue
    # 加载级联分类器
    facecascade = cv.CascadeClassifier(cascade_file)
    # 检查级联分类器是否成功加载
    if facecascade.empty():
        print(f"无法加载级联分类器文件: {cascade_file}")
        continue
    # 进行目标检测
    faces = facecascade.detectMultiScale(src, scaleFactor=scaleFactor)
    print(f"使用 {cascade_file} 检测到的目标数量: {len(faces)}")

    # 复制原始图像,避免修改原始图像
    result = src.copy()
    # 在检测到的目标周围绘制矩形框
    for (x, y, w, h) in faces:
        cv.rectangle(result, (x, y), (x + w, y + h), (200, 200, 55), 2)

    # 获取文件名
    file_name = os.path.basename(cascade_file)
    # 拼接文件名和 scaleFactor 信息
    info_text = f"{file_name} (sF={scaleFactor})"

    # 在图像上方添加文件名
    text_height = int(0.1 * result.shape[0])  # 文本高度
    text_width = result.shape[1]  # 文本宽度
    text_image = np.zeros((text_height, text_width, 3), dtype=np.uint8)
    cv.putText(text_image, info_text, (int(0.05 * text_width), int(0.6 * text_height)), cv.FONT_HERSHEY_SIMPLEX, 0.58,
               (155, 100, 155), 2)
    result_with_text = cv.vconcat([text_image, result])
    result_images.append(result_with_text)

# 拼接所有检测结果图像
if result_images:
    num_images = len(result_images)
    if num_images % 2 != 0:
        num_images += 1
        print('num_images=', num_images)
        blank_image = np.zeros_like(src)

        # 在空白图像上方添加 "none" 文字
        text_height = int(0.1 * blank_image.shape[0])
        text_width = blank_image.shape[1]
        text_image = np.zeros((text_height, text_width, 3), dtype=np.uint8)
        cv.putText(text_image, "none", (int(0.2 * text_width), int(0.6 * text_height)), cv.FONT_HERSHEY_SIMPLEX, 0.58,
                   (155, 100, 155), 2)
        blank_image_with_text = cv.vconcat([text_image, blank_image])
        result_images.append(blank_image_with_text)

    print('num_images=', num_images)

    # 图像拼接
    first_row = result_images[:int(0.5 * num_images)]
    second_row = result_images[int(0.5 * num_images):num_images]

    # 水平拼接每行的图像
    h_concat_first_row = cv.hconcat(first_row)
    h_concat_second_row = cv.hconcat(second_row)

    # 垂直拼接两行的图像
    final_image = cv.vconcat([h_concat_first_row, h_concat_second_row])

    # 显示拼接后的大图
    cv.imshow('Combined Results', final_image)
    cv.imwrite('Combined Results-named.png', final_image)
    # 等待按键事件
    cv.waitKey(0)
    # 关闭所有窗口
    cv.destroyAllWindows()
else:
    print("没有有效的检测结果。")
【5】细节说明
代码中使用了zip()函数,这个函数可以把两个矩阵一一对应拼接起来,然后再依次调用参数,由此实现不同的级联分类器和scaleFactor的对应关系。
# 遍历每个级联分类器文件
for cascade_file,scaleFactor in zip(cascade_files,scaleFactors):
    # 检查文件是否存在
    if not os.path.exists(cascade_file):
        print(f"级联分类器文件不存在: {cascade_file}")
        continue
    # 加载级联分类器
    facecascade = cv.CascadeClassifier(cascade_file)
    # 检查级联分类器是否成功加载
    if facecascade.empty():
        print(f"无法加载级联分类器文件: {cascade_file}")
        continue
    # 进行目标检测
    faces = facecascade.detectMultiScale(src, scaleFactor=scaleFactor)
    print(f"使用 {cascade_file} 检测到的目标数量: {len(faces)}")

    # 复制原始图像,避免修改原始图像
    result = src.copy()
    # 在检测到的目标周围绘制矩形框
    for (x, y, w, h) in faces:
        cv.rectangle(result, (x, y), (x + w, y + h), (200, 200, 55), 2)

    # 获取文件名
    file_name = os.path.basename(cascade_file)
    # 拼接文件名和 scaleFactor 信息
    info_text = f"{file_name} (sF={scaleFactor})"
上述代码证,每个级联分类器cascade_file对应一个scaleFactor,这两个参数分别由cv.CascadeClassifier()函数和detectMultiScale()函数调用,然后通过f"{file_name} (sF={scaleFactor})"函数在输出名字的时候也是一一对应。
【6】总结
掌握了python+opencv实现通过调用cv2.CascadeClassifier()函数+detectMultiScale()函数实现对图像中的眼睛检测的技巧。