前言
随着深度学习技术的不断发展,目标检测算法在计算机视觉领域扮演着越来越重要的角色。YOLO(You Only Look Once)系列算法因其高效、实时的特点,在目标检测领域备受关注。本文旨在帮助读者深入了解如何将YOLOv11det算法与TensorRT结合,实现高效的推理过程。本文将详细介绍YOLOv11det算法如何在C++环境下实现tensorrt推理流程。通过本文的学习,读者可以掌握YOLOv11det-cpp-tensorrt推理流程的核心技术,为实际应用提供有力支持。
一、yoloV11介绍
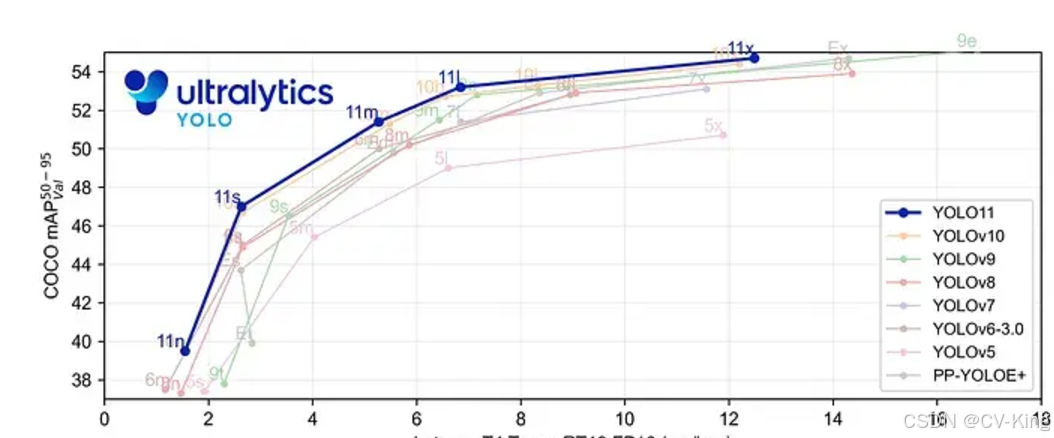
YOLO11 是 Ultralytics YOLO 系列的最新版本,结合了尖端的准确性、速度和效率,用于目标检测、分割、分类、定向边界框和姿态估计。与 YOLOv8 相比,它具有更少的参数和更好的结果,不难预见,YOLO11 在边缘设备上更高效、更快,将频繁出现在计算机视觉领域的最先进技术(SOTA)中。
主要特点:
增强的特征提取:YOLO11 使用改进的主干和颈部架构来增强特征提取,以实现更精确的目标检测和复杂任务的性能。
针对效率和速度优化:精细的架构设计和优化的训练流程在保持准确性和性能之间最佳平衡的同时,提供更快的处理速度。
更少的参数,更高的准确度:YOLO11m 在 COCO 数据集上实现了比 YOLOv8m 更高的 mAP,参数减少了 22%,提高了计算效率,同时不牺牲准确度。
跨环境的适应性:YOLO11 可以无缝部署在边缘设备、云平台和配备 NVIDIA GPU 的系统上,确保最大的灵活性。
支持广泛的任务范围:YOLO11 支持各种计算机视觉任务,如目标检测、实例分割、图像分类、姿态估计和定向目标检测(OBB)。
二、yolov11det-cpp-tensorrt推理流程
在推理阶段需要经过以下五个阶段,最终才可以输出一个可直接使用的推理结果,分别为,模型初始化,模型预热,图片转化,模型推理,后处理,经过这五个阶段后就可以将一张输入图转化为矩形框,类别标签与置信度,接下来对其进行详细介绍
2.1 模型初始化
模型初始化的目的是初始化一个基于TensorRT的YOLOv11对象检测模型。首先,打开一个包含TensorRT引擎的文件,并确保文件可以正常读取。然后,获取文件大小,并分配足够的内存来存储文件内容。接下来,将文件内容读入分配的内存中,并关闭文件。初始化TensorRT插件库后,创建一个TensorRT推理运行时实例。使用内存中的数据反序列化一个Cuda引擎,并创建一个执行上下文,用于执行推理。创建一个CUDA流,用于异步执行。获取引擎的Binding数量,并输出。遍历所有Binding,为每个Binding创建一个结构体,并设置其维度、数据类型和名称。对于输入Binding,设置最大优化形状,并添加到输入Binding列表中。对于输出Binding,获取当前Binding维度,并添加到输出绑定列表中。
代码如下:
/**
 * 构造函数:YOLOv11_det
 *
 * @param engine_file_path 指向TensorRT引擎文件路径的字符串
 *
 * 功能:初始化YOLOv11检测器,加载TensorRT引擎,并设置输入输出绑定
 *
 * 步骤:
 * 1. 打开指定的引擎文件路径,并确保文件状态良好
 * 2. 获取文件大小,并分配相应大小的内存空间
 * 3. 读取文件内容到内存中,并关闭文件
 * 4. 初始化TensorRT插件库
 * 5. 创建TensorRT推理运行时
 * 6. 反序列化Cuda引擎
 * 7. 创建执行上下文
 * 8. 创建CUDA流
 * 9. 获取绑定数量,并输出
 * 10. 遍历所有绑定,根据输入或输出类型,设置绑定信息,包括维度、数据类型和名称
 * 11. 对于输入绑定,设置最大优化形状
 * 12. 对于输出绑定,获取当前绑定维度
 *
 * 注意:该函数假定所有操作都成功执行,如果任何操作失败,程序将终止
 */
YOLOv11_det::YOLOv11_det(const std::string& engine_file_path)
{


    std::ifstream file(engine_file_path, std::ios::binary);
    assert(file.good());
    file.seekg(0, std::ios::end);
    auto size = file.tellg();
    file.seekg(0, std::ios::beg);
    char* trtModelStream = new char[size];
    assert(trtModelStream);
    file.read(trtModelStream, size);
    file.close();
    initLibNvInferPlugins(&this->gLogger, "");
    this->runtime = nvinfer1::createInferRuntime(this->gLogger);
    assert(this->runtime != nullptr);

    this->engine = this->runtime->deserializeCudaEngine(trtModelStream, size);
    assert(this->engine != nullptr);
    delete[] trtModelStream;
    this->context = this->engine->createExecutionContext();

    assert(this->context != nullptr);
    cudaStreamCreate(&this->stream);
    this->num_bindings = this->engine->getNbBindings();
    std::cout << "Binding " <<   this->num_bindings << std::endl;
    for (int i = 0; i < this->num_bindings; ++i) {


        Binding            binding;
        nvinfer1::Dims     dims;
        nvinfer1::DataType dtype = this->engine->getBindingDataType(i);
        std::string        name  = this->engine->getBindingName(i);
        binding.name             = name;
        binding.dsize            = type_to_size(dtype);

        bool IsInput = engine->bindingIsInput(i);

        if (IsInput) {


            this->num_inputs += 1;

            dims         = this->engine->getProfileDimensions(i, 0, nvinfer1::OptProfileSelector::kMAX);
            binding.size = get_size_by_dims(dims);
            binding.dims = dims;
            this->input_bindings.push_back(binding);
            // set max opt shape
            this->context->setBindingDimensions(i, dims);
        }
        else {


            dims         = this->context->getBindingDimensions(i);
            binding.size = get_size_by_dims(dims);
            binding.dims = dims;
            this->output_bindings.push_back(binding);
            this->num_outputs += 1;
        }
    }
}
2.2 模型预热
模型预热是指在深度学习模型训练过程中,为了提高训练效率和模型性能,在正式训练之前先进行一定次数的预训练。预训练的目的是让模型在训练初期快速适应数据分布,避免训练过程中的梯度消失或梯度爆炸问题,同时也有助于提高模型的泛化能力。
在代码执行过程中,首先遍历所有输入Binding,为每个Binding分配设备内存(GPU内存),并将设备指针添加到设备指针列表中。然后,遍历所有输出Binding,为每个Binding分配设备内存和主机内存(CPU内存),并将设备指针和主机指针添加到对应的列表中。执行以下步骤:执行10次推理,每次推理前为输入Binding分配主机内存,并将数据从主机内存复制到设备内存。在每次推理后释放主机内存。
代码如下:
/**
 * @brief 构建推理管道,并在需要时进行模型预热。
 *
 * @param warmup 是否进行模型预热的标志。
 *
 * 该函数的主要任务是为输入和输出绑定分配内存,并在模型预热时执行多次推理。
 *
 * 步骤:
 * 1. 遍历输入绑定,为每个绑定分配设备内存(GPU内存),并将设备指针添加到设备指针列表中。
 * 2. 遍历输出绑定,为每个绑定分配设备内存和主机内存(CPU内存),并将设备指针和主机指针添加到对应的列表中。
 * 3. 如果需要进行模型预热(warmup为true),则执行以下步骤:
 *    a. 执行10次推理,每次推理前为输入绑定分配主机内存,并将数据从主机内存复制到设备内存。
 *    b. 在每次推理后释放主机内存。
 *    c. 打印模型预热信息。
 */
void YOLOv11_det::make_pipe(bool warmup)
{


    // 为输入绑定分配设备内存
    for (auto& bindings : this->input_bindings) {


        void* d_ptr;
        CHECK(cudaMallocAsync(&d_ptr, bindings.size * bindings.dsize, this->stream));
        this->device_ptrs.push_back(d_ptr);
    }

    // 为输出绑定分配设备内存和主机内存
    for (auto& bindings : this->output_bindings) {


        void * d_ptr, *h_ptr;
        size_t size = bindings.size * bindings.dsize;
        CHECK(cudaMallocAsync(&d_ptr, size, this->stream));
        CHECK(cudaHostAlloc(&h_ptr, size, 0));
        this->device_ptrs.push_back(d_ptr);
        this->host_ptrs.push_back(h_ptr);
    }

    // 如果需要进行模型预热
    if (warmup) {


        for (int i = 0; i < 10; i++) {


            // 为输入绑定分配主机内存,并将数据从主机内存复制到设备内存
            for (auto& bindings : this->input_bindings) {


                size_t size  = bindings.size * bindings.dsize;
                void*  h_ptr = malloc(size);
                memset(h_ptr, 0, size);
                CHECK(cudaMemcpyAsync(this->device_ptrs[0], h_ptr, size, cudaMemcpyHostToDevice, this->stream));
                free(h_ptr);
            }
            // 执行推理
            this->infer();
        }
        // 打印模型预热信息
        printf("model warmup 10 times\n");
    }
}
2.3 图片转化
在通过opencv获取到Mat格式的图片后,要想对图片进行推理,首先要做的就是修改图片的大小,让图片适应网络的输入,然后将修改后的图送入GPU中准备进行推理。
修改图片:
/**
 * @brief 对输入图像进行letterbox处理,以适应网络输入尺寸。
 *
 * @param image 输入的OpenCV Mat图像。
 * @param out 输出的OpenCV Mat图像,格式为NCHW(批大小,通道数,高度,宽度)。
 * @param size 网络输入的尺寸。
 *
 * 该函数的主要任务是对输入图像进行缩放和填充,以适应网络输入尺寸,并将图像转换为NCHW格式。
 *
 * 步骤:
 * 1. 计算缩放比例,使得图像的宽度和高度不超过网络输入尺寸。
 * 2. 根据缩放比例计算填充尺寸,并对图像进行缩放。
 * 3. 计算填充位置,并将图像复制到输出图像中,同时进行填充。
 * 4. 将图像转换为NCHW格式,并将数据类型转换为浮点数。
 * 5. 保存缩放比例和填充尺寸,以便后续处理。
 */
void YOLOv11_det::letterbox(const cv::Mat& image, cv::Mat& out, cv::Size& size)
{


    const float inp_h  = size.height;
    const float inp_w  = size.width;
    float       height = image.rows;
    float       width  = image.cols;

    float r    = std::min(inp_h / height, inp_w / width);
    int   padw = std::round(width * r);
    int   padh = std::round(height * r);

    cv::Mat tmp;
    if ((int)width != padw || (int)height != padh) {


        cv::resize(image, tmp, cv::Size(padw, padh));
    }
    else {


        tmp = image.clone();
    }

    float dw = inp_w - padw;
    float dh = inp_h - padh;

    dw /= 2.0f;
    dh /= 2.0f;
    int top    = int(std::round(dh - 0.1f));
    int bottom = int(std::round(dh + 0.1f));
    int left   = int(std::round(dw - 0.1f));
    int right  = int(std::round(dw + 0.1f));

    cv::copyMakeBorder(tmp, tmp, top, bottom, left, right, cv::BORDER_CONSTANT, {

    114, 114, 114});

    out.create({

    1, 3, (int)inp_h, (int)inp_w}, CV_32F);

    std::vector<cv::Mat> channels;
    cv::split(tmp, channels);

    cv::Mat c0((int)inp_h, (int)inp_w, CV_32F, (float*)out.data);
    cv::Mat c1((int)inp_h, (int)inp_w, CV_32F, (float*)out.data + (int)inp_h * (int)inp_w);
    cv::Mat c2((int)inp_h, (int)inp_w, CV_32F, (float*)out.data + (int)inp_h * (int)inp_w * 2);

    channels[0].convertTo(c2, CV_32F, 1 / 255.f);
    channels[1].convertTo(c1, CV_32F, 1 / 255.f);
    channels[2].convertTo(c0, CV_32F, 1 / 255.f);

    this->pparam.ratio  = 1 / r;
    this->pparam.dw     = dw;
    this->pparam.dh     = dh;
    this->pparam.height = height;
    this->pparam.width  = width;
}
送入GPU:
/**
 * @brief 将处理后的图像数据复制到CUDA设备上。
 *
 * @param image 输入的OpenCV Mat图像。
 * @param size 网络输入的尺寸。
 *
 * 该代码块的主要任务是将经过letterbox处理的图像数据从主机内存复制到CUDA设备内存。
 *
 * 步骤:
 * 1. 获取输入绑定的维度信息,包括图像的宽度和高度。
 * 2. 调用letterbox函数对输入图像进行处理,得到NCHW格式的图像数据。
 * 3. 使用cudaMemcpyAsync函数将处理后的图像数据从主机内存复制到CUDA设备内存。
 *
 */
{


    cv::Mat  nchw;
    auto&    in_binding = this->input_bindings[0];
    int      width      = in_binding.dims.d[3];
    int      height     = in_binding.dims.d[2];

    this->letterbox(image, nchw, size);

    CHECK(cudaMemcpyAsync(
        this->device_ptrs[0], nchw.ptr<float>(), nchw.total() * nchw.elemSize(), cudaMemcpyHostToDevice, this->stream));
}
2.4 图片推理
在初始化模型并将图像移动到GPU之后,就需要使用TensorRT的执行上下文在GPU上启动推理任务,然后异步地将每个输出从GPU复制到CPU,最后等待所有复制操作完成。这样,CPU就可以访问推理结果并进行后续处理。
void YOLOv11_det::infer()
{


    // 使用TensorRT的执行上下文进行推理
    // enqueueV2是异步执行推理的函数,它将推理任务放入CUDA流中
    // device_ptrs.data()提供了设备指针数组的起始地址,这些指针指向输入和输出数据
    // stream是CUDA流,用于管理异步操作的执行顺序
    // nullptr表示没有提供用户提供的流回调函数
    this->context->enqueueV2(this->device_ptrs.data(), this->stream, nullptr);

    // 遍历所有输出绑定,准备将输出数据从设备内存复制到主机内存
    for (int i = 0; i < this->num_outputs; i++) {


        // 计算当前输出的总字节大小
        // size是输出张量的元素数量,dsize是每个元素的字节大小
        size_t osize = this->output_bindings[i].size * this->output_bindings[i].dsize;

        // 异步地将设备内存中的输出数据复制到主机内存
        // host_ptrs[i]是主机内存中的指针,指向接收输出数据的缓冲区
        // device_ptrs[i + this->num_inputs]是设备内存中的指针,指向当前输出的数据
        // osize是要复制的字节数
        // cudaMemcpyDeviceToHost指定了复制方向,从设备到主机
        // stream是CUDA流,用于同步复制操作
        CHECK(cudaMemcpyAsync(
            this->host_ptrs[i], this->device_ptrs[i + this->num_inputs], osize, cudaMemcpyDeviceToHost, this->stream));
    }

    // 同步CUDA流,确保所有异步操作完成
    // 这一步是必要的,因为cudaMemcpyAsync是异步操作,程序可能需要在数据复制完成之前继续执行
    // 调用cudaStreamSynchronize会阻塞当前线程,直到stream中的所有操作都完成
    cudaStreamSynchronize(this->stream);
}
2.5 后处理
后处理的算法流程为:首先,我们清空传入的对象列表 objs,以便重新填充新的检测数据。接着,我们获取输出绑定(output bindings)的维度信息,包括通道数 num_channels 和锚点数 num_anchors。然后,我们从 pparam 结构中提取图像的缩放参数 dw、dh、width、height 和 ratio。接下来,我们初始化三个向量 bboxes、scores 和 labels,用于存储边界框、分数和标签。我们将模型的输出转换为 OpenCV 矩阵 output,并进行转置以便于后续处理。我们遍历每个锚点,提取边界框坐标、分数和标签。应用分数阈值 score_thres 来过滤掉低分数的检测。对边界框进行缩放和裁剪,以适应原始图像的尺寸。将符合条件的检测存储到 bboxes、scores 和 labels 中。使用非极大值抑制(NMS)算法来过滤掉重叠的边界框,并保留得分最高的检测。根据索引 indices 和 topk 参数,将得分最高的检测添加到 objs 列表中。最终,objs 列表将包含检测到的对象及其相关信息,如边界框、概率和标签
void YOLOv11_det::postprocess(std::vector<Object>& objs, float score_thres, float iou_thres, int topk, int num_labels)
{


    // 清空对象列表,准备填充新的检测数据
    objs.clear();

    // 获取输出绑定的维度信息,包括通道数和锚点数
    int num_channels = this->output_bindings[0].dims.d[1];
    int num_anchors  = this->output_bindings[0].dims.d[2];

    // 从pparam结构中获取图像的缩放参数
    auto& dw     = this->pparam.dw;
    auto& dh     = this->pparam.dh;
    auto& width  = this->pparam.width;
    auto& height = this->pparam.height;
    auto& ratio  = this->pparam.ratio;

    // 初始化用于存储边界框、分数和标签的向量
    std::vector<cv::Rect> bboxes;
    std::vector<float>    scores;
    std::vector<int>      labels;
    std::vector<int>      indices;

    // 将模型的输出转换为OpenCV矩阵,并进行转置
    cv::Mat output = cv::Mat(num_channels, num_anchors, CV_32F, static_cast<float*>(this->host_ptrs[0]));
    output         = output.t();

    // 遍历每个锚点,提取边界框坐标、分数和标签
    for (int i = 0; i < num_anchors; i++) {


        auto  row_ptr    = output.row(i).ptr<float>();
        auto  bboxes_ptr = row_ptr;
        auto  scores_ptr = row_ptr + 4;
        auto  max_s_ptr  = std::max_element(scores_ptr, scores_ptr + num_labels);
        float score      = *max_s_ptr;
        if (score > score_thres) {


            float x = *bboxes_ptr++ - dw;
            float y = *bboxes_ptr++ - dh;
            float w = *bboxes_ptr++;
            float h = *bboxes_ptr;

            // 应用缩放和裁剪,以适应原始图像的尺寸
            float x0 = clamp((x - 0.5f * w) * ratio, 0.f, width);
            float y0 = clamp((y - 0.5f * h) * ratio, 0.f, height);
            float x1 = clamp((x + 0.5f * w) * ratio, 0.f, width);
            float y1 = clamp((y + 0.5f * h) * ratio, 0.f, height);

            // 获取标签索引
            int              label = max_s_ptr - scores_ptr;
            cv::Rect_<float> bbox;
            bbox.x      = x0;
            bbox.y      = y0;
            bbox.width  = x1 - x0;
            bbox.height = y1 - y0;

            // 将符合条件的检测存储到向量中
            bboxes.push_back(bbox);
            labels.push_back(label);
            scores.push_back(score);
        }
    }

    // 使用非极大值抑制(NMS)算法来过滤掉重叠的边界框
#ifdef BATCHED_NMS
    cv::dnn::NMSBoxesBatched(bboxes, scores, labels, score_thres, iou_thres, indices);
#else
    cv::dnn::NMSBoxes(bboxes, scores, score_thres, iou_thres, indices);
#endif

    // 根据索引和topk参数,将得分最高的检测添加到objs列表中
    int cnt = 0;
    for (auto& i : indices) {


        if (cnt >= topk) {


            break;
        }
        Object obj;
        obj.rect  = bboxes[i];
        obj.prob  = scores[i];
        obj.label = labels[i];
        objs.push_back(obj);
        cnt += 1;
    }
}
三、总结
至此我们完成了yolov11det-cpp-tensorrt推理流程,之后只需要对检测框进行绘制或者直接应用即可,如果需要全套推理代码留言。
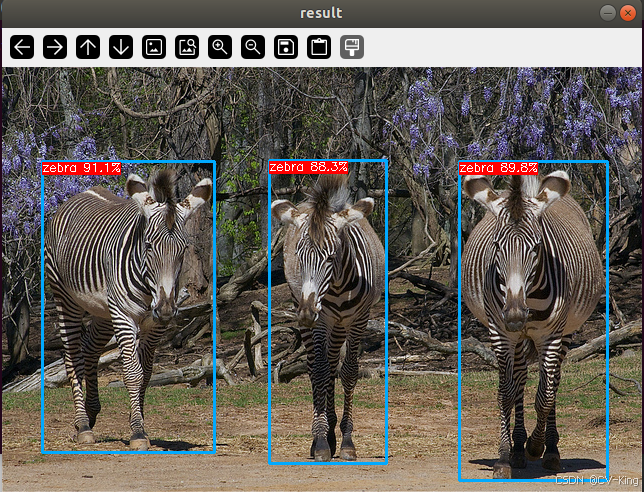
效果图: