一、引言
当今快速发展的科技环境中,人工智能(AI)已经成为推动创新和提升业务效率的关键驱动力。特别是对于那些寻求在其应用程序中集成先进AI能力的企业而言,选择合适的框架和技术栈至关重要。本文将详细介绍如何使用Spring Boot作为后端框架,并结合DeepSeek提供的机器学习模型以及Spring AI提供的抽象层,构建一个具备智能服务能力的应用程序。
二、环境搭建
Spring AI的介绍与基本使用参考:Spring AI初识:快速上手-CSDN博客
环境要求:
- JDK 17 + Spring Boot 3.x:确保开发环境兼容。
- Ollama本地客户端:官网下载
- DeepSeek-R1模型: Ollama部署DeepSeek参考:利用Ollama部署DeepSeek本地模型:从入门到实践_ollama deepseek 嵌入模型-CSDN博客
1、新建基于JDK17的Spring boot3.x的Java项目
在pom.xml配置Spring Boot 版本并添加Spring的里程碑和快照存储库。Spring Boot版本
<parent>
    <groupId>org.springframework.boot</groupId>
    <artifactId>spring-boot-starter-parent</artifactId>
    <version>3.4.0</version>
    <relativePath/>
</parent>
Spring的里程碑和快照存储库
<repositories>
  <repository>
    <id>spring-milestones</id>
    <name>Spring Milestones</name>
    <url>https://repo.spring.io/milestone</url>
    <snapshots>
      <enabled>false</enabled>
    </snapshots>
  </repository>
  <repository>
    <id>spring-snapshots</id>
    <name>Spring Snapshots</name>
    <url>https://repo.spring.io/snapshot</url>
    <releases>
      <enabled>false</enabled>
    </releases>
  </repository>
</repositories>
2、添加Spring AI的依赖管理。
Spring AI 物料清单 (BOM) 声明了给定 Spring AI 版本使用的所有依赖项的推荐版本。从应用程序的构建脚本使用 BOM 可以避免您自己指定和维护依赖项版本的需求。相反,您使用的 BOM 版本决定了使用的依赖项版本。它还确保默认情况下使用受支持和经过测试的依赖项版本,除非您选择覆盖它们。
<dependencyManagement>
    <dependencies>
        <dependency>
            <groupId>org.springframework.ai</groupId>
            <artifactId>spring-ai-bom</artifactId>
            <version>1.0.0-SNAPSHOT</version>
            <type>pom</type>
            <scope>import</scope>
        </dependency>
    </dependencies>
</dependencyManagement>
3、添加Spring AI Ollama特定组件的依赖项
本次我们通过Spring AI 的 OllamaChatModel API 支持 Ollama 聊天功能,所以我们要将Spring AI提供的Ollama依赖包添加进来
<dependency>
    <groupId>org.springframework.boot</groupId>
    <artifactId>spring-boot-starter-web</artifactId>
</dependency>

<dependency>
    <groupId>org.springframework.ai</groupId>
    <artifactId>spring-ai-ollama-spring-boot-starter</artifactId>
</dependency>
Spring AI Ollama介绍:
基本属性
前缀 spring.ai.ollama 是配置与 Ollama 连接的属性前缀。
| 属性 |
描述 |
默认值 |
| spring.ai.ollama.base-url |
运行 Ollama API 服务器的基本 URL。 |
以下是在初始化 Ollama 集成和 自动提取模型 的属性。
| 属性 |
描述 |
默认值 |
| spring.ai.ollama.init.pull-model-strategy |
是否在启动时以及如何提取模型。 |
|
| spring.ai.ollama.init.timeout |
等待模型提取的时间。 |
|
| spring.ai.ollama.init.max-retries |
模型提取操作的最大重试次数。 |
|
| spring.ai.ollama.init.chat.include |
在初始化任务中包含此类型的模型。 |
|
| spring.ai.ollama.init.chat.additional-models |
除了通过默认属性配置的模型之外,还要初始化的其他模型。 |
|
聊天属性
前缀 spring.ai.ollama.chat.options 是配置 Ollama 聊天模型的属性前缀。它包括 Ollama 请求(高级)参数,例如 model、keep-alive 和 format,以及 Ollama 模型 options 属性。
以下是 Ollama 聊天模型的高级请求参数
| 属性 |
描述 |
默认值 |
| spring.ai.ollama.chat.enabled |
启用 Ollama 聊天模型。 |
true |
| spring.ai.ollama.chat.options.model |
要使用的 受支持模型 的名称。 |
mistral |
| spring.ai.ollama.chat.options.format |
返回响应的格式。目前,唯一接受的值是 |
- |
| spring.ai.ollama.chat.options.keep_alive |
控制模型在请求后保留在内存中的时间 |
5m |
其他详细介绍请查阅官方文档:Ollama 聊天 :: Spring AI 参考 - Spring 框架
4、添加swagger等其他基本依赖
        <!-- 添加Swagger依赖 -->
        <dependency>
            <groupId>org.springdoc</groupId>
            <artifactId>springdoc-openapi-starter-webmvc-ui</artifactId>
            <version>2.2.0</version>
        </dependency>

        <dependency>
            <groupId>com.github.xiaoymin</groupId>
            <artifactId>knife4j-openapi3-jakarta-spring-boot-starter</artifactId>
            <version>4.4.0</version>
        </dependency>

        <dependency>
            <groupId>org.projectlombok</groupId>
            <artifactId>lombok</artifactId>
        </dependency>
        <!-- 添加Redis依赖 -->
        <dependency>
            <groupId>org.springframework.boot</groupId>
            <artifactId>spring-boot-starter-data-redis</artifactId>
        </dependency>
        <!-- redis 连接池  -->
        <dependency>
            <groupId>org.apache.commons</groupId>
            <artifactId>commons-pool2</artifactId>
        </dependency>

        <!-- 添加FastJSON依赖 -->
        <dependency>
            <groupId>com.alibaba</groupId>
            <artifactId>fastjson</artifactId>
            <version>1.2.83</version>
        </dependency>
5、application.yml配置
spring:
  application:
    name: ai-chat
  main:
    web-application-type: servlet
  # 添加Spring AI Ollama相关配置
  ai:
    ollama:
      base-url: http://localhost:11434
      chat:
        options:
          model: deepseek-r1:7b
          temperature: 0.7
          num-g-p-u: 1
  # 添加Swagger配置
  mvc:
    pathmatch:
      matching-strategy: ant_path_matcher
  data:
    # 添加Redis配置
    redis:
      host: YOUR_REDIS_HOST
      port: 6379
      password: YOUR_REDIS_PASS
      database: 1

server:
  port: 8080

# springdoc-openapi项目配置
springdoc:
  swagger-ui:
    path: /swagger-ui.html
    tags-sorter: alpha
    operations-sorter: alpha
  api-docs:
    path: /v3/api-docs
  group-configs:
    - group: 'default'
      paths-to-match: '/**'
      packages-to-scan: com.wanganui.controller
# knife4j的增强配置,不需要增强可以不配
knife4j:
  enable: true
  setting:
    language: zh_cn
三、聊天接口
1、基础聊天接口
在上述环境完成后,新建一个测试Controller调试环境及模型是否可用
package com.wanganui.controller;

import io.swagger.v3.oas.annotations.Operation;
import io.swagger.v3.oas.annotations.tags.Tag;
import lombok.RequiredArgsConstructor;
import org.springframework.ai.ollama.OllamaChatModel;
import org.springframework.web.bind.annotation.GetMapping;
import org.springframework.web.bind.annotation.RequestMapping;
import org.springframework.web.bind.annotation.RequestParam;
import org.springframework.web.bind.annotation.RestController;

import java.util.Map;

/**
 * @author xtwang
 * @des
 * @date 2025/2/12 下午3:52
 */
@RestController
@RequestMapping("/test/chat")
@Tag(name = "测试AI聊天")
@RequiredArgsConstructor
public class TestController {

    private final OllamaChatModel ollamaChatModel;

    @Operation(summary = "普通聊天")
    @GetMapping("/ai/generate")
    public Map<String, String> generate(@RequestParam(value = "message", defaultValue = "讲个笑话") String message) {
        return Map.of("generation", this.ollamaChatModel.call(message));
    }
}
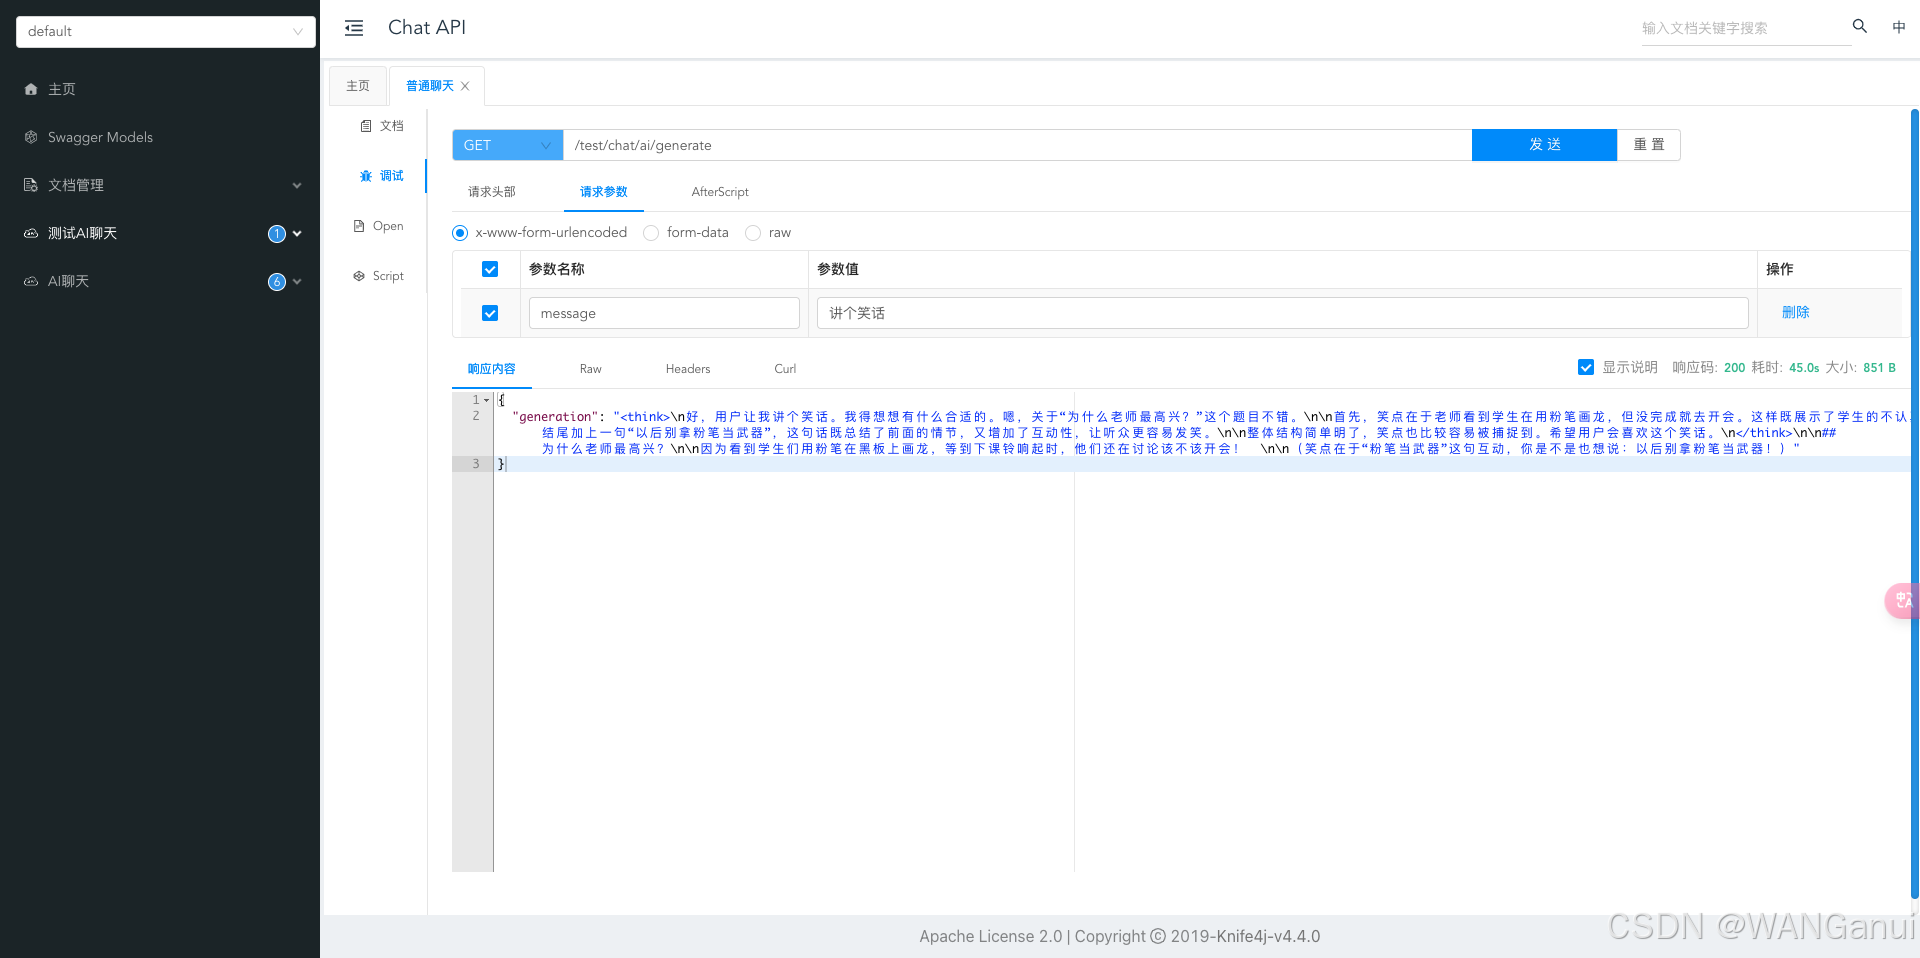
启动项目,访问项目swagger地址http://127.0.0.1:8080/doc.html,输入内容可以看到模型正常回答
2、流式输出接口
可以看到上面的接口是程序需要等待DeepSeek本地模型回答完成后才会输出答案,那么要实现像各大AI模型聊天一样的流式输出的话,需要使用Flux流,并将响应内容设置成text/event-stream(text/event-stream 是服务器发送事件(Server-Sent Events, SSE)的标准媒体类型,允许服务器向客户端推送事件流)。
Flux 是Reactor库中的一个核心类,代表一个0到N个元素的异步序列。它实现了 Publisher 接口,遵循Reactive Streams规范。Flux 可以用于处理多种类型的事件流,如网络请求、数据库查询等。其主要特点包括:
- 异步非阻塞:适合高并发场景。
- 背压支持:可以控制数据流的速度,避免过载。
- 丰富的操作符:提供了大量的操作符来转换、过滤、组合数据流。
具体代码如下:
@Operation(summary = "流式回答聊天")
@GetMapping(value = "/ai/generateStream", produces = MediaType.TEXT_EVENT_STREAM_VALUE)
public Flux<ChatResponse> generateStream(@RequestParam(value = "message", defaultValue = "讲个笑话") String message) {
    return ollamaChatModel.stream(new Prompt(new UserMessage(message)));
}
四:结论
总的来说,通过整合Spring Boot和Spring AI提供的功能,可以为应用程序赋予智能服务能力,提升用户体验和业务效率。希望本文对您有所帮助,让您在构建智能应用程序时有更清晰的思路和操作指南。
下一期将介绍如何使用ChatMemory实现聊天上下文记忆,请持续关注吧~