在本系列的上篇中,我们拿介绍了如何在亚马逊云科技(Amazon Bedrock)上集成Anthropic的Model Context Protocol(MCP),并使用Python构建MCP客户端和服务器的技术方案。文章涵盖了MCP的概念、优势、架构设计及实现流程,重点展示了如何通过MCP搭建一个智能代理系统环境的配置步骤,实现博客文章摘要生成和链接检查功能。在本系列下篇文章中我们会分享具体业务逻辑实现的源代码和步骤。欢迎大家关注小李哥,不要错过未来更多的国际前沿AI技术方案和动态
定义客户端
为了简化,我们将客户端的所有业务逻辑封装在一个类MCPClient中。
# client.py
class MCPClient:
    MODEL_ID = "anthropic.claude-3-sonnet-20240229-v1:0"

    def __init__(self):
        self.session: Optional[ClientSession] = None
        self.exit_stack = AsyncExitStack()
        self.bedrock = boto3.client(service_name='bedrock-runtime', region_name='us-east-1')

    async def connect_to_server(self, server_script_path: str):
        if not server_script_path.endswith(('.py', '.js')):
            raise ValueError("Server script must be a .py or .js file")

        command = "python" if server_script_path.endswith('.py') else "node"
        server_params = StdioServerParameters(command=command, args=[server_script_path], env=None)

        stdio_transport = await self.exit_stack.enter_async_context(stdio_client(server_params))
        self.stdio, self.write = stdio_transport
        self.session = await self.exit_stack.enter_async_context(ClientSession(self.stdio, self.write))
        await self.session.initialize()

        response = await self.session.list_tools()
        print("\nConnected to server with tools:", [tool.name for tool in response.tools])

    async def cleanup(self):
await self.exit_stack.aclose()-
self.session是我们正在建立的MCP会话对象。在本代码示例中,我们将使用标准输入/输出(stdio)与MCP交互,我们使用的工具和服务器托管在同一台机器上。 -
self.bedrock创建了一个亚马逊云科技Bedrock客户端,它提供与Amazon Bedrock运行时API交互功能,使大家可以调用converseAPI与基础模型进行通信。 -
self.exit_stack = AsyncExitStack()创建了一个上下文管理器,帮助管理多个异步资源(如网络连接和文件句柄),并在程序退出时按相反顺序自动释放它们,类似于一堆嵌套的async with语句,但更加灵活和程序化。我们将在cleanup方法中使用self.exit_stack以确保资源释放。 connect_to_server方法用于建立与通过Python或Node.js脚本创建MCP服务器的双向通信通道,使用标准输入/输出(stdio)进行消息传递,并初始化一个会话,使客户端能够发现并调用服务器脚本提供的工具。
处理查询
接下来,我们深入代码逻辑的核心代码部分。
# client.py
    def _make_bedrock_request(self, messages: List[Dict], tools: List[Dict]) -> Dict:
        return self.bedrock.converse(
            modelId=self.MODEL_ID,
            messages=messages,
            inferenceConfig={"maxTokens": 1000, "temperature": 0},
            toolConfig={"tools": tools}
        )

    async def process_query(self, query: str) -> str:
        # (1)
        messages = [Message.user(query).__dict__]
        # (2)
        response = await self.session.list_tools()

        # (3)
        available_tools = [{
            "name": tool.name,
            "description": tool.description,
            "input_schema": tool.inputSchema
        } for tool in response.tools]

        bedrock_tools = Message.to_bedrock_format(available_tools)

        # (4)
        response = self._make_bedrock_request(messages, bedrock_tools)

        # (6)
        return await self._process_response( # (5)
          response, messages, bedrock_tools
)_make_bedrock_request方法是一个私有辅助方法,它向Amazon Bedrock的ConverseAPI发送请求,传递对话历史(messages)、可用工具,以及模型配置参数(如token限制和temperature等),从基础模型中获取下一轮对话的响应。我们将在多个方法中使用这个方法。process_query方法负责处理和编排整个查询流程:- 从用户的问题中创建一条消息
- 获取连接服务器上可用的工具
- 格式化这些工具,使其符合Bedrock的API格式
- 使用用户问题和可用工具向Bedrock发送请求
- 处理响应,可能需要多轮对话(如果涉及到外部工具的调用)
- 返回最终的响应
这个方法是处理用户查询的入口,用户管理用户、工具和基础模型之间的对话流程。接下来我们将深入了解对话是如何进行的。
循环对话
以下代码实现了一个对话循环,处理来自用户发送的和Bedrock返回的各种请求。让我们详细介绍它的工作原理:
# client.py
   async def _process_response(self, response: Dict, messages: List[Dict], bedrock_tools: List[Dict]) -> str:
        # (1)
        final_text = []
        MAX_TURNS=10
        turn_count = 0

        while True:
            # (2)
            if response['stopReason'] == 'tool_use':
                final_text.append("received toolUse request")
                for item in response['output']['message']['content']:
                    if 'text' in item:
                        final_text.append(f"[Thinking: {item['text']}]")
                        messages.append(Message.assistant(item['text']).__dict__)
                    elif 'toolUse' in item:
                        # (3)
                        tool_info = item['toolUse']
                        result = await self._handle_tool_call(tool_info, messages)
                        final_text.extend(result)

                        response = self._make_bedrock_request(messages, bedrock_tools)
            # (4)
            elif response['stopReason'] == 'max_tokens':
                final_text.append("[Max tokens reached, ending conversation.]")
                break
            elif response['stopReason'] == 'stop_sequence':
                final_text.append("[Stop sequence reached, ending conversation.]")
                break
            elif response['stopReason'] == 'content_filtered':
                final_text.append("[Content filtered, ending conversation.]")
                break
            elif response['stopReason'] == 'end_turn':
                final_text.append(response['output']['message']['content'][0]['text'])
                break

            turn_count += 1

            if turn_count >= MAX_TURNS:
                final_text.append("\n[Max turns reached, ending conversation.]")
                break
        # (5)
        return "\n\n".join(final_text)
_process_response方法初始化了一个最大10轮的对话(MAX_TURNS),并用final_text追踪大语言模型的响应内容。- 当模型请求使用工具时,它会处理CoT思考步骤(文本)和工具执行步骤(
toolUse)。 - 在调用工具时,该方法也会调用工具处理器,并使用工具返回的结果向Bedrock发送新请求。请记住,我们的工具是托管在本地MCP服务器上的。
- 此外该方法会处理各种终止条件(如最大token限制、内容过滤、停止序列、对话结束等),在合适的时候追加消息并终止循环。
- 最后它会将多轮荻花累积的文本用换行符连接起来,并返回完整的对话历史。
处理工具请求
# client.py

    async def _handle_tool_call(self, tool_info: Dict, messages: List[Dict]) -> List[str]:
        # (1)
        tool_name = tool_info['name']
        tool_args = tool_info['input']
        tool_use_id = tool_info['toolUseId']

        # (2)
        result = await self.session.call_tool(tool_name, tool_args)

        # (3)
        messages.append(Message.tool_request(tool_use_id, tool_name, tool_args).__dict__)
        messages.append(Message.tool_result(tool_use_id, result.content).__dict__)

        # (4)
return [f"[Calling tool {tool_name} with args {tool_args}]"]_handle_tool_call方法用于大模型要执行工具请求,它从提供的信息中提取工具名称、参数和ID。- 它通过Session的会话接口调用工具,并等待其返回结果。
- 该方法会将工具请求和结果都记录到对话历史中。这样可以让Bedrock知道,我们的对话过程中还涉及了一个外部工具(即运行在本地机器上的工具)。
- 最终它会返回一个格式化的消息,指明调用了哪个工具,使用了哪些参数。
这个方法本质上是模型的调用工具请求(来自Bedrock)和实际工具执行系统(运行在本机)之间的桥梁。
与MCPserver对话聊天测试
chat_loop方法创建了一个简单的交互式命令行界面,它会不断接受用户输入,通过MCP服务器系统处理用户查询,并显示大模型最终的响应,直到用户输入quit或发生错误时停止。
# client.py

    async def chat_loop(self):
        print("\nMCP Client Started!\nType your queries or 'quit' to exit.")
        while True:
            try:
                query = input("\nQuery: ").strip()
                if query.lower() == 'quit':
                    break
                response = await self.process_query(query)
                print("\n" + response)
            except Exception as e:
                print(f"\nError: {str(e)}")
主函数代码部分
# client.py
async def main():
    if len(sys.argv) < 2:
        print("Usage: python client.py <path_to_server_script>")
        sys.exit(1)

    client = MCPClient()
    try:
        await client.connect_to_server(sys.argv[1])
        await client.chat_loop()
    finally:
        await client.cleanup()

if __name__ == "__main__":
asyncio.run(main())在主函数部分我们验证了命令行参数,并初始化一个MCP客户端,用到连接到指定的服务器。然后,我们在异步上下文中运行聊天循环,并通过Python的asyncio来管理异步执行流程,确保资源得到正确释放。
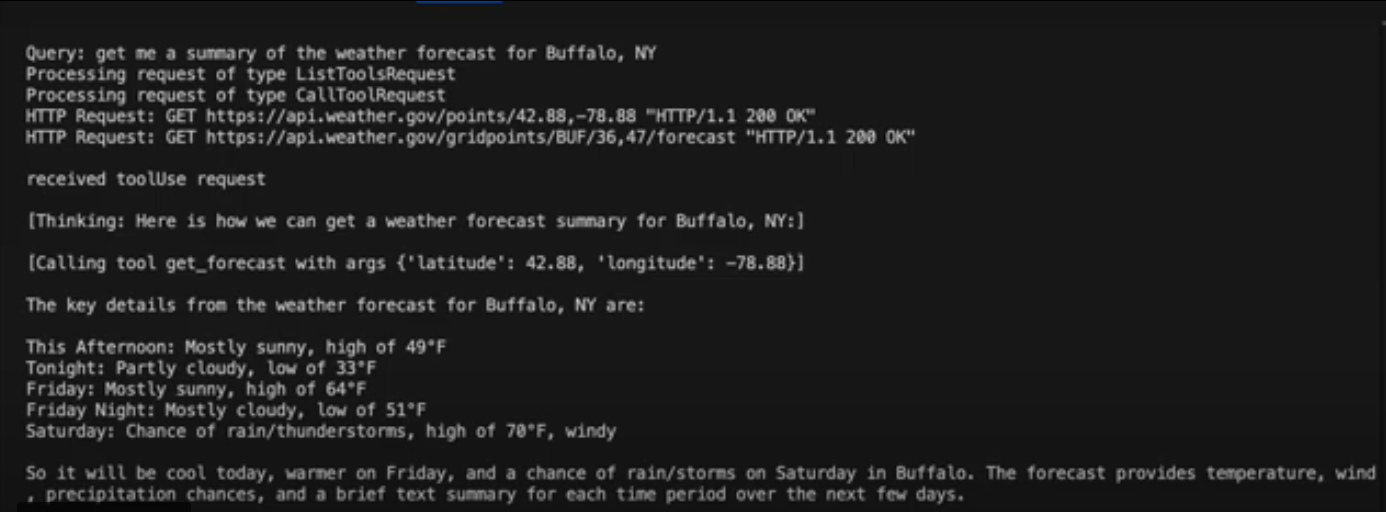
实验结果展示
这里有一个演示视频,展示了我们构建的客户端如何与天气工具交互,这是Anthropic发布的官方教程的一部分。
我们将分别测试瑞安两个工具:
- 天气警报工具:帮助我们获取美国某个州的天气警报
示例输入:"get me a summary of the weather alerts in California" - 天气预报工具:帮助我们获取美国某个城市的天气预报
示例输入:"get me a summary of the weather forecast for Buffalo, NY"
运行对话主文件
在命令行中使用uv运行client.py,不要忘记添加工具存放的路径。
uv run client.py ../weather/weather.py用MCP自动化博客文章审核
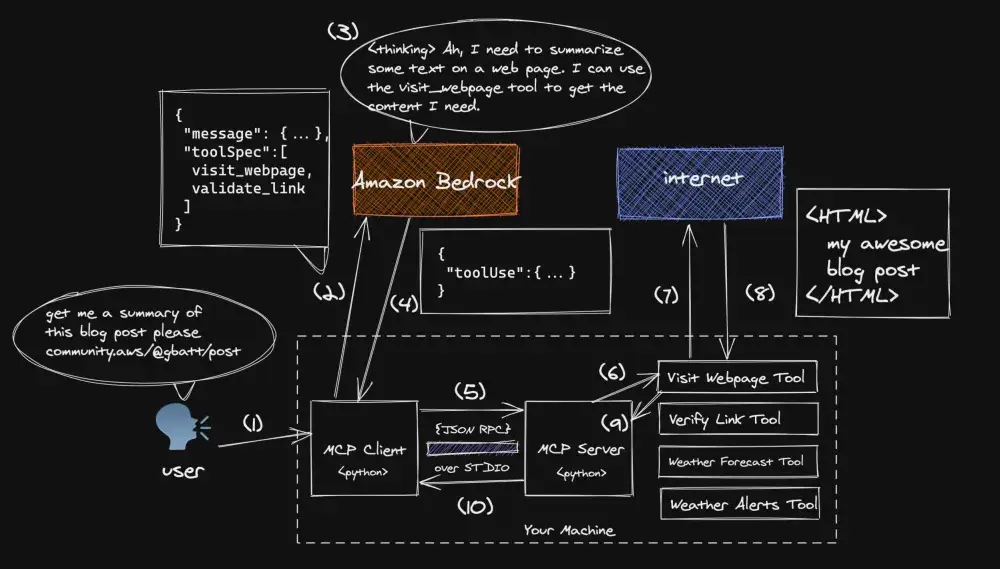
现在我们已经搭建好了MCP客户端和服务器,可以开始解决真实的业务场景的需求了。在本示例中我们将构建自定义外部API调用工具,为大语言模型提供网页浏览能力。
更新MCP服务器非常简单,只需向服务器文件添加新函数,或者创建一个新的服务器文件即可。在本示例中,我们将在现有服务器文件中添加几个非常强大的功能,并展示Claude如何智能地将它们组合起来执行任务。在编写代码之前,请确保切换到MCP服务器文件夹,并安装额外的依赖项。
cd ../weather
uv add requests markdownify
访问网页
我们为大语言模型提供了一个定义工具的HTTP客户端,以访问网页并提取其中的Markdown内容。
# wheather.py (I know, I know...)

import re
import requests
from markdownify import markdownify
from requests.exceptions import RequestException

@mcp.tool()
def visit_webpage(url: str) -> str:
    """Visits a webpage at the given URL and returns its content as a markdown string.

    Args:
        url: The URL of the webpage to visit.

    Returns:
        The content of the webpage converted to Markdown, or an error message if the request fails.
    """
    try:
        # Send a GET request to the URL
        response = requests.get(url, timeout=30)
        response.raise_for_status()  # Raise an exception for bad status codes

        # Convert the HTML content to Markdown
        markdown_content = markdownify(response.text).strip()

        # Remove multiple line breaks
        markdown_content = re.sub(r"\n{3,}", "\n\n", markdown_content)

        return markdown_content

    except RequestException as e:
        return f"Error fetching the webpage: {str(e)}"
    except Exception as e:
        return f"An unexpected error occurred: {str(e)}"
visit_webpage函数定义的就是API调用工具,它使用HTTP GET请求从指定URL获取内容,并将获取的HTML内容转换为更清晰的Markdown格式,去除多余的换行符,并处理边缘情况。该函数还包含全面的错误处理,以应对网络问题和意外错误,并在出现问题时返回适当的错误消息。
链接有效性验证
validate_links函数用于接收一个URL列表,并检查每个URL是否是有效、可访问的网页。它会对每个URL执行HTTP GET请求,并根据请求是否成功且返回的内容是否为空来判断链接是否有效。该函数返回一个“URL-有效性”键值对列表,其中每个键值对为URL及其有效性(布尔值),同时函数中包含对网络错误和一般异常的处理逻辑。
# weather.py
@mcp.tool()
def validate_links(urls: list[str]) -> list[str, bool]:
    """Validates that the links are valid webpages.

    Args:
        urls: The URLs of the webpages to visit.

    Returns:
        A list of the url and boolean of whether or not the link is valid.
    """
    output = []
    for url in urls:
        try:
            # Send a GET request to the URL
            response = requests.get(url, timeout=30)
            response.raise_for_status()  # Raise an exception for bad status codes
            print('validateResponse',response)
            # Check if the response content is not empty
            if response.text.strip():
                output.append([url, True])
            else:
                output.append([url, False])
        except RequestException as e:
            output.append([url, False])
            print(f"Error fetching the webpage: {str(e)}")
        except Exception as e:
            output.append([url, False])
            print(f"An unexpected error occurred: {str(e)}")
    return output
进一步增强工具能力
最令我印象深刻的是即使没有明显提前安排,Claude依然能够规划并组合这些工具以实现复杂的任务。在本示例中我们的MCP系统首先下载了网页内容,然后提取所有链接,验证所有链接的有效性,并最终返回一个总结给用户。

总结
这篇技术文档详细介绍了如何使用MCP客户端和服务器处理自然语言查询、调用本地工具、进行多轮对话以及添加更多大模型Agent外部API调用工具,用于博客文章有效性审核。大家可以根据自身需求,扩展MCP服务器的功能,让基础模型在更多场景中发挥更大作用!