在系列上篇中,我们介绍了AI代理的核心逻辑和代码模块。在本篇中,我们将继续介绍如何为AI代理定义明确的AI模型输入/输出结构,并创建一个有记忆功能的AI代理。文接上回,我们继续介绍!
代理结构介绍(Agent Structure)
通常大型语言模型(LLM)需要通过API调用生成回复,因此输入和输出都必须遵循特定的数据结构。在Python中比较常用的数据有效性的验证编程库叫Pydantic,它可以确保AI应用使用的数据符合正确的API格式,并且数据值符合我们的要求。
该库的主要作用就是是将LLM的响应(通常是不稳定的)转换为格式化的Agent响应,它是一种经过结构化和验证的数据形式(如下图)。

首先我们需要创建一个描述所需数据的类,包括数据类型以及任何必须遵循的约束条件。Pydantic会检查数据是否符合这些约束条件,如果不符合,它会返回清晰的错误信息。这一点尤为重要,因为大语言模型的响应在每次运行时可能会有所不同、随机变化。输出的格式转换,我们可以通过如下的代码实现。
from pydantic import BaseModel #this is the standard class

# Taking for example the last LLM response, I want this structure:
# {tool_name: 'tool_browser',
#  tool_input: {'q':'September 9 2024 deaths'},
#  tool_output: str( tool_browser({'q':'September 9 2024 deaths'})) }

class AgentRes(BaseModel):
    tool_name: str  #<--must be a string = 'tool_browser'
    tool_input: dict #<--must be a dictionary = {'q':'September 9 2024 deaths'}
    tool_output: str | None = None #can be a string or None, default = None

    @classmethod
    def from_llm(cls, res:dict): #<--return the class itself
        try:
            out = json.loads(res["message"]["content"])
            return cls(tool_name=out["name"], tool_input=out["parameters"])
        except Exception as e:
            print(f"Error from Ollama:\n{res}\n")
            raise e

# test
agent_res = AgentRes.from_llm(llm_res)
print("from\n", llm_res["message"]["content"], "\nto")
agent_res
响应输出如下:

接下来Agent通过转换后的输出调用工具,可以通过这样的代码实现:
# test the tool output
AgentRes(tool_name = "tool_browser",
         tool_input = {'q':'September 9 2024 deaths'},
         tool_output = str( tool_browser({'q':'September 9 2024 deaths'})) )
获得以下的输出内容:
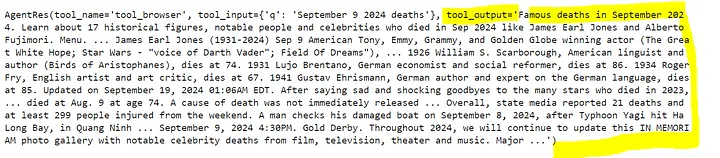
从上述的输出结果可以看出模型已经可以理解什么条件下,以及如何使用外部的工具,但我们还可以通过添加记忆系统(Memory System)让它变得更智能。记忆系统将包括来自聊天历史的相关信息,以及用户最初请求的存储在Agent中,用于后续和用户的交互上下文。大家可以通过下面的代码来实现Agent的记忆功能。
'''
Messages in Memory will have this structure:
[{'role':'assistant', 'content':'{"name":"final_answer", "parameters":{"text":"How can I assist you today?"}}'},
 {'role':'user', 'content':None}]
'''

def save_memory(lst_res:list[AgentRes], user_q:str) -> list:
    ## create
    memory = []
    for res in [res for res in lst_res if res.tool_output is not None]:
        memory.extend([
            ### assistant message
            {"role": "assistant", "content": json.dumps({"name":res.tool_name, "parameters":res.tool_input})},
            ### user message
            {"role":"user", "content":res.tool_output}
        ])

    ## add a reminder of the original goal
    if memory:
        memory += [{"role":"user", "content":(f'''
                This is just a reminder that my original query was `{user_q}`.
                Only answer to the original query, and nothing else, but use the information I gave you.
                Provide as much information as possible when you use the `final_answer` tool.
                ''')}]
    return memory
对于过去的聊天历史,我们还可以添加一段预先定义的对话内容,以定义我们这次对话的目的,以确保Agent理解我们的需求。
history=[{"role": "user", "content": "hi there, how are you?"},
         {"role": "assistant", "content": "I'm good, thanks!"},
         {"role": "user", "content": "I have a question"},
         {"role": "assistant", "content": "tell me"}]
现在我们可以将所有内容整合在一起,创建一个具有记忆功能的Agent的完整代码如下:
def run_agent(user_q:str, chat_history:list[dict], lst_res:list[AgentRes], lst_tools:list) -> AgentRes:
    ## start memory
    memory = save_memory(lst_res=lst_res, user_q=user_q)

    ## track used tools
    if memory:
        tools_used = [res.tool_name for res in lst_res]
        if len(tools_used) >= len(lst_tools):
            memory[-1]["content"] = "You must now use the `final_answer` tool."

    ## messages
    messages = [{"role":"system", "content":prompt+"\n"+prompt_tools},
                *chat_history,
                {"role":"user", "content":user_q},
                *memory]
    pprint(messages) #<--print to see prompt + tools + chat_history

    ## output
    llm_res = ollama.chat(model=llm, messages=messages, format="json")
    return AgentRes.from_llm(llm_res)


# test
agent_res = run_agent(user_q=q, chat_history=chat_history, lst_res=[], lst_tools=dic_tools.keys())
print("\nagent_res:", agent_res)
Agent的输出内容如下:
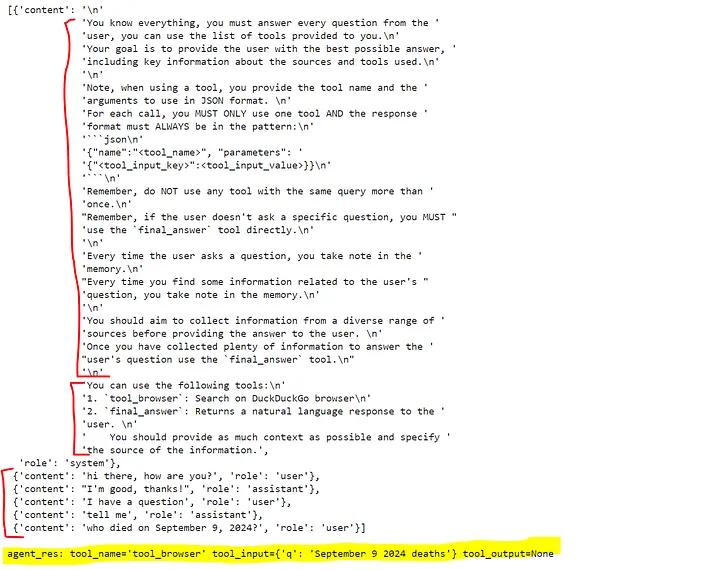
如大家所见,我们的Agent的创建是由提示词(prompt)+ 可用工具(tools)+ 聊天历史(chat history) 共同组成的。
Agent图形工作流(Graph Workflow)
LangGraph是一个工作流编排框架,可以更精细地控制Agent执行的工作流。其核心概念之一是状态(State),每次执行都会创建一个包含状态信息的字典(dictionary),并在工作流的节点之间传递该状态,每个节点的输出都会更新该状态。
我们使用Python的Typing库来定义初始状态的数据类型,如下方的代码。
import typing

class State(typing.TypedDict):
    user_q: str
    chat_history: list
    lst_res: list[AgentRes]
    output: dict

# test
state = State({"user_q":q, "chat_history":chat_history, "lst_res":[agent_res], "output":{}})
state
代码运行的输出如下:

对于图形工作流中的每个节点(Agent和调用工具)以及每条边(Agent下一步执行的方向),我们都需要编写一个函数来定义模型的行为。首先我们先定义Agent节点:
# Agent
def node_agent(state):
    print("--- node_agent ---")
    agent_res = run_agent(prompt=prompt,
                          dic_tools={k:v for k,v in dic_tools.items() if k in ["tool_browser","final_answer"]},
                          user_q=state["user_q"],
                          chat_history=state["chat_history"],
                          lst_res=state["lst_res"])
    print(agent_res)
    return {"lst_res":[agent_res]} #<--must return a the list of agent_res

# test
node_agent(state)
Agent的初始化状态的输出如下:
![]()
然后我们为工具节点执行相同的初始化定义:
def node_tool(state):
    print("--- node_tool ---")
    res = state["lst_res"][-1]
    print(f"{res.tool_name}(input={res.tool_input})")

    agent_res = AgentRes(tool_name=res.tool_name,
                         tool_input=res.tool_input,
                         tool_output=str(dic_tools[res.tool_name](res.tool_input)) )

    return {"output":agent_res} if res.tool_name == "final_answer" else {"lst_res":[agent_res]}

# test
node_tool(state)
得到输出如下:
![]()
工作流中的边(Edges),也就是Agent下一步执行的方向有两种类型:
-
条件边(Conditional Edge) —— 调用一个函数来决定下一个执行的节点(例如,Agent来决定是否调用工具)。
-
普通边(Normal Edge) —— 直接从一个节点跳转到另一个节点(例如,从外部工具的输出返回到Agent)。
举一个条件边的代码示例:
def conditional_edges(state):
    print("--- conditional_edges ---")
    last_res = state["lst_res"][-1]
    next_node = last_res.tool_name if isinstance(state["lst_res"], list) else "final_answer"
    print("next_node:", next_node)
    return next_node #<--must return the next node to go

# test
conditional_edges(state)
根据Agent的输入判断出,下一个执行的节点为tool_browser:
![]()
最后,我们通过以下代码创建一个完整工作流并可视化整个图形流程。
from langgraph.graph import StateGraph, END
## start the graph
workflow = StateGraph(State)
## add Agent node
workflow.add_node(node="Agent", action=node_agent)
workflow.set_entry_point(key="Agent") #<--user query
## add Tools nodes
for k in dic_tools.keys():
workflow.add_node(node=k, action=node_tool)
## conditional_edges from Agent
workflow.add_conditional_edges(source="Agent", path=conditional_edges)
## normal_edges to Agent
for k in dic_tools.keys():
if k != "final_answer":
workflow.add_edge(start_key=k, end_key="Agent")
## end the graph
workflow.add_edge(start_key="final_answer", end_key=END)
g = workflow.compile()
## plot
from IPython.display import Image, display
from langchain_core.runnables.graph import MermaidDrawMethod
display(Image(
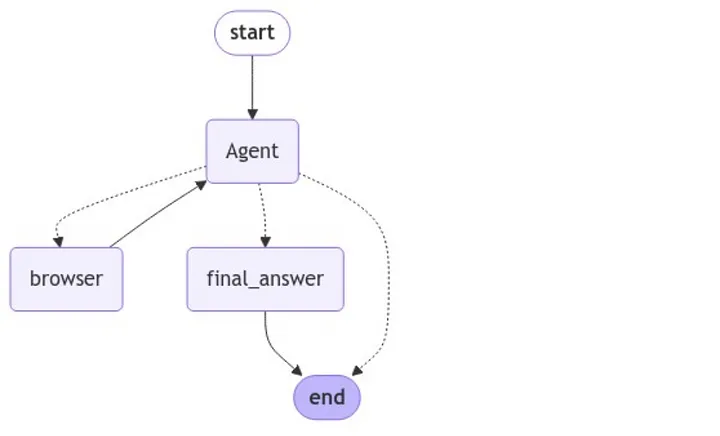
g.get_graph().draw_mermaid_png(draw_method=MermaidDrawMethod.API)
))输出的可视化的图形工作流如下:
在启动Agent工作流时,必须传入初始状态作为输入。大家可以通过两种不同的方式(一次性运行和流式运行)启动Agent:
state = {'user_q':q,
         'chat_history':chat_history,
         'lst_res':[],
         'output':{} }

## 1) invoke function
out = g.invoke(input=state)
agent_out = out['output'].tool_output

## 2) stream function
steps = g.stream(input=state)
for n,step in enumerate(steps):
    print("--- step", n, "---")
    print(step)
两种不同方式都可以得到如下的输出:

通过本文的讲解,我们成功构建了一个具备记忆能力的 AI 代理,并利用LangGraph构建了完整的工作流,使其能够更灵活地调用工具并进行决策。整个系统通过提示词(prompt)+ 工具(tools)+ 聊天历史(chat history)的组合,让AI代理具备了上下文理解能力,并能根据不同的输入动态调整执行路径。希望这篇文章能为大家在 AI 代理的开发中带来启发,让 AI 变得更加智能、高效。本系列最后一章,我们将介绍多智能体的技术解决方案,大家快关注我,不要错过更多海外前沿AI方案和技术分享。