引言
在 Android 开发中,布局是 UI 构建的核心,而选择合适的布局类型对应用的表现和性能至关重要。除了常见的 LinearLayout 和 RelativeLayout,Android 还提供了一个特殊的布局类型——TableLayout,它用于将子视图按表格的形式进行排列。这种布局方式非常适合需要行列展示的场景,比如表单、计算器界面或者数据列表等。
与传统的线性布局(LinearLayout)相比,TableLayout让你能够更加直观地管理视图的行列排列。通过灵活的设置和精确的控制,TableLayout 不仅能确保控件有序排列,还能在复杂布局中提高代码的可读性和可维护性。在本文中,我们将详细介绍 TableLayout的基本概念、常用属性、以及如何在实际项目中高效地使用它。
TableLayout 的基本概念
TableLayout 是一种基于表格模型的布局容器,用于将子视图按行列的形式排列。TableLayout 的核心思想是将视图按“表格”的方式组织,每一行由 TableRow 容器承载,而 TableRow内的控件则按列排列。
在 TableLayout 中,所有的子视图都被组织为若干行,每一行中可以包含多个列。通过这种方式,开发者可以轻松地创建出结构化的布局,适用于表单、数据展示以及其他需要表格样式的界面。
与传统的布局方式相比,TableLayout 的排列方式较为直观,每行控件的宽度和高度会根据它们所处的位置自动调整,而不需要开发者手动指定位置。为了进一步控制布局,TableLayout 提供了一些特有的属性,比如设置某些列的伸缩、收缩,或者设置列的隐藏等功能。
与 LinearLayout 的单一排列方式不同,TableLayout 使得多个视图在同一行和列中进行组织,适合需要列对齐的复杂布局。通过这种方式,开发者不仅能够提高布局的可读性,还能更加高效地管理 UI 组件。
TableLayout 的常用属性
TableLayout 提供了多种属性来帮助开发者精确控制子视图的排列和布局。掌握这些属性的使用,可以使我们在开发中更加高效地创建符合需求的界面。以下是一些常用的属性:
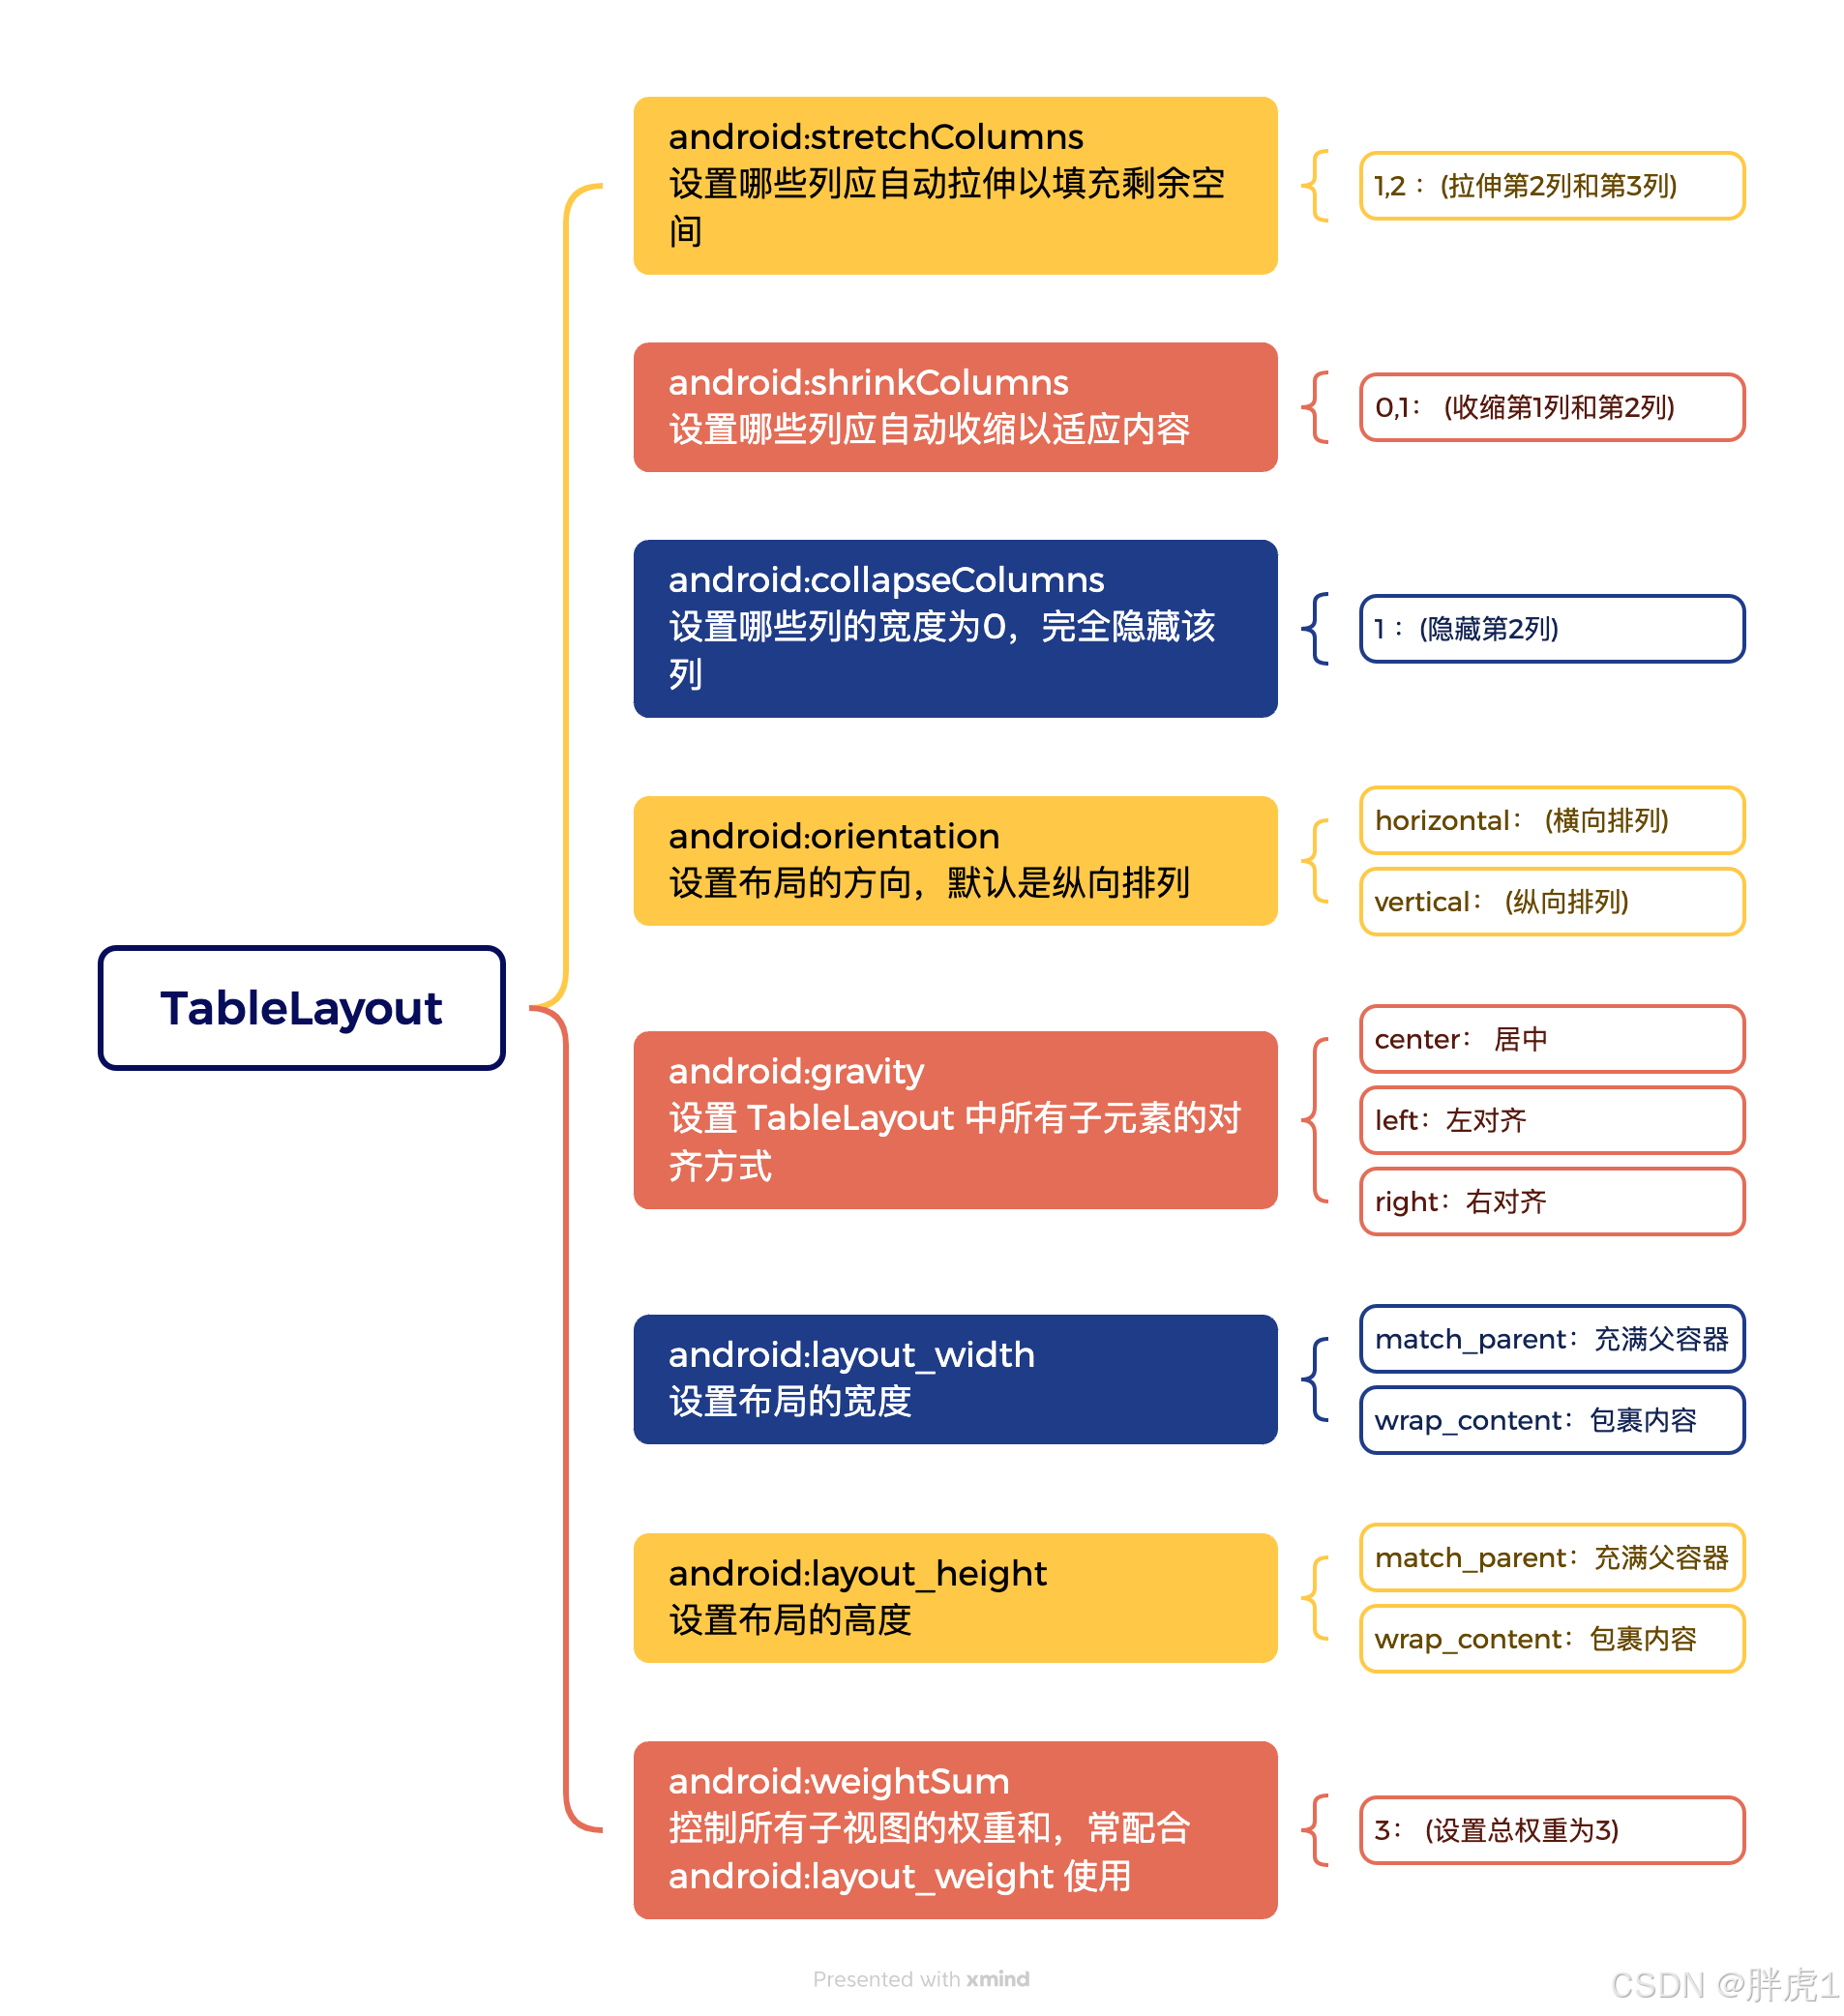
1. android: stretchColumns
这个属性允许我们指定哪些列应该自动拉伸以填充剩余的空间。当表格的列宽不固定时,可以通过设置该属性来确保特定列占据更多空间。例如:
<TableLayout
android:stretchColumns="1,2"
android:layout_width="match_parent"
android:layout_height="wrap_content">
<!-- 子视图 -->
</TableLayout>
在这个例子中,android:stretchColumns="1,2",表示第二列和第三列将自动拉伸,以填充剩余的空间。
2. android:shrinkColumns
这个属性与android:stretchColumns类似但它的作用是控制哪些列应该自动收缩以适应内容。例如,如果某些列内容较少,我们希望它们收缩以节省空间,就可以使用这个属性:
<TableLayout
android:shrinkColumns="0,1"
android:layout_width="match_parent"
android:layout_height="wrap_content">
<!-- 子视图 -->
</TableLayout>
这里,android:shrinkColumns="0,1"表示第一列和第二列在需要时会收缩。
3. android:collapseColumns
这个属性允许我们指定某些列在显示时完全被隐藏(宽度为0)。对于一些不需要显示的列,可以使用此属性来避免占用空间,从而使布局更加紧凑:
<TableLayout
android:collapseColumns="1"
android:layout_width="match_parent"
android:layout_height="wrap_content">
<!-- 子视图 -->
</TableLayout>
在此示例中,android:collapseColumns="1"表示第二列将完全被隐藏。
4. android:orientation
TableLayout 的排列方向是由 android:orientation 属性决定的。尽管 TableLayout 默认按纵向排列子视图,但仍然可以显式设置这个属性来决定排列方向:
<TableLayout
android:orientation="horizontal"
android:layout_width="match_parent"
android:layout_height="wrap_content">
<!-- 子视图 -->
</TableLayout>
将 android:orientation 设置为horizontal后,所有的 TableRow会横向排列子控件。
5. android:layout_width和android:layout_height
与其他布局一样,TableLayout也使用android:layout_width和android:layout_height来定义布局的尺寸,通常,我们会将其设置为 match_parent或wrap_content,以便布局根据子视图的内容或父视图的尺寸来调整:
<TableLayout
android:layout_width="match_parent"
android:layout_height="wrap_content">
<!-- 子视图 -->
</TableLayout>
6. android:weightSum
android:weightSum 是一个控制子视图按比例分配空间的属性。当我们需要根据权重分配空间时,可以使用它来确保所有的子视图加起来的权重和符合预期。例如:
<TableLayout
android:weightSum="3"
android:layout_width="match_parent"
android:layout_height="wrap_content">
<!-- 子视图 -->
</TableLayout>
通过设置 weightSum,我们可以对每个子视图的 android:layout_width 属性进行细致控制,从而实现精确的布局调整。
TableLayout 的使用示例
在这一部分,我们将使用 TableLayout 布局来实现一个简单的登录页面。TableLayout 的优点是可以轻松地将界面元素按行列方式排列,非常适合这种需要对齐控件的表单界面。在这个示例中,我们将创建一个包含用户名和密码输入框,以及登录和退出按钮的界面,展示如何利用 TableLayout 来布局这些元素。
<TableLayout xmlns:android="http://schemas.android.com/apk/res/android"
    android:id="@+id/main"
    android:layout_width="match_parent"
    android:layout_height="match_parent"
    android:gravity="center_vertical">

    <!--第一行-->
    <TableRow>
        <TextView
            android:text="用户名:"
            android:padding="5dp"
            android:layout_width="wrap_content"
            android:layout_height="wrap_content"
            android:textColor="#000000"/>
        <EditText
            android:layout_width="match_parent"
            android:layout_height="wrap_content"
            android:minWidth="200dp" />
    </TableRow>

    <!--第二行-->
    <TableRow>
        <TextView
            android:text="密     码:"
            android:padding="5dp"
            android:textColor="#000000"/>
        <EditText
            android:id="@+id/et_password"
            android:layout_width="match_parent"
            android:layout_height="wrap_content"
            android:minWidth="200dp" />
    </TableRow>

    <!--第三行-->
    <TableRow>
        <Button
            android:layout_width="match_parent"
            android:layout_height="wrap_content"
            android:text="登录"
            android:layout_marginLeft="30dp"/>
        <Button
            android:layout_width="match_parent"
            android:layout_height="wrap_content"
            android:text="退出"
            android:layout_marginLeft="30dp"/>
    </TableRow>
</TableLayout>- 首先我们使用TableLayout作为根布局容器,并使它充满整个屏幕,设置表单垂直居中。
- 第一行,用于输入用户名输入,在第一行中我们放置了一个TextView和一个EditText。
- 第二行,用于输入密码,同样也是放置了一个TextView和EditText。
- 第三行,我们使用了两个按钮,登录按钮和退出按钮。
效果如下:

结语
通过这篇博客,我们了解了如何使用 TableLayout 来构建一个简单而清晰的登录页面。TableLayout 为我们提供了一种按行列方式排列控件的便捷方法,使得界面布局更加整洁,且易于管理。无论是在简单的表单界面,还是在需要精确对齐的复杂布局中,TableLayout 都能够发挥出色的作用。
掌握了 TableLayout 的使用技巧后,您可以在 Android 开发中更高效地处理各种 UI 布局需求。希望本文能为您的开发工作提供帮助,并激发您在实际项目中进一步探索和应用 TableLayout 布局的潜力。