参考:
Hadoop(一)之实验一CentOS7配置Hadoop系统:配置CentOS和下载安装包_基于虚拟机cents7搭建hadoop实验目的-CSDN博客
---------------------------------------------------------
一、安装Vmware
二、创建虚拟机
1.安装centos7
①打开VMware,点击新建虚拟机。
②选择典型类型,下一步。
③选择稍后安装操作系统,下一步。
④客户机操作系统–Linux版本,CentOS 7 64位。
⑤命名虚拟机c0,选择位置。
⑥使用默认磁盘20G大小。
⑦不修改虚拟机硬件配置,完成创建虚拟机。
⑧选择创建好的虚拟机,点击编辑虚拟机。
⑨移除USB控制器、声卡、打印机(针对克隆,不移除克隆后可能产生冲突,无法正常开机)
⑩选择CD/DVD ,使用ISO映像文件,选择ISO文件位置。
之后开启虚拟机,安装虚拟机。
a)选择中文,时间
b)软件选择,选择GNOME桌面
c)设置root密码
d)重启,接受许可,时区选择中国上海
关机并备份
2.配置静态IP、修改主机名
①虚拟机连接方式选择NAT模式。
②在VMware里,依次点击”编辑“ - ”虚拟网络编辑器“,如下图:


这里需要记住的就是自己的网关192.168.157.2,下一步就是打开虚拟机了。
③修改网络配置
命令:
进入root模式,不用一遍遍输密码
su - root
cd /etc/sysconfig/network-scripts/
ls
看看自己的ifcfg-ensXXX是什么(每个机子可能不同),比如
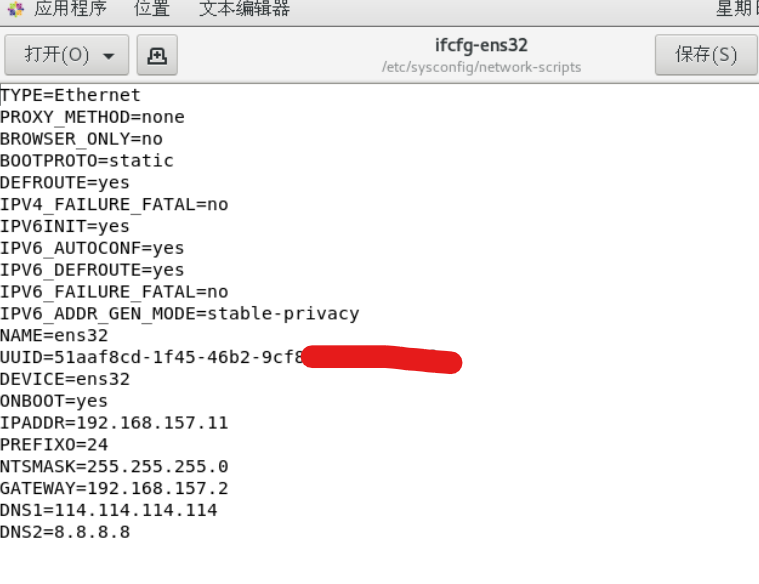
sudo gedit ifcfg-ens32
原来的:

改后:
TYPE=Ethernet
BOOTPROTO=static // 这里改一下,默认的是dhcp,改成static表示静态的意思
......
ONBOOT=yes // 这里改成yes,表示网卡设备开机启动//下边的都是加上的
IPADDR=192.168.157.11
//IP地址自己写,只要和网关处于同一网段就行,如192.168.157.xxx
PREFIXO=24
NTSMASK=255.255.255.0 //这里是子网掩码
GATEWAY=192.168.157.2 //这里是网关
DNS1=114.114.114.114
DNS2=8.8.8.8
改完上面的内容之后,要重启网络。重启之后静态IP配置完成。
systemctl restart network
查看网络配置信息
ifconfig
④修改主机名
查看主机名:
hostname
将主机名修改成c0
hostnamectl set-hostname c0
重启终端
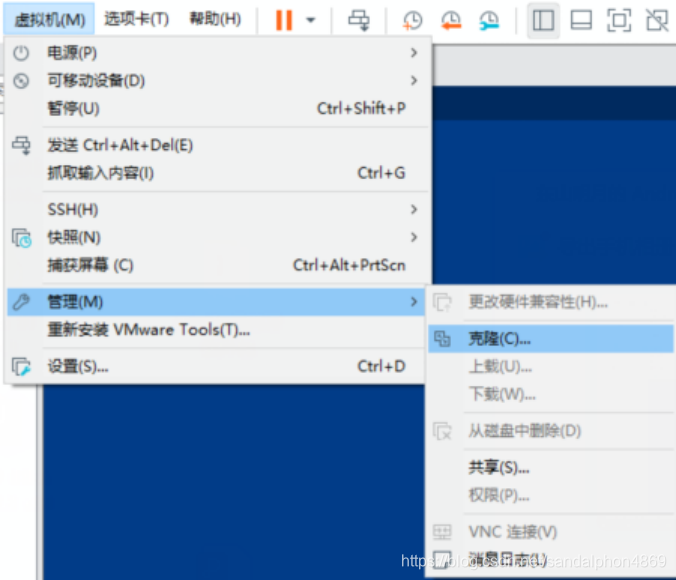
3.将刚刚的c0虚拟机克隆三台出来
克隆之后的三台centos分别进行上述的修改静态IP、修改主机名操作。
四台机子的IP与主机名对应如下:
192.168.157.11 c0
192.168.157.12 c1
192.168.157.13 c2
192.168.157.14 c3
4.在四台机子上设置hosts,以下以c0为例
sudo gedit /etc/hosts
127.0.0.1 localhost localhost.localdomain localhost4 localhost4.localdomain4
::1 localhost localhost.localdomain localhost6 localhost6.localdomain6
192.168.157.11 c0
192.168.157.12 c1
192.168.157.13 c2
192.168.157.14 c3
(看到这里就是第4步中自己设置的IP和主机名,加到hosts文件之后 。记着四台机子都要这样的操作)
5.配置 SSH 免密码登录
①每一台机器都单独生成密钥,每一台机子都打一遍,所有的打完①步骤之后才能进入②步骤
ssh-keygen
一路按回车到最后
②将 ssh-keygen 生成的密钥,分别复制到其他三台机器,以下以 c0 为例
【每个机子都这么打一遍】
- 命令:
rm -rf ~/.ssh/known_hosts
ssh-copy-id c0
ssh-copy-id c1
ssh-copy-id c2
ssh-copy-id c3
- c0的完整实例:
[root@c0 ~]# rm -rf ~/.ssh/known_hosts
[root@c0 ~]# ssh-copy-id c0
/usr/bin/ssh-copy-id: INFO: Source of key(s) to be installed: "/root/.ssh/id_rsa.pub"
The authenticity of host 'c0 (10.0.0.100)' can't be established.
ECDSA key fingerprint is SHA256:O8y8TBSZfBYiHPvJPPuAd058zkfsOfnBjvnf/3cvOCQ.
ECDSA key fingerprint is MD5:da:3c:29:65:f2:86:e9:61:cb:39:57:5b:5e:e2:77:7c.
Are you sure you want to continue connecting (yes/no)? yes
/usr/bin/ssh-copy-id: INFO: attempting to log in with the new key(s), to filter out any that are already installed
/usr/bin/ssh-copy-id: INFO: 1 key(s) remain to be installed -- if you are prompted now it is to install the new keys
root@c0's password:Number of key(s) added: 1
Now try logging into the machine, with: "ssh 'c0'"
and check to make sure that only the key(s) you wanted were added.[root@c0 ~]# ssh-copy-id c1
/usr/bin/ssh-copy-id: INFO: Source of key(s) to be installed: "/root/.ssh/id_rsa.pub"
The authenticity of host 'c1 (10.0.0.101)' can't be established.
ECDSA key fingerprint is SHA256:O8y8TBSZfBYiHPvJPPuAd058zkfsOfnBjvnf/3cvOCQ.
ECDSA key fingerprint is MD5:da:3c:29:65:f2:86:e9:61:cb:39:57:5b:5e:e2:77:7c.
Are you sure you want to continue connecting (yes/no)? yes
/usr/bin/ssh-copy-id: INFO: attempting to log in with the new key(s), to filter out any that are already installed
/usr/bin/ssh-copy-id: INFO: 1 key(s) remain to be installed -- if you are prompted now it is to install the new keys
root@c1's password:Number of key(s) added: 1
Now try logging into the machine, with: "ssh 'c1'"
and check to make sure that only the key(s) you wanted were added.[root@c0 ~]# ssh-copy-id c2
/usr/bin/ssh-copy-id: INFO: Source of key(s) to be installed: "/root/.ssh/id_rsa.pub"
The authenticity of host 'c2 (10.0.0.102)' can't be established.
ECDSA key fingerprint is SHA256:O8y8TBSZfBYiHPvJPPuAd058zkfsOfnBjvnf/3cvOCQ.
ECDSA key fingerprint is MD5:da:3c:29:65:f2:86:e9:61:cb:39:57:5b:5e:e2:77:7c.
Are you sure you want to continue connecting (yes/no)? yes
/usr/bin/ssh-copy-id: INFO: attempting to log in with the new key(s), to filter out any that are already installed
/usr/bin/ssh-copy-id: INFO: 1 key(s) remain to be installed -- if you are prompted now it is to install the new keys
root@c2's password:Number of key(s) added: 1
Now try logging into the machine, with: "ssh 'c2'"
and check to make sure that only the key(s) you wanted were added.[root@c0 ~]# ssh-copy-id c3
/usr/bin/ssh-copy-id: INFO: Source of key(s) to be installed: "/root/.ssh/id_rsa.pub"
The authenticity of host 'c3 (10.0.0.103)' can't be established.
ECDSA key fingerprint is SHA256:O8y8TBSZfBYiHPvJPPuAd058zkfsOfnBjvnf/3cvOCQ.
ECDSA key fingerprint is MD5:da:3c:29:65:f2:86:e9:61:cb:39:57:5b:5e:e2:77:7c.
Are you sure you want to continue connecting (yes/no)? yes
/usr/bin/ssh-copy-id: INFO: attempting to log in with the new key(s), to filter out any that are already installed
/usr/bin/ssh-copy-id: INFO: 1 key(s) remain to be installed -- if you are prompted now it is to install the new keys
root@c3's password:Number of key(s) added: 1
Now try logging into the machine, with: "ssh 'c3'"
and check to make sure that only the key(s) you wanted were added.
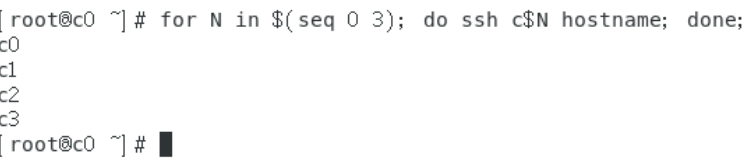
测试密钥是否配置成功,可以在任意机器上执行以下命令:
for N in $(seq 0 3); do ssh c$N hostname; done;
6.关闭防火墙
在每一台机器上运行以下命令:
systemctl stop firewalld && systemctl disable firewalld
示例:
# c0
[root@c0 ~]# systemctl stop firewalld && systemctl disable firewalld
Removed symlink /etc/systemd/system/multi-user.target.wants/firewalld.service.
Removed symlink /etc/systemd/system/dbus-org.fedoraproject.FirewallD1.service.
以后步骤略
测试
用户 hadoop
密码 123456
启动hadoop
在master上操作
start-all.sh

- rz: receive zmodem的缩写,运行该命令会弹出一个文件选择窗口,从本地选择文件上传到Linux服务器。
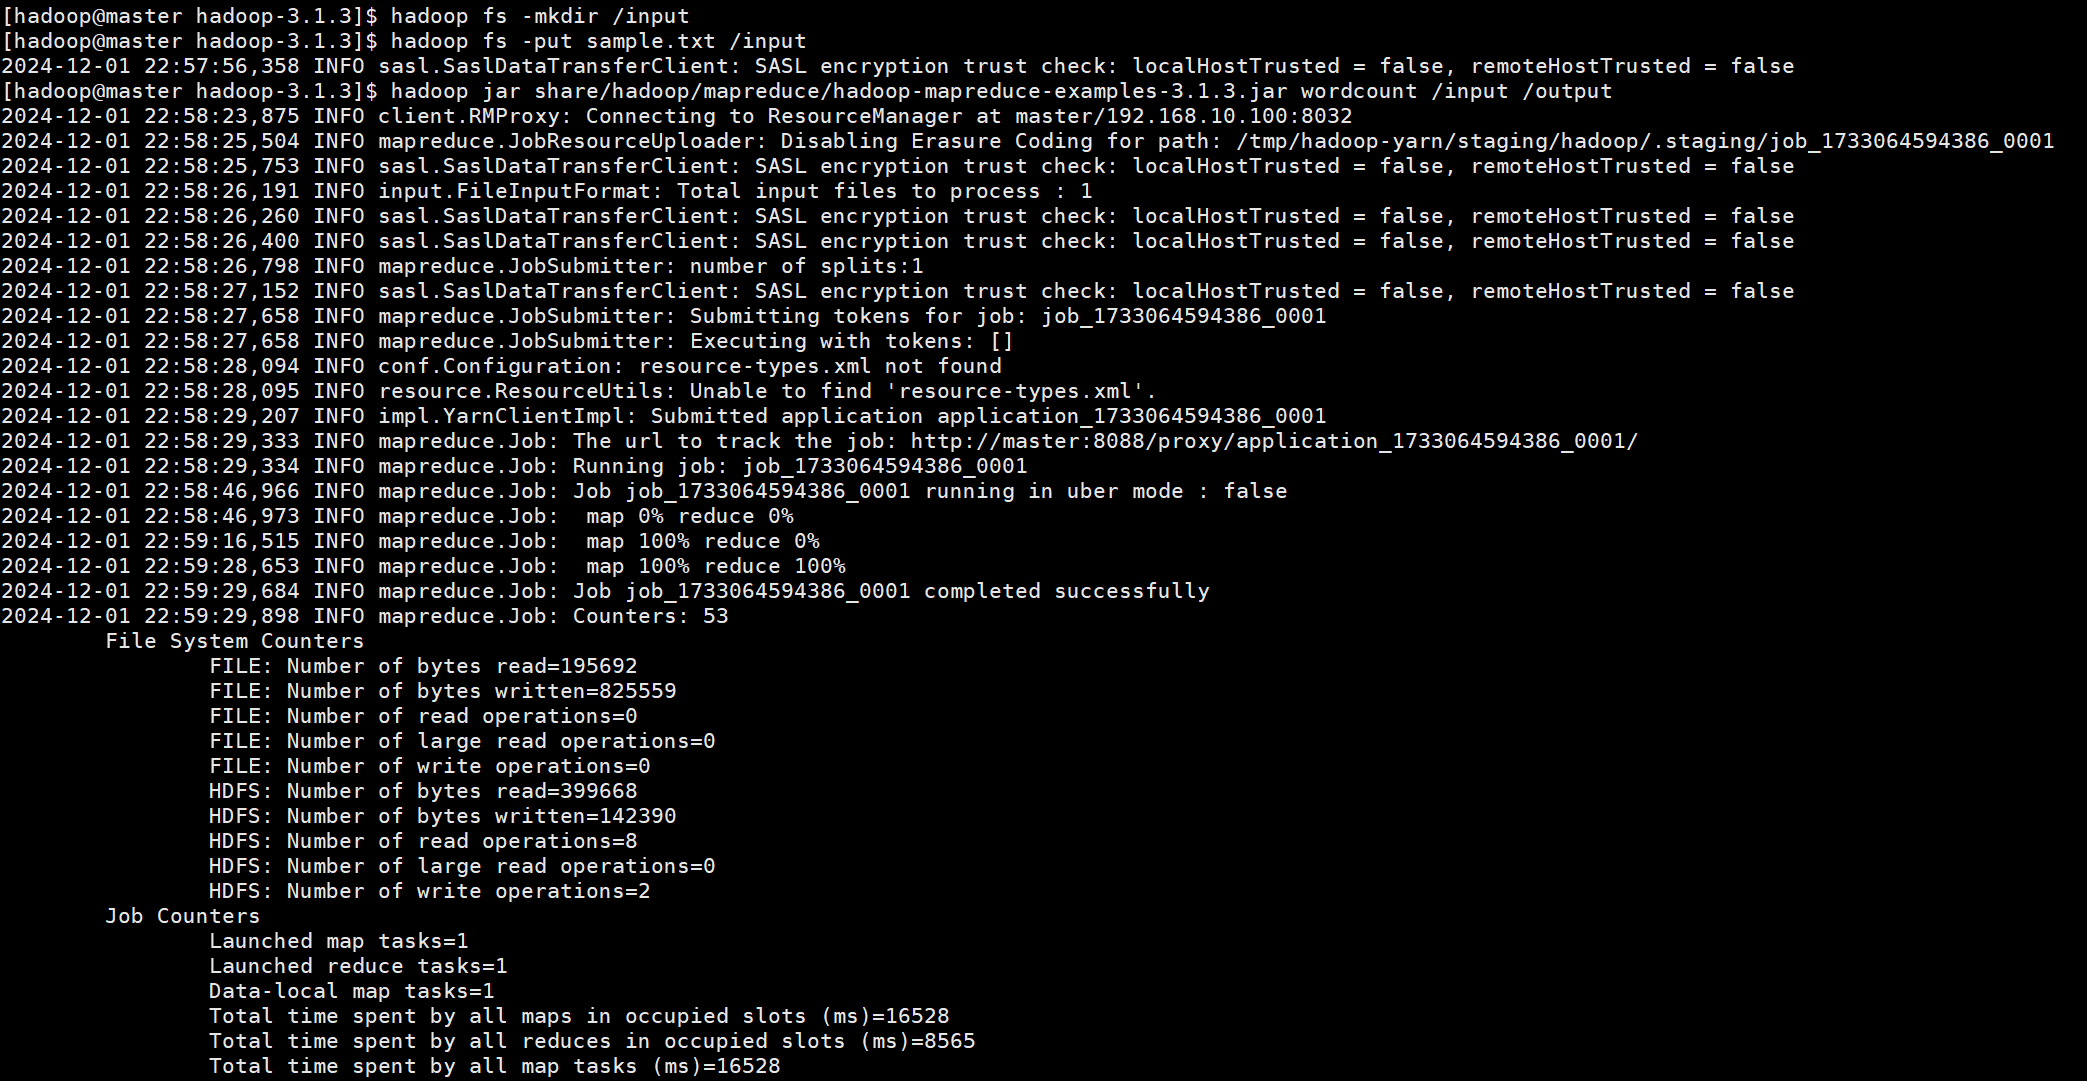
在hadoop指定目录内创建新目录
hadoop fs -mkdir [hadoop目标目录]
将本地文件存储至hadoop
hadoop fs -put [本地目录] [hadoop文件目录]
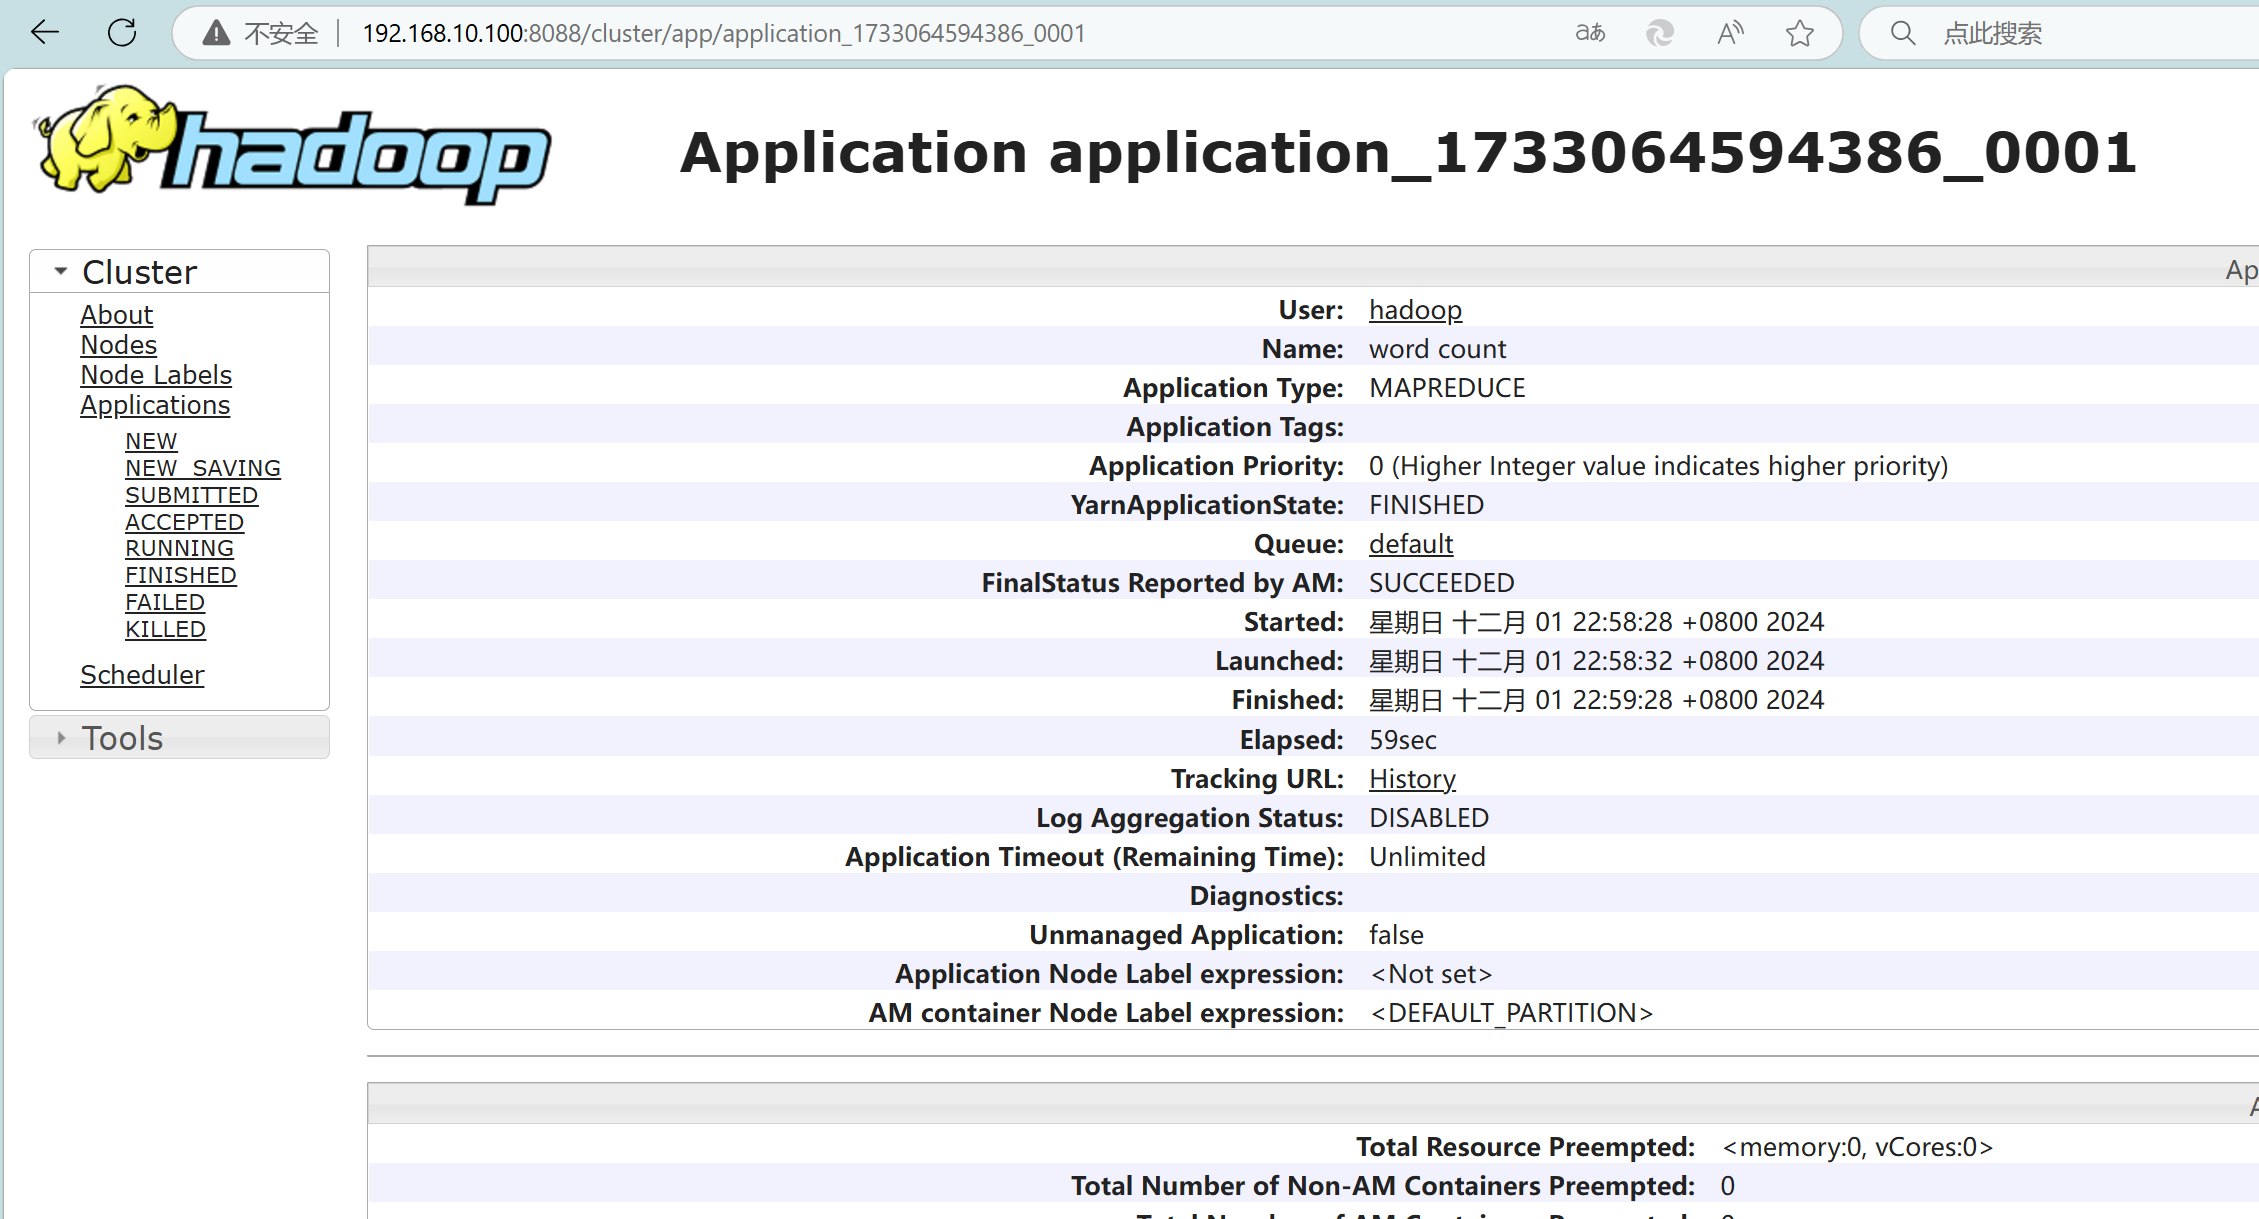
我们来做一个经典的例子,统计单词频率
hadoop jar ....
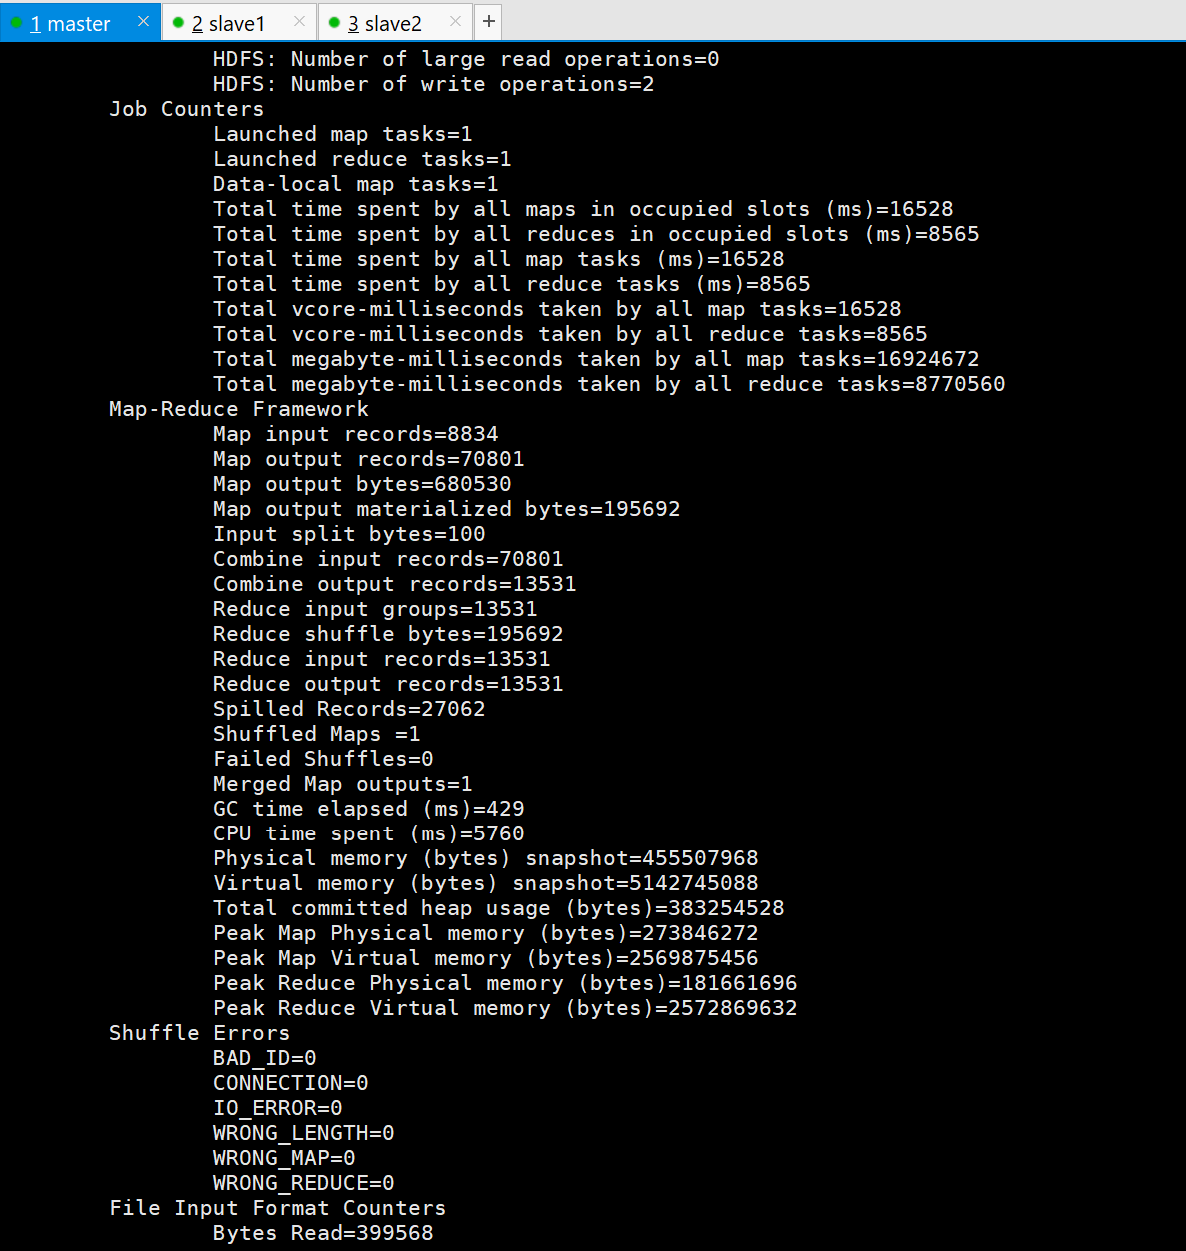
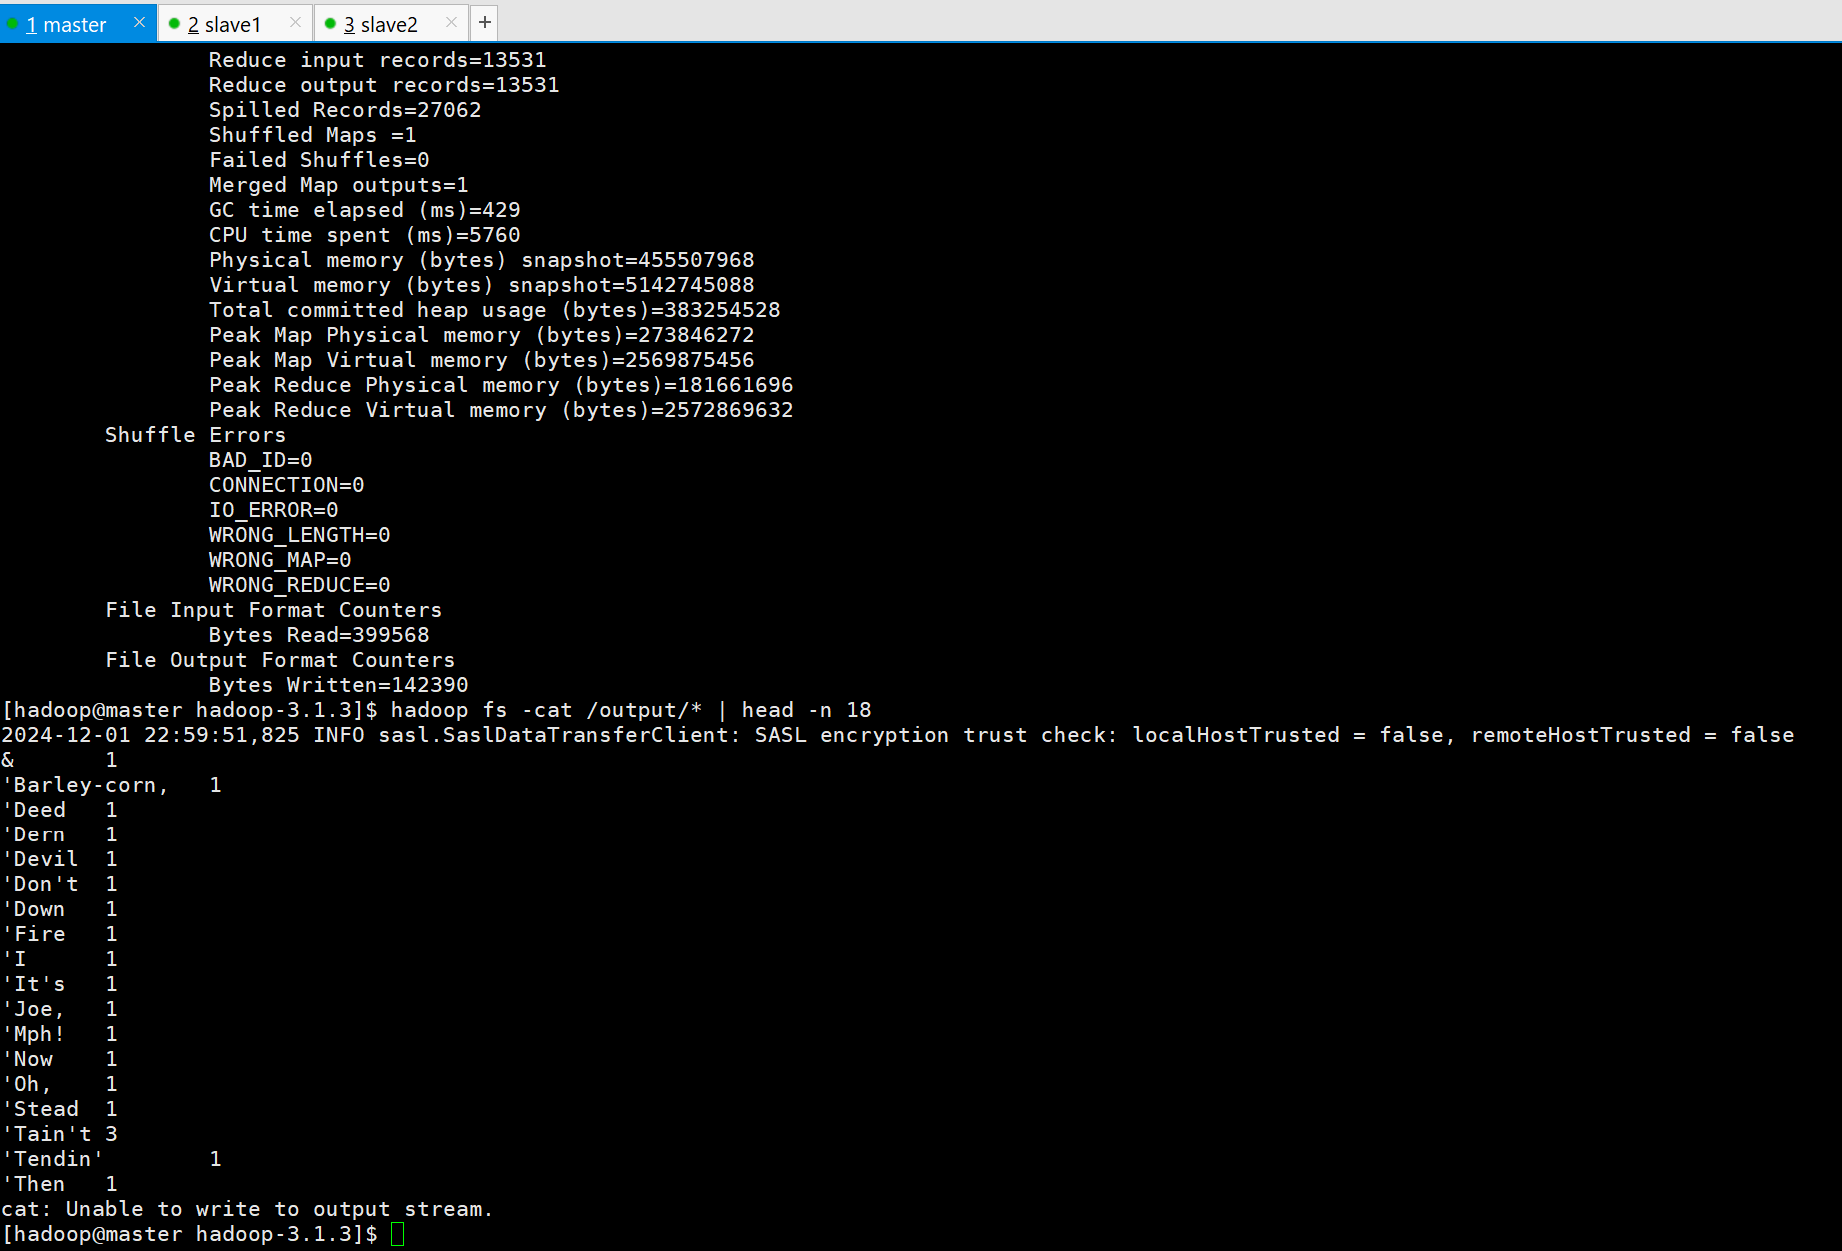
批量处理任务结果查看示例
hadoop fs -cat /output/* | head -n 18
浏览器可查看web
hdfs-web
192.168.10.100:9870
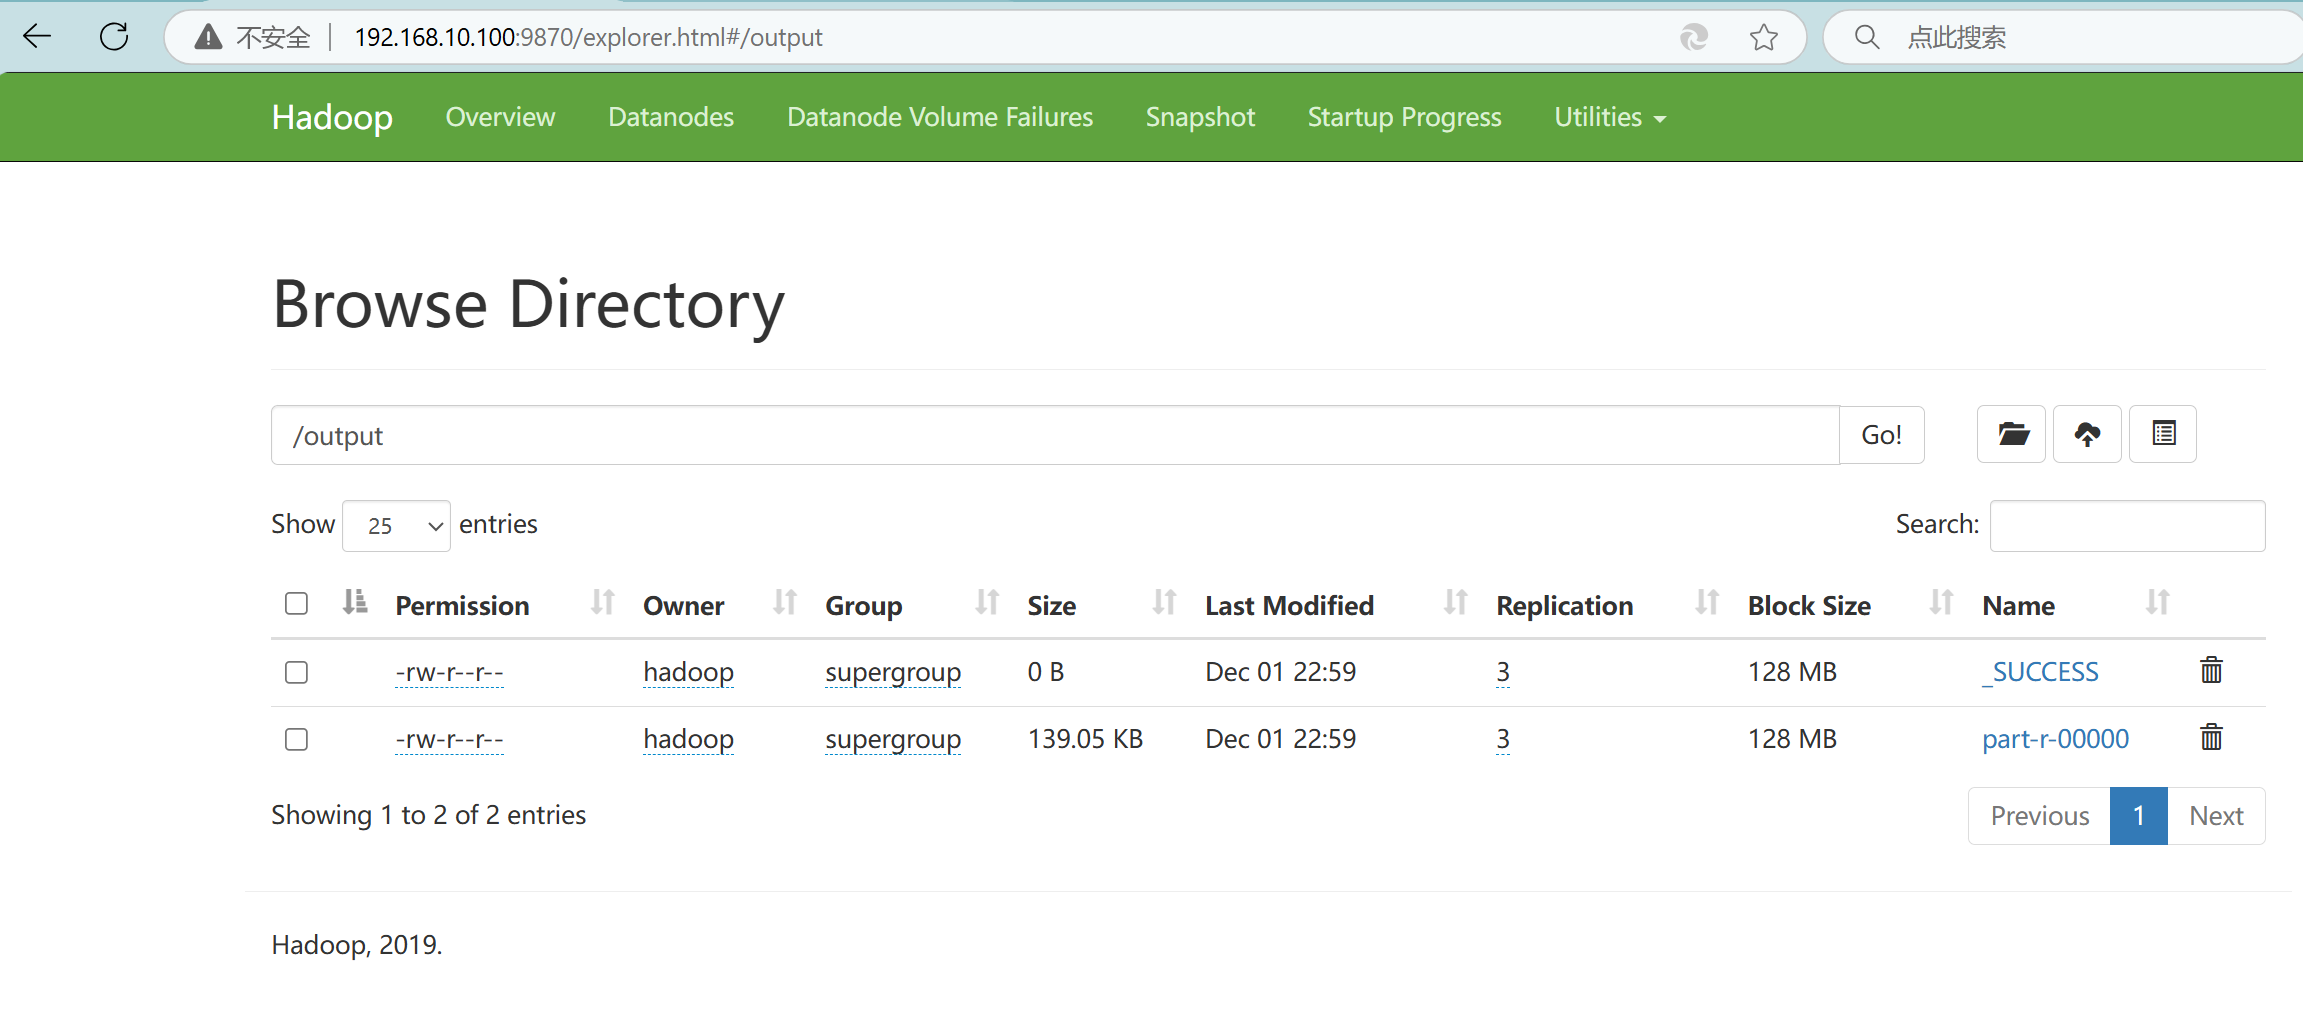
点击part-r-00000可以download结果文件
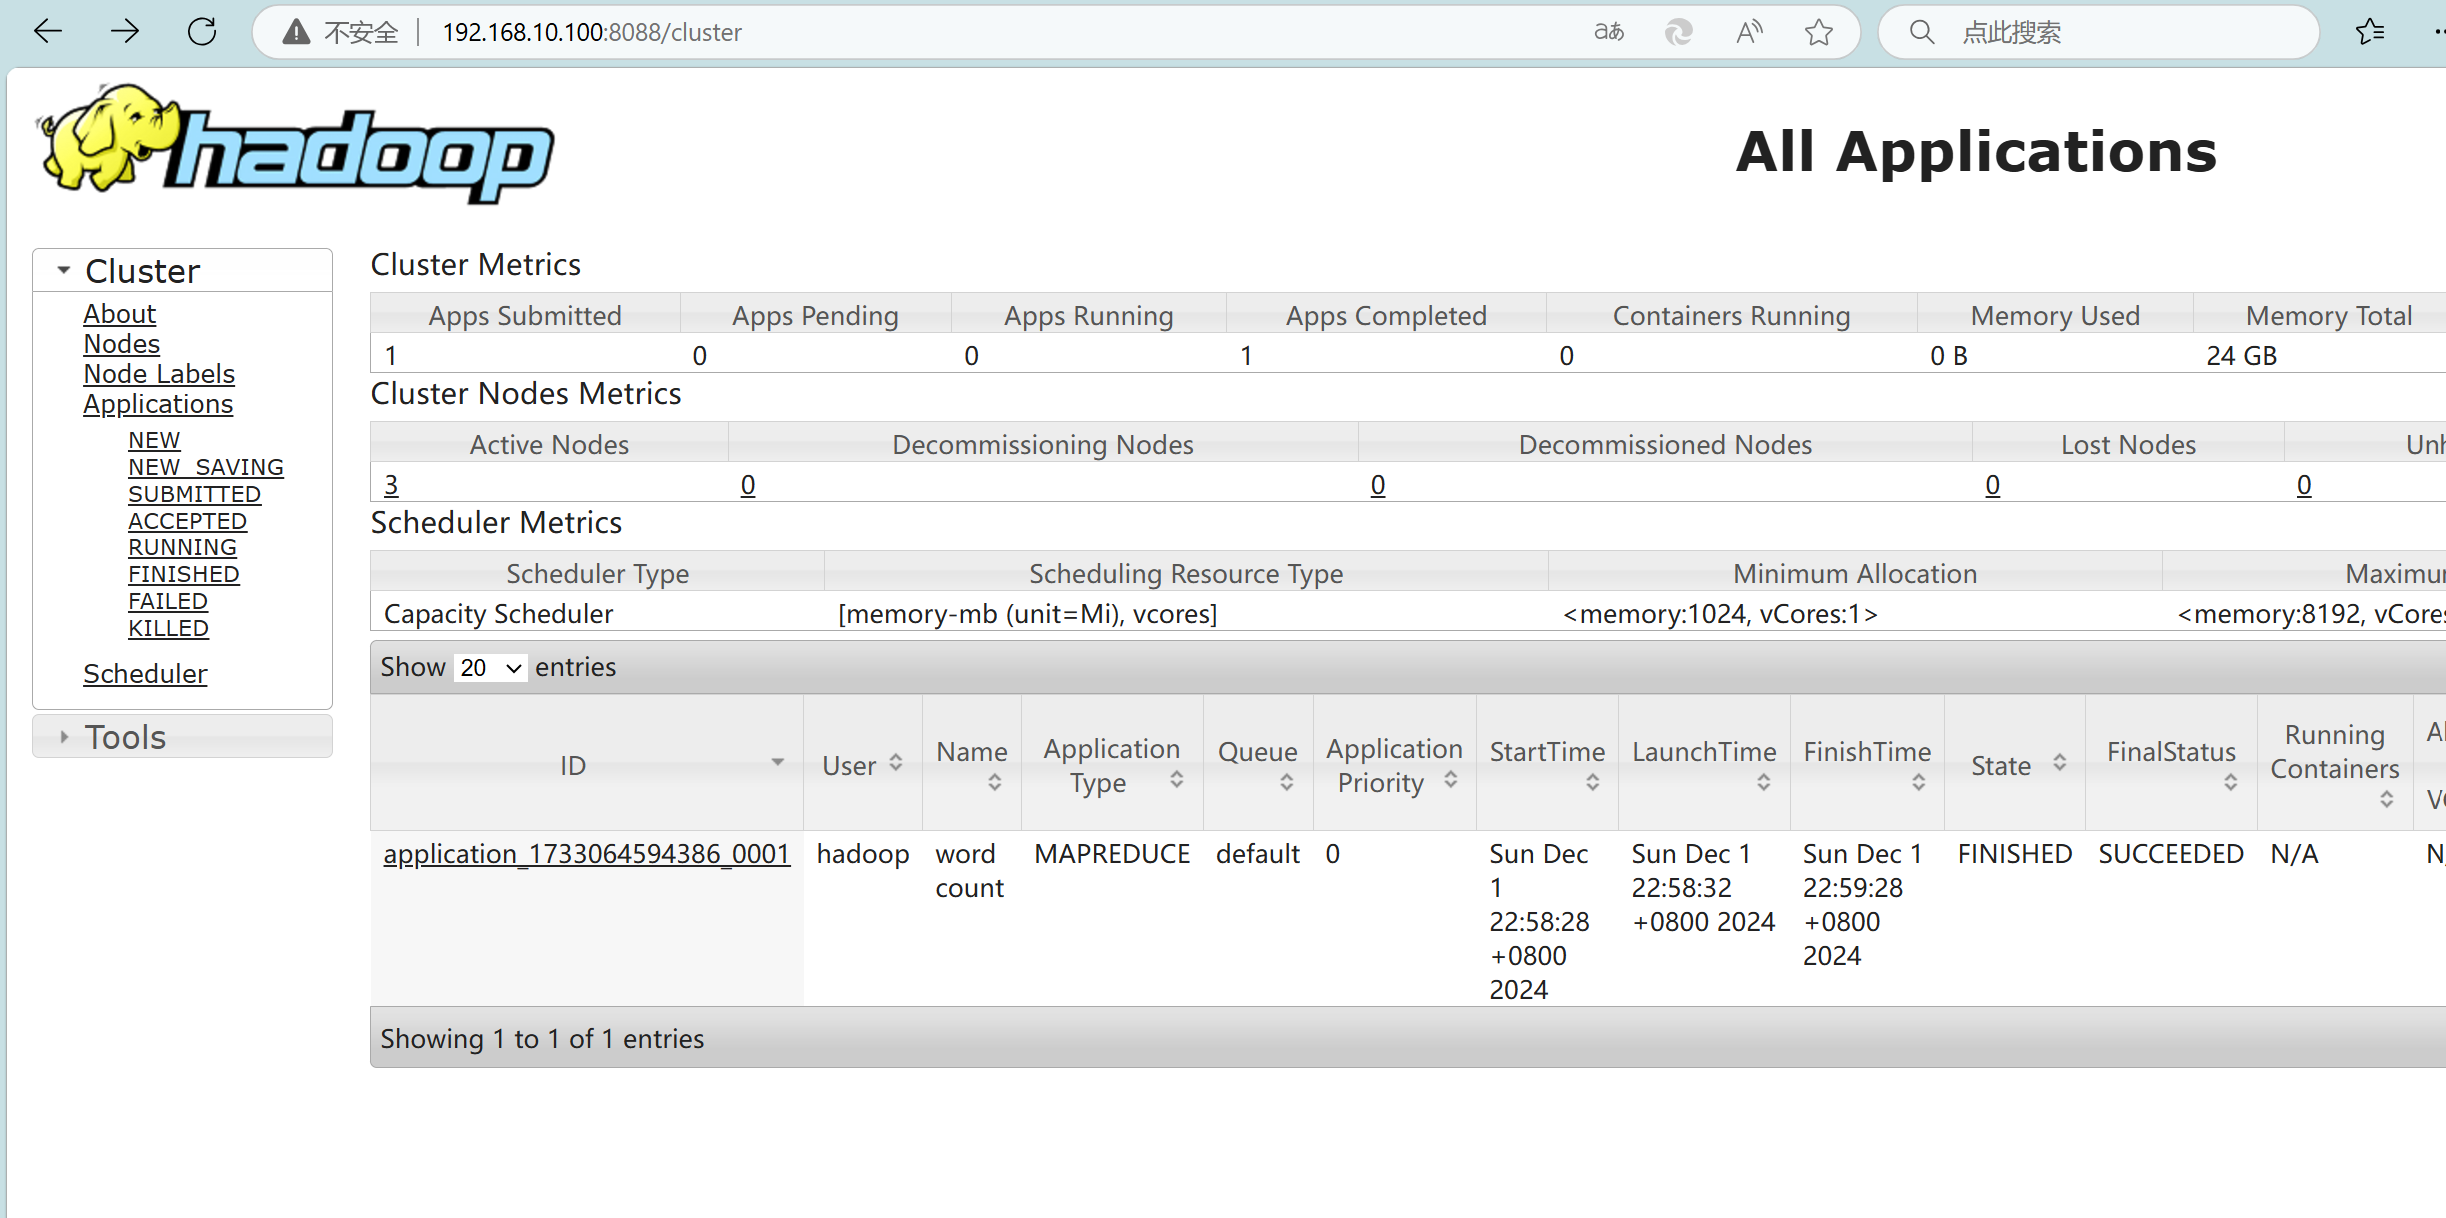
yarn-web
192.168.10.100:8088
如果不用时 请执行
stop-all.sh