Rest Assured
概念
官网地址:Rest Assured
Rest Assured 是 Java 中一个用于测试 RESTful API 的开源框架,因其简单且直观的语法,广泛应用于接口测试。它可以帮助开发者和测试人员轻松地发送 HTTP 请求、验证响应以及进行参数化和关联。
Rest Assured 提供了一组 DSL(领域特定语言),可以直观地发送 HTTP 请求并验证响应。核心的类和概念包括:
RestAssured:框架的核心类,用于设置请求的基本配置(如根路径)。RequestSpecification:封装 HTTP 请求的相关配置(如 headers、body、query 参数等)。Response:封装 HTTP 响应,提供提取数据的方法。Matchers:使用 Hamcrest Matchers 来断言响应数据。
实践
Rest Assured 支持多种 HTTP 方法,如 GET、POST、PUT、DELETE 等。
Rest Assured 的语法结构主要包括三个部分:Given、When、Then,类似于行为驱动开发(BDD)中的Given-When-Then结构。
Given:在某场景下,When:发生什么事件,Then:产生了什么结果。
- Given:假定一个测试场景,这一步主要会做一些API测试前的准备工作,如设置Base URL、请求头、请求参数等。
- When:当执行一个动作时,这一步会实际的执行请求操作,如GET、POST等,并拿到响应。
- Then:那么期望的结果是?这一步会断言实际的响应结果与期望的响应结果(如HTTP状态码、响应体、响应头等)是否一致。
使用方式
pom.xml 中引入如下依赖:
<dependency>
      <groupId>io.rest-assured</groupId>
      <artifactId>rest-assured</artifactId>
      <version>5.4.0</version>
    </dependency>

    <dependency>
      <groupId>io.rest-assured</groupId>
      <artifactId>json-schema-validator</artifactId>
      <version>5.4.0</version>
</dependency>
为了有效地使用 REST Assured,建议从以下类中静态导入方法:
io.restassured.RestAssured.*
io.restassured.matcher.RestAssuredMatchers.*
org.hamcrest.Matchers.*
基本请求示例
GET 请求
import static io.restassured.RestAssured.*;
import static org.hamcrest.Matchers.*;

public class RestAssuredExample {


    public static void main(String[] args) {


        given()
            .baseUri("https://jsonplaceholder.typicode.com") // 基础 URL
            .header("Content-Type", "application/json")      // 设置请求头
        .when()
            .get("/posts/1") // GET 请求
        .then()
            .statusCode(200)                              // 断言响应状态码
            .body("id", equalTo(1))                      // 断言 JSON 响应体字段
            .body("userId", greaterThan(0));             // 断言字段值
    }
}
POST 请求
import static io.restassured.RestAssured.*;

public class RestAssuredExample {


    public static void main(String[] args) {


        String requestBody = """
            {
                "title": "foo",
                "body": "bar",
                "userId": 1
            }
        """;

        given()
            .baseUri("https://jsonplaceholder.typicode.com")
            .header("Content-Type", "application/json")
            .body(requestBody) // 设置请求体
        .when()
            .post("/posts") // POST 请求
        .then()
            .statusCode(201) // 断言响应状态码
            .log().all();    // 打印完整响应
    }
}
PUT 请求
given()
    .baseUri("https://jsonplaceholder.typicode.com")
    .header("Content-Type", "application/json")
    .body("{\"title\": \"updated title\"}")
.when()
    .put("/posts/1")
.then()
    .statusCode(200)
    .body("title", equalTo("updated title"));
DELETE 请求
given()
    .baseUri("https://jsonplaceholder.typicode.com")
.when()
    .delete("/posts/1")
.then()
    .statusCode(200);
详细请求基本方式
get 请求
普通请求
 public static void get(){


        /**
         * response 大致形式如下:
         * {
         *    "headers" : {
         *        "Host" : "www.httpbin.org"
         *    },
         *    "url" : "http://www.httpbin.org/get"
         * }
         *
         * 因此 断言 Host ---> headers.Host
         */

        given().
                when().log().all()
                .get(get)
                .then()
                .log().all()
                .statusCode(200)
                .body("headers.Host", equalTo("www.httpbin.org"))  // 断言
                .body("url", equalTo("http://www.httpbin.org/get"));

//        // 提取 Host 的值
//        String hostValue = response.jsonPath().getString("headers.Host");
//        System.out.println("Host: " + hostValue);
//
//        // 断言
//        assert hostValue.equals("www.httpbin.org") : "Host 值不匹配!";

    }
getParams
get 携带 params 参数请求:
public static void getParams() {


    hashMap.put("test", "123456");
    hashMap.put("test1", "123456");

    given().contentType("application/json; charset=UTF-8").when().log().all()
            .params(hashMap)
            .get(get)
            .then()
            .log().all()
            .statusCode(200);
}
完整请求路径类似为:https://xxxx?test=123456&test1=123456
put 请求
普通请求
public static void put(){


    given().when().log().all()
            .put(put)
            .then().log().all()
            .statusCode(200);

}
putFormData
public static void putFormData(){


    hashMap.put("test", "123456");
    hashMap.put("test1", "123456");

    given().when().log().all()
            .formParams(hashMap)
            .multiPart("test", new File(GetBaseDirUtil.getBaseDir() + "\\data\\image\\1.jpg"))
            .multiPart("test1", "1234567")
            .put(put)
            .then().log().all()
            .statusCode(200);
}
其中 multiPart 为上传文件方式,后面接文件参数以及文件的具体路径
例如:
.multiPart("file", new File(GetBaseDirUtil.getBaseDir() + "\\data\\image\\1.jpg"))
putFormUrlencodedData
public static void putFormUrlencodedData() {


    hashMap.put("test", "123456");
    hashMap.put("test1", "123456");

    given().when().log().all()
            .formParams(hashMap)
            .put(put)
            .then().log().all()
            .statusCode(200);
}
putRawJsonData
public static void putRawJsonData() {


    given().contentType(ContentType.JSON)
            .body(new File(GetBaseDirUtil.getBaseDir() + "/data/data.json"))
            .when().log().all()
            .put(put)
            .then()
            .log().all();
}
想要传递json数据的格式,可以在请求体中声明json文件。
.body(new File(GetBaseDirUtil.getBaseDir() + "/data/data.json"))
其中传入json文件所在路径即可。
也可以直接传入json数据:
public static void putRawJsonData() {


    String json = "{\n" +
                "  \"name\": \"John Doe\",\n" +
                "  \"age\": 32,\n" +
                "  \"email\": \"[email protected]\",\n" +
                "  \"address\": {\n" +
                "    \"street\": \"123 Main St\",\n" +
                "    \"city\": \"Anytown\",\n" +
                "    \"state\": \"CA\",\n" +
                "    \"zip\": \"12345\"\n" +
                "  },\n" +
                "  \"hobbies\": [\"reading\", \"hiking\", \"traveling\"]\n" +
                "}";

    given().contentType(ContentType.JSON)
            .body(json)
            .when().log().all()
            .put(put)
            .then()
            .log().all();
}
post 请求
普通请求
public static void post(){


    given().when().log().all()
            .post(post)
            .then().log().all()
            .statusCode(200);

}
postFormData
public static void postFormData(){


    hashMap.put("test", "123456");
    hashMap.put("test1", "123456");

    given().when().log().all()
            .formParams(hashMap)
            .multiPart("test", new File(GetBaseDirUtil.getBaseDir() + "\\data\\image\\1.jpg"))
            .multiPart("test1", "1234567")
            .post(post)
            .then().log().all()
            .statusCode(200);
}
postFormUrlencodedData
public static void postFormUrlencodedData() {


    hashMap.put("test", "123456");
    hashMap.put("test1", "123456");
    PrintStreamLogUtil.printStreamLog();
    given().when().log().all()
            .formParams(hashMap)
            .post(post)
            .then().log().all()
            .statusCode(200);

}
postRawJsonData
public static void postRawJsonData() {
//
//        String json = "{\n" +
//                "  \"name\": \"John Doe\",\n" +
//                "  \"age\": 32,\n" +
//                "  \"email\": \"[email protected]\",\n" +
//                "  \"address\": {\n" +
//                "    \"street\": \"123 Main St\",\n" +
//                "    \"city\": \"Anytown\",\n" +
//                "    \"state\": \"CA\",\n" +
//                "    \"zip\": \"12345\"\n" +
//                "  },\n" +
//                "  \"hobbies\": [\"reading\", \"hiking\", \"traveling\"]\n" +
//                "}";

        given().contentType(ContentType.JSON)
                .body(new File(GetBaseDirUtil.getBaseDir() + "/data/data.json"))
                .when().log().all()
                .post(post)
                .then()
                .log().all().statusCode(200);
    }
delete 请求
普通请求
public static void delete() {


    given().when().log().all()
            .delete( delete)
            .then().log().all();

}
deleteFormData
public static void deleteFormData() {


    hashMap.put("test", "123456");
    hashMap.put("test1", "123456");

    given().when().log().all()
            .formParams(hashMap)
            .multiPart("test", new File(GetBaseDirUtil.getBaseDir() + "\\data\\image\\1.jpg"))
            .multiPart("test1", "1234567")
            .delete( delete)
            .then().log().all();
}
deleteFormUrlencodedData
public static void deleteFormUrlencodedData() {


    hashMap.put("test", "123456");
    hashMap.put("test1", "123456");

    given().when().log().all()
            .formParams(hashMap)
            .delete( delete)
            .then().log().all();

}
deleteRawJsonData
public static void deleteRawJsonData() {


    given().contentType(ContentType.JSON).
            body(new File(GetBaseDirUtil.getBaseDir() + "/data/data.json"))
            .when().log().all()
            .delete(delete)
            .then()
            .log().all();

}
断言
基本断言
Rest Assured 使用 then() 方法进行响应验证,支持以下常用断言:
-
状态码断言:
.then().statusCode(200); -
响应时间断言:
.then().time(lessThan(2000L)); // 响应时间小于 2000ms -
响应体断言:
.then().body("id", equalTo(1));
多条件断言
假设 GET 请求(http://localhost:8080/lotto)返回 JSON 如下:
{


"lotto":{


 "lottoId":5,
 "winning-numbers":[2,45,34,23,7,5,3],
 "winners":[{


   "winnerId":23,
   "numbers":[2,45,34,23,3,5]
 },{


   "winnerId":54,
   "numbers":[52,3,12,11,18,22]
 }]
}
}
可以同时对多个字段进行验证:
.then()
    .body("lotto.lottoId", equalTo(5)) // 验证 lottoId 是否等于 5
    .body("lotto.winners.winnerId", hasItems(23, 54)); // 检查winningId是否为23和54
注意:equalTo和hasItems是 Hamcrest 匹配器,您应该从中静态导入org.hamcrest.Matchers
使用 Hamcrest Matchers
Hamcrest 是一个断言库,Rest Assured 完美集成它:
equalTo:匹配值相等。notNullValue:断言非空。hasSize:验证集合长度。
参数化
路径参数
使用 {} 定义路径占位符,通过 .pathParam 进行动态传值:
given()
    .baseUri("https://jsonplaceholder.typicode.com")
    .pathParam("postId", 1)
.when()
    .get("/posts/{postId}") // {postId} 这个名称 需要跟 .pathParam("postId", 1) 的名称保持一致
.then()
    .statusCode(200);
最终发送的请求 URL 会是:https://jsonplaceholder.typicode.com/posts/1
注意:/xxx/{ key} 里面的 key值 需要与.pathParam(key, value) 里面的 key值保持一致,否则无效。
查询参数
通过 .queryParam 动态添加查询参数(可以参考postman get查询方式):
given()
    .baseUri("https://jsonplaceholder.typicode.com")
    .queryParam("userId", 1)
.when()
    .get("/posts")
.then()
    .statusCode(200);
最终发送的请求 URL 会是:https://jsonplaceholder.typicode.com/posts?userId=1
这里的 ?userId=1 就是通过 .queryParam("userId", 1) 动态生成的。
如果有多个查询参数,可以多次调用 .queryParam() 方法。例如:
given()
    .baseUri("https://jsonplaceholder.typicode.com")
    .queryParam("userId", 1)
    .queryParam("postId", 10)
.when()
    .get("/posts")
.then()
    .statusCode(200);
最终发送的请求 URL 会是:https://jsonplaceholder.typicode.com/posts?userId=1&postId=10
你也可以使用 .queryParams(Map<String, Object> params),通过传递一个 Map 设置多个查询参数。
例如:
Map<String, Object> params = new HashMap<>();
params.put("userId", 1);
params.put("postId", 10);

given()
    .baseUri("https://jsonplaceholder.typicode.com")
    .queryParams(params)
.when()
    .get("/posts")
.then()
    .statusCode(200);
最终发送的请求 URL 会是:https://jsonplaceholder.typicode.com/posts?userId=1&postId=10
数据驱动(TestNG 参数化)
使用 TestNG 的 @DataProvider 注解实现数据驱动测试:
@DataProvider(name = "userIds")
public Object[][] userIds() {


    return new Object[][] {

     {

    1}, {

    2}, {

    3} };
}

@Test(dataProvider = "userIds")
public void testGetPosts(int userId) {


    given()
        .baseUri("https://jsonplaceholder.typicode.com")
        .queryParam("userId", userId)
    .when()
        .get("/posts")
    .then()
        .statusCode(200);
}
@DataProvider 的作用:
- 它提供测试数据,供对应的测试方法使用。
- 这里定义了一个名为
userIds的数据提供器。
返回值:
- 它返回了一个二维数组
Object[][],每一行的值将作为参数传递给测试方法testGetPosts。 - 返回的数据为
{ {1}, {2}, {3}},代表测试将使用userId为 1、2 和 3 运行三次。
@Test(dataProvider = "userIds"):
- 告诉 TestNG 这个测试方法使用
userIds数据提供器提供的数据。
参数化:
- 测试方法的参数
userId会依次取值1、2和3,由@DataProvider提供。 - 每次测试都会运行一遍,分别验证
userId=1、userId=2和userId=3的接口响应。
Rest Assured 的请求部分:
.queryParam("userId", userId):动态设置查询参数userId,值为当前测试迭代的值(1、2 或 3)。- 最终 URL 会分别是:
https://jsonplaceholder.typicode.com/posts?userId=1https://jsonplaceholder.typicode.com/posts?userId=2https://jsonplaceholder.typicode.com/posts?userId=3
关联
提取响应值
Rest Assured 提供了 extract() 方法,可以从响应中提取需要的值。
示例 1:提取 JSON 中的某个字段
import static io.restassured.RestAssured.given;

public class ApiChainingExample {


    public static void main(String[] args) {


        // Step 1: 提取第一个接口响应中的 token
        String token = given()
            .baseUri("http://example.com/api")
            .when()
            .get("/login")
            .then()
            .statusCode(200)
            .extract()
            .path("data.token"); // 假设 token 在 data 对象中

        System.out.println("Extracted Token: " + token);

        // Step 2: 使用提取的 token 调用第二个接口
        given()
            .baseUri("http://example.com/api")
            .header("Authorization", "Bearer " + token) // 将 token 作为请求头
            .when()
            .get("/user/profile")
            .then()
            .statusCode(200)
            .log().body();
    }
}
提取复杂 JSON 数据
如果响应是一个复杂的 JSON 对象或数组,可以使用 JsonPath 或直接提取整个对象。
示例 2:提取数组中的特定值
java复制编辑import io.restassured.path.json.JsonPath;

public class ExtractArrayExample {


    public static void main(String[] args) {


        // 假设接口返回一个数组
        String response = given()
            .baseUri("http://example.com/api")
            .when()
            .get("/items")
            .then()
            .extract()
            .asString();

        // 使用 JsonPath 提取数组中的第一个 item 的 id
        JsonPath jsonPath = new JsonPath(response);
        String itemId = jsonPath.getString("items[0].id");
        System.out.println("Extracted Item ID: " + itemId);

        // 使用提取的 itemId 调用另一个接口
        given()
            .baseUri("http://example.com/api")
            .pathParam("id", itemId) // 动态设置路径参数
            .when()
            .get("/items/{id}")
            .then()
            .statusCode(200)
            .log().body();
    }
}
将值传递到后续请求中
你可以将提取的值存储在变量中,或者在多个测试方法之间共享。
示例 3:在多个测试方法之间共享数据(通过静态变量)
public class ApiChainingTest {


    private static String token; // 用于存储全局 token

    @Test
    public void loginAndExtractToken() {


        token = given()
            .baseUri("http://example.com/api")
            .when()
            .get("/login")
            .then()
            .statusCode(200)
            .extract()
            .path("data.token");

        System.out.println("Extracted Token: " + token);
    }

    @Test(dependsOnMethods = "loginAndExtractToken")
    public void useTokenInNextRequest() {


        given()
            .baseUri("http://example.com/api")
            .header("Authorization", "Bearer " + token)
            .when()
            .get("/user/profile")
            .then()
            .statusCode(200)
            .log().body();
    }
}
将值存储在公共工具类中
如果需要在多个测试类之间共享数据,可以封装一个工具类来管理提取的值。
示例 4:封装工具类
public class TokenUtil {


    private static String token;

    public static String getToken() {


        return token;
    }

    public static void setToken(String tokenValue) {


        token = tokenValue;
    }
}
在测试中使用:
@Test
public void loginAndExtractToken() {


    String token = given()
        .baseUri("http://example.com/api")
        .when()
        .get("/login")
        .then()
        .extract()
        .path("data.token");

    TokenUtil.setToken(token);
}

@Test(dependsOnMethods = "loginAndExtractToken")
public void useTokenInNextRequest() {


    String token = TokenUtil.getToken();

    given()
        .baseUri("http://example.com/api")
        .header("Authorization", "Bearer " + token)
        .when()
        .get("/user/profile")
        .then()
        .statusCode(200)
        .log().body();
}
关联路径参数和请求体
除了通过 Header 或 Query 参数传递数据,你也可以将提取的值作为路径参数或请求体的一部分。
示例 5:路径参数关联
given()
    .baseUri("http://example.com/api")
    .pathParam("id", extractedId) // 动态传递路径参数
    .when()
    .get("/items/{id}")
    .then()
    .statusCode(200);
.pathParam("id", extractedId) 是 Rest Assured 提供的一种方法,用于动态设置请求 URL 中的路径参数。它的作用是将 extractedId 的值替换到 URL 中定义的 {id} 占位符。
通常用大括号 {} 包裹表示占位符,例如 /items/{id}。
.pathParam(String name, Object value) 方法:
name是路径参数的名称(与 URL 中的占位符{}对应)。value是替换占位符的具体值。- Rest Assured 会自动将指定的值插入到 URL 中的占位符位置。
上述路径最终发送的请求 URL = http://example.com/api/items/{id}
示例 6:请求体关联
given()
    .baseUri("http://example.com/api")
    .header("Content-Type", "application/json")
    .body("{\"id\": \"" + extractedId + "\"}") // 动态构建请求体
    .when()
    .post("/process")
    .then()
    .statusCode(200);
与testng框架结合
你可以直接使用 testng框架,来进行测试。
引入依赖
在pom.xml 文件中引入testng框架依赖。
<!--testng-->
<dependency>
  <groupId>org.testng</groupId>
  <artifactId>testng</artifactId>
  <version>6.14.3</version>
</dependency>
具体实践,假设你有如下的测试接口:
package org.ceiling.controller;

import io.qameta.allure.*;
import io.qameta.allure.restassured.AllureRestAssured;
import io.restassured.RestAssured;
import org.ceiling.api.HttpBinApi;
import org.testng.annotations.BeforeTest;
import org.testng.annotations.Test;


public class TestHttpBInController {


    @Epic("测试")
    @Story("测试")
    @Severity(SeverityLevel.BLOCKER)
    @Step("测试")
    @Test(description = "get 请求")
    public static void testHttpBinGet(){


        Allure.step("发送get请求");
        given().
                when().log().all()
                .get("http://www.httpbin.org/get")
                .then()
                .log().all()
                .statusCode(200)
                .body("headers.Host", equalTo("www.httpbin.org"))  // 断言
                .body("url", equalTo("http://www.httpbin.org/get"));

    }

    ....................
}
您可以直接点击测试运行按钮测试即可
testng.xml
为了更加方便的执行,我们需要引入 testng.xml 文件来管理我们的测试框架。
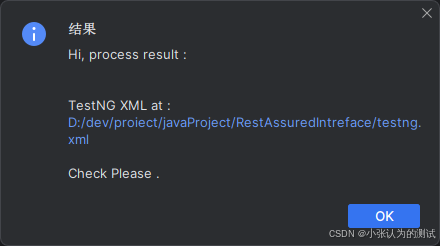
首先需要下载 testng.xml 生成插件
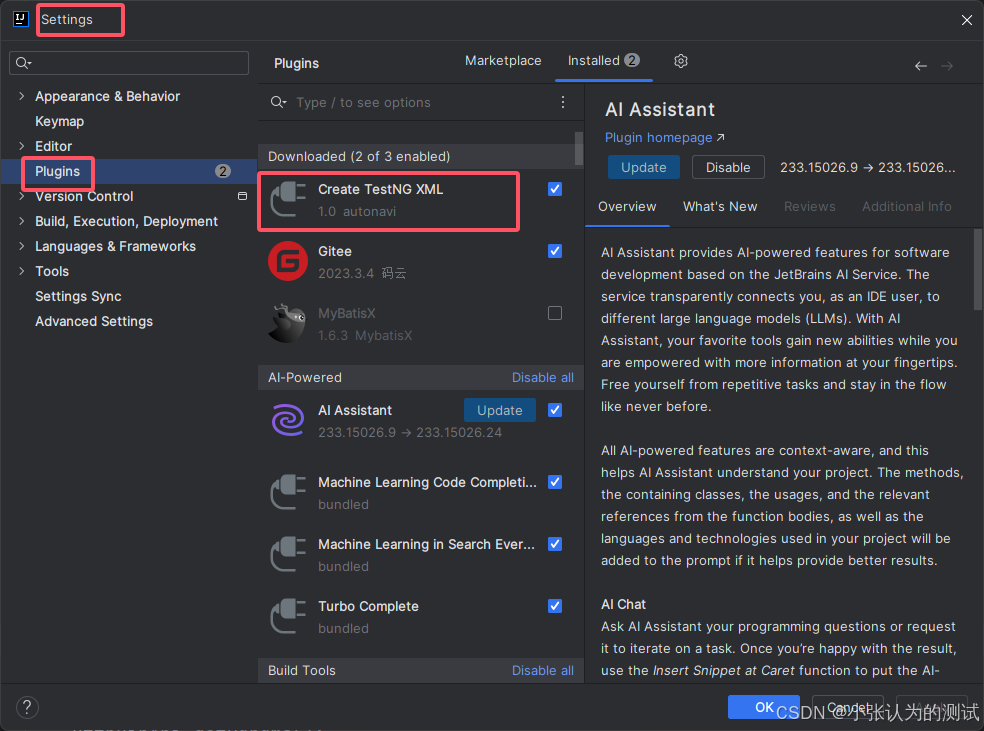
然后选择我们的测试类,右键,会有生成图标,它会帮助我们创建 testng.xml 文件

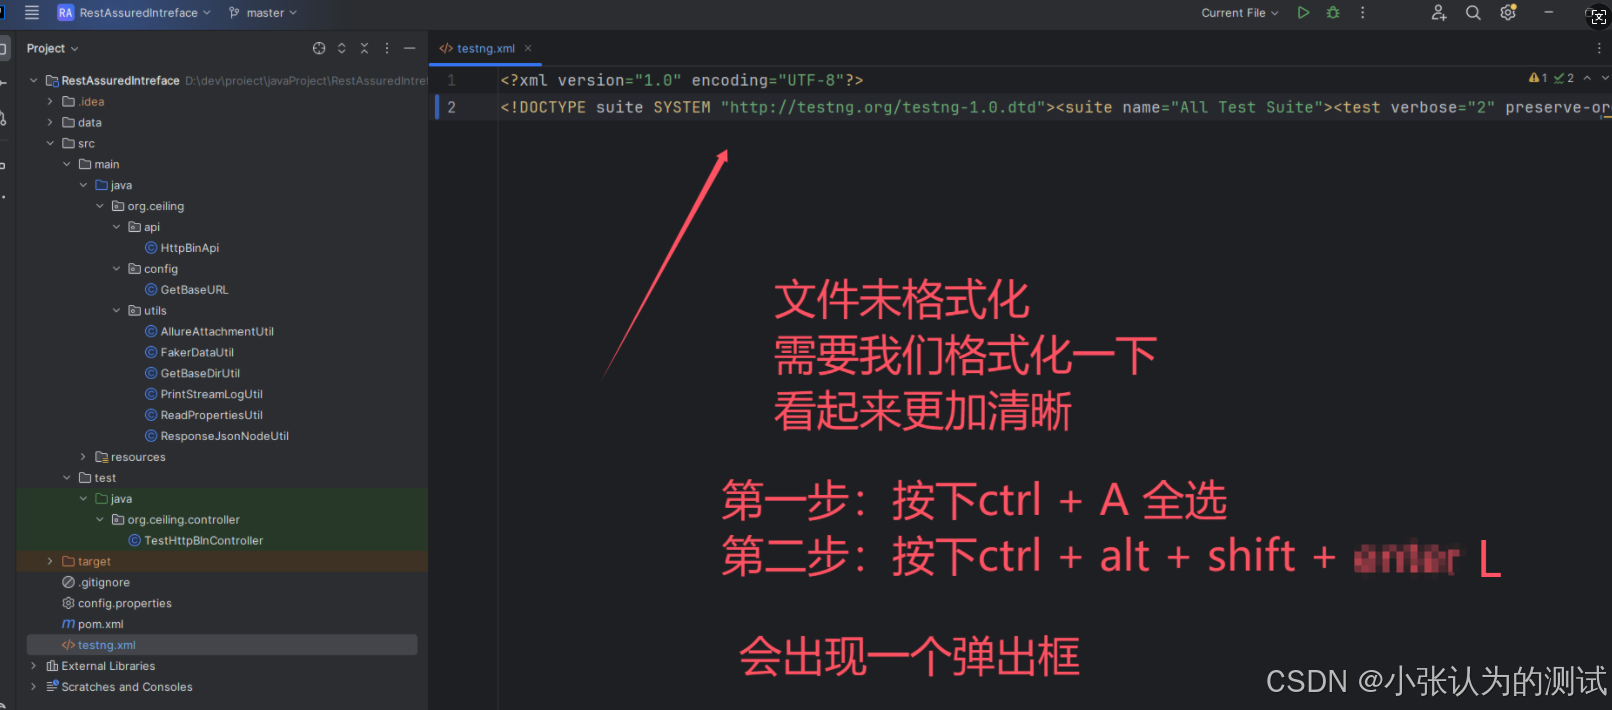
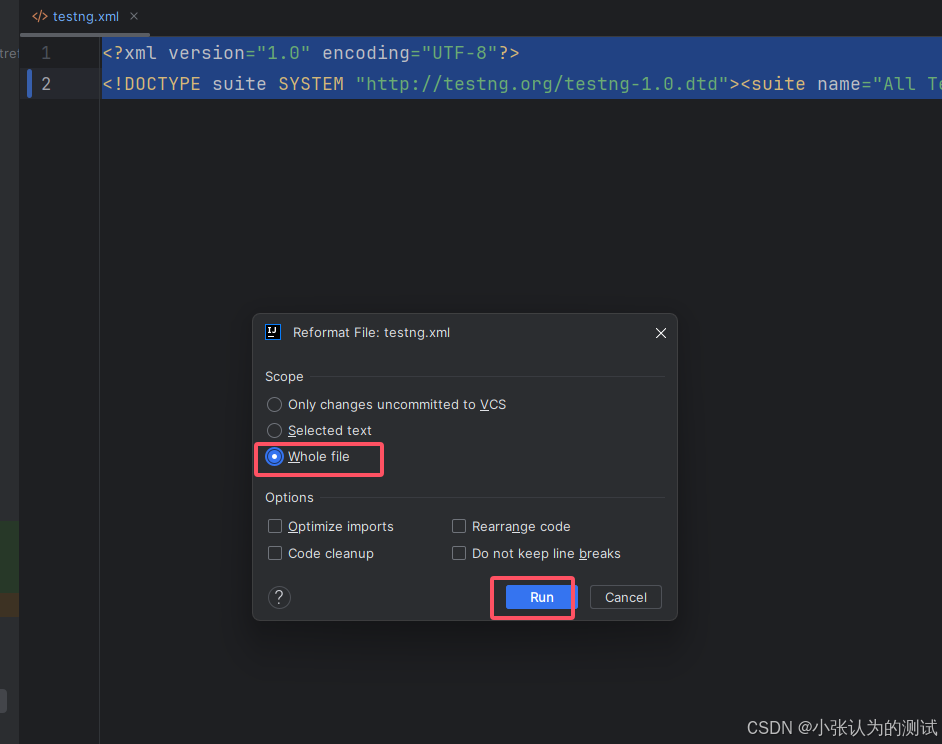
此时格式化完毕,下一步运行
如何运行?
我们需要在pom.xml 文件中添加以下加载
 <build>
    <defaultGoal>compile</defaultGoal>
    <plugins>
      <plugin>
        <groupId>org.apache.maven.plugins</groupId>
        <artifactId>maven-compiler-plugin</artifactId>
        <version>3.11.0</version>
        <configuration>
          <encoding>UTF-8</encoding>
          <source>21</source>
          <target>21</target>
        </configuration>
      </plugin>
      <!--maven-surefire-plugin的test目标会自动执行测试源码路径(默认为src/test/java/)下所有符合一组命名模式的测试类-->
      <plugin>
        <groupId>org.apache.maven.plugins</groupId>
        <artifactId>maven-surefire-plugin</artifactId>
        <version>3.0.0-M5</version>
        <configuration>
          <!-- 测试失败后,是否忽略并继续测试 -->
          <testFailureIgnore>true</testFailureIgnore>
          <suiteXmlFiles>
            <suiteXmlFile>testng.xml</suiteXmlFile>
          </suiteXmlFiles>
        </configuration>
      </plugin>
    </plugins>
  </build>
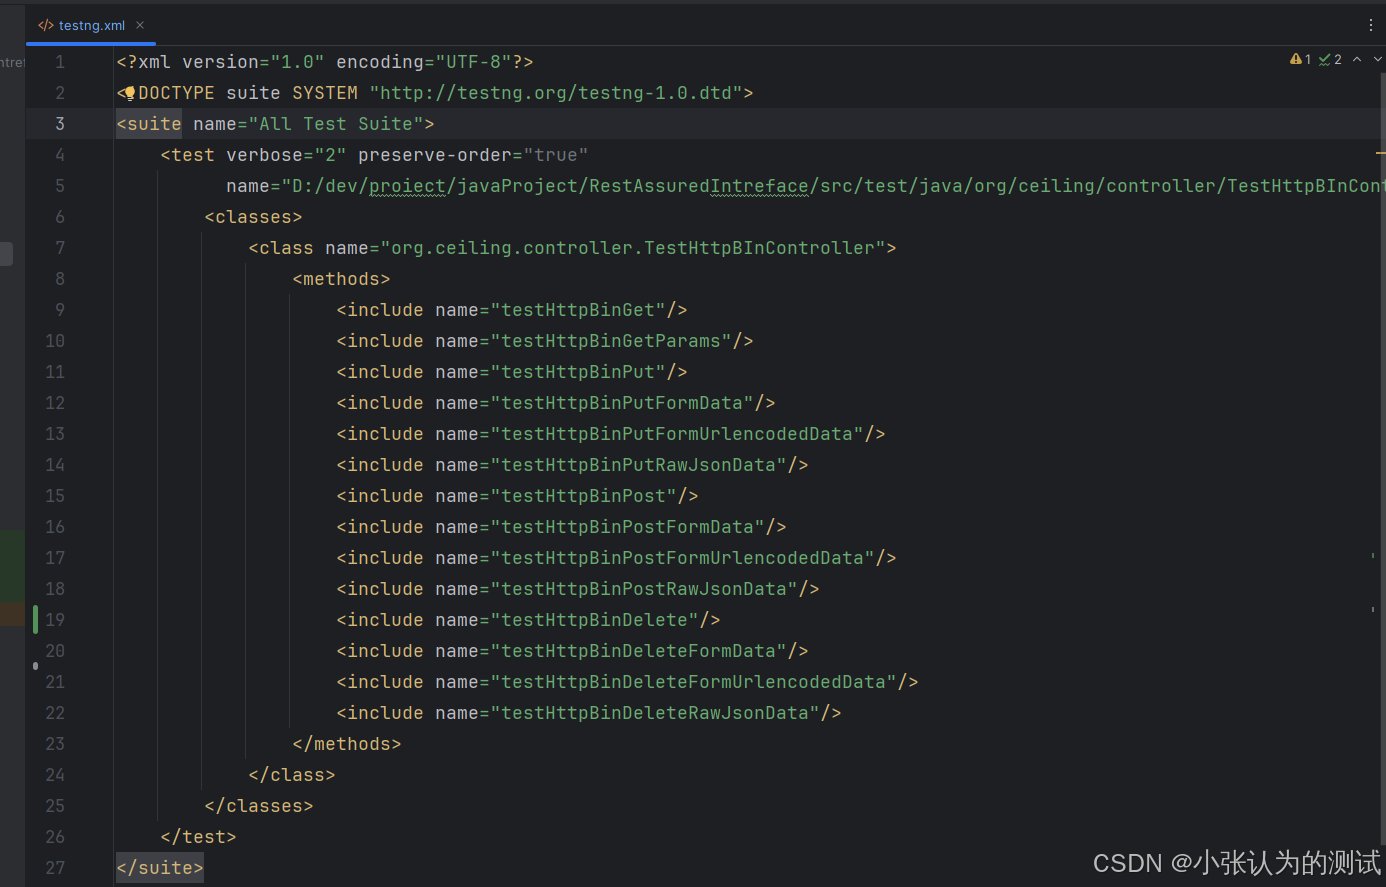
此时它会自动去找寻 testng.xml 文件,并且运行我们的测试用例
运行顺序为 testng.xml 文件中 测试方法的顺序
<methods>
      <include name="testHttpBinGet"/>
      <include name="testHttpBinGetParams"/>
      <include name="testHttpBinPut"/>
      ......................
</methods>
按照从上往下的顺序执行
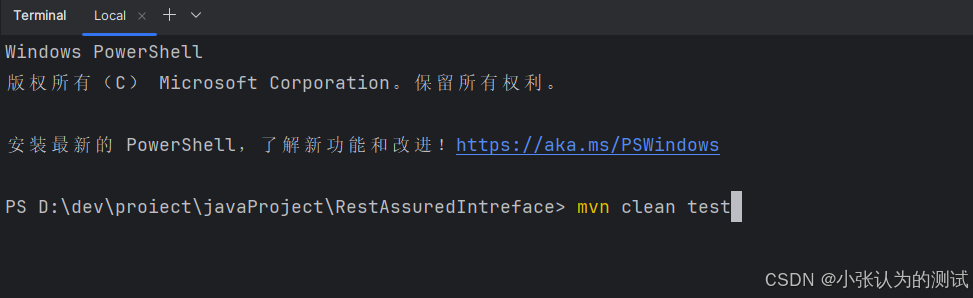
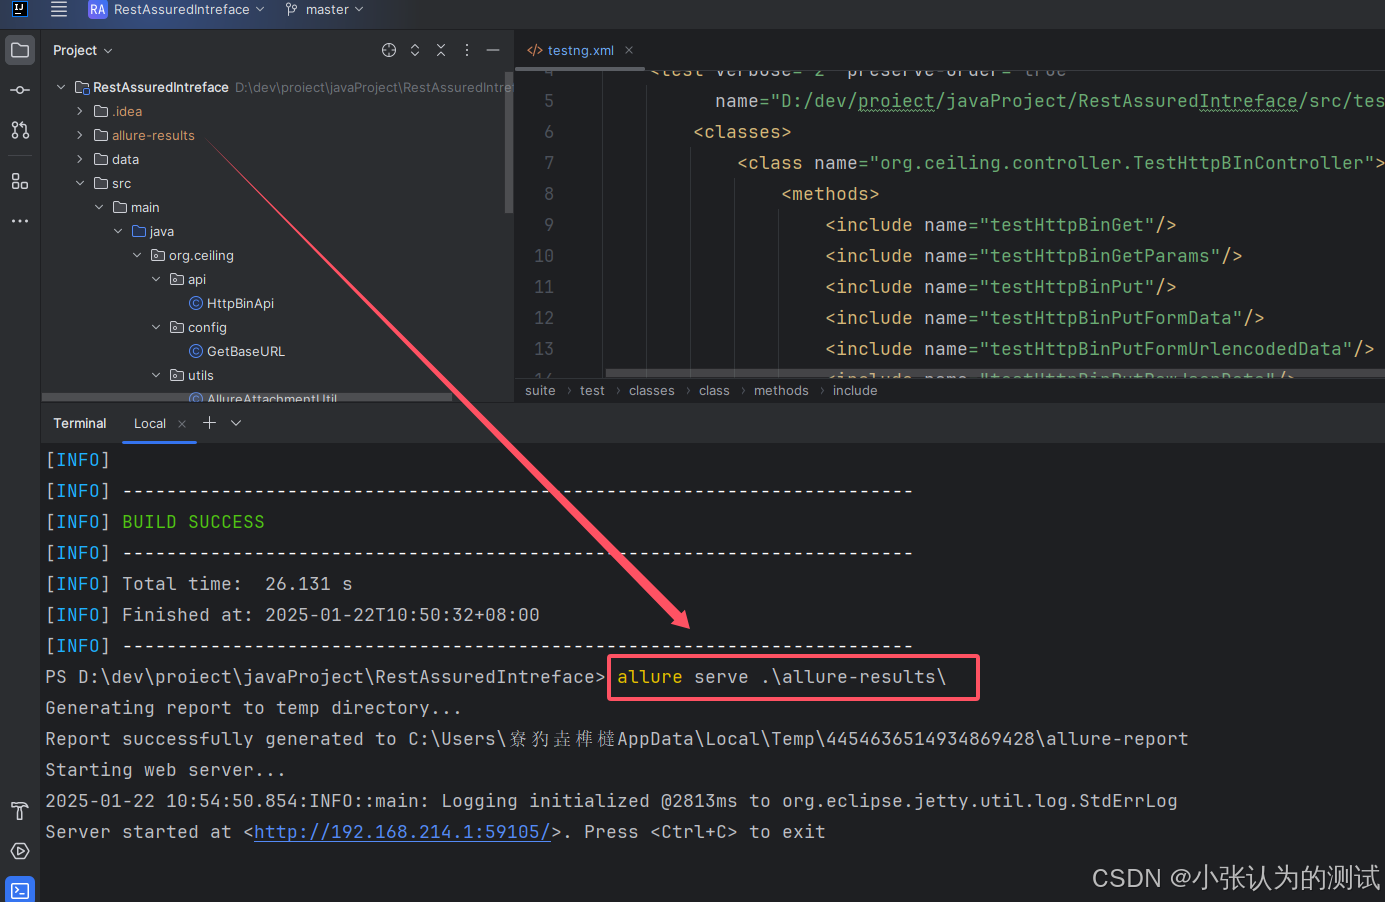
然后在终端执行 mvn clean test 即可运行
与allure 报告结合
添加依赖
我们需要在pom.xml文件中添加 allure 报告的相关依赖
<!-- Allure dependency for attaching screenshots -->
<dependency>
  <groupId>io.qameta.allure</groupId>
  <artifactId>allure-java-commons</artifactId>
  <version>2.17.2</version>
</dependency>

<!--allure  testng -->
<dependency>
  <groupId>io.qameta.allure</groupId>
  <artifactId>allure-testng</artifactId>
  <version>2.20.1</version>
</dependency>

 <!--添加请求日志到allure报告中-->
 <dependency>
      <groupId>io.qameta.allure</groupId>
      <artifactId>allure-rest-assured</artifactId>
      <version>2.13.9</version>
      <scope>compile</scope>
  </dependency>
在allure报告添加请求响应日志
如果需要将请求以及响应的日志展示在allure报告中
我们需要在我们的测试类中声明如下:
@BeforeTest
public void setUp(){
/*
* 在每个测试类之前执行一次
* 记录请求结果
* 将执行请求头 请求结果添加到allure报告中
* */
RestAssured.filters(new AllureRestAssured());
}
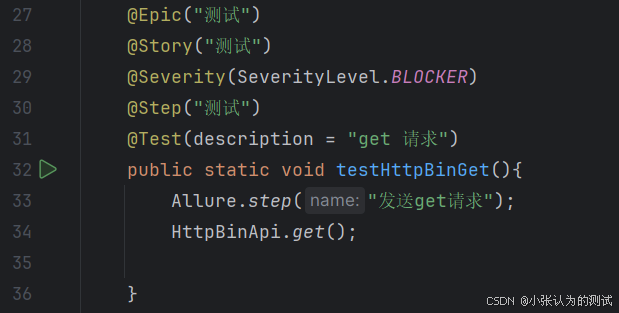
@Epic("测试")
@Story("测试")
@Severity(SeverityLevel.BLOCKER)
@Step("测试")
@Test(description = "get 请求")
public static void testHttpBinGet(){
Allure.step("发送get请求");
HttpBinApi.get();
}
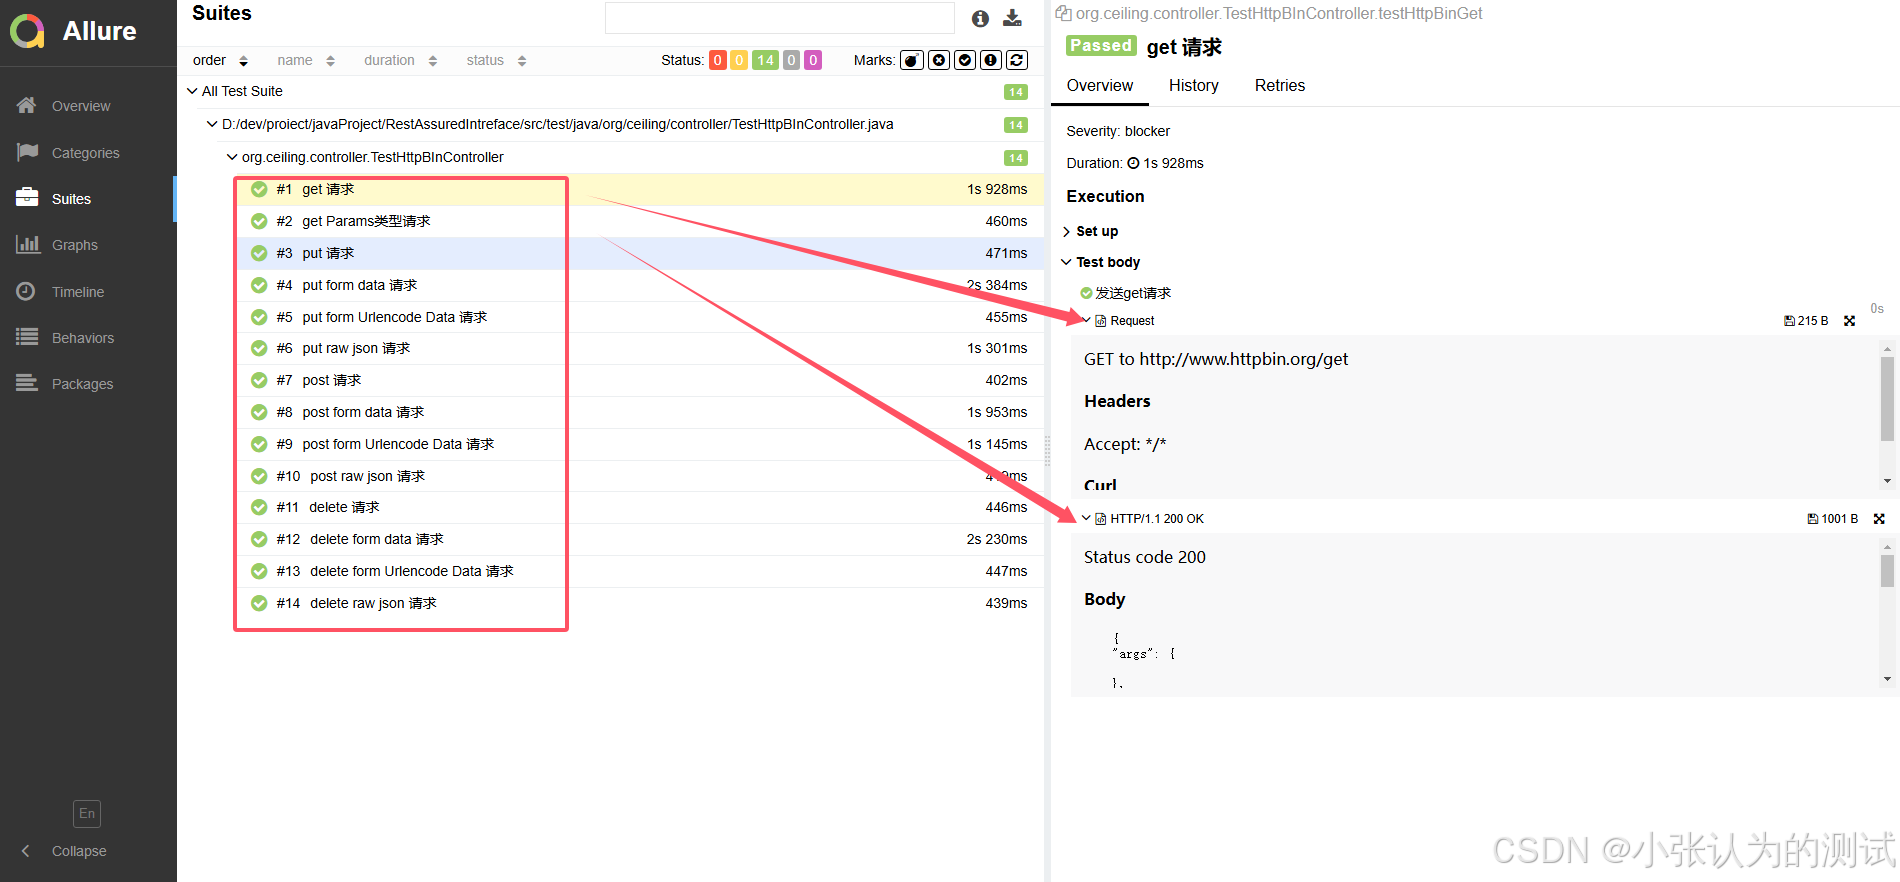
至此,rest assured + testng + allure 基本框架搭建已经完成了。