设计思路,如下:
1.通过采集卡将视频信号输出到个人PC中
2.PC按设置好的时间,视频属性分片保存
3.将步骤2中的视频,按预处理要求,得到待计算的视频片段
4.使用SSIM算法计算预处理后的视频,将计算得到的数据存放在硬盘中
5.WEB端,分页按时间倒序展示,视屏卡顿情况
6.循环执行上述1~5步骤,直到视频输出结束
ps:根据视频的质量的不同,计算时间和硬盘空间要求也要具体区分准备
代码A,实现了视频采集,预处理和计算的阶梯循环运行
#################################### 代码A ################################

import time
import multiprocessing
import cv2
from skimage.metrics import structural_similarity as ssim
import matplotlib.pyplot as plt
import os


class LagAnalysis():
    # 文件名称
    file_name = 0
    # 单文件最大时长 单位秒
    file_time = 900
    # 文件记录最大数量
    file_max = 3
    # 文件分辨率大小
    file_resolution_ratio = (640, 480)
    # 文件帧率单位
    file_frame_rate = 60
    # 原始文件路径
    file_o_path = os.getcwd() + "\\original"
    # 预处理文件路径
    file_p_path = os.getcwd() + "\\pretreatment"
    # 解析结果文件路径
    file_r_path = os.getcwd() + "\\result"

    def record(self):
        # 初始化摄像头
        cap = cv2.VideoCapture(0)  # 0 通常是默认摄像头的标识
        # 检查摄像头是否成功打开
        if not cap.isOpened():
            print("无法打开摄像头")
            exit()
        # 设置视频编码格式和输出视频文件
        fourcc = cv2.VideoWriter_fourcc(*'XVID')
        name = self.file_name
        out_file = "original/output_" + str(name) + ".avi"
        out = cv2.VideoWriter(out_file, fourcc, self.file_frame_rate, self.file_resolution_ratio)
        flag = 0
        # 单文件包含最大帧数
        flag1 = self.file_time * self.file_frame_rate
        # 循环捕获视频帧
        while cap.isOpened() and name < self.file_max:
            ret, frame = cap.read()
            if ret:
                if flag < flag1:
                    # 写入帧到输出视频文件
                    out.write(frame)
                    flag = flag + 1
                else:
                    out.release()
                    flag = 0
                    name = name + 1
                    if name < self.file_max:
                        out_file = "original/output_" + str(name) + ".avi"
                        out = cv2.VideoWriter(out_file, fourcc, self.file_frame_rate, self.file_resolution_ratio)
            else:
                break
        # 释放资源
        cap.release()
        out.release()
        cv2.destroyAllWindows()

    def pretreatment(self, x, y, width, height, f):
        # 预处理视频函数
        index = f.find("/")
        out_file = "pretreatment/" + f[index + 1:]
        fourcc = cv2.VideoWriter_fourcc(*'XVID')
        cap = cv2.VideoCapture(f)
        out = cv2.VideoWriter(out_file, fourcc, self.file_frame_rate, (width, height))
        # 检查视频是否成功打开
        if not cap.isOpened():
            print("Error: Could not open video.")
            exit()
        # 通过循环读取视频的每一帧
        while True:
            # 读取下一帧,ret是一个布尔值,表示是否成功读取
            # frame是读取到的帧,如果读取失败,则为None
            ret, frame = cap.read()
            # 如果正确读取帧,进行处理
            if ret:
                # 展示帧
                # cv2.imshow('Frame', frame)
                cropped_image = frame[y:y + height, x:x + width]
                # cv2.imshow('Cropped Image', cropped_image)
                out.write(cropped_image)
                # time.sleep(10)
            else:
                # 如果读取帧失败,退出循环
                break
        cap.release()
        out.release()
        cv2.destroyAllWindows()

    def calculate(self, width, height, f):
        # 预处理视频函数
        index = f.find("/")
        index1 = f.find(".")
        out_file = "result/" + f[index + 1:index1] + ".txt"
        # fourcc = cv2.VideoWriter_fourcc(*'XVID')
        fourcc = cv2.VideoWriter_fourcc(*'XVID')
        cap = cv2.VideoCapture(f)
        # 检查视频是否成功打开
        if not cap.isOpened():
            print("Error: Could not open video.")
            exit()
        ret, frame = cap.read()
        old_frame = frame
        # 打开文件进行写入
        with open(out_file, 'w') as file:
            # 通过循环读取视频的每一帧
            while True:
                # 读取下一帧,ret是一个布尔值,表示是否成功读取
                # frame是读取到的帧,如果读取失败,则为None
                ret, frame = cap.read()
                # 如果正确读取帧,进行处理
                if ret:
                    score, diff = self.compare_images(old_frame, frame)
                    file.write(str(score))
                    file.write("\n")
                else:
                    # 如果读取帧失败,退出循环
                    break
        cap.release()
        cv2.destroyAllWindows()
        file.close()

    def compare_images(self, imageA, imageB):
        # 转换图片为灰度
        grayA = cv2.cvtColor(imageA, cv2.COLOR_BGR2GRAY)
        grayB = cv2.cvtColor(imageB, cv2.COLOR_BGR2GRAY)
        # 计算SSIM
        score, diff = ssim(grayA, grayB, full=True)
        diff = (diff * 255).astype("uint8")
        return score, diff

    def show_images(self, imageA, imageB, diff):
        fig, axes = plt.subplots(1, 3, figsize=(20, 8))
        ax = axes.ravel()
        ax[0].imshow(imageA, cmap=plt.cm.gray)
        ax[0].set_title('Image A')
        ax[1].imshow(imageB, cmap=plt.cm.gray)
        ax[1].set_title('Image B')
        ax[2].imshow(diff, cmap=plt.cm.gray)
        ax[2].set_title('Difference')
        for a in ax:
            a.axis('off')
        plt.show()

    def listen1(self):
        # 监听指定目录下是否有新的待预处理的文件
        name = self.file_name
        flag = 0
        o_name = ""
        next_name = ""
        while name < self.file_max and flag < self.file_max:
            file_list = [file for file in os.listdir(self.file_o_path) if
                         os.path.isfile(os.path.join(self.file_o_path, file))]
            print(file_list)
            next_name = "output_" + str(name + 1) + ".avi"
            o_name = "original/output_" + str(name) + ".avi"
            if next_name in file_list:
                self.pretreatment(0, 0, 640, 240, o_name)
                name = name + 1
            if name == self.file_max-1:
                flag = flag + 1
        time.sleep(self.file_time)
        self.pretreatment(0, 0, 640, 240, o_name)

    def listen2(self):
        # 监听指定目录下是否有新的待计算的预处理文件
        name = self.file_name
        flag = 0
        o_name = ""
        next_name = ""
        while name < self.file_max and flag < self.file_max:
            file_list = [file for file in os.listdir(self.file_p_path) if
                         os.path.isfile(os.path.join(self.file_p_path, file))]
            print(file_list)
            next_name = "output_" + str(name + 1) + ".mp4"
            o_name = "pretreatment/output_" + str(name) + ".mp4"
            if next_name in file_list:
                self.calculate(640, 240, o_name)
                name = name + 1
            if name == self.file_max-1:
                flag = flag + 1
        # time.sleep(self.file_time)
        self.calculate(640, 240, o_name)

if __name__ == "__main__":
    a = LagAnalysis()
    process = multiprocessing.Process(target=a.listen1)
    process.start()
    process1 = multiprocessing.Process(target=a.listen2)
    process1.start()
    a.record()
    # process.join()
    process1.join()
代码B,实现了后端获取计算结果的分页功能
// 代码B
const express = require('express');
const fs = require('fs');
const path = require('path');

const app = express();
const port = 3000;
// const txtDirectory = path.join(__dirname, 'txt_files'); // Adjust this path to your txt files directory
const txtDirectory = path.join("D:/others/python/ts_autotest/private/", 'result');

app.use(express.static('public'));

app.get('/files', (req, res) => {
    const page = parseInt(req.query.page) || 1;
    const limit = parseInt(req.query.limit) || 20;

    fs.readdir(txtDirectory, (err, files) => {
        if (err) {
            return res.status(500).json({ error: 'Failed to read directory' });
        }

        const txtFiles = files.filter(file => file.endsWith('.txt'));
        const totalFiles = txtFiles.length;
        const totalPages = Math.ceil(totalFiles / limit);
        const startIndex = (page - 1) * limit;
        const endIndex = Math.min(startIndex + limit, totalFiles);

        const selectedFiles = txtFiles.slice(startIndex, endIndex);
        const fileDataPromises = selectedFiles.map(file => {
            const filePath = path.join(txtDirectory, file);
            return new Promise((resolve, reject) => {
                fs.readFile(filePath, 'utf-8', (err, data) => {
                    if (err) {
                        return reject(err);
                    }
                    const parsedData = data.split('\n').map(Number);
                    resolve({ fileName: file, data: parsedData });
                });
            });
        });

        Promise.all(fileDataPromises)
            .then(fileData => res.json({ files: fileData, totalPages }))
            .catch(err => res.status(500).json({ error: 'Failed to read files' }));
    });
});

app.listen(port, () => {
    console.log(`Server is running at http://localhost:${port}`);
});
代码C,实现了前端展示计算结果的折线图
扫描二维码关注公众号,回复:
17602043 查看本文章

<--- 代码C --->
<!DOCTYPE html>
<html lang="en">
<head>
<meta charset="UTF-8">
<meta name="viewport" content="width=device-width, initial-scale=1.0">
<title>Text Files to Charts</title>
<style>
body {
font-family: Arial, sans-serif;
}
.container {
display: flex;
flex-direction: column;
flex-wrap: wrap;
margin: 20px;
}
.row {
display: flex;
width: 100%;
margin-bottom: 20px;
}
.chart {
flex: 1;
margin: 0 10px;
}
canvas {
width: 100%;
}
#pagination {
margin-top: 20px;
text-align: center;
}
#pagination button {
margin: 0 5px;
padding: 5px 10px;
}
#modal {
display: none;
position: fixed;
top: 50%;
left: 50%;
transform: translate(-50%, -50%);
background: white;
padding: 20px;
box-shadow: 0 0 10px rgba(0, 0, 0, 0.5);
}
#modal canvas {
width: 500px;
height: 300px;
}
</style>
</head>
<body>
<div class="container" id="container"></div>
<div id="pagination"></div>
<div id="modal">
<button onclick="closeModal()">Close</button>
<canvas id="zoomChart"></canvas>
</div>
<!-- Include Chart.js library -->
<script src="https://cdn.jsdelivr.net/npm/chart.js"></script>
<script>
const itemsPerPage = 20;
let currentPage = 1;
let totalPages = 1;
async function fetchTextFiles(page) {
const response = await fetch(`/files?page=${page}&limit=${itemsPerPage}`);
const filesData = await response.json();
return filesData;
}
function initializeChart(chartId, data) {
const ctx = document.getElementById(chartId).getContext('2d');
const chart = new Chart(ctx, {
type: 'line',
data: {
labels: data.map((_, index) => `Point ${index + 1}`),
datasets: [{
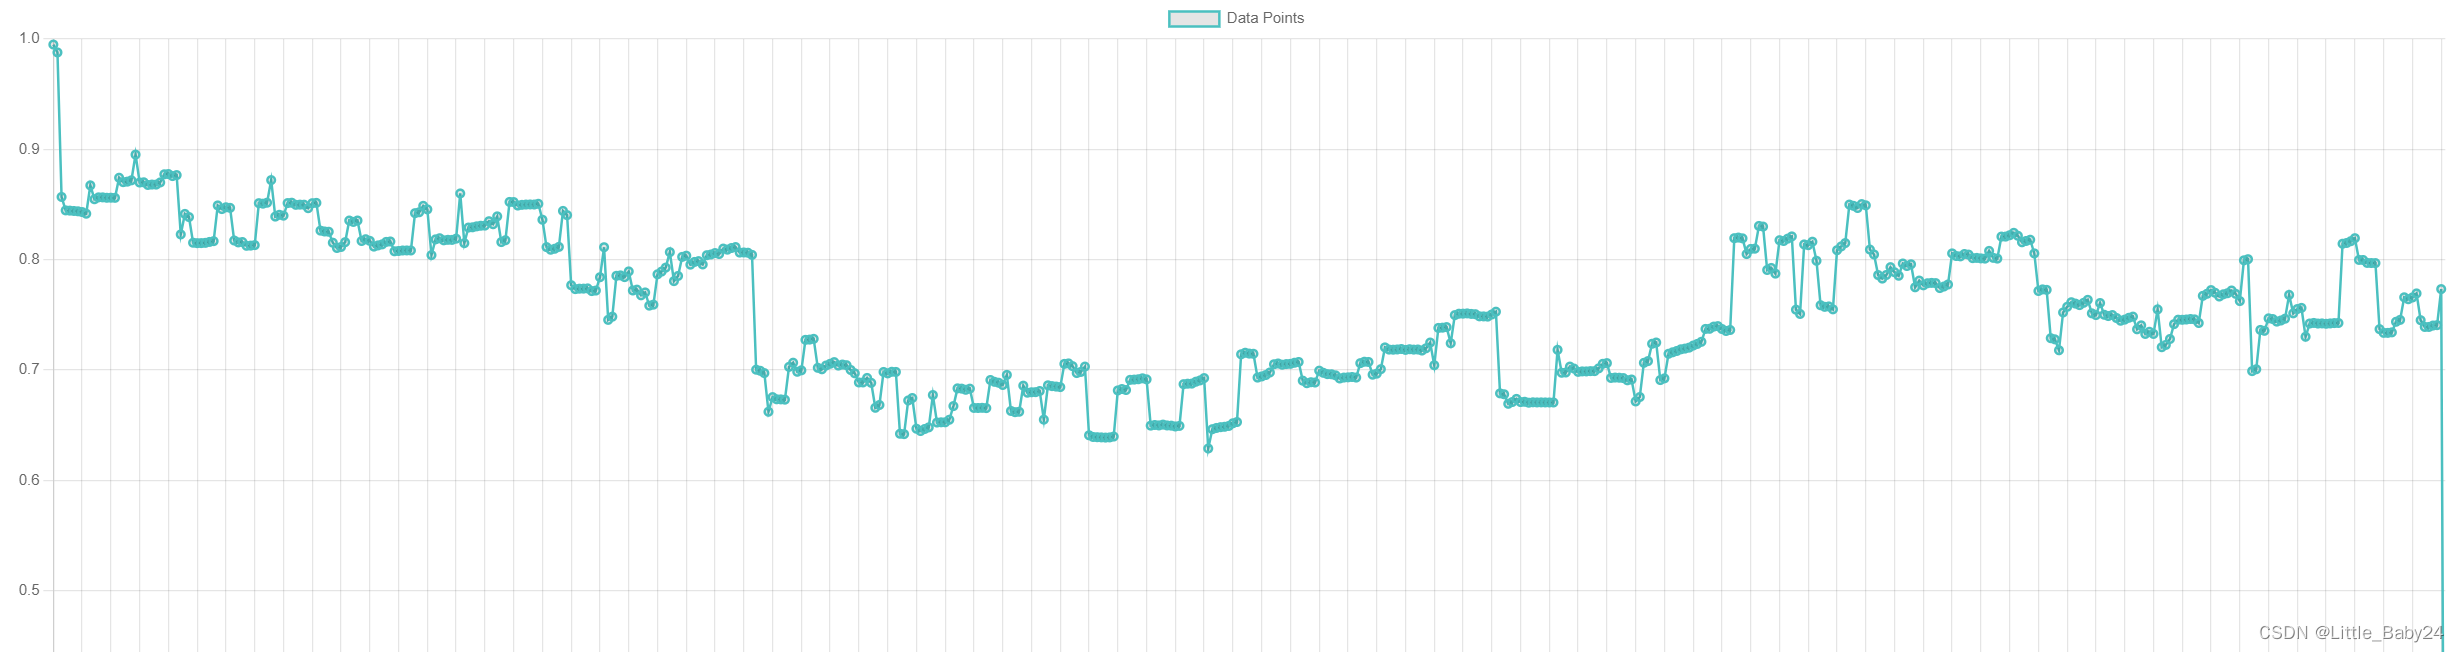
label: 'Data Points',
data: data,
borderColor: 'rgba(75, 192, 192, 1)',
borderWidth: 2,
fill: false
}]
},
options: {
responsive: true,
scales: {
x: {
beginAtZero: true
},
y: {
beginAtZero: true
}
},
onClick: (event, elements) => {
if (elements.length > 0) {
const elementIndex = elements[0].index;
showModal(data, elementIndex);
}
}
}
});
}
function createRow(data, chartId) {
const row = document.createElement('div');
row.className = 'row';
const chartContainer = document.createElement('div');
chartContainer.className = 'chart';
const canvasElement = document.createElement('canvas');
canvasElement.id = chartId;
chartContainer.appendChild(canvasElement);
row.appendChild(chartContainer);
return row;
}
function updatePaginationControls() {
const paginationContainer = document.getElementById('pagination');
paginationContainer.innerHTML = '';
for (let i = 1; i <= totalPages; i++) {
const button = document.createElement('button');
button.textContent = i;
button.disabled = i === currentPage;
button.addEventListener('click', () => {
currentPage = i;
initializePage();
});
paginationContainer.appendChild(button);
}
}
async function initializePage() {
const container = document.getElementById('container');
container.innerHTML = '';
const filesData = await fetchTextFiles(currentPage);
totalPages = filesData.totalPages;
filesData.files.forEach((fileData, index) => {
const row = createRow(fileData.data, `chart${index + 1}`);
container.appendChild(row);
initializeChart(`chart${index + 1}`, fileData.data);
});
updatePaginationControls();
}
function showModal(data, index) {
const modal = document.getElementById('modal');
const ctx = document.getElementById('zoomChart').getContext('2d');
const zoomData = data.slice(Math.max(0, index - 5), index + 6);
new Chart(ctx, {
type: 'line',
data: {
labels: zoomData.map((_, i) => `Point ${i + 1}`),
datasets: [{
label: 'Zoomed Data Points',
data: zoomData,
borderColor: 'rgba(255, 99, 132, 1)',
borderWidth: 2,
fill: false
}]
},
options: {
responsive: true,
scales: {
x: {
beginAtZero: true
},
y: {
beginAtZero: true
}
}
}
});
modal.style.display = 'block';
}
function closeModal() {
const modal = document.getElementById('modal');
modal.style.display = 'none';
}
document.addEventListener('DOMContentLoaded', function() {
initializePage();
});
</script>
</body>
</html>
项目运行成功后,刷新浏览器,页面将实时显示当前视频片段的卡顿情况(如下图)