关于Ar识别的功能,使用了第三方EasyAR再配合微信小程序开发文档相关api实现的功能,
基础效果如下
ar扫描
参考文档如下:
easy ar官网 https://help.easyar.cn/EasyAR%20Miniprogram/manual.html#id5
微信官方关于ar文档 https://developers.weixin.qq.com/miniprogram/dev/component/xr-frame/overview/
废话不多说,具体操作如下
一、在easy ar官网上查看文档并下载微信小程序Ar模版
下图是下载实例位置
文档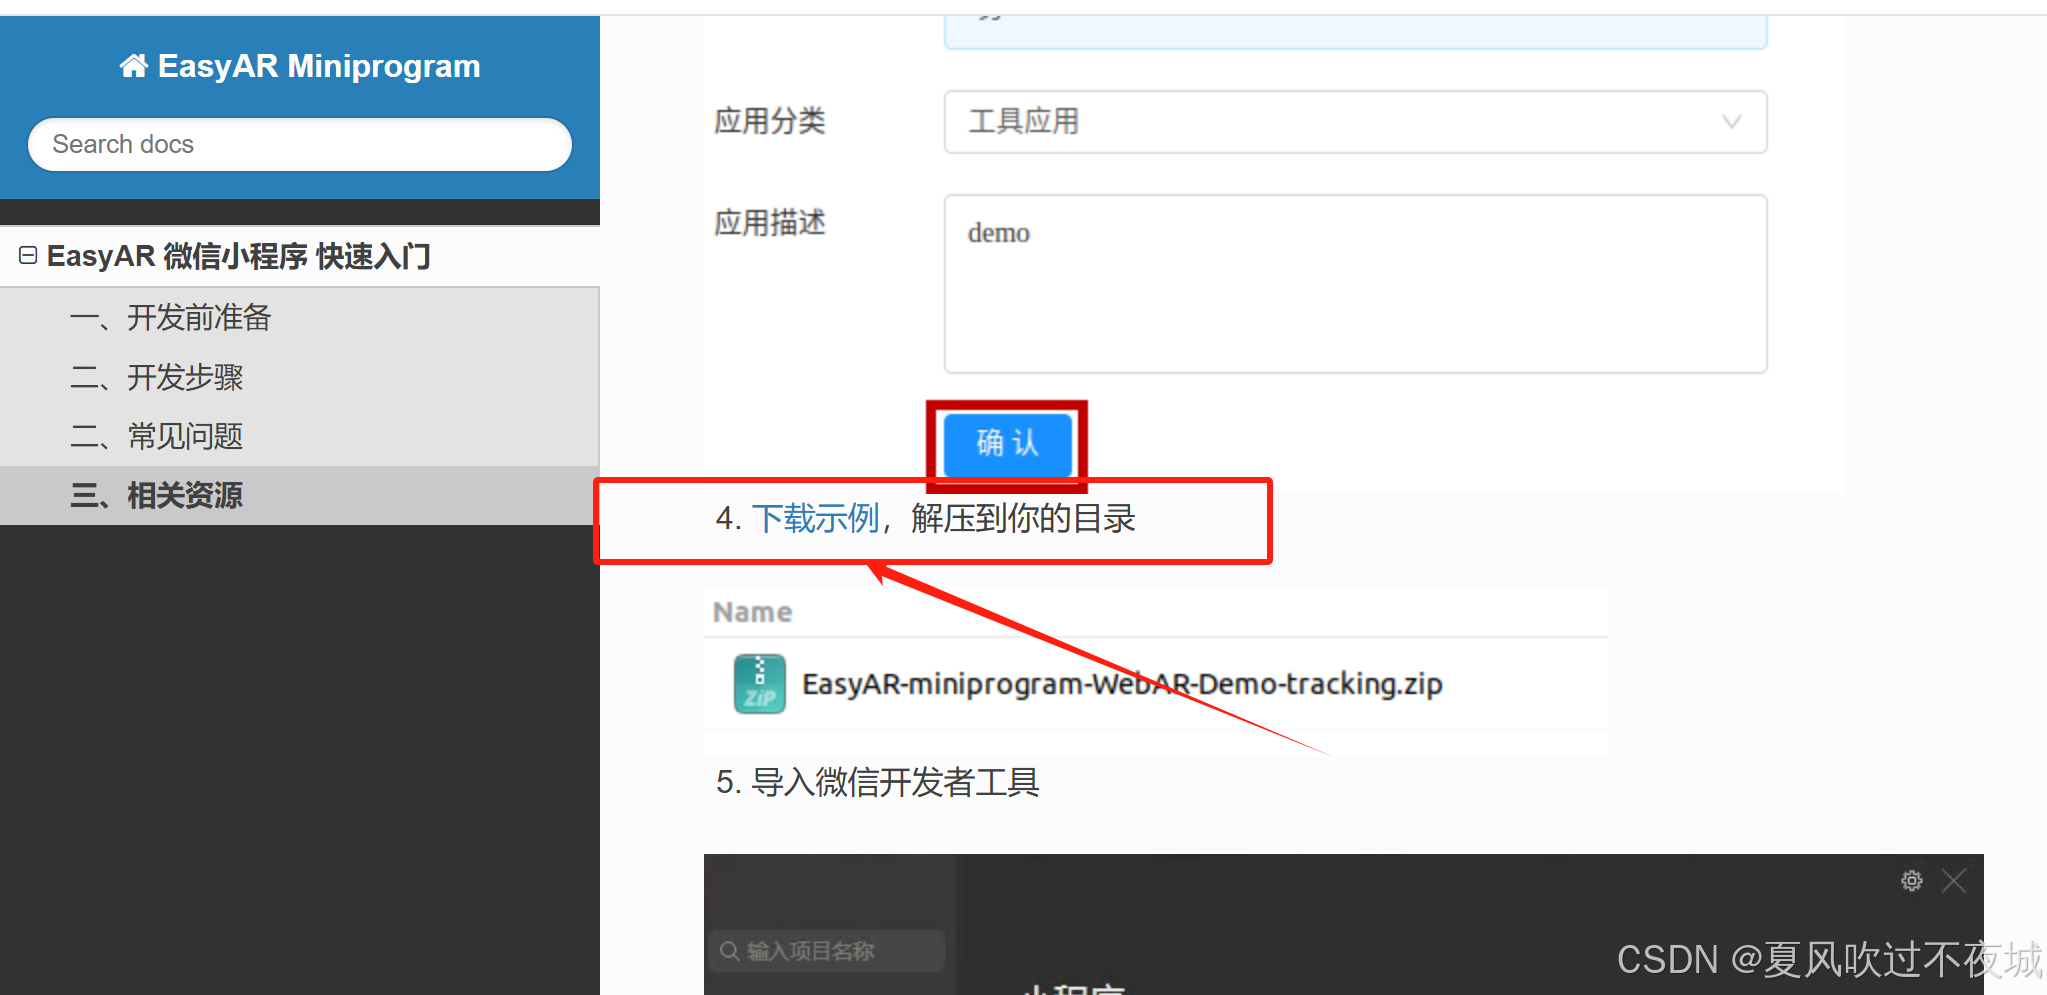
关于esay ar后台账号等配置,文档中有提示,这里就不在追叙了
二、将模版里需要用的的文件移入到自己项目中
这里需要注意的是,下载的模版是直接使用微信小程序原生代码的,我们需要使用Hbuildx打包成小程序代码,再将对应的文件放置在对应位置
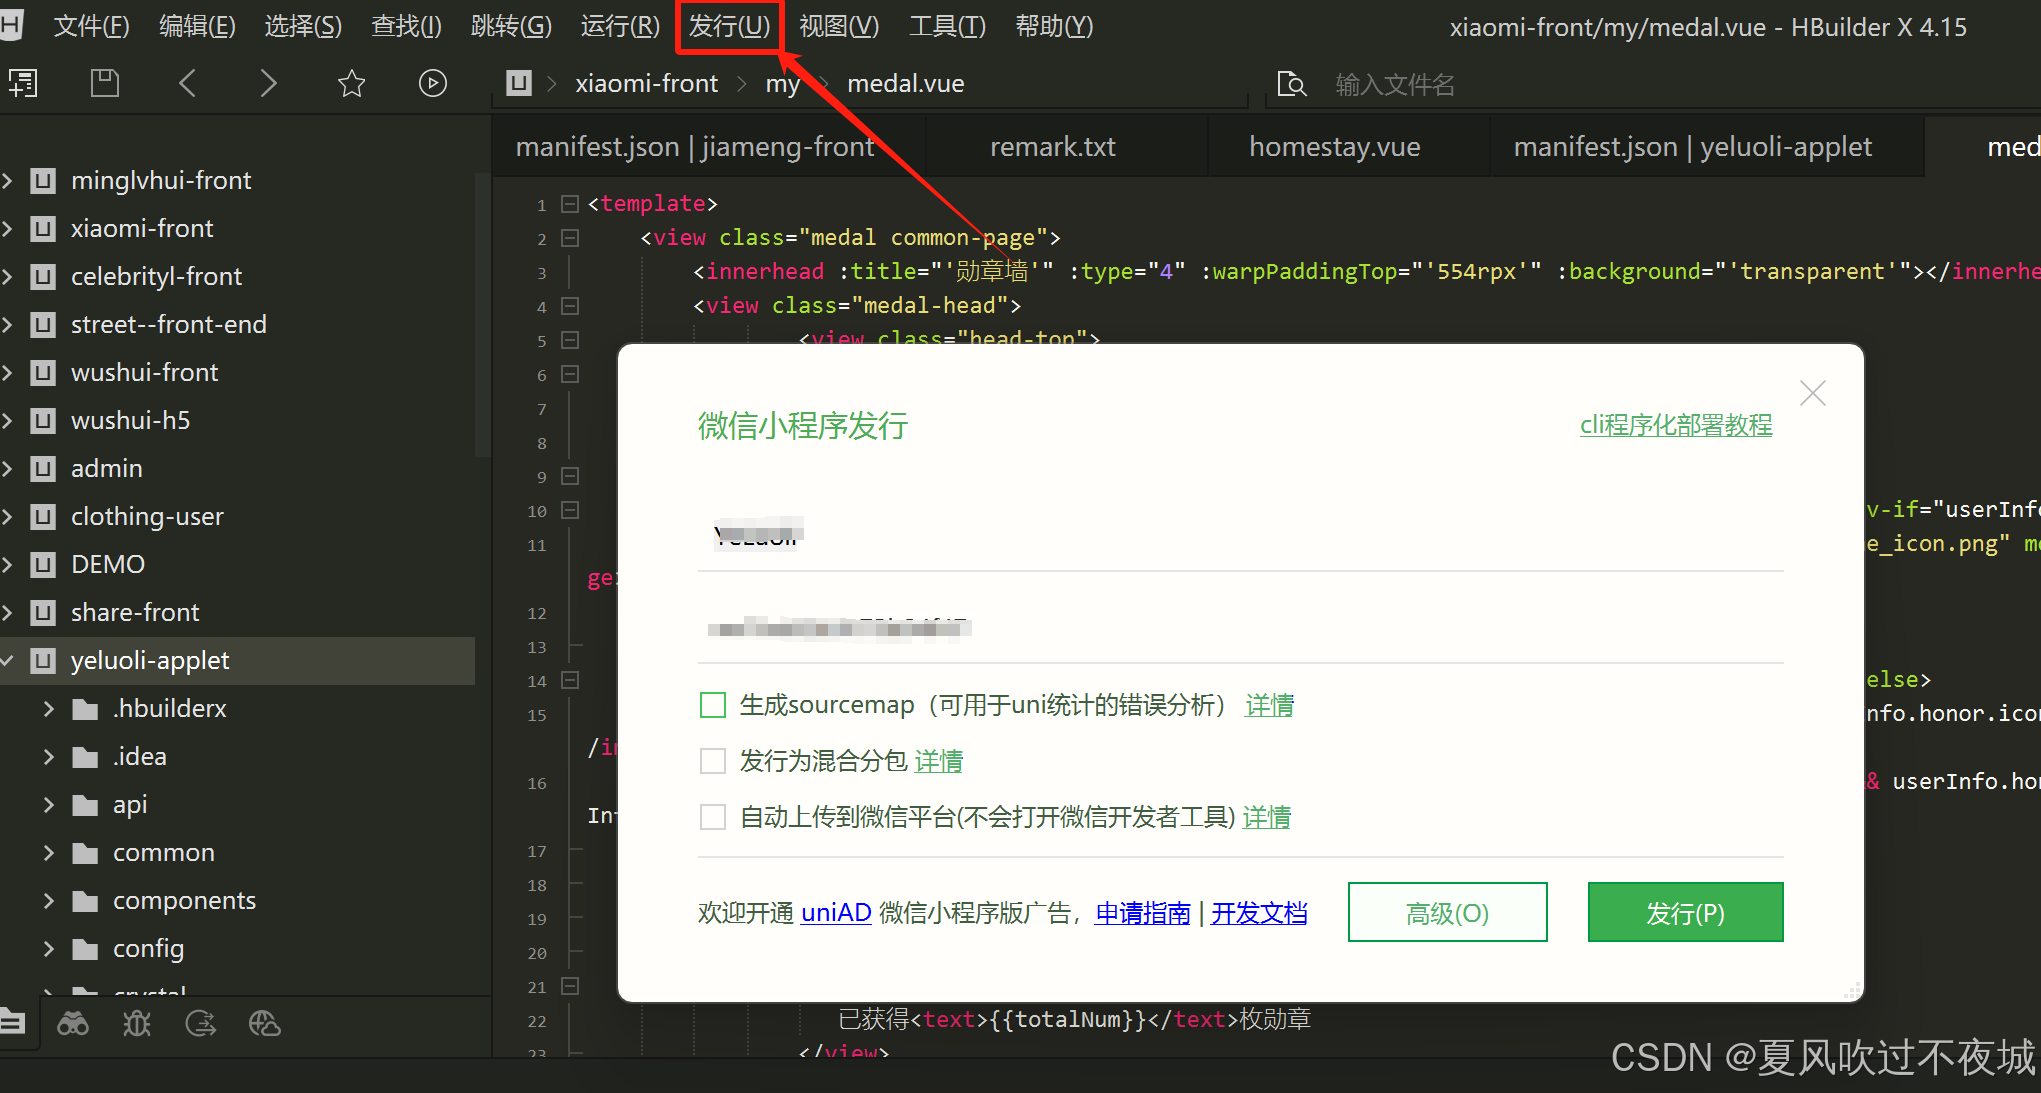
1、uniapp 生成小程序代码
点击发行,选中微信小程序,弹出如下界面。填写对应数据点击发行就行
打包完成后,我们可以看到如下路径

2、将下面的文件放到自己的项目对应位置里
/components文件夹下 easyar-ar 、easyar-cloud、easyar-crs、images、libs、loading、
/pages文件下tracking文件夹
以及外部的sitemap.json、project.private.config.json、project.config.json、package.json
这里我个人使用vscode软件去打开此文件
需要注意
package.json中使用了两个插件,需要npm i
app.json中需要添加当前扫描页面 pages/tracking/index
三、修改文件内容
1、配置app.js文件
在app.js里面配置如下数据,咱们可以拿模版里面的内容复制过来,然后去easy ar后台拿去对应的数据

2、修改扫码界面及逻辑
1、界面调整
根据个人情况而定,我的界面如下

在/components/easyar-crs/下修改
easyar-crs.wxml
<view class="container">
    <easyar-ar runingCrs="{

   {runingCrs}}" tracking="{

   {tracking}}" config="{

   {config}}" width="{

   {width * dpi}}" height="{

   {height * dpi}}" style="width:{

   {width}}px;height:{

   {height}}px" bind:searchSuccess="onSearchSuccess" bind:showImage="showImage" markerImg="{

   {markerImg}}"></easyar-ar>
</view>
<view class="controller">
    <image class="back-icon"  src="../images/arrow_left.png" bind:tap="back" ></image>
    <view class="loading" wx:if="{

   {showLoading}}">
        <loading text="{

   {showLoadingText}}"></loading>
    </view>
</view>
easyar-crs.js
Component({
    data: {
        config: {},
        // showOverlay: true,
        showLoading: true,
        showLoadingText: "识别中",
        width: 320,
        height: 500,
        dpi: 1,
        // runingCrs: false,
        // tracking: false,

        showOverlay: false,
        runingCrs: true,
        tracking: true,

    },
    lifetimes: {
        attached() {
            const sys = wx.getSystemInfoSync();
            this.setData({
                width: sys.windowWidth,
                height: sys.windowHeight,
                dpi: sys.pixelRatio,
                config: getApp().globalData.config,
            });
        },
    },
    methods: {
        showLoading(text='识别中') {
            this.setData({
                showLoading: true,
                showLoadingText: text,
            });
        },
        hideLoading() {
            this.setData({
                showLoading: false,
            });
        },
        back() {
            this.stop();
            this.setData({
                showOverlay: true,
                tracking: false,
            });
            wx.redirectTo({url:'/pages/main/index'})
        },
        download() {
            wx.saveImageToPhotosAlbum({
                filePath: "../images/xiongmao.png",
                success: res => wx.showToast({ title: "已保存到相册", icon: "none" }),
                fail: res => wx.showToast({ title: "保存失败", icon: "none" }),
            });
        },
        scan() {
            this.setData({
                showOverlay: false,
                runingCrs: true,
                tracking: true,
            });
            this.showLoading("识别中");
        },
        stop() {
            this.setData({ runingCrs: false });
            this.hideLoading();
        },
        onSearchSuccess(res) {
            // 识别到目标的回调
            console.info(res);
            this.stop();
        },
    },

})
easyar-crs.wxss
.container {
    position: absolute;
    top: 0;
    left: 0;
    z-index: 1;
}

.controller {
    position: absolute;
    top: 0;
    left: 0;
    bottom: 0;
    z-index: 10;
    width: 100%;
}

.overlay {
    position: absolute;
    top: 0;
    left: 0;
    width: 100vw;
    height: 100vh;
    background: rgba(63, 63, 63, 0.6);
    z-index: 30;
}

.overlay-top {
    position: absolute;
    margin: 100rpx 44rpx 0 54rpx;
    left: 0;
    right: 0;
}

.title {
    position: absolute;
    font-size: 36rpx;
    font-family: PingFangSC-Medium, PingFang SC, serif;
    font-weight: 500;
    color: #FFFFFF;
    line-height: 46rpx;
}

.logo {
    position: absolute;
    top: 0;
    right: 0;
    width: 178rpx;
    height: 54rpx;
}

.desc {
    position: absolute;
    top: 106rpx;
    font-size: 28rpx;
    font-family: PingFangSC-Medium, PingFang SC, serif;
    font-weight: 500;
    color: #FFFFFF;
    line-height: 46rpx;
}

.back-icon{
    position: absolute;
    width: 40rpx;
    height: 40rpx;
    top: 100rpx;
    left: 30rpx;
    z-index: 30;
}

.overlay-bottom {
    position: absolute;
    width: 540rpx;
    left: 0;
    right: 0;
    bottom: 0;
    margin: 0 auto;
}

.loading {
    position: absolute;
    width: fit-content;
    height: fit-content;
    left: 0;
    right: 0;
    top: 0;
    bottom: 0;
    margin: auto;
    z-index: 40;
}

.primary-button {
    width: 540rpx;
    height: 112rpx;
    margin-top: 22rpx;
    text-align: center;

    font-size: 32rpx;
    font-family: PingFangSC-Medium, PingFang SC, serif;
    font-weight: 500;
    color: #FFFFFF;
    line-height: 112rpx;
}

.secondary-button {
    width: 540rpx;
    height: 80rpx;
    margin-top: 22rpx;
    text-align: center;

    font-size: 24rpx;
    font-family: PingFangSC-Medium, PingFang SC, serif;
    font-weight: 500;
    color: #EDEDED;
    line-height: 80rpx;
}

.select {
    position: absolute;
    bottom: 210rpx;
    right: 0;
    z-index: 20;
}

.select {
    width: 180rpx;
    height: 88rpx;
    color: white;
    line-height: 88rpx;
    text-align: center;
    margin-top: 20rpx;
    border-top-left-radius: 10rpx;
    border-bottom-left-radius: 10rpx;

    font-size: 28rpx;
    font-family: PingFangSC-Medium, PingFang SC, serif;
    font-weight: 500;

    box-shadow: 0 4rpx 8rpx 0 rgba(0, 0, 0, 0.5);
    background: linear-gradient(90deg, #EEA167 0%, #F97605 50%, #EEA167 100%);
}

.selected {
    color: black;

    background: linear-gradient(90deg, #ABABAB 0%, #D6D6D6 50%, #ABABAB 100%);
}

.hide-marker {
    position: absolute;
    top: -1000px;
    left: -1000px;
    z-index:0
}
在/components/easyar-ar/easyar-ar.wxml
<xr-scene ar-system="modes:Marker" id="xr-scene" bind:ready="handleReady" bind:ar-ready="handleARReady" bind:tick="handleTick">
    <xr-node>
        <xr-ar-tracker wx:if="{

   {markerImg != ''}}" bind:ar-tracker-switch="handleTrackerSwitch" mode="Marker" src="{

   {markerImg}}" id="arTracker">
        </xr-ar-tracker>
        <xr-camera id="camera" node-id="camera" position="0.8 2.2 -5" clear-color="0.925 0.925 0.925 1" background="ar" is-ar-camera></xr-camera>
    </xr-node>
    <xr-assets  bind:progress="handleAssetsProgress" wx:if="{

   {videoUrl != ''}}">
        <xr-asset-load
            type="video-texture" asset-id="hikari" options="loop:true"
            src="{

   {videoUrl}}"
        />
     </xr-assets>
    <xr-shadow id="shadow-root" >
    </xr-shadow>
    <xr-node node-id="lights">
        <xr-light type="ambient" color="1 1 1" intensity="2.4" />
        <xr-light type="directional" rotation="180 0 0" color="1 1 1" intensity="0.1" />
    </xr-node>
</xr-scene>
2、扫码逻辑调整如下
在/components/easyar-ar/easyar-ar.js
import CrsClient from '../libs/crs-client';
import { atob } from '../libs/atob';

Component({
    properties: {
        runingCrs: {
            type: Boolean,
            value: false,
        },
        config: Object,
        tracking: {
            type: Boolean,
            value: false,
        },
    },
    observers: {
        'runingCrs, tracking': function (value1, value2) {
            if (!value2) {
                this.stopTracking();
            }
        },
    },
    data: {
        loaded: false,
        arReady: false,
        markerImg: '',
        lastTime: 0,
        isSearching: false,
        video:null,
        targetId:'',
        videoUrl:''
    },
    crsClient: undefined,
    lifetimes: {
        attached() {
            this.crsClient = new CrsClient(this.properties.config);

            const sys = wx.getSystemInfoSync();
            if (sys.platform == 'devtools') {
                wx.showModal({
                    title: '提示',
                    content: '开发工具上不支持AR,请使用手机预览。',
                    showCancel: false,
                });
            }
        },
        detached() {

        }
    },
    methods: {

        handleAssetsProgress(e){
            wx.showToast({
                icon: 'none',
                title: '请将相机对着识别图',
            });
            console.log(e,567);

        },
        handleReady({ detail }) {
            this.scene = detail.value;
            this.shadowRoot = this.scene.getElementById('shadow-root');
            this.xrFrameSystem = wx.getXrFrameSystem();
        },
        handleARReady: function ({ detail }) {
            this.setData({ arReady: true });
        },
        handleTick() {
            if (!this.data.arReady || !this.properties.runingCrs || !this.crsClient || this.data.isSearching) {
                return;
            }

            const now = Date.now();
            if (now - this.data.lastTime < this.properties.config.minInterval) {
                return;
            }
            this.data.lastTime = now;
            this.data.isSearching = true;

            // 文档:https://developers.weixin.qq.com/miniprogram/dev/component/xr-frame/share/
            // 截图并发送到云识别服务
            this.capture().then(base64 => this.crsClient.searchByBase64(base64.split('base64,').pop())).then(res => {
                this.data.isSearching = false;
                console.info(res)

                if (res.statusCode != 0) {
                    return;
                }

                // res.statusCode = 0 表示识别到目标
                // 识别成功后,处理你的业务逻辑
                // 可以展示图片,播放视频,渲染模型等
                const title = res.statusCode == 0 ? `识别到 ${res.result.target.name}` : `未识别到目标`;
                wx.showToast({ title, icon: 'none' });


                this.triggerEvent('searchSuccess', res, {});
                const target = res.result.target;

                // 设置marker
                this.loadTrackingImage(target.trackingImage.replace(/[\r\n]/g, ''));

                // 从meta信息中检测是模型,还是视频
                // meta内容请参考文档:https://help.easyar.cn/EasyAR%20Miniprogram/manual.html
                try {
                    const setting = JSON.parse(atob(target.meta));
                    if (setting.modelUrl) {
                        this.loadModel(target.targetId, setting);
                    } else if (setting.videoUrl) {
                        this.loadVideo(target.targetId, setting);
                    }
                } catch (e) {
                    console.error(e);
                    wx.showModal({
                        title: '提示',
                        content: 'meta信息解析错误',
                        showCancel: false,
                    })
                }
            }).catch(err => {
                this.data.isSearching = false;
                console.info(err)
            });
        },
        capture() {
            const opt = { type: 'jpg', quality: this.properties.config.jpegQuality };

            if (this.scene.share.captureToDataURLAsync) {
                return this.scene.share.captureToDataURLAsync(opt);
            }

            return Promise.resolve(this.scene.share.captureToDataURL(opt));
        },
        stopTracking() {
            if (this.scene) {
                const el = this.scene.getElementById('player');
                this.shadowRoot.removeChild(el);
            }
        },
        loadTrackingImage(img) {
            const filePath = `${wx.env.USER_DATA_PATH}/marker.jpg`;
            wx.getFileSystemManager().writeFile({
                filePath,
                data: img,
                encoding: 'base64',
                success: (r) => {

                    // 测试过程中发现问题:android与iOS在处理临时文件上有不同
                    if (wx.getSystemInfoSync().platform == 'ios') {
                        this.toTempFile(filePath);
                        return;
                    }
                    this.setData({ markerImg: filePath });

                },
                fail: (err) => console.log(err),
            });

        },
        loadModel: function (targetId, setting) {

            wx.showToast({
                icon: 'none',
                title: '模型加载中...',
                duration: 2000,
            });

            const asset = this.scene.assets.getAssetWithState('gltf', targetId);
            if (asset.state == 0) {
                this.scene.assets.loadAsset({ type: 'gltf', assetId: targetId, src: setting.modelUrl });
            }

            const el = this.scene.createElement(this.xrFrameSystem.XRGLTF, { 'model': targetId, 'anim-autoplay': '' });
            el.setId("player");
            this.shadowRoot.addChild(el);


            const t = el.getComponent(this.xrFrameSystem.Transform);
            setting.scale = 0.4;
            t.scale.setValue(setting.scale, setting.scale, setting.scale);


        },
        loadVideo: async function (targetId, setting) {
            this.targetId=targetId
            wx.showToast({
                icon: 'none',
                title: '视频加载中...',
                duration: 900000,
            });

            let asset = this.scene.assets.getAsset('video-texture', targetId);
            //autoPlay 是否自动播放 abortAudio是否开启音频  loop是否重复播放
            if (!asset) {
                const v = await this.scene.assets.loadAsset({
                    type: 'video-texture', assetId: targetId, src: setting.videoUrl,
                    options: { autoPlay: true, abortAudio: false,loop:true}
                });
                asset = v.value;
            }else{
                asset.seek(0)
            }
            const { width, height } = asset;
            this.setData({videoUrl: setting.videoUrl})
            const el = this.scene.createElement(this.xrFrameSystem.XRMesh, { geometry: 'plane', uniforms: `u_baseColorMap:video-${targetId}` });
            el.setId("player");

            this.shadowRoot.addChild(el);
            const w = 1;
            const h = height / width;

            const t = el.getComponent(this.xrFrameSystem.Transform);
            t.scale.setValue(1.02, 1, h+0.01);
            wx.showToast({
                icon: 'none',
                title: '请将相机对着识别图',
            });
        },
        toTempFile(filePath) {
            wx.compressImage({
                src: filePath,
                quality: 90,
                success: (res) => {
                    console.info(res);
                    this.setData({ markerImg: res.tempFilePath });
                }, fail: (err) => {
                    console.info(err);
                }
            });
        },
    }
})
三、针对模版上的功能,我遇到的问题以及做的调整
1、扫描出现视频之后,再次扫描视频不会重新播放的问题
这个easy ar官网以及微信小程序官方,我查阅了很多资料,没有相关的api,所以目前改为循环播放,暂时解决不播放的问题
2、扫描加载时间过大,提示提前结束
这里原模板使用的wx.showToast,并且是默认时间,有时视频过长就会导致用户以为系统出错,这里我增加了一个视频加载资源组件,在/components/easyar-ar/easyar-ar.wxml里可以查看,这里通过获取资源进度的方式,获取到视频加载完成,再关闭提示,这样就不会出现视频未出现,提示就已经结束,注意弹出提示的代码位置,将展示时间写长点,我这边写的900000
<xr-assets  bind:progress="handleAssetsProgress" wx:if="{

   {videoUrl != ''}}">
        <xr-asset-load
            type="video-texture" asset-id="hikari" options="loop:true"
            src="{

   {videoUrl}}"
        />
     </xr-assets>
3、关于光线问题,扫描前后界面亮度不同,结果页面偏暗
这里在/components/easyar-ar/easyar-ar.wxml中,如下代码是调整界面亮度,
可以查看官方文档去调整界面亮度 ,这里我调整为intensity="2.4",就基本满足条件了https://developers.weixin.qq.com/miniprogram/dev/component/xr-frame/render/light.html#%E9%98%B4%E5%BD%B1
<xr-node node-id="lights">
        <xr-light type="ambient" color="1 1 1" intensity="2.4" />
        <xr-light type="directional" rotation="180 0 0" color="1 1 1" intensity="0.1" />
    </xr-node>
4、关于扫描之后,视频和扫描图大小不一致的问题
在我的效果视频中,可以看到两者大小基本保持一致,且视频也未发生任何变形,这里需要在配置扫描图和视频的时候尽量保持两者的比例一致就行,不一致的情况可以查看easy ar官方文档上的视频,一个横屏一个竖屏,导致视频未覆盖完全扫描图,然后我在扫描之后的视频的比例中稍微增点了点,因为可能出现一点边线漏出来
在我的代码示例 /components/easyar-ar/easyar-ar.js中,修改下面value比例,依照个人情况而定,我的设置这种基本满足常见情况
t.scale.setValue(1.02, 1, h+0.01);完结!!!撒花!!!
以上是个人的一些见解,不足之处肯定各位大佬批评指正,谢谢!!!