文章目录
ERC20合约的基本调用
项目参考https://github.com/Dapp-Learning-DAO/Dapp-Learning/blob/main/basic/03-web3js-erc20
项目使用node20.11
合约功能
// SPDX-License-Identifier: MIT
pragma solidity ^0.8.0;

import "@openzeppelin/contracts/token/ERC20/presets/ERC20PresetMinterPauser.sol";

contract SimpleToken is ERC20PresetMinterPauser {


    /**
     * @dev Constructor that gives msg.sender all of existing tokens.
     */

    uint8 private _decimals;
    uint256 public INITIAL_SUPPLY;

    function decimals() public view override returns (uint8) {


        return _decimals;
    }

    constructor(
        string memory name,
        string memory symbol,
        uint8 decimals_,
        uint256 initial_supply
    ) ERC20PresetMinterPauser(name, symbol) {


        _decimals = decimals_;
        INITIAL_SUPPLY = initial_supply * (10**uint256(decimals_));
        _mint(msg.sender, INITIAL_SUPPLY);
    }
}
-
IERC20
totalSupply: 获取该合约内总的 ERC20 Token 总量
balanceOf: 获取特定账户的 ERC20 Token 总量
transfer: 向目标账户转移特定数量的 ERC20 Token
allowance: 获取目标账户能够使用的源账户的 ERC20 Token 数量
approve: 向目标账户授权, 可以转移指定额度的 ERC20 Token 数量
transferFrom: ( 第三方调用 ) 从源账户向目标账户转移制定数量的 ERC20 Token -
IERC20Metadata
name: 返回 Token 的名称
symbol: 返回 Token 的符号
decimals: 返回 Token 所支持的精度
compile.js 代码
我们无法直接使用 .sol 文件, 需要把它编译为 bin 文件 ( 二进制文件 ), 因此在代码中需要进行这一步的逻辑处理.
const fs = require('fs');
const solc = require('solc');

// Get Path and Load Contract
const source = fs.readFileSync('SimpleToken.sol', 'utf8');
function findImports(path) {


  if (fs.existsSync(path)) {


    return {


      contents: fs.readFileSync(path, 'utf8'),
    };
  } else if (fs.existsSync('./node_modules/' + path)) {


    return {


      contents: fs.readFileSync('./node_modules/' + path, 'utf8'),
    };
  } else {


    return {

     error: 'File not found' };
  }
}

// Compile Contract
// https://docs.soliditylang.org/en/v0.8.0/using-the-compiler.html#compiler-input-and-output-json-description
const input = {


  language: 'Solidity',
  sources: {


    'SimpleToken.sol': {


      content: source,
    },
  },
  settings: {


    outputSelection: {


      '*': {


        '*': ['*'],
      },
    },
  },
};

const tempFile = JSON.parse(
  solc.compile(JSON.stringify(input), {

     import: findImports })
);
const contractFile = tempFile.contracts['SimpleToken.sol']['SimpleToken'];

// Export Contract Data
module.exports = contractFile;
读取文件
第一步, 我们先进行文件的读取, 把 sol 文件加载为 source 变量
// Load contract
const source = fs.readFileSync('SimpleToken.sol', 'utf8');
进行合约编译
这里进行编译动作. 把 sol 源码编译为 solidity 对象. 这里需要注意的是不同的 sol 源码版本, 编译的方式可能稍有不同, 这里因为 “SimpleToken.sol” 对应的是 sol 是 0.8.0 版本, 所以我们可以使用如下的方式进行编译
// compile solidity
const input = {


  language: 'Solidity',
  sources: {


    'SimpleToken.sol': {


      content: source,
    },
  },
  settings: {


    outputSelection: {


      '*': {


        '*': ['*'],
      },
    },
  },
};

const tempFile = JSON.parse(solc.compile(JSON.stringify(input)));
获取二进制对象
在上一步编译成功的 solidity 对象里面包含很多的属性/值, 而我们需要的是其中合约对象, 通过访问对象属性的方式提示 SimpleToken 合约对象
const contractFile = tempFile.contracts['SimpleToken.sol']['SimpleToken'];
导出对象
为了能使其他 js 文件使用 SimpleToken 合约对象 , 我们需要对合约对象进行导出
module.exports = contractFile;
index.js 代码
const Web3 = require('web3');
const fs = require('fs');
const contractFile = require('./compile');

require('dotenv').config();
const privatekey = process.env.PRIVATE_KEY;
/*
   -- Define Provider & Variables --
*/

const receiver = '0xf39Fd6e51aad88F6F4ce6aB8827279cffFb92266';

// Provider
const web3 = new Web3(
  new Web3.providers.HttpProvider(
    'https://sepolia.infura.io/v3/' + process.env.INFURA_ID
  )
);

//account
const account = web3.eth.accounts.privateKeyToAccount(privatekey);
const account_from = {


  privateKey: account.privateKey,
  accountaddress: account.address,
};

// sol ---> abi + bin
const bytecode = contractFile.evm.bytecode.object;
const abi = contractFile.abi;

/*
   -- Deploy Contract --
*/
const Trans = async () => {


  console.log(
    `Attempting to deploy from account ${

    account_from.accountaddress}`
  );
  web3.eth.getBlockNumber(function (error, result) {


    console.log(result);
  });
  // Create deploy Contract Instance
  const deployContract = new web3.eth.Contract(abi);

  // method 1
  // Create Constructor Tx
  const deployTx = deployContract.deploy({


    data: bytecode,
    arguments: ['DAPPLEARNING', 'DAPP', 0, 10000000],
  });

  // Sign Transacation and Send
  const deployTransaction = await web3.eth.accounts.signTransaction(
    {


      data: deployTx.encodeABI(),
      gas: '8000000',
    },
    account_from.privateKey
  );

  // Send Tx and Wait for Receipt
  const deployReceipt = await web3.eth.sendSignedTransaction(
    deployTransaction.rawTransaction
  );
  console.log(`Contract deployed at address: ${

    deployReceipt.contractAddress}`);

  const erc20Contract = new web3.eth.Contract(
    abi,
    deployReceipt.contractAddress
  );

  //build the Tx
  const transferTx = erc20Contract.methods
    .transfer(receiver, 100000)
    .encodeABI();

  // Sign Tx with PK
  const transferTransaction = await web3.eth.accounts.signTransaction(
    {


      to: deployReceipt.contractAddress,
      data: transferTx,
      gas: 8000000,
    },
    account_from.privateKey
  );

  // Send Tx and Wait for Receipt
  await web3.eth.sendSignedTransaction(
    transferTransaction.rawTransaction
  );

  await erc20Contract.methods
    .balanceOf(receiver)
    .call()
    .then((result) => {


      console.log(`The balance of receiver is ${

    result}`);
    });
};

Trans()
  .then(() => process.exit(0))
  .catch((error) => {


    console.error(error);
    process.exit(1);
  });
编译合约
导入 compile 文件中的 SimpleToken 合约对象

const contractFile = require('./compile');
读取私钥
处于安全考虑, 私钥没有进行硬编码, 而是通过环境变量的方式进行获取. 启动测试时, dotenv 插件自动读取 .env 配置文件中的配置项, 然后加载为环境变量, 之后在代码中可以通过 process.env 读取私钥 ( 也包括其他环境变量 )
require('dotenv').config();
const privatekey = process.env.PRIVATE_KEY;
设置收款账户
这里为方便测试, 固定的一个收款账户, 在后续的交易测试中, 会使用这个收款账户进行测试
const receiver = '0xf39Fd6e51aad88F6F4ce6aB8827279cffFb92266';
构造 web3 对象
通过 web3 对象可以很方便的发送相应的交易到区块链网络, 同时获取区块链的处理结果. 构造 web3 对象时, 主要需要传入一个参数, 就是对应的区块链网络, 包括 sepolia 等测试网络, 或是 mainnet 主网. 这里我们使用 sepolia 测试网络. 如果没有 sepolia 网络的测试币, 可以切换到其他的测试网络. 同时需要注意的是, 这里我们通过 infura 向对应的区块链网络发送交易, 而 INFURA_ID 这个变量值也需要配置在 .env 文件中, 具体如何获取 infura_id, 可自行搜索查找相关文档
const web3 = new Web3(new Web3.providers.HttpProvider('https://sepolia.infura.io/v3/' + process.env.INFURA_ID));
获取账户地址
在区块链上, 每个用户都有一个对应的账户地址, 而这个账户地址可以通过私钥进行获取. 这里, 我们调用 web3.eth.accounts.privateKeyToAccount 接口, 传入对应的私钥, 就可以获取对应的账户地址
const account = web3.eth.accounts.privateKeyToAccount(privatekey);
const account_from = {


  privateKey: account.privateKey,
  accountaddress: account.address,
};
获取 abi 和 bin
在部署合约的过程中, 我们会用到两个重要的参数, 合约对应的 bytecode 和 abi. 在步骤 1 的时候, 我们导入了编译后的 SimpleToken 合约对象, 通过这个对象, 我们可以获取的合约对应的 bytecode 和 abi
const bytecode = contractFile.evm.bytecode.object;
const abi = contractFile.abi;
构造合约实例 在步骤 3 中, 我们获取了 sol 源文件编译后的二进制 和 abi, 这里就可以使用对应的 abi 构造相应的合约实例, 以便在后续中通过合约实例进行交易的发送
const deployContract = new web3.eth.Contract(abi);
创建合约交易
调用 deployContract.deploy 接口, 我们创建了部署合约的二进制交易. 这里, 此交易还没有发送到区块链网络, 即合约还没有被创建
const deployTx = deployContract.deploy({


  data: bytecode,
  arguments: ['DAPPLEARNING', 'DAPP', 0, 10000000],
});
交易签名 如下使用私钥对交易进行签名,
const deployTransaction = await web3.eth.accounts.signTransaction(
  {


    data: deployTx.encodeABI(),
    gas: '8000000',
  },
  account_from.privateKey
);
部署合约
这里发送签名后的交易到区块链网络, 同时得到返回的交易回执. 从返回的交易回执中可以得到此次部署的合约的地址
const deployReceipt = await web3.eth.sendSignedTransaction(deployTransaction.rawTransaction);
console.log(`Contract deployed at address: ${

    deployReceipt.contractAddress}`);
构造转账交易
如下构造一个 ERC20 Token 的转账交易, 收款账户为 receiver, 转账金额为 100000
const transferTx = erc20Contract.methods.transfer(receiver, 100000).encodeABI();
签名并发送交易 对转账交易进行签名并发送
const transferReceipt = await web3.eth.sendSignedTransaction(transferTransaction.rawTransaction);
验证转账后余额
转账成功后, 输出验证下收款账户的余额, 检查余额是否正确
erc20Contract.methods
  .balanceOf(receiver)
  .call()
  .then((result) => {


    console.log(`The balance of receiver is ${

    result}`);
  });
测试
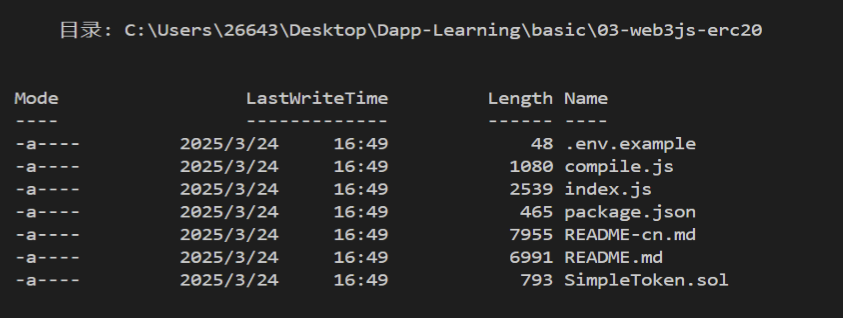
项目目录
执行

查询
在区块链游览器中查询