目录
DOM
事件监听
事件:编程时系统内发生的动作或事情,例如用户在网页上单击一个按钮
事件监听:让程序检测是否产生事件,一旦事件触发,立即调用函数做出响应,也称为绑定事件或注册事件,如鼠标经过显示下拉菜单、点击播放轮播图等
语法:元素对象.addEventListener (' 事件类型 ', 要执行的函数)
事件监听三要素:
- 事件源:被事件触发的 DOM 元素,需先获取该 DOM 元素
- 事件类型:触发事件的方式,如鼠标单击(click)、鼠标经过(mouseover)等
- 事件调用的函数:事件触发后执行的具体操作(要做的事)
代码示例:
<!DOCTYPE html>
<html lang="en">
<head>
    <meta charset="UTF-8">
    <meta name="viewport" content="width=device-width, initial-scale=1.0">
    <title>Document</title>
</head>
<body>
    <button>按钮</button>
    <script>
        // 获取按钮元素
        const button = document.querySelector('button')
        // 为按钮添加点击事件
        button.addEventListener('click', function(){


            // 弹出警告框
            alert('你点击了按钮')
        })
    </script>
</body>
</html>
结果如下:
屏幕录制 2025-03-30 212736
注意事项:
- 事件类型要加引号
- 函数是点击之后再去执行,每次点击都会执行一次
案例
关闭广告
代码示例:
<!DOCTYPE html>
<html lang="en">
<head>
    <meta charset="UTF-8">
    <meta name="viewport" content="width=device-width, initial-scale=1.0">
    <title>Document</title>
    <style>
        .box {


            position: relative;
            width: 1000px;
            height: 200px;
            background-color: skyblue;
            margin: 100px auto;
            text-align: center;
            font-size: 50px;
            line-height: 200px;
            font-weight: 700;
        }
        .box1 {


            position: absolute;
            right: 20px;
            top: 10px;
            width: 20px;
            height: 20px;
            background-color: pink;
            text-align: center;
            line-height: 20px;
            font-size: 16px;
            cursor: pointer;
        }
    </style>
</head>
<body>
    <div class="box">
        广告
        <div class="box1">X</div>
    </div>
    <script>
        // 获取事件源
        const box1 = document.querySelector('.box1')
        const box = document.querySelector('.box')

        // 事件侦听
        box1.addEventListener('click', function () {


            // 隐藏
            box.style.display = 'none'
        })
    </script>
</body>
</html>
结果如下:
屏幕录制 2025-03-30 214210
随机点名
代码示例:
<!DOCTYPE html>
<html lang="en">
<head>
    <meta charset="UTF-8">
    <meta name="viewport" content="width=device-width, initial-scale=1.0">
    <title>Document</title>
    <style>
        * {


            margin: 0;
            padding: 0;
        }
        h2 {


            text-align: center;
        }
        .box {


            width: 600px;
            margin: 50px auto;
            display: flex;
            font-size: 25px;
            line-height: 40px;
        }
        .qs {


            width: 450px;
            height: 40px;
            color: red
        }
        .btns {


            text-align: center;
        }
       .btns button {


            width: 120px;
            height: 35px;
            margin: 0 50px;
       }
    </style>
</head>
<body>
    <h2>随机点名</h2>
    <div class="box">
        <span>名字是:</span>
        <div class="qs">这里显示姓名</div>
    </div>
    <div class="btns">
        <button class="start">开始点名</button>
        <button class="end">停止点名</button>
    </div>
    <script>
        let timeId
        const arr = ['张三','李四','王五','赵六','田七','宋八','周九','吴十']
        const qs = document.querySelector('.qs')
        const start = document.querySelector('.start')
        start.addEventListener('click',function () {


            timeId = setInterval(function () {


                const random = Math.floor(Math.random() * arr.length)
                //console.log(arr[random]);
                qs.innerHTML = arr[random]
            },35)
        })
        const end = document.querySelector('.end')
        end.addEventListener('click',function () {


            clearInterval(timeId)
        })
    </script>
</body>
</html>
结果如下:
屏幕录制 2025-03-30 221210
事件监听版本
DOM 发展历史:
- DOM L0:DOM 发展的第一个版本,L 代表 level
- DOM L1:1998 年 10 月 1 日成为 W3C 推荐标准
- DOM L2:使用
addEventListener注册事件 - DOM L3:在 DOM 2 级事件基础上重新定义事件,新增部分新事件类型
DOM L0:
事件源.on 事件 = function (){}
DOM L2:
事件源.addEventListener (事件,事件处理函数)
区别:
on方式绑定的事件处理函数会被覆盖addEventListener方式可多次绑定同一事件,支持更多事件特性,推荐使用
事件类型
鼠标事件:触发方式为鼠标触发,包含 click(鼠标点击)、mouseenter(鼠标经过)、mouseleave(鼠标离开)
焦点事件:触发与表单光标相关,包含 focus(获得焦点)、blur(失去焦点)
键盘事件:触发方式为键盘操作,包含 keydown(键盘按下触发)、keyup(键盘抬起触发)
文本事件:由表单输入触发,包含 input(用户输入事件)
鼠标事件
代码示例:
<!DOCTYPE html>
<html lang="en">
<head>
    <meta charset="UTF-8">
    <meta name="viewport" content="width=device-width, initial-scale=1.0">
    <title>Document</title>
    <style>
        div {


            width: 100px;
            height: 100px;
            background-color: skyblue;
        }
    </style>
</head>
<body>
    <div></div>
    <script>
        const div = document.querySelector('div')
        // 鼠标经过
        div.addEventListener('mouseenter', function () {


          console.log('轻轻的我来了')
        })
        // 鼠标离开
        div.addEventListener('mouseleave', function () {


          console.log('轻轻的我走了')
        })
      </script>
</body>
</html>
结果如下:
屏幕录制 2025-03-30 223729
案例:轮播图(完整版)
代码示例:
<!DOCTYPE html>
<html lang="en">
<head>
<meta charset="UTF-8">
<meta name="viewport" content="width=device-width, initial-scale=1.0">
<title>Document</title>
<style>
* {
box-sizing: border-box;
}
.slider {
width: 280px;
height: 400px;
overflow: hidden;
}
.slider-wrapper {
width: 100%;
height: 320px;
}
.slider-wrapper img {
width: 100%;
height: 100%;
display: block;
}
.slider-footer {
height: 80px;
background-color: rgb(100, 67, 68);
padding: 12px 12px 12px;
position: relative;
}
.slider-footer .toggle {
position: absolute;
right: 0;
top: 12px;
display: flex;
}
.slider-footer .toggle button {
margin-right: 12px;
width: 28px;
height: 28px;
appearance: none;
border: none;
background: rgba(255, 255, 255, 0.1);
color: #fff;
border-radius: 4px;
cursor: pointer;
}
.slider-footer .toggle button:hover {
background: rgba(255, 255, 255, 0.2);
}
.slider-footer p {
margin: 0;
color: #fff;
font-size: 18px;
margin-bottom: 10px;
}
.slider-indicator {
margin: 0;
padding: 0;
list-style: none;
display: flex;
align-items: center;
}
.slider-indicator li {
width: 8px;
height: 8px;
margin: 4px;
border-radius: 50%;
background: #fff;
opacity: 0.4;
cursor: pointer;
}
.slider-indicator li.active {
width: 12px;
height: 12px;
opacity: 1;
}
</style>
</head>
<body>
<div class="slider">
<div class="slider-wrapper">
<img src="./img/1.png" alt="">
</div>
<div class="slider-footer">
<p>假面骑士空我</p>
<ul class="slider-indicator">
<li class="active"></li>
<li></li>
<li></li>
<li></li>
<li></li>
</ul>
<div class="toggle">
<button class="prev"><</button>
<button class="next">></button>
</div>
</div>
</div>
<script>
let data = [
{
src:'./img/1.png',name:'假面骑士空我',color: 'rgb(100, 67, 68)'},
{
src:'./img/2.png',name:'假面骑士亚极陀',color: 'rgb(100, 67, 68)'},
{
src:'./img/3.png',name:'假面骑士龙骑',color: 'rgb(100, 67, 68)'},
{
src:'./img/4.png',name:'假面骑士555',color: 'rgb(100, 67, 68)'},
{
src:'./img/5.png',name:'假面骑士剑',color: 'rgb(100, 67, 68)'}
]
// 获取轮播图图片元素
const img = document.querySelector('.slider-wrapper img')
// 获取轮播图标题元素
const p = document.querySelector('.slider-footer p')
function toggle(){
// 更新轮播图图片路径
img.src = data[i].src
// 更新轮播图标题
p.innerHTML = data[i].name
// 移除当前激活的指示器的 active 类
document.querySelector('.slider-indicator .active').classList.remove('active')
// 为当前索引对应的指示器添加 active 类
document.querySelector(`.slider-indicator li:nth-child(${
i + 1})`).classList.add('active')
}
// 当前轮播图索引
let i = 0
// 开启定时器,实现自动轮播
// let n = setInterval(function(){
// // 索引加 1
// i++
// // 实现无缝轮播,当索引等于数据长度时,重置为 0
// if(i === data.length){
// i = 0
// }
// toggle()
// },2000)
const prev = document.querySelector('.prev')
const next = document.querySelector('.next')
prev.addEventListener('click',function(){
i--
if(i < 0){
i = data.length - 1
}
toggle()
})
next.addEventListener('click',function(){
i++
if(i === data.length){
i = 0
}
toggle()
})
let n = setInterval(function(){
next.click()
},2000)
const slider = document.querySelector('.slider')
slider.addEventListener('mouseenter',function(){
clearInterval(n)
})
slider.addEventListener('mouseleave',function(){
n = setInterval(function(){
next.click()
},2000)
})
</script>
</body>
</html>
结果如下:
屏幕录制 2025-03-31 160534
焦点事件
代码示例:
<!DOCTYPE html>
<html lang="en">
<head>
    <meta charset="UTF-8">
    <meta name="viewport" content="width=device-width, initial-scale=1.0">
    <title>Document</title>
</head>
<body>
    <div>
        <input type="text" placeholder="请输入" id="input">
    </div>
    <script>
        const input = document.querySelector('#input')
        // 焦点事件
        input.addEventListener('focus', function () {


            console.log('获取焦点')
        })
        // 失去焦点事件
        input.addEventListener('blur', function () {


            console.log('失去焦点')
        })
    </script>
</body>
</html>
结果如下:
屏幕录制 2025-03-31 161634
案例:小米搜索框
代码示例:
<!DOCTYPE html>
<html lang="en">
<head>
    <meta charset="UTF-8">
    <meta name="viewport" content="width=device-width, initial-scale=1.0">
    <title>Document</title>
    <style>
        * {


            margin: 0;
            padding: 0;
            box-sizing: border-box;
        }
        ul {


            list-style: none;
        }
        .mi {


            position: relative;
            width: 223px;
            margin: 100px auto;
        }
        .mi input {


            width: 223px;
            height: 48px;
            padding: 0 10px;
            font-size: 14px;
            line-height: 48px;
            border: 1px solid #e0e0e0;
            outline: none;
        }
        .mi .search {


            border: 1px solid #ff6700;
        }
        .result-list {


            display: none;
            position: absolute;
            left: 0;
            top: 48px;
            width: 223px;
            border: 1px solid #ff6700;
            border-top: 0;
            background: #fff;
        }
       .result-list a {


            display: block;
            padding: 6px 15px;
            font-size: 12px;
            color: #424242;
            text-decoration: none;
        }
       .result-list a:hover {


              background-color: #eee;
       }
    </style>
</head>
<body>
    <div class="mi">
        <input type="search" placeholder="搜索">
        <ul class="result-list">
            <li><a href="#">全部商品</a></li>
            <li><a href="#">小米笔记本</a></li>
            <li><a href="#">小米手机</a></li>
            <li><a href="#">小米电视</a></li>
            <li><a href="#">小米智能穿戴</a></li>
            <li><a href="#">米家智能生活</a></li>
        </ul>
    </div>
    <script>
        const input = document.querySelector('[type=search]')
        const ul = document.querySelector('.result-list')
        // 监听事件 获得焦点
        input.addEventListener('focus', function () {


            ul.style.display = 'block'
            input.classList.add('search')
        })
        // 失去焦点
        input.addEventListener('blur', function () {


            ul.style.display = 'none'
            input.classList.remove('search')
        })

    </script>
</body>
</html>
结果如下:
屏幕录制 2025-03-31 160725
键盘事件
代码示例:
<!DOCTYPE html>
<html lang="en">
<head>
    <meta charset="UTF-8">
    <meta name="viewport" content="width=device-width, initial-scale=1.0">
    <title>Document</title>
</head>
<body>
    <div>
        <input type="text" placeholder="请输入" id="input">
    </div>
    <script>
        const input = document.querySelector('#input')
        // 键盘事件
        input.addEventListener('keydown',function(){


            console.log('键盘按下了')
        })

        input.addEventListener('keyup',function(){


            console.log('键盘抬起了')
        })
    </script>
</body>
</html>
结果如下:
屏幕录制 2025-03-31 162434
文本事件
代码示例:
<!DOCTYPE html>
<html lang="en">
<head>
    <meta charset="UTF-8">
    <meta name="viewport" content="width=device-width, initial-scale=1.0">
    <title>Document</title>
</head>
<body>
    <div>
        <input type="text" placeholder="请输入" id="input">
    </div>
    <script>
        // 文本事件
        const input = document.querySelector('#input')
        input.addEventListener('input',function(){


            console.log(input.value)
        })
    </script>
</body>
</html>
结果如下:
屏幕录制 2025-03-31 162852
案例:发布评论
代码示例:
<!DOCTYPE html>
<html lang="en">
<head>
    <meta charset="UTF-8">
    <meta name="viewport" content="width=device-width, initial-scale=1.0">
    <title>Document</title>
    <style>
        .wrapper {


            min-width: 400px;
            max-width: 800px;
            display: flex;
            justify-content: flex-end;
        }
        .avatar {


            width: 48px;
            height: 48px;
            border-radius: 50%;
            overflow: hidden;
            background: url(./img/1.jpg) no-repeat center / cover;
            margin-right: 20px;
        }
        .wrapper textarea {


            outline: none;
            border-color: transparent;
            resize: none;
            background: #f5f5f5;
            border-radius: 4px;
            flex: 1;
            padding: 10px;
            transition: all 0.5s;
            height: 30px;
        }
       .wrapper textarea:focus {


            border-color: #00aeec;
            background: #fff;
            height: 50px;
        }
        .wrapper button {


            background: #6287ec;
            color: #fff;
            border: none;
            border-radius: 4px;
            margin-left: 10px;
            width: 70px;
            cursor: pointer;
        }
        .wrapper .total {


            margin-right: 80px;
            color: #999;
            margin-top: 5px;
            opacity: 0;
            transition: all 0.5s;
        }
        .list {


            min-width: 400px;
            min-width: 800px;
            display: flex;
        }
        .list .item {


            width: 100%;
            display: flex;
        }
        .list .item .info {


            flex: 1;
            border-bottom: 1px dashed #e4e4e4;
            padding-bottom: 10px;
        }
        .list .item p {


            margin: 0;
        }
        .list .item .name {


            color: #fb7299;
            font-size: 14px;
            font-weight: bold;
        }
        .list .item .text {


            color: #333;
            padding: 10px 0;
        }
        .list .item .time {


            color: #999;
            font-size: 12px;
        }
    </style>
</head>
<body>
    <div class="wrapper">
        <i class="avatar"></i>
        <textarea id="tx" placeholder="发一条友善的评论" rows="1" maxlength="20"></textarea>
        <button>发布</button>
    </div>
    <div class="wrapper">
        <span class="total">0/200字</span>
    </div>
    <div class="list">
        <div class="item" style="display: none;">
            <i class="avatar"></i>
            <div class="info">
                <p class="name">清风徐来</p>
                <p class="text">今天天气不错,风好大</p>
                <p class="time">2025-01-01 12:00:00</p>
            </div>
        </div>
    </div>
    <script>
        const tx = document.querySelector('#tx')
        const total = document.querySelector('.total')
        tx.addEventListener('focus', function () {


            total.style.opacity = 1
        })
        tx.addEventListener('blur', function () {


            total.style.opacity = 0
        })
        tx.addEventListener('input', function () {


            total.innerHTML = `${
        tx.value.length}/200字`
        })
    </script>
</body>
</html>
屏幕录制 2025-03-31 175928
事件对象
获取事件对象
事件对象是存储事件触发时相关信息的对象,例如鼠标点击事件中,会记录鼠标点击位置等信息
使用场景:
- 判断用户按下的按键(如按下回车键发布新闻)
- 判断鼠标点击的具体元素,以便执行相应操作
语法:如何获取事件对象
- 在事件绑定的回调函数中,第一个参数就是事件对象
- 一般将其命名为
event、ev或e
元素.addEventListener('click',function(e)){

    }
事件对象部分常用属性:
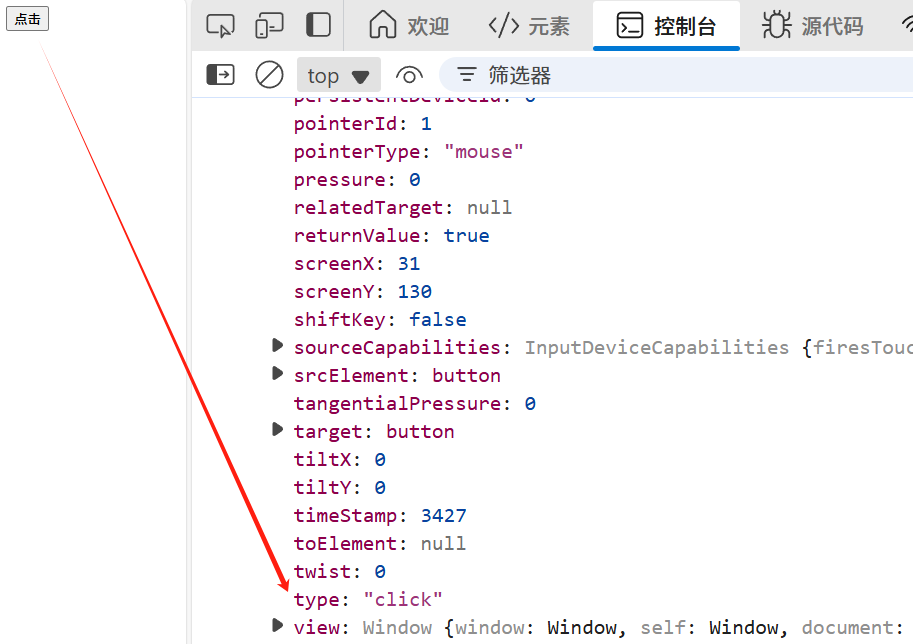
-
type:用于获取当前的事件类型
<!DOCTYPE html>
<html lang="en">
<head>
    <meta charset="UTF-8">
    <meta name="viewport" content="width=device-width, initial-scale=1.0">
    <title>Document</title>
</head>
<body>
    <button>点击</button>
    <script>
        const btn = document.querySelector('button')
        btn.addEventListener('click',function(e){


            console.log(e)
        })
    </script>
</body>
</html>
结果如下:
-
clientX/clientY:获取光标相对于浏览器可见窗口左上角的位置
-
offsetX/offsetY:获取光标相对于当前 DOM 元素左上角的位置
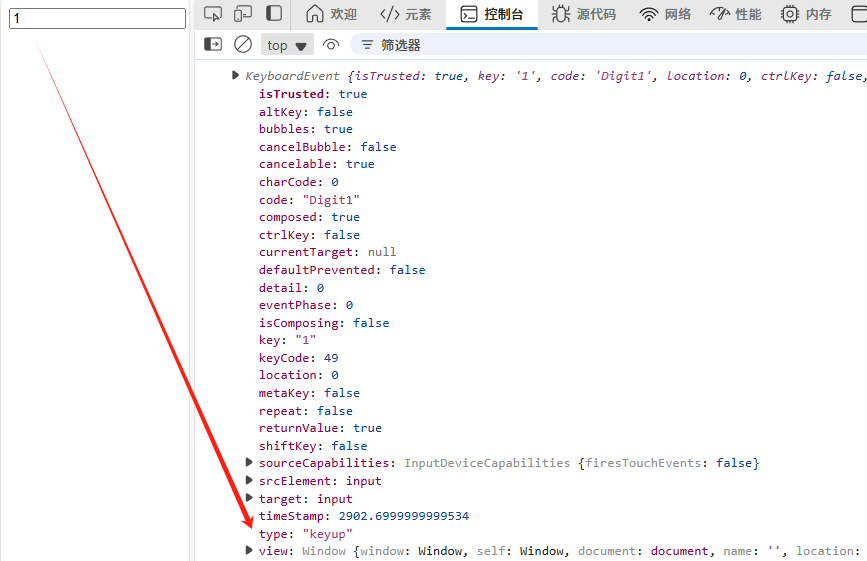
-
key:获取用户按下的键盘键的值,且现在不提倡使用
keyCode<!DOCTYPE html> <html lang="en"> <head> <meta charset="UTF-8"> <meta name="viewport" content="width=device-width, initial-scale=1.0"> <title>Document</title> </head> <body> <input type="text"> <script> const input = document.querySelector('input') input.addEventListener('keyup',function(e){ console.log(e) }) </script> </body> </html>结果如下:
案例:发布评论(完整)
代码示例:
<!DOCTYPE html>
<html lang="en">
<head>
    <meta charset="UTF-8">
    <meta name="viewport" content="width=device-width, initial-scale=1.0">
    <title>Document</title>
    <style>
        .wrapper {


            min-width: 400px;
            max-width: 800px;
            display: flex;
            justify-content: flex-end;
        }
        .avatar {


            width: 48px;
            height: 48px;
            border-radius: 50%;
            overflow: hidden;
            background: url(./img/1.jpg) no-repeat center / cover;
            margin-right: 20px;
        }
        .wrapper textarea {


            outline: none;
            border-color: transparent;
            resize: none;
            background: #f5f5f5;
            border-radius: 4px;
            flex: 1;
            padding: 10px;
            transition: all 0.5s;
            height: 30px;
        }
       .wrapper textarea:focus {


            border-color: #00aeec;
            background: #fff;
            height: 50px;
        }
        .wrapper button {


            background: #6287ec;
            color: #fff;
            border: none;
            border-radius: 4px;
            margin-left: 10px;
            width: 70px;
            cursor: pointer;
        }
        .wrapper .total {


            margin-right: 80px;
            color: #999;
            margin-top: 5px;
            opacity: 0;
            transition: all 0.5s;
        }
        .list {


            min-width: 400px;
            min-width: 800px;
            display: flex;
        }
        .list .item {


            width: 100%;
            display: flex;
        }
        .list .item .info {


            flex: 1;
            border-bottom: 1px dashed #e4e4e4;
            padding-bottom: 10px;
        }
        .list .item p {


            margin: 0;
        }
        .list .item .name {


            color: #fb7299;
            font-size: 14px;
            font-weight: bold;
        }
        .list .item .text {


            color: #333;
            padding: 10px 0;
        }
        .list .item .time {


            color: #999;
            font-size: 12px;
        }
    </style>
</head>
<body>
    <div class="wrapper">
        <i class="avatar"></i>
        <textarea id="tx" placeholder="发一条友善的评论" rows="2" maxlength="200"></textarea>
        <button>发布</button>
    </div>
    <div class="wrapper">
        <span class="total">0/200字</span>
    </div>
    <div class="list">
        <div class="item" style="display: none;">
            <i class="avatar"></i>
            <div class="info">
                <p class="name">超级熬夜玩家</p>
                <p class="text">今天天气不错,风好大</p>
                <p class="time">2025-01-01 12:00:00</p>
            </div>
        </div>
    </div>
    <script>
        const tx = document.querySelector('#tx')
        const total = document.querySelector('.total')
        const item = document.querySelector('.item')
        const text = document.querySelector('.text')
        tx.addEventListener('focus', function () {


            total.style.opacity = 1
        })
        tx.addEventListener('blur', function () {


            total.style.opacity = 0
        })
        tx.addEventListener('input', function () {


            total.innerHTML = `${
        tx.value.length}/200字`
        })

        tx.addEventListener('keyup', function (e) {


            if(e.key === 'Enter'){


                if(tx.value.trim() !== ''){


                    item.style.display = 'block'
                    //console.log(tx.value)
                    text.innerHTML = tx.value.trim()
                }
                tx.value = ''
                total.innerHTML = '0/200字'
            }
        })
    </script>
</body>
</html>
结果如下:
屏幕录制 2025-03-31 232002
环境对象
环境对象指的是函数内部特殊的变量 this,它代表着当前函数运行时所处的环境
作用:弄清楚 this 的指向,可以使代码更简洁
- 函数的调用方式不同,this 指向的对象也不同
- 【谁调用,this 就指向谁】是判断 this 指向的粗略规则
- 直接调用函数其实相当于是 window.函数,所以 this 指向 window
代码示例:
<!DOCTYPE html>
<html lang="en">
<head>
    <meta charset="UTF-8">
    <meta name="viewport" content="width=device-width, initial-scale=1.0">
    <title>Document</title>
</head>
<body>
    <button>点击按钮</button>
    <script>
        function fn(){


            console.log(this)
        }
        fn()
        const btn = document.querySelector('button')
        btn.addEventListener('click',function(){


            console.log(this)
        })
    </script>
</body>
</html>
结果如下:

回调函数
如果将函数 A 作为参数传递给函数 B 时,称函数 A 为回调函数
简单理解:当一个函数做参数传递给另一个函数时,这个函数就是回调函数
常见使用场景:
- 定时器
- 事件监听
案例:Tab 栏切换
代码示例:
<!DOCTYPE html>
<html lang="en">
<head>
    <meta charset="UTF-8">
    <meta name="viewport" content="width=device-width, initial-scale=1.0">
    <title>Document</title>
    <style>
        * {


            margin: 0;
            padding: 0;
        }
        .tab {


            width: 590px;
            height: 340px;
            margin: 20px;
            border: 1px solid #e4e4e4;
        }
        .tab-nav {


            width: 100%;
            height: 60px;
            line-height: 60px;
            display: flex;
            justify-content: space-between;
        }
        .tab-nav h3 {


            font-size: 24px;
            font-weight: normal;
            margin-left: 20px;
        }
        .tab-nav ul {


            list-style: none;
            display: flex;
            justify-content: flex-end;
        }
        .tab-nav ul li {


            margin: 0 20px;
            font-size: 14px;
        }
        .tab-nav ul li a {


            text-decoration: none;
            border-bottom: 2px solid transparent;
            color: #333;
        }
        .tab-nav ul li a.active {


            border-color: #e1251b;
            color: #e1251b;
        }
        .tab-content {


            padding: 0 16px;
        }
        .tab-content .item {


            display: none;
        }
        .tab-content .item.active {


            display: block;
        }
        .content-container {


            display: flex;
            justify-content: space-between;
        }
        .description {


            padding-left: 16px;
        }
    </style>
</head>
<body>
    <div class="tab">
        <div class="tab-nav">
            <h3>假面骑士</h3>
            <ul>
                <li><a href="javascript:;" class="active">选项一</a></li>
                <li><a href="javascript:;">选项二</a></li>
                <li><a href="javascript:;">选项三</a></li>
                <li><a href="javascript:;">选项四</a></li>
                <li><a href="javascript:;">选项五</a></li>
            </ul>
        </div>
        <div class="tab-content">
            <div class="item active">
                <div class="content-container">
                    <img src="./img/1.png" alt="假面骑士空我">
                    <div class="description" style="width: 50%;">
                        <p>故事讲述由主角五代雄介变身而成的假面骑士空我及日本警方,合力对抗以杀戮为乐的古朗基怪人(未确认生命体)。</p>
                    </div>
                </div>
            </div>
            <div class="item">
                <div class="content-container">
                    <img src="./img/2.png" alt="假面骑士亚极陀">
                    <div class="description" style="width: 50%;">
                        <p>故事发生在《假面骑士空我》的两年后,描述了人类、AgitΩ与“神”的故事。(虽然世界观与空我一样,但是剧情没有直接关联),除了继承空我变身和形态转换要素的假面骑士AgitΩ外,该剧还突破性地加入了装着人造装甲的假面骑士G3以及狂野的假面骑士Gills,在故事后期还加入了带有昭和骑士色彩的骑士假面骑士Another AgitΩ。</p>
                    </div>
                </div>
            </div>
            <div class="item">
                <div class="content-container">
                    <img src="./img/3.png" alt="假面骑士龙骑">
                    <div class="description" style="width: 50%;">
                        <p>在本剧中,假面骑士的形象已转变,不再是前作中那个“守护人类的英雄”,而是变为了为达成个人目标而战的战士。任何人,只要获得变身卡牌,无需特定训练或改造,都可化身为假面骑士。此外,剧中登场的镜怪物也不再受任何组织控制,它们仅凭本能行事,无共同目的。</p>
                    </div>
                </div>
            </div>
            <div class="item">
                <div class="content-container">
                    <img src="./img/4.png" alt="假面骑士555">
                    <div class="description" style="width: 50%;">
                        <p>该剧是平成假面骑士的第4部作品,主要讲述了西历2003年独自一人在九州旅行的青年乾巧与巧遇的少女园田真理遭到了神秘怪人奥菲诺克的袭击。园田真理想要装备自己随身携带的腰带变身为超战士555结果却失败了,最后她强行地将腰带戴在巧的身上,让他变身为555才终于逃过一劫,故事以此拉开了帷幕。</p>
                    </div>
                </div>
            </div>
            <div class="item">
                <div class="content-container">
                    <img src="./img/5.png" alt="假面骑士剑">
                    <div class="description" style="width: 50%;">
                        <p>这部剧描绘了人类基盘史研究所(简称BOARD)研发出骑士系统后,委派青年剑崎一真为假面骑士Blade,与前辈橘朔也联手,共同封印复苏的不死生物“Undead”的历程。尽管历经橘的背叛、研究所的毁灭,以及残酷命运的捉弄,剑崎依然坚守信念,不懈地为人类而战。</p>
                    </div>
                </div>
            </div>
        </div>
    </div>
    <script>
        const as = document.querySelectorAll('.tab-nav a')
        for (let i = 0; i < as.length; i++) {


            as[i].addEventListener('mouseenter', function () {


                document.querySelector('.tab-nav .active').classList.remove('active')
                this.classList.add('active')
                document.querySelector('.tab-content .active').classList.remove('active')
                document.querySelector(`.tab-content .item:nth-child(${
        i+1})`).classList.add('active')
            })
        }
    </script>
</body>
</html>
结果如下:
屏幕录制 2025-04-01 162658
案例:勾选框
代码示例:
<!DOCTYPE html>
<html lang="en">
<head>
    <meta charset="UTF-8">
    <meta name="viewport" content="width=device-width, initial-scale=1.0">
    <title>Document</title>
    <style>
        * {


            margin: 0;
            padding: 0;
        }

        table {


            border-collapse: collapse;
            border-spacing: 0;
            border: 1px solid #c0c0c0;
            width: 500px;
            margin: 100px auto;
            text-align: center;
        }

        th {


            background-color: #09c;
            font: bold 16px "微软雅黑";
            color: #fff;
            height: 24px;
        }

        td {


            border: 1px solid #d0d0d0;
            color: #404060;
            padding: 10px;
        }

        .allCheck {


            width: 80px;
        }
    </style>
</head>
<body>
    <table>
        <tr>
            <th class="allCheck">
                <input type="checkbox" name="" id="checkAll"><span class="all">全选</span></input>
            </th>
            <th>商品</th>
            <th>商家</th>
            <th>价格</th>
        </tr>
        <tr>
            <td>
                <input type="checkbox" name="check" class="ck">
            </td>
            <td>小米手机</td>
            <td>小米</td>
            <td>4999</td>
        </tr>
        <tr>
            <td>
                <input type="checkbox" name="check" class="ck">
            </td>
            <td>华为手机</td>
            <td>华为</td>
            <td>5999</td>
        </tr>
        <tr>
            <td>
                <input type="checkbox" name="check" class="ck">
            </td>
            <td>苹果手机</td>
            <td>苹果</td>
            <td>7999</td>
        </tr>
    </table>
    <script>
        const checkAll = document.querySelector('#checkAll')
        const cks = document.querySelectorAll('.ck')

        checkAll.addEventListener('click', function () {


            for (let i = 0; i < cks.length; i++) {


                cks[i].checked = checkAll.checked
            }
        })
        for (let i = 0; i < cks.length; i++) {


            cks[i].addEventListener('click', function () {


                // let flag = true
                // for (let j = 0; j < cks.length; j++) {


                //     if (!cks[j].checked) {


                //         flag = false
                //     }
                // }
                // checkAll.checked = flag
                checkAll.checked = document.querySelectorAll('.ck:checked').length === cks.length
            })
        }
    </script>
</body>
</html>
结果如下:
屏幕录制 2025-04-01 195009