1 概念
有分析到Activity中界面加载显示的基本流程原理,记不记得最终分析结果就是下面的关系,id为content的内容就是整个View树的结构,所以对每个具体View对象的操作,其实就是个递归的实现。

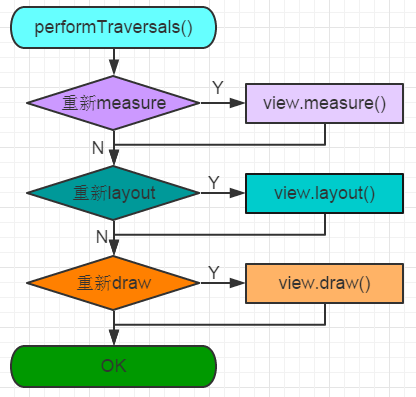
整个View树的绘图流程是在ViewRootImpl类的performTraversals()方法开始的(在上一篇博客—-Android系统分析之Window的视图对象的创建过程分析-的最后阶段分析到),该函数做的执行过程主要是根据之前设置的状态,判断是否重新计算视图大小(measure)、是否重新放置视图的位置(layout)、以及是否重绘 (draw),其核心也就是通过判断来选择顺序执行这三个方法中的哪个,如下:
private void performTraversals() {
        ......
        //最外层的根视图的widthMeasureSpec和heightMeasureSpec由来
        //lp.width和lp.height在创建ViewGroup实例时等于MATCH_PARENT
        int childWidthMeasureSpec = getRootMeasureSpec(mWidth, lp.width);
        int childHeightMeasureSpec = getRootMeasureSpec(mHeight, lp.height);
        ......
        performMeasure(childWidthMeasureSpec,childHeightMeasureSpec);
        ......
        performLayout(lp, mWidth, mHeight);
        ......
        performDraw();
        ......
    }
private void performMeasure(int childWidthMeasureSpec, int childHeightMeasureSpec) {
mView.measure(childWidthMeasureSpec, childHeightMeasureSpec);
}//测Root View,基于它的布局参数,计算出窗口中根视图的度量标准
//上面传入参数后这个函数走的是MATCH_PARENT,使用MeasureSpec.makeMeasureSpec方法
//组装一个MeasureSpec,MeasureSpec的specMode等于EXACTLY,specSize等于windowSize,也就是为何根视图总是全屏的原因。
private static int getRootMeasureSpec(int windowSize, int rootDimension) {
int measureSpec;
switch (rootDimension) {
case ViewGroup.LayoutParams.MATCH_PARENT:
// Window can't resize. Force root view to be windowSize.
measureSpec = MeasureSpec.makeMeasureSpec(windowSize, MeasureSpec.EXACTLY);
break;
......
}
return measureSpec;
} 其中的mView就是View对象。如下就是整个流程的大致流程图:
2 View绘制流程第一步:递归measure源码分析
2.1 measure源码分析
(1)先看下View的measure方法源码,如下:
    //final方法,子类不可重写
    public final void measure(int widthMeasureSpec, int heightMeasureSpec) {
        ......
        //回调onMeasure()方法
        onMeasure(widthMeasureSpec, heightMeasureSpec);
        ......
    }
为整个View树计算实际的大小,然后设置实际的高和宽,每个View控件的实际宽高都是由父视图和自身决定的。实际的测量是在onMeasure方法进行,所以在View的子类需要重写onMeasure方法,这是因为measure方法是final的,不允许重载,所以View子类只能通过重载onMeasure来实现自己的测量逻辑。
在这里可以看出measure方法最终回调了View的onMeasure方法,我们来看下View的onMeasure源码,如下:
//View的onMeasure默认实现方法
protected void onMeasure(int widthMeasureSpec, int heightMeasureSpec) {
        setMeasuredDimension(getDefaultSize(getSuggestedMinimumWidth(), widthMeasureSpec),
                getDefaultSize(getSuggestedMinimumHeight(), heightMeasureSpec));
    }
测量的结果怎么办?onMeasure默认的实现仅仅调用了setMeasuredDimension,setMeasuredDimension函数是一个很关键的函数,它对View的成员变量mMeasuredWidth和mMeasuredHeight变量赋值,measure的主要目的就是对View树中的每个View的mMeasuredWidth和mMeasuredHeight进行赋值,所以一旦这两个变量被赋值意味着该View的测量工作结束。
对于非ViewGroup的View而言,通过调用上面默认的onMeasure即可完成View的测量。如果是ViewGroup就需要测量里面的所有childview。
到此一次最基础的元素View的measure过程就完成了。上面说了View实际是嵌套的,而且measure是递归传递的,所以每个View都需要measure。实际能够嵌套的View一般都是ViewGroup的子类,所以在ViewGroup中定义了measureChildren, measureChild, measureChildWithMargins方法来对子视图进行测量,measureChildren内部实质只是循环调用measureChild,measureChild和measureChildWithMargins的区别就是是否把margin和padding也作为子视图的大小。如下我们以ViewGroup中稍微复杂的measureChildWithMargins方法来分析:
//对父视图提供的measureSpec参数结合自身的LayoutParams参数进行了调整,然后再来调用child.measure()方法
protected void measureChildWithMargins(View child,
            int parentWidthMeasureSpec, int widthUsed,
            int parentHeightMeasureSpec, int heightUsed) {
        //获取子视图的LayoutParams
        final MarginLayoutParams lp = (MarginLayoutParams) child.getLayoutParams();
        //调整MeasureSpec
        //通过这两个参数以及子视图本身的LayoutParams来共同决定子视图的测量规格
        final int childWidthMeasureSpec = getChildMeasureSpec(parentWidthMeasureSpec,
                mPaddingLeft + mPaddingRight + lp.leftMargin + lp.rightMargin
                        + widthUsed, lp.width);
        final int childHeightMeasureSpec = getChildMeasureSpec(parentHeightMeasureSpec,
                mPaddingTop + mPaddingBottom + lp.topMargin + lp.bottomMargin
                        + heightUsed, lp.height);
        //调运子View的measure方法,子View的measure中会回调子View的onMeasure方法
        child.measure(childWidthMeasureSpec, childHeightMeasureSpec);
    }
2.2 measure原理总结
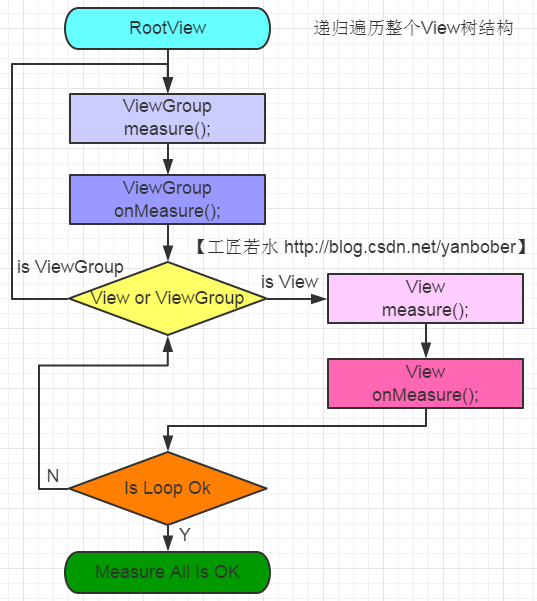
通过上面分析可以看出measure过程主要就是从顶层父View向子View递归调用view.measure方法(measure中又回调onMeasure方法)的过程。具体measure核心主要有如下几点:
- MeasureSpec(View的内部类)测量规格为int型,值由高2位规格模式specMode和低30位具体尺寸specSize组成。其中specMode只有三种值:
MeasureSpec.EXACTLY //确定模式,父View希望子View的大小是确定的,由specSize决定;
MeasureSpec.AT_MOST //最多模式,父View希望子View的大小最多是specSize指定的值;
MeasureSpec.UNSPECIFIED //未指定模式,父View完全依据子View的设计值来决定; - View的measure方法是final的,不允许重载,View子类只能重载onMeasure来完成自己的测量逻辑。
- 最顶层DecorView测量时的MeasureSpec是由ViewRootImpl中getRootMeasureSpec方法确定的(LayoutParams宽高参数均为MATCH_PARENT,specMode是EXACTLY,specSize为物理屏幕大小)。
- ViewGroup类提供了measureChild,measureChild和measureChildWithMargins方法,简化了父子View的尺寸计算。
- 只要是ViewGroup的子类就必须要求LayoutParams继承子MarginLayoutParams,否则无法使用layout_margin参数。
- View的布局大小由父View和子View共同决定。
- 使用View的getMeasuredWidth()和getMeasuredHeight()方法来获取View测量的宽高,必须保证这两个方法在onMeasure流程之后被调用才能返回有效值。
3 View绘制流程第二步:递归layout源码分析
3.1 layout源码分析
private void performLayout(WindowManager.LayoutParams lp, int desiredWindowWidth, int desiredWindowHeight) {
    //layout方法接收四个参数,这四个参数分别代表相对Parent的左、上、右、下坐标。而且还可以看见左上都为0,右下分别为上面刚刚测量的width和height。
    view.layout(0, 0, host.getMeasuredWidth(), host.getMeasuredHeight());
}
类似measure过程,lauout调运了onLayout方法。
3.2 layout原理总结
整个layout过程比较容易理解,从上面分析可以看出layout也是从顶层父View向子View的递归调用view.layout方法的过程,即父View根据上一步measure子View所得到的布局大小和布局参数,将子View放在合适的位置上。
具体layout核心主要有以下几点:
- View.layout方法可被重载,ViewGroup.layout为final的不可重载,ViewGroup.onLayout为abstract的,子类必须重载实现自己的位置逻辑。
- measure操作完成后得到的是对每个View经测量过的measuredWidth和measuredHeight,layout操作完成之后得到的是对每个View进行位置分配后的mLeft、mTop、mRight、mBottom,这些值都是相对于父View来说的。
- 使用View的getWidth()和getHeight()方法来获取View测量的宽高,必须保证这两个方法在onLayout流程之后被调用才能返回有效值。
4 View绘制流程第三步:递归draw源码分析
4.1 draw源码分析
private void performDraw() {
    draw(fullRedrawNeeded);
}
public void draw(Canvas canvas) {
......
/*
* Draw traversal performs several drawing steps which must be executed
* in the appropriate order:
*
* 1. Draw the background,对View的背景进行绘制
* 2. If necessary, save the canvas' layers to prepare for fading
* 3. Draw view's content,对View的内容进行绘制
* 4. Draw children,对当前View的所有子View进行绘制,如果当前的View没有子View就不需要进行绘制
* 5. If necessary, draw the fading edges and restore layers
* 6. Draw decorations (scrollbars for instance),对View的滚动条进行绘制
*/
// Step 1, draw the background, if needed
......
if (!dirtyOpaque) {
drawBackground(canvas);
}
// skip step 2 & 5 if possible (common case)
......
// Step 2, save the canvas' layers
......
if (drawTop) {
canvas.saveLayer(left, top, right, top + length, null, flags);
}
......
// Step 3, draw the content
if (!dirtyOpaque) onDraw(canvas);
// Step 4, draw the children
dispatchDraw(canvas);
// Step 5, draw the fade effect and restore layers
......
if (drawTop) {
matrix.setScale(1, fadeHeight * topFadeStrength);
matrix.postTranslate(left, top);
fade.setLocalMatrix(matrix);
p.setShader(fade);
canvas.drawRect(left, top, right, top + length, p);
}
......
// Step 6, draw decorations (scrollbars)
onDrawScrollBars(canvas);
......
}5 View的invalidate和postInvalidate方法源码分析
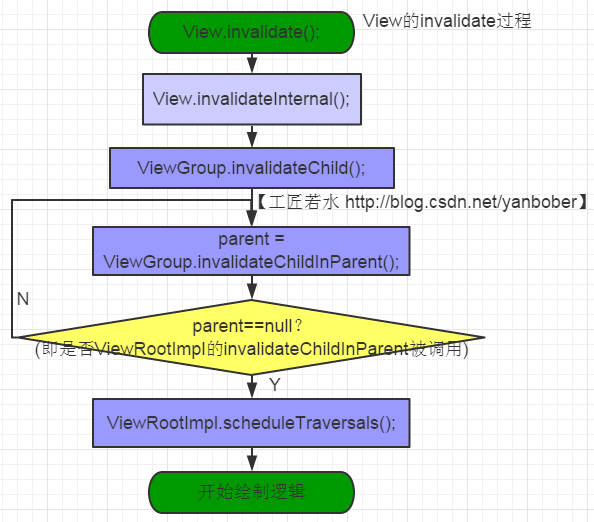
在上面分析View的三步绘制流程中,高频率调用一个叫invalidate的方法,我们下面对此进行分析。View调用invalidate方法的实质是层层上传到父级,直到传递到ViewRootImpl后触发了scheduleTraversals方法,然后整个View树开始重新按照上面分析的View绘制流程进行重绘任务。
5.1 区别
(1)invalidate():在主线程当中刷新;
(2)postInvalidate():在子线程当中刷新;其实最终调用的就是invalidate。原理依然是通过子线程向主线程发送消息这一机制。
5.2 invalidate方法源码分析
(1)View的invalidate(invalidateInternal)方法
 /**
     * Mark the area defined by dirty as needing to be drawn. If the view is
     * visible, {@link #onDraw(android.graphics.Canvas)} will be called at some point in the future.
     * This must be called from a UI thread. To call from a non-UI thread, call
     * {@link #postInvalidate()}.
     * <b>WARNING:</b> In API 19 and below, this method may be destructive to {@code dirty}.
     * @param dirty the rectangle representing the bounds of the dirty region
     */
     //public,只能在UI Thread中使用,别的Thread用postInvalidate方法,View是可见的才有效,回调onDraw方法,针对局部View
    public void invalidate(Rect dirty) {
        final int scrollX = mScrollX;
        final int scrollY = mScrollY;
        //实质还是调运invalidateInternal方法
        invalidateInternal(dirty.left - scrollX, dirty.top - scrollY,
                dirty.right - scrollX, dirty.bottom - scrollY, true, false);
    }

    /**
     * Mark the area defined by the rect (l,t,r,b) as needing to be drawn. The
     * coordinates of the dirty rect are relative to the view. If the view is
     * visible, {@link #onDraw(android.graphics.Canvas)} will be called at some point in the future.
     * This must be called from a UI thread. To call from a non-UI thread, call
     * {@link #postInvalidate()}.
     */
     //看见上面注释没有?public,只能在UI Thread中使用,别的Thread用postInvalidate方法,View是可见的才有效,回调onDraw方法,针对局部View
    public void invalidate(int l, int t, int r, int b) {
        final int scrollX = mScrollX;
        final int scrollY = mScrollY;
        //实质还是调运invalidateInternal方法
        invalidateInternal(l - scrollX, t - scrollY, r - scrollX, b - scrollY, true, false);
    }

    /**
     * Invalidate the whole view. If the view is visible,
     * {@link #onDraw(android.graphics.Canvas)} will be called at some point in the future.
     * This must be called from a UI thread. To call from a non-UI thread, call
     */
     //public,只能在UI Thread中使用,别的Thread用postInvalidate方法,View是可见的才有效,回调onDraw方法,针对整个View
    public void invalidate() {
        //invalidate的实质还是调运invalidateInternal方法
        invalidate(true);
    }

    /**
     * This is where the invalidate() work actually happens. A full invalidate()
     * causes the drawing cache to be invalidated, but this function can be
     * called with invalidateCache set to false to skip that invalidation step
     * for cases that do not need it (for example, a component that remains at
     * the same dimensions with the same content).
     *
     * @param invalidateCache Whether the drawing cache for this view should be
     *            invalidated as well. This is usually true for a full
     *            invalidate, but may be set to false if the View's contents or
     *            dimensions have not changed.
     */
     //default的权限,只能在UI Thread中使用,别的Thread用postInvalidate方法,View是可见的才有效,回调onDraw方法,针对整个View
    void invalidate(boolean invalidateCache) {
        //实质还是调运invalidateInternal方法
        invalidateInternal(0, 0, mRight - mLeft, mBottom - mTop, invalidateCache, true);
    }

    //!!!!!!看见没有,这是所有invalidate的终极调用方法!!!!!!
    void invalidateInternal(int l, int t, int r, int b, boolean invalidateCache,
            boolean fullInvalidate) {
        ......
            // Propagate the damage rectangle to the parent view.
            final AttachInfo ai = mAttachInfo;
            final ViewParent p = mParent;
            if (p != null && ai != null && l < r && t < b) {
                final Rect damage = ai.mTmpInvalRect;
                //设置刷新区域
                damage.set(l, t, r, b);
                //传递调运Parent--ViewGroup的invalidateChild方法
                p.invalidateChild(this, damage);
            }
            ......
    }
(2)ViewGroup的invalidateChild方法
View的invalidate(invalidateInternal)方法实质是将要刷新区域直接传递给了父ViewGroup的invalidateChild方法,在invalidate中,调用父View的invalidateChild,这是一个从当前向上级父View回溯的过程,每一层的父View都将自己的显示区域与传入的刷新Rect做交集 。所以我们看下ViewGroup的invalidateChild方法,源码如下:
public final void invalidateChild(View child, final Rect dirty) {
        ViewParent parent = this;
        final AttachInfo attachInfo = mAttachInfo;
        ......
        do {
            ......
            if (parent instanceof ViewRootImpl) {
            }
            //循环层层上级调用,直到ViewRootImpl会返回null
            parent = parent.invalidateChildInParent(location, dirty);
            ......
        } while (parent != null);
    }
(3)ViewRootImpl的invalidateChildInParent方法
这个过程最后传递到ViewRootImpl的invalidateChildInParent方法结束,所以我们看下ViewRootImpl的invalidateChildInParent方法,如下:
@Override
public ViewParent invalidateChildInParent(int[] location, Rect dirty) {
    //invalidate()
  invalidate();

    return null;
}
这个ViewRootImpl类的invalidateChildInParent方法直接返回了null,也就是上面ViewGroup中说的,层层上级传递到ViewRootImpl的invalidateChildInParent方法结束了那个do while循环。
void invalidate() {
    mDirty.set(0, 0, mWidth, mHeight);
    if (!mWillDrawSoon) {
        //scheduleTraversals()
        scheduleTraversals();
    }
}
scheduleTraversals会通过Handler的Runnable发送一个异步消息,调运doTraversal方法,然后最终调用performTraversals()执行重绘。

5.3 postInvalidate方法源码分析
(1)View的postInvalidate()方法
public void postInvalidate() {
    //postInvalidateDelayed()
    postInvalidateDelayed(0);
}
public void postInvalidateDelayed(long delayMilliseconds) {
final AttachInfo attachInfo = mAttachInfo;
//核心,实质就是调运了ViewRootImpl.dispatchInvalidateDelayed方法
if (attachInfo != null) {
attachInfo.mViewRootImpl.dispatchInvalidateDelayed(this, delayMilliseconds);
}
}(2)ViewRootImpl类的dispatchInvalidateDelayed方法
public void dispatchInvalidateDelayed(View view, long delayMilliseconds) {
        Message msg = mHandler.obtainMessage(MSG_INVALIDATE, view);
        mHandler.sendMessageDelayed(msg, delayMilliseconds);
    }
通过ViewRootImpl类的Handler发送了一条MSG_INVALIDATE消息,继续追踪这条消息的处理可以发现,实质就是又在UI Thread中调运了View的invalidate();方法。
public void handleMessage(Message msg) {
    ......
    switch (msg.what) {
    case MSG_INVALIDATE:
        //invalidate()
        ((View) msg.obj).invalidate();
        break;
    ......
    }
    ......
}
5.4 invalidate与postInvalidate方法总结
invalidate系列方法请求重绘View树(也就是draw方法),如果View大小没有发生变化就不会调用layout过程,并且只绘制那些“需要重绘的”View,也就是哪个View(View只绘制该View,ViewGroup绘制整个ViewGroup)请求invalidate系列方法,就绘制该View。
(1)依据上面对View的invalidate分析我总结绘制如下流程图:
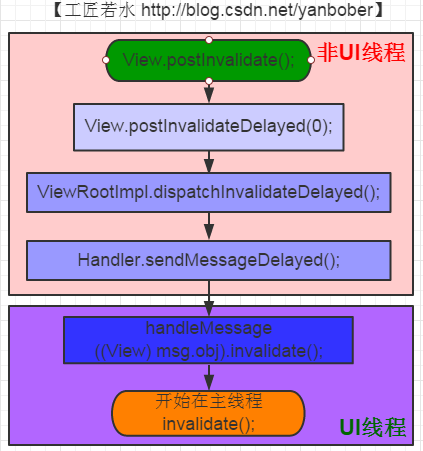
(2)依据上面对View的postInvalidate分析我总结绘制如下流程图:
(3)常见的引起invalidate方法操作的原因主要有:
- 直接调用invalidate方法.请求重新draw,但只会绘制调用者本身。
- 触发setSelection方法。请求重新draw,但只会绘制调用者本身。
- 触发setVisibility方法。 当View可视状态在INVISIBLE转换VISIBLE时会间接调用invalidate方法,继而绘制该View。当View的可视状态在INVISIBLE\VISIBLE 转换为GONE状态时会间接调用requestLayout和invalidate方法,同时由于View树大小发生了变化,所以会请求measure过程以及draw过程,同样只绘制需要“重新绘制”的视图。
- 触发setEnabled方法。请求重新draw,但不会重新绘制任何View包括该调用者本身。
- 触发requestFocus方法。请求View树的draw过程,只绘制“需要重绘”的View。
6 相关问答题
6.1 requestlayout, onlayout, onDraw, drawChild区别与联系
(1)requestLayout()方法:会导致调用Measure()方法和layout(),将会根据标志位判断是否需要onDraw();
(2)onLayout():摆放viewGroup里面的子控件;
(3)onDraw():绘制视图本身;(ViewGroup还需要绘制里面的所有子控件)
(4)drawChild(): 重新回调每一个子视图的draw方法,child.draw(canvas, this, drawingTime);
6.2 LinearLayout对比RelativeLayout(实质是性能对比)
(1)RelativeLayout会对子View做两次measure。这是为什么呢?首先RelativeLayout中子View的排列方式是基于彼此的依赖关系,而这个依赖关系可能和布局中View的顺序并不相同,在确定每个子View的位置的时候,就需要先给所有的子View排序一下。又因为RelativeLayout允许A,B 2个子View,横向上B依赖A,纵向上A依赖B。所以需要横向纵向分别进行一次排序测量。
(2)LinearLayout,如果不使用weight属性,LinearLayout会在当前方向上进行一次measure的过程,如果使用weight属性,LinearLayout会避开设置过weight属性的view做第一次measure,完了再对设置过weight属性的view做第二次measure。由此可见,weight属性对性能是有影响的,而且本身有大坑,请注意避让。
(3)参考链接:Android中RelativeLayout和LinearLayout性能分析