在《下载Spring4.1.x源码并用IntelliJ IDEA打开》一文中,我们将spring-framework源码在本地用ideal打开,今天来实战修改spring-framework源码,然后编译构建,最后用写一个demo工程来验证构建成功;
原文地址:https://blog.csdn.net/boling_cavalry/article/details/80791786
环境信息
实战涉及的版本如下:
1. 操作系统:win10 64;
2. JDK:1.8.0_144;
3. Maven:3.5.0;
4. IntelliJ IDEA:2018.1.5(Ultimate Edition);
全文概要
本次实战所有步骤如下:
1. 下载spring-framwork源码,用IDEA打开此工程;
1. 修改spring-framework中的类,添加代码;
2. 编译构建spring-framework,添加到本地maven仓库;
3. 基于maven创建一个新的demo,使用本地仓库的spring-framework;
4. 执行demo工程验证修改的代码已经生效;
接下来开始实战吧;
下载spring-framework源码,用IDEA打开此工程
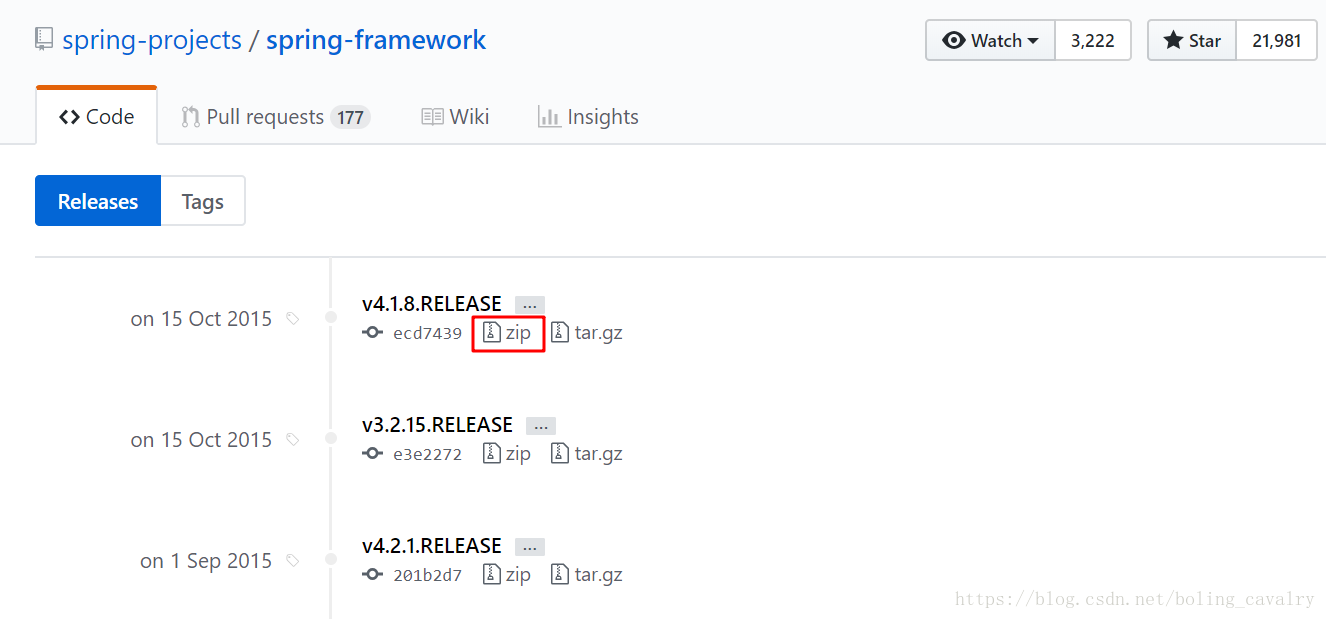
打开spring-framework在GitHub上的release列表,地址是:https://github.com/spring-projects/spring-framework/releases,下载4.1.8.RELEASE版本,如下图红框所示:
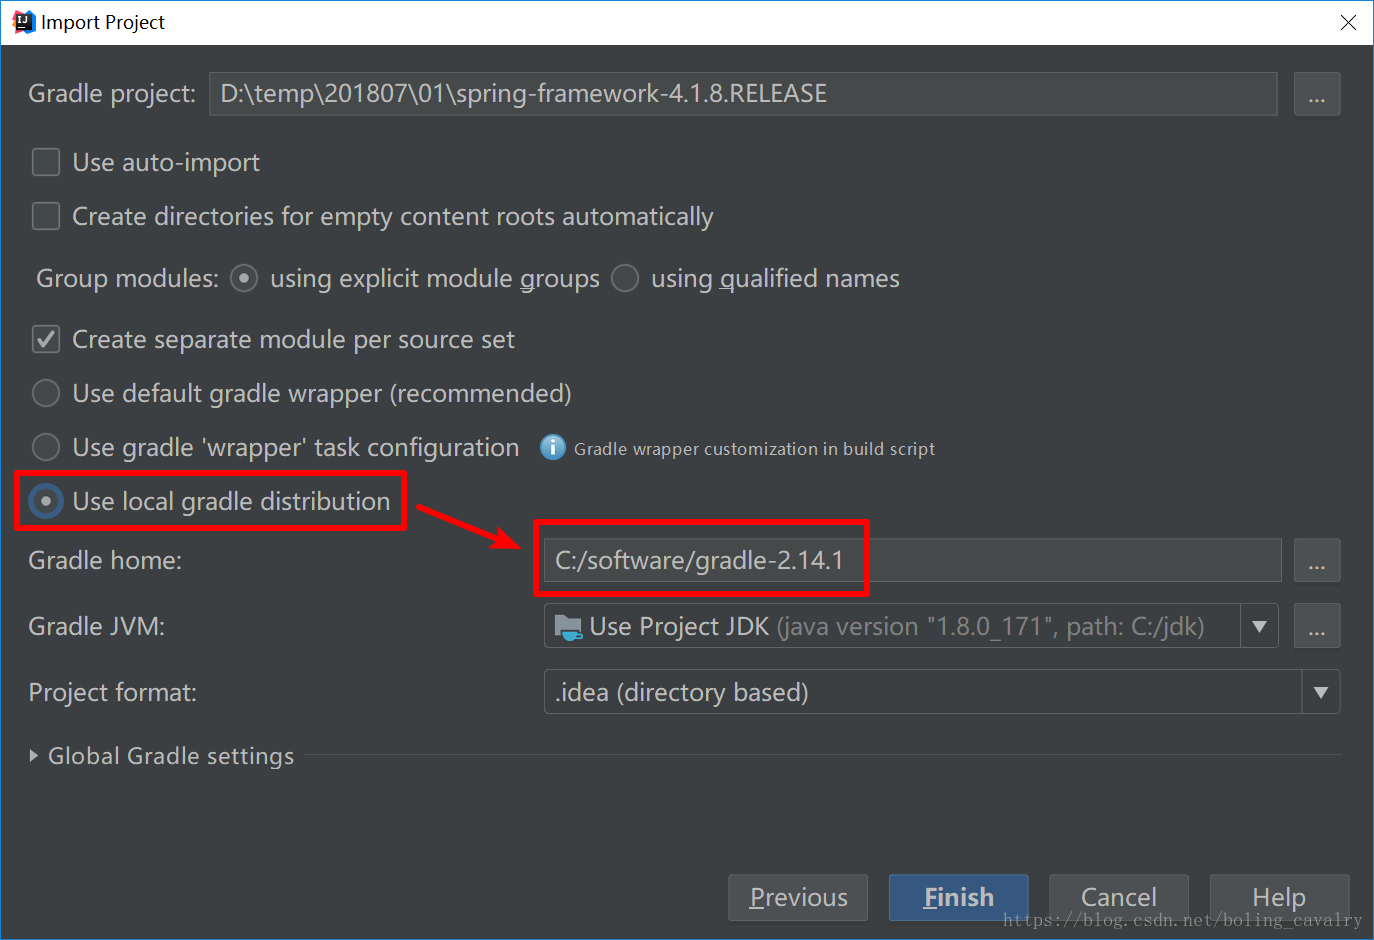
解压后,用Intellij IDEA以Gradle工程的形式导入,Gradle版本记得使用2.14.1,如下图:
修改spring-framework中的类
本次修改的类是PropertyPlaceholderHelper.java,这个类用来替换字符串中的占位符,本次修改源码的目的如下:
1. 将替换前后的字符串打印出来用于对比;
2. 将调用堆栈打印出来,这样我们在学习spring源码时,可以知道处理占位符的时机和位置;
对PropertyPlaceholderHelper.java的具体修改如下所示:
1. 新增一个private方法,用于打印当前堆栈位置:
private void printTrack(String prefix){
    StackTraceElement[] st = Thread.currentThread().getStackTrace();
    if(st==null){
        logger.info("invalid stack");
        return;
    }

    StringBuffer sbf =new StringBuffer();

    for(StackTraceElement e:st){
        if(sbf.length()>0){
            sbf.append(" <- ");
            sbf.append(System.getProperty("line.separator"));
        }

        sbf.append(java.text.MessageFormat.format("{0}.{1}() {2}"
                    ,e.getClassName()
                    ,e.getMethodName()
                    ,e.getLineNumber()));
    }
    logger.info(prefix + "\n" + sbf.toString());
}
2. 找到方法parseStringValue,注意是protected类型的那个,在该方法的起始位置添加如下两行代码:
protected String parseStringValue(
            String strVal, PlaceholderResolver placeholderResolver, Set<String> visitedPlaceholders) {
    printTrack("start parseStringValue");
logger.info("before parse : [" + strVal + "]");上述代码先是将parseStringValue被调用的堆栈打印出来,接着将入参strVal打印出来;
3. 在上一步中的parseStringValue方法的结束位置,在return之前增加一行代码,将处理后的字符串打印出来,如下:
    logger.info("after parse : [" + result + "]");
    return result.toString();
}
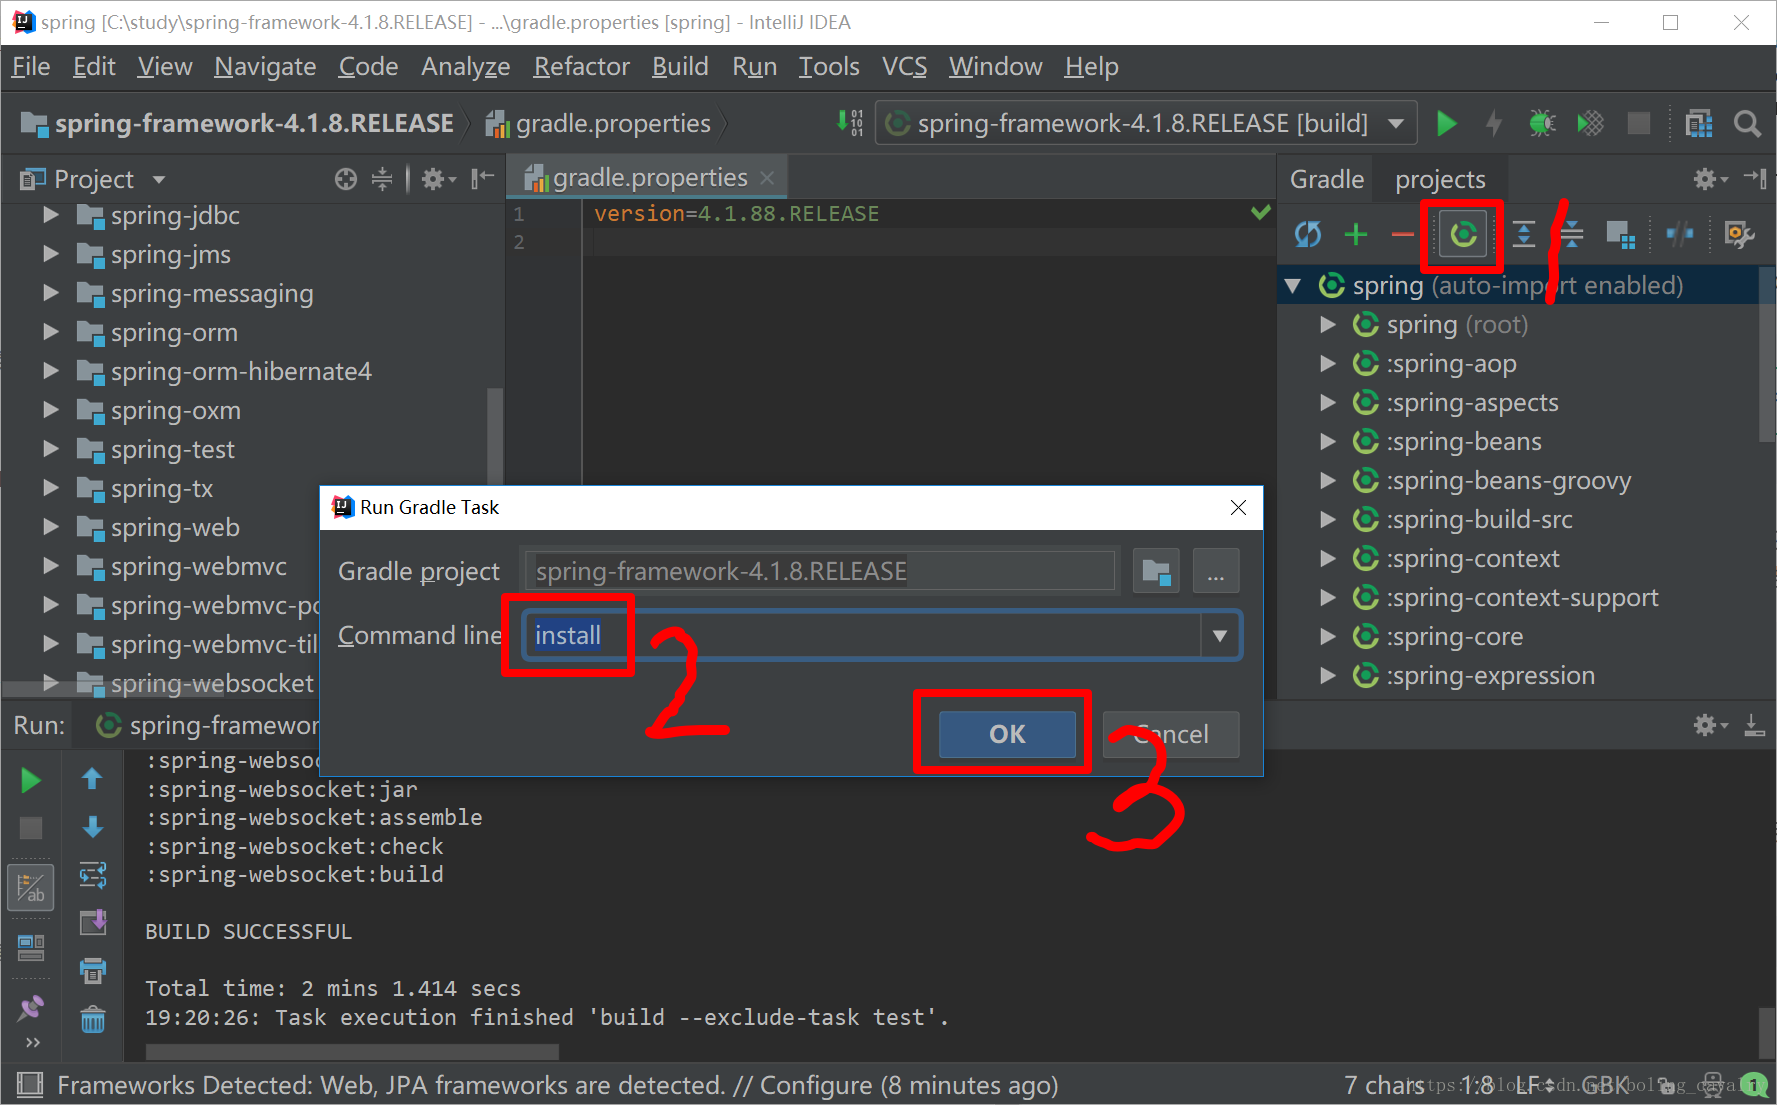
4. 为了避免当前电脑的其他项目用到我们构建的spring版本,我们把版本号改掉,打开gradle.properties文件,修改版本号为”4.1.88.RELEASE”,如下:
version=4.1.88.RELEASE编译构建spring-framework
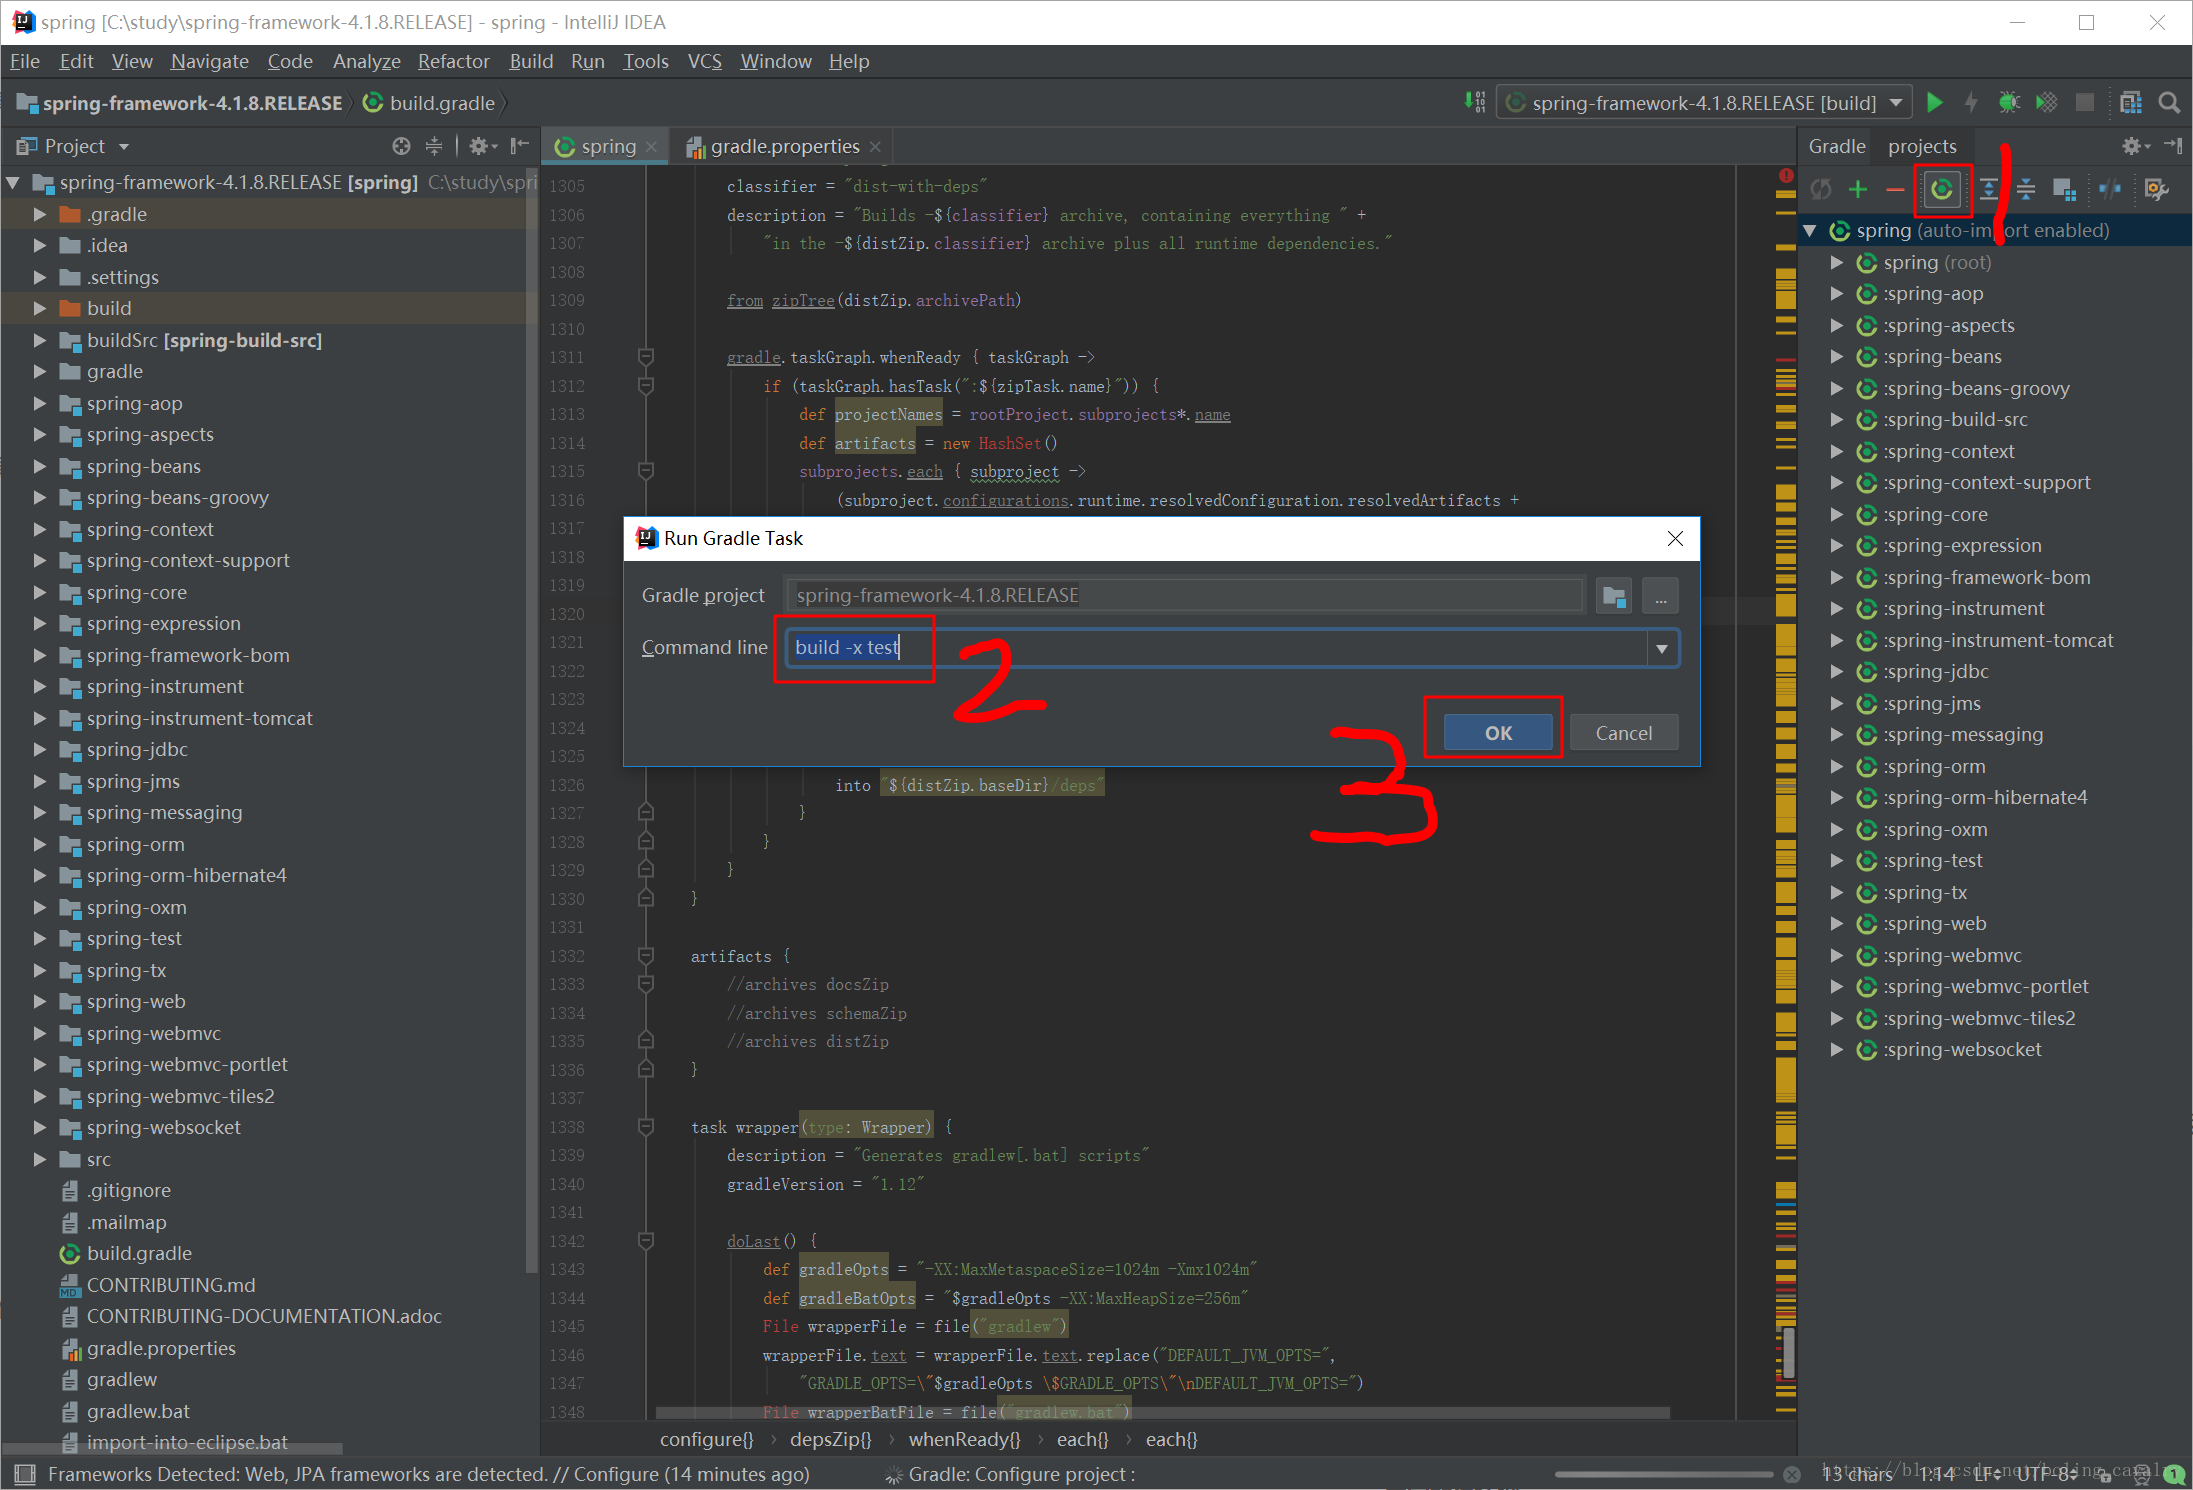
- 用命令build -x test编译和构建工程,操作如下图所示:
- 等待构建完成之后,用命令install将构建的jar部署到本地maven仓库中,如下图:
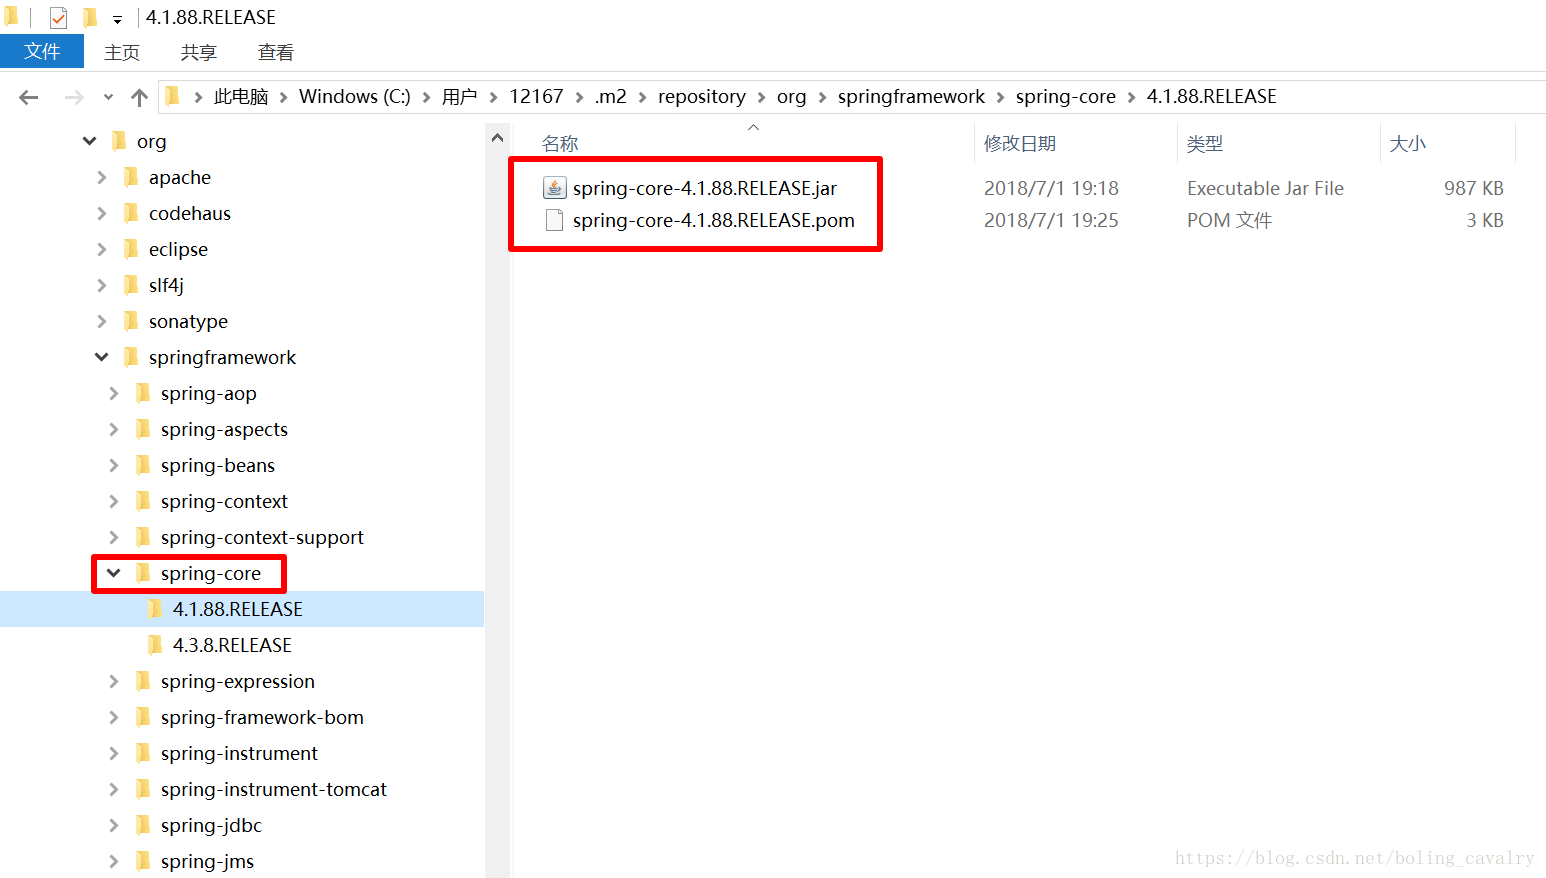
- 去本地maven仓库看看,果然已经有文件了,如下图:
创建demo,使用本地仓库的spring-framework
基于maven创建一个java应用,以下是步骤:
1. pom.xml内容如下:
<?xml version="1.0" encoding="UTF-8"?>
<project xmlns="http://maven.apache.org/POM/4.0.0"
         xmlns:xsi="http://www.w3.org/2001/XMLSchema-instance"
         xsi:schemaLocation="http://maven.apache.org/POM/4.0.0 http://maven.apache.org/xsd/maven-4.0.0.xsd">
    <modelVersion>4.0.0</modelVersion>

    <groupId>com.bolingcavalry</groupId>
    <artifactId>springcoredemo</artifactId>
    <version>1.0-SNAPSHOT</version>

    <dependencies>
        <!-- Spring framework -->
        <dependency>
            <groupId>org.springframework</groupId>
            <artifactId>spring-core</artifactId>
            <version>4.1.88.RELEASE</version>
        </dependency>
        <dependency>
            <groupId>org.springframework</groupId>
            <artifactId>spring-context</artifactId>
            <version>4.1.88.RELEASE</version>
        </dependency>
    </dependencies>

</project>
2. 新增文件:src/main/resources/applicationContext.xml,用于配置bean,内容如下:
<?xml version="1.0" encoding="UTF-8"?>
<beans xmlns="http://www.springframework.org/schema/beans"
       xmlns:mvc="http://www.springframework.org/schema/mvc"
       xmlns:xsi="http://www.w3.org/2001/XMLSchema-instance"
       xmlns:p="http://www.springframework.org/schema/p"
       xmlns:aop="http://www.springframework.org/schema/aop"
       xmlns:tx="http://www.springframework.org/schema/tx"
       xmlns:context="http://www.springframework.org/schema/context"
       xsi:schemaLocation="
http://www.springframework.org/schema/beans
http://www.springframework.org/schema/beans/spring-beans.xsd
http://www.springframework.org/schema/mvc
http://www.springframework.org/schema/mvc/spring-mvc.xsd
http://www.springframework.org/schema/aop
http://www.springframework.org/schema/aop/spring-aop.xsd
http://www.springframework.org/schema/tx
    http://www.springframework.org/schema/tx/spring-tx-4.0.xsd
http://www.springframework.org/schema/context
http://www.springframework.org/schema/context/spring-context.xsd">

    <beans>
        <bean class="com.bolingcavalry.bean.Simple"></bean>
    </beans>
</beans>
3. 创建一个类:com.bolingcavalry.bean.Simple.java:
public class Simple {
    public void execute() {
        System.out.println("Simple execute method");
    }
}
4. 创建启动类com.bolingcavalry.DemoApplication.java:
public class DemoApplication {

    public static void main(String[] args) {
        ClassPathXmlApplicationContext context = new ClassPathXmlApplicationContext("${CONFIG_PATH}");
        Simple bean = context.getBean(Simple.class);
        bean.execute();
        context.close();
    }
}注意以上代码中有个变量${CONFIG_PATH},这个变量的值不在代码和配置文件中,留待运行的时候再设置;
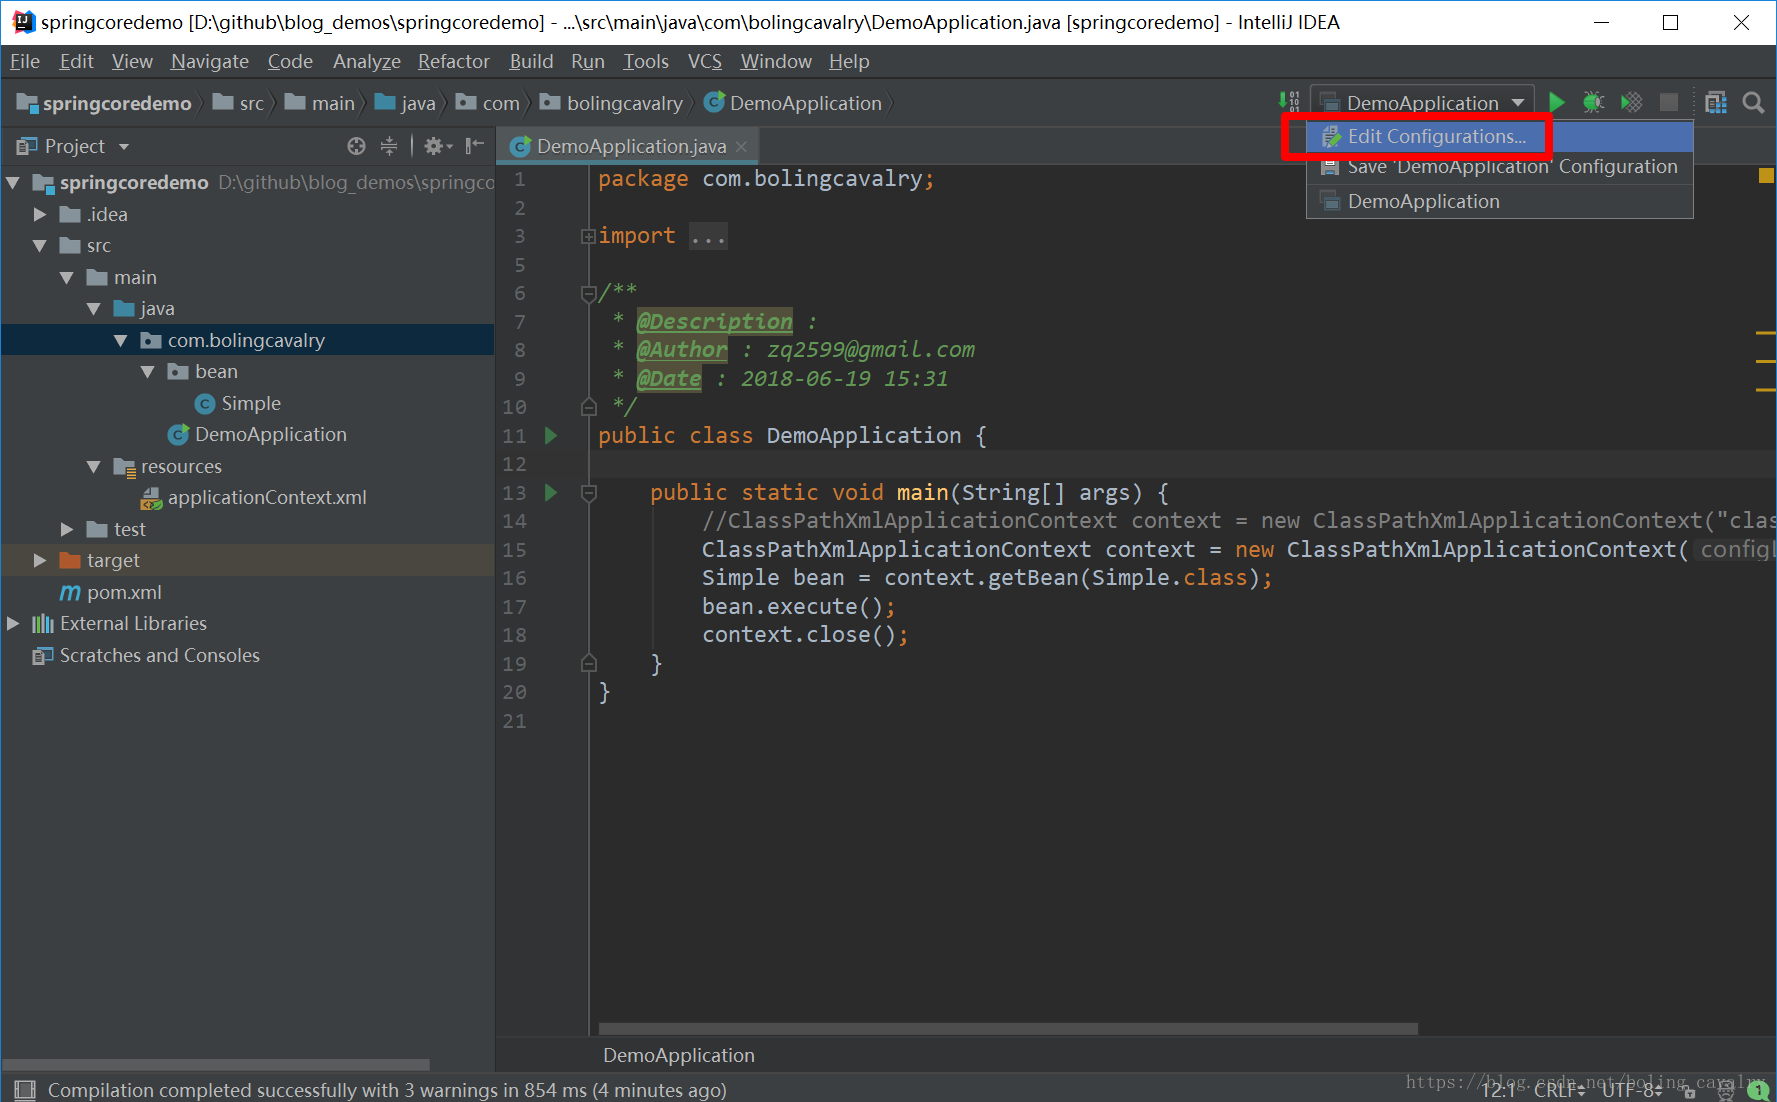
5. 运行DemoApplication.java的时候,注意传入环境变量CONFIG_PATH的值,在IDEAL上的做法如下,点击红框中的”Edit Configurations…”:
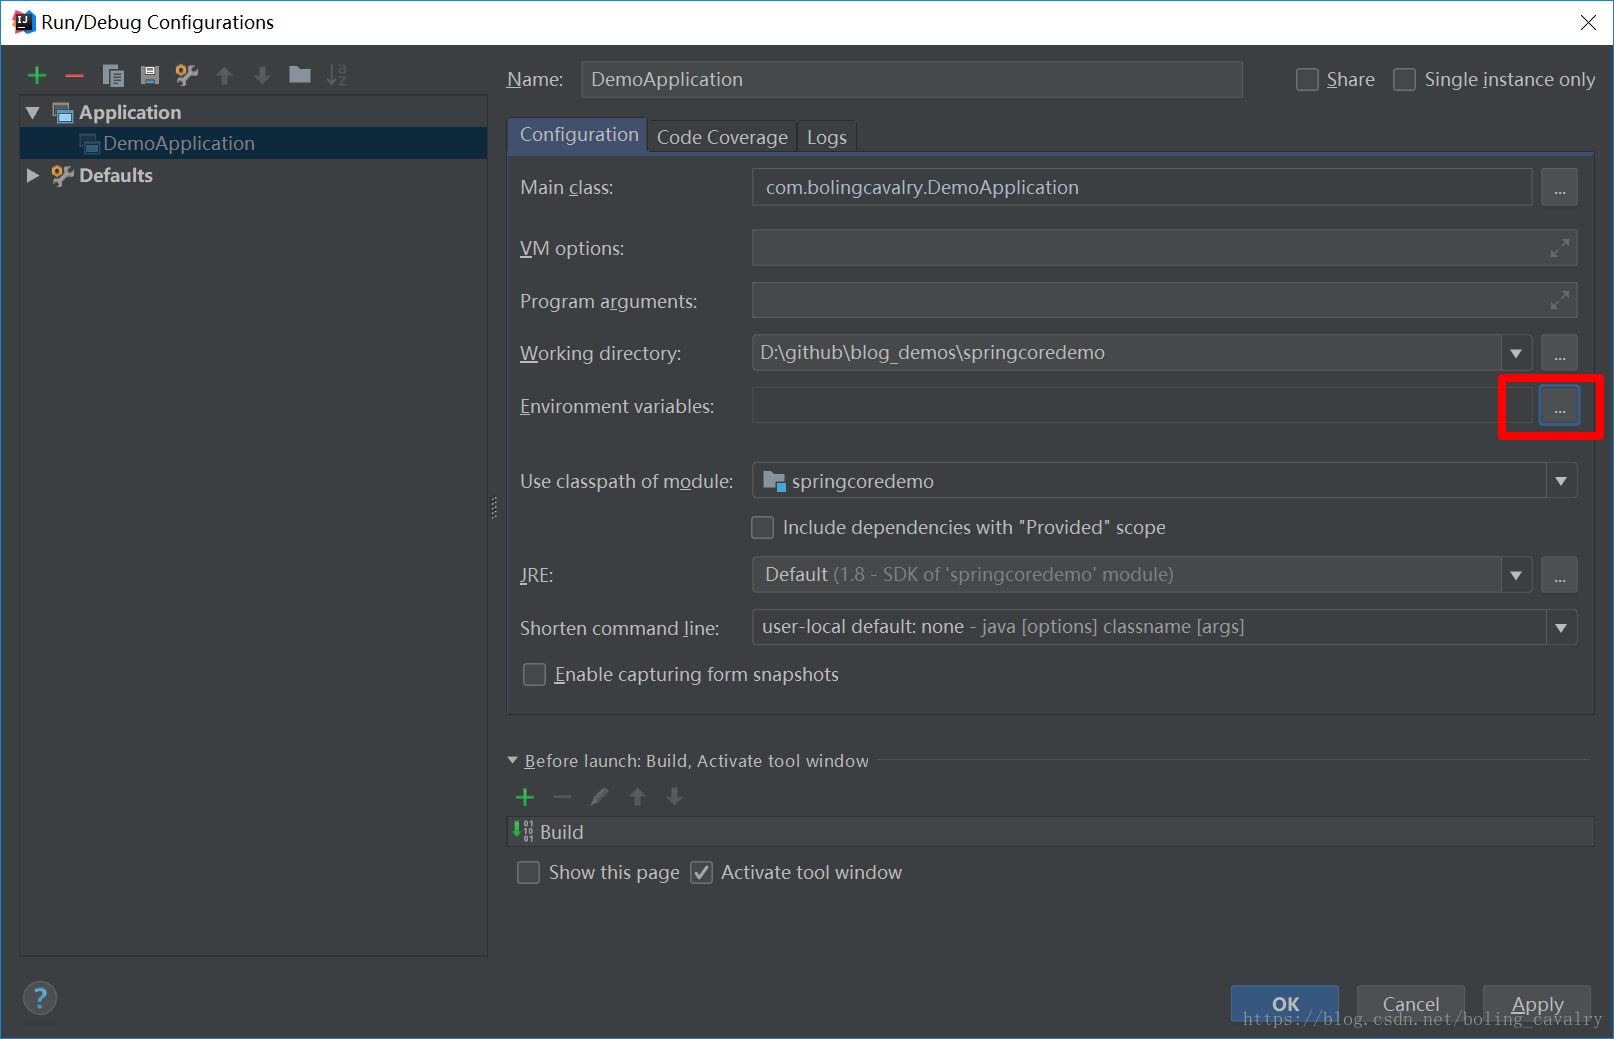
6. 如下图,点击红框中的按钮:
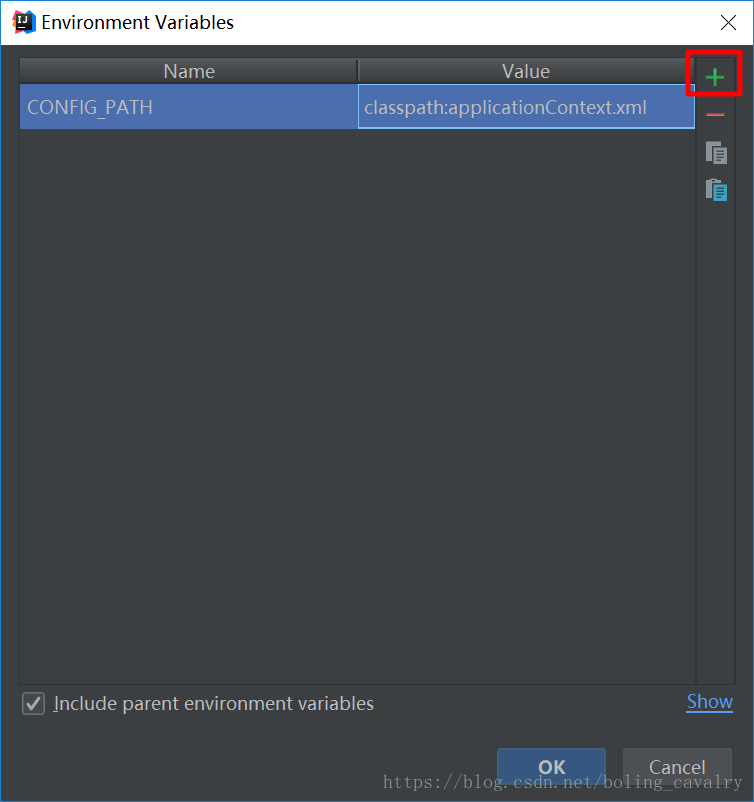
7. 如下图,点击红框中的加号,然后添加一个键值对,Name是”CONFIG_PATH”,Value是”classpath:applicationContext.xml”
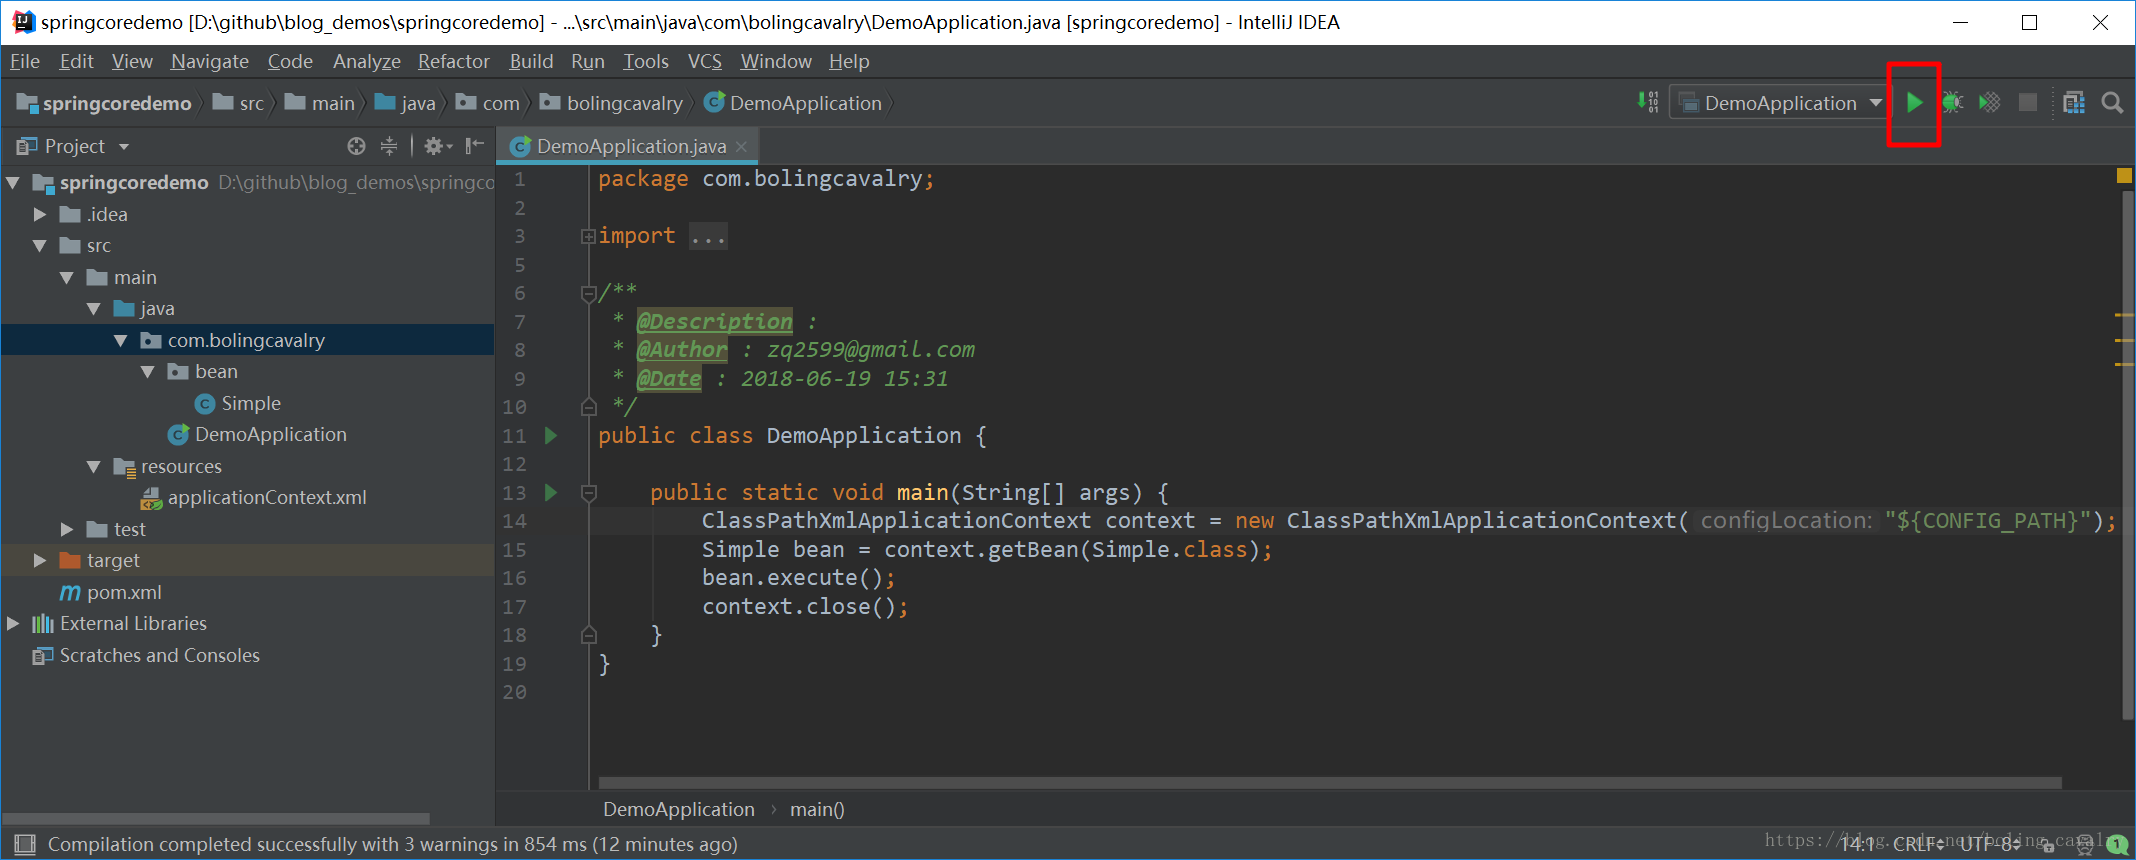
8. 配置完毕后,点击下图红框中的绿色三角形按钮,即可运行DemoApplication的main方法,并且刚刚设置的环境变量也生效了:
9. 运行结果如下:
C:\jdk\bin\java.exe -javaagent:C:\software\JetBrains\IntelliJIDEA\lib\idea_rt.jar=60748:C:\software\JetBrains\IntelliJIDEA\bin -Dfile.encoding=UTF-8 -classpath C:\jdk\jre\lib\charsets.jar;C:\jdk\jre\lib\deploy.jar;C:\jdk\jre\lib\ext\access-bridge-64.jar;C:\jdk\jre\lib\ext\cldrdata.jar;C:\jdk\jre\lib\ext\dnsns.jar;C:\jdk\jre\lib\ext\jaccess.jar;C:\jdk\jre\lib\ext\jfxrt.jar;C:\jdk\jre\lib\ext\localedata.jar;C:\jdk\jre\lib\ext\nashorn.jar;C:\jdk\jre\lib\ext\sunec.jar;C:\jdk\jre\lib\ext\sunjce_provider.jar;C:\jdk\jre\lib\ext\sunmscapi.jar;C:\jdk\jre\lib\ext\sunpkcs11.jar;C:\jdk\jre\lib\ext\zipfs.jar;C:\jdk\jre\lib\javaws.jar;C:\jdk\jre\lib\jce.jar;C:\jdk\jre\lib\jfr.jar;C:\jdk\jre\lib\jfxswt.jar;C:\jdk\jre\lib\jsse.jar;C:\jdk\jre\lib\management-agent.jar;C:\jdk\jre\lib\plugin.jar;C:\jdk\jre\lib\resources.jar;C:\jdk\jre\lib\rt.jar;D:\github\blog_demos\springcoredemo\target\classes;C:\Users\12167\.m2\repository\org\springframework\spring-core\4.1.88.RELEASE\spring-core-4.1.88.RELEASE.jar;C:\Users\12167\.m2\repository\commons-logging\commons-logging\1.2\commons-logging-1.2.jar;C:\Users\12167\.m2\repository\org\springframework\spring-context\4.1.88.RELEASE\spring-context-4.1.88.RELEASE.jar;C:\Users\12167\.m2\repository\org\springframework\spring-aop\4.1.88.RELEASE\spring-aop-4.1.88.RELEASE.jar;C:\Users\12167\.m2\repository\aopalliance\aopalliance\1.0\aopalliance-1.0.jar;C:\Users\12167\.m2\repository\org\springframework\spring-beans\4.1.88.RELEASE\spring-beans-4.1.88.RELEASE.jar;C:\Users\12167\.m2\repository\org\springframework\spring-expression\4.1.88.RELEASE\spring-expression-4.1.88.RELEASE.jar com.bolingcavalry.DemoApplication
七月 07, 2018 7:18:14 下午 org.springframework.util.PropertyPlaceholderHelper printTrack
信息: start parseStringValue
java.lang.Thread.getStackTrace() 1,559 <-
org.springframework.util.PropertyPlaceholderHelper.printTrack() 231 <-
org.springframework.util.PropertyPlaceholderHelper.parseStringValue() 132 <-
org.springframework.util.PropertyPlaceholderHelper.replacePlaceholders() 126 <-
org.springframework.core.env.AbstractPropertyResolver.doResolvePlaceholders() 204 <-
org.springframework.core.env.AbstractPropertyResolver.resolveRequiredPlaceholders() 178 <-
org.springframework.core.env.AbstractEnvironment.resolveRequiredPlaceholders() 571 <-
org.springframework.context.support.AbstractRefreshableConfigApplicationContext.resolvePath() 122 <-
org.springframework.context.support.AbstractRefreshableConfigApplicationContext.setConfigLocations() 80 <-
org.springframework.context.support.ClassPathXmlApplicationContext.<init>() 137 <-
org.springframework.context.support.ClassPathXmlApplicationContext.<init>() 83 <-
com.bolingcavalry.DemoApplication.main() 14
七月 07, 2018 7:18:14 下午 org.springframework.util.PropertyPlaceholderHelper parseStringValue
信息: before parse : [${CONFIG_PATH}]
七月 07, 2018 7:18:14 下午 org.springframework.util.PropertyPlaceholderHelper printTrack
信息: start parseStringValue
java.lang.Thread.getStackTrace() 1,559 <-
org.springframework.util.PropertyPlaceholderHelper.printTrack() 231 <-
org.springframework.util.PropertyPlaceholderHelper.parseStringValue() 132 <-
org.springframework.util.PropertyPlaceholderHelper.parseStringValue() 148 <-
org.springframework.util.PropertyPlaceholderHelper.replacePlaceholders() 126 <-
org.springframework.core.env.AbstractPropertyResolver.doResolvePlaceholders() 204 <-
org.springframework.core.env.AbstractPropertyResolver.resolveRequiredPlaceholders() 178 <-
org.springframework.core.env.AbstractEnvironment.resolveRequiredPlaceholders() 571 <-
org.springframework.context.support.AbstractRefreshableConfigApplicationContext.resolvePath() 122 <-
org.springframework.context.support.AbstractRefreshableConfigApplicationContext.setConfigLocations() 80 <-
org.springframework.context.support.ClassPathXmlApplicationContext.<init>() 137 <-
org.springframework.context.support.ClassPathXmlApplicationContext.<init>() 83 <-
com.bolingcavalry.DemoApplication.main() 14
七月 07, 2018 7:18:14 下午 org.springframework.util.PropertyPlaceholderHelper parseStringValue
信息: before parse : [CONFIG_PATH]
七月 07, 2018 7:18:14 下午 org.springframework.util.PropertyPlaceholderHelper parseStringValue
信息: after parse : [CONFIG_PATH]
七月 07, 2018 7:18:14 下午 org.springframework.util.PropertyPlaceholderHelper printTrack
信息: start parseStringValue
java.lang.Thread.getStackTrace() 1,559 <-
org.springframework.util.PropertyPlaceholderHelper.printTrack() 231 <-
org.springframework.util.PropertyPlaceholderHelper.parseStringValue() 132 <-
org.springframework.util.PropertyPlaceholderHelper.parseStringValue() 165 <-
org.springframework.util.PropertyPlaceholderHelper.replacePlaceholders() 126 <-
org.springframework.core.env.AbstractPropertyResolver.doResolvePlaceholders() 204 <-
org.springframework.core.env.AbstractPropertyResolver.resolveRequiredPlaceholders() 178 <-
org.springframework.core.env.AbstractEnvironment.resolveRequiredPlaceholders() 571 <-
org.springframework.context.support.AbstractRefreshableConfigApplicationContext.resolvePath() 122 <-
org.springframework.context.support.AbstractRefreshableConfigApplicationContext.setConfigLocations() 80 <-
org.springframework.context.support.ClassPathXmlApplicationContext.<init>() 137 <-
org.springframework.context.support.ClassPathXmlApplicationContext.<init>() 83 <-
com.bolingcavalry.DemoApplication.main() 14
七月 07, 2018 7:18:14 下午 org.springframework.util.PropertyPlaceholderHelper parseStringValue
信息: before parse : [classpath:applicationContext.xml]
七月 07, 2018 7:18:14 下午 org.springframework.util.PropertyPlaceholderHelper parseStringValue
信息: after parse : [classpath:applicationContext.xml]
七月 07, 2018 7:18:14 下午 org.springframework.util.PropertyPlaceholderHelper parseStringValue
信息: after parse : [classpath:applicationContext.xml]
七月 07, 2018 7:18:14 下午 org.springframework.context.support.ClassPathXmlApplicationContext prepareRefresh
信息: Refreshing org.springframework.context.support.ClassPathXmlApplicationContext@20ad9418: startup date [Sat Jul 07 19:18:14 GMT+08:00 2018]; root of context hierarchy
七月 07, 2018 7:18:14 下午 org.springframework.beans.factory.xml.XmlBeanDefinitionReader loadBeanDefinitions
信息: Loading XML bean definitions from class path resource [applicationContext.xml]
七月 07, 2018 7:18:14 下午 org.springframework.context.support.ClassPathXmlApplicationContext doClose
信息: Closing org.springframework.context.support.ClassPathXmlApplicationContext@20ad9418: startup date [Sat Jul 07 19:18:14 GMT+08:00 2018]; root of context hierarchy
Simple execute method

Process finished with exit code 0上述结果我们看到堆栈信息,能反映出该方法在运行时的调用情况,另外before parse和after parse反映了解析前和解析后的字符串变化,至于为何堆栈会打印多次,那是因为parseStringValue方法自身存在迭代调用的情况,每次都会打印,这从堆栈信息中也能看出来(parseStringValue() 148 );
这个demo的源码可以在github下载,地址和链接信息如下表所示:
| 名称 | 链接 | 备注 |
|---|---|---|
| 项目主页 | https://github.com/zq2599/blog_demos | 该项目在GitHub上的主页 |
| git仓库地址(https) | https://github.com/zq2599/blog_demos.git | 该项目源码的仓库地址,https协议 |
| git仓库地址(ssh) | [email protected]:zq2599/blog_demos.git | 该项目源码的仓库地址,ssh协议 |
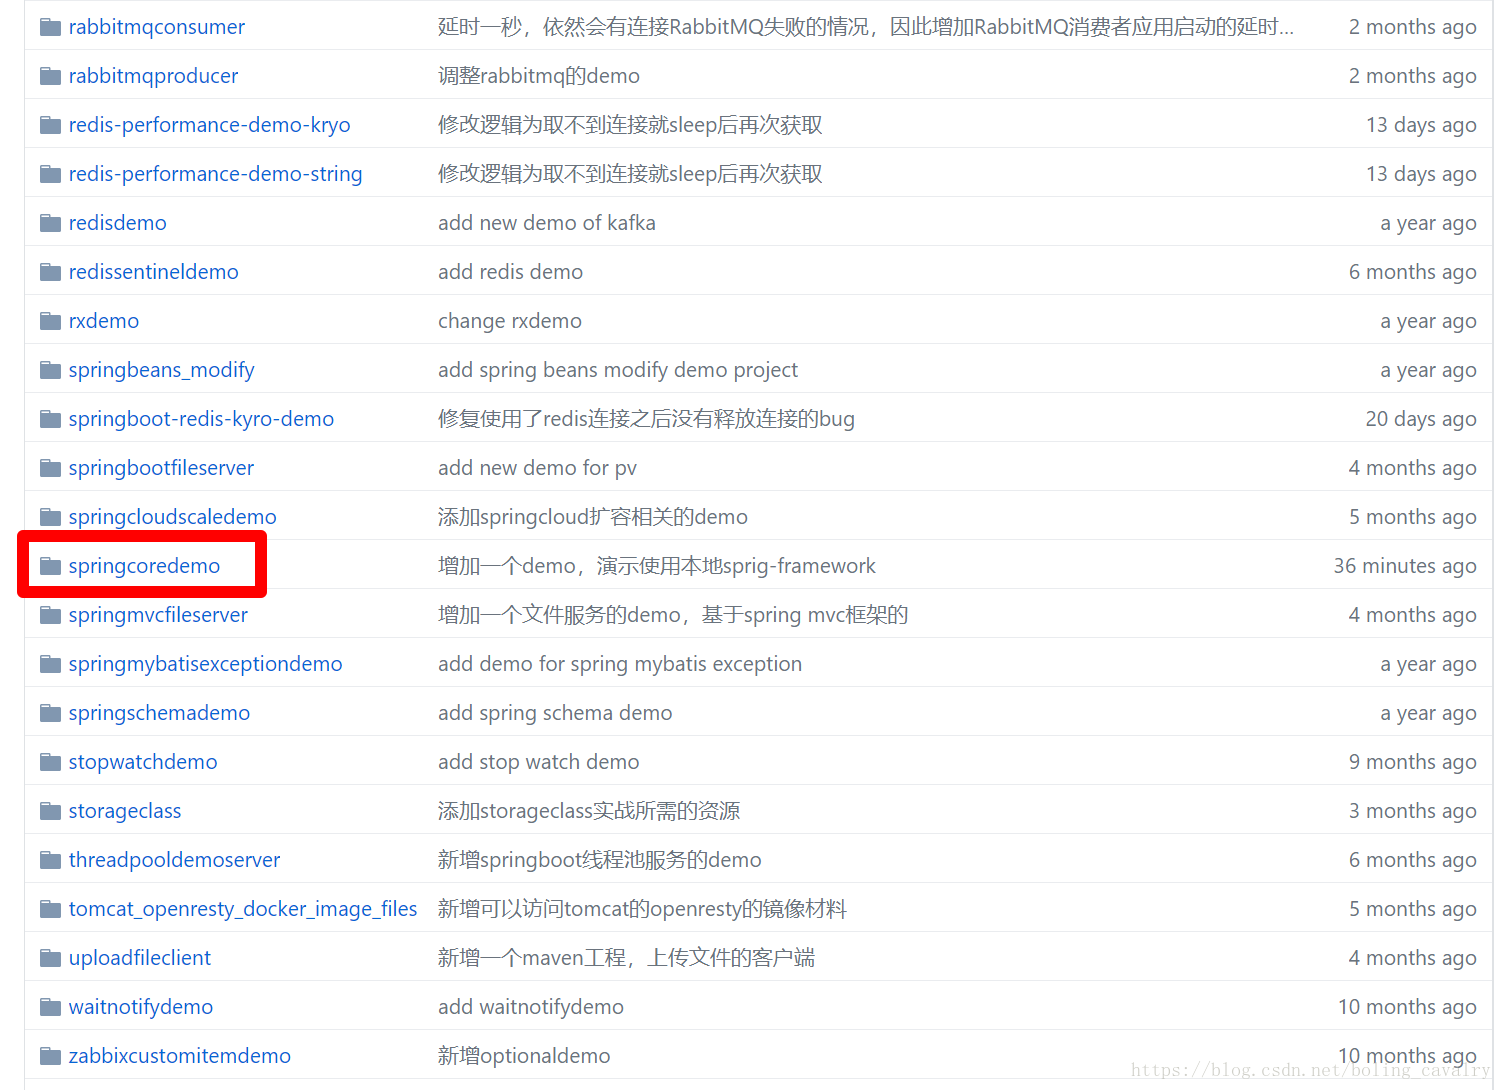
这个git项目中有多个文件夹,本章源码在springcoredemo文件夹中,如下图红框所示:
至此,修改spring-framwork源码的实战就完成了,希望您在学习spring-framwork的时候也能动手修改和构建自己有兴趣的地方,也希望本文能给您一些参考;