Apache Shiro是一个强大且易用的Java安全框架,执行身份验证、授权、密码学和会话管理。
以下将详细讲解用户的验证(用户登陆)以及用户的注册(用户注册不是shiro的功能,这里用户注册用到了shiro的密码加密)
1.导包
在maven的pom.xml文件下导入shiro的相关包
			<!-- 二级缓存ehcache -->
		<dependency>
			<groupId>net.sf.ehcache</groupId>
			<artifactId>ehcache</artifactId>
			<version>2.10.4</version>
		</dependency>
             <!-- shiro -->
		<dependency>
			<groupId>org.apache.shiro</groupId>
			<artifactId>shiro-core</artifactId>
			<version>${shiro-version}</version>
		</dependency>
		<dependency>
			<groupId>org.apache.shiro</groupId>
			<artifactId>shiro-ehcache</artifactId>
			<version>${shiro-version}</version>
		</dependency>
		<dependency>
			<groupId>org.apache.shiro</groupId>
			<artifactId>shiro-web</artifactId>
			<version>${shiro-version}</version>
		</dependency>
		<dependency>
			<groupId>org.apache.shiro</groupId>
			<artifactId>shiro-spring</artifactId>
			<version>${shiro-version}</version>
		</dependency>
		<!-- shiro end -->
2.在web.xml中配置shiro
    <!-- 配置Shiro过滤器,先让Shiro过滤系统接收到的请求 -->
    <!-- 这里filter-name必须对应applicationContext.xml中定义的<bean id="shiroFilter"/> -->
    <!-- 使用[/*]匹配所有请求,保证所有的可控请求都经过Shiro的过滤 -->
    <!-- 通常会将此filter-mapping放置到最前面(即其他filter-mapping前面),以保证它是过滤器链中第一个起作用的 -->
    <filter>
        <filter-name>shiroFilter</filter-name>
        <filter-class>org.springframework.web.filter.DelegatingFilterProxy</filter-class>
        <init-param>
            <!-- 该值缺省为false,表示生命周期由SpringApplicationContext管理,设置为true则表示由ServletContainer管理 -->
            <param-name>targetFilterLifecycle</param-name>
            <param-value>true</param-value>
        </init-param>
    </filter>
    <filter-mapping>
        <filter-name>shiroFilter</filter-name>
        <url-pattern>/*</url-pattern>
shiroFilter其实和springmvc拦截器原理一样,也是对请求进行拦截
3.配置shiro的配置文件spring-shiro.xml
<?xml version="1.0" encoding="UTF-8"?>
<beans xmlns="http://www.springframework.org/schema/beans"
	xmlns:xsi="http://www.w3.org/2001/XMLSchema-instance"
	xsi:schemaLocation="http://www.springframework.org/schema/beans http://www.springframework.org/schema/beans/spring-beans.xsd">

    <!-- 1. 配置 securityManager -->
    <bean id="securityManager" class="org.apache.shiro.web.mgt.DefaultWebSecurityManager">
        <property name="cacheManager" ref="cacheManager"/>
        <property name="realm" ref="jdbcRealm"/>
    </bean>

	<!--
		2. 配置cacheManager
		2.1  需要加入ehcache的jar包及其配置文件
	 -->
    <bean id="cacheManager" class="org.apache.shiro.cache.ehcache.EhCacheManager">
        <property name="cacheManagerConfigFile" value="classpath:ehcache.xml"/>
    </bean>

    <!--  3. 配置 Realm-->
    <bean id="jdbcRealm" class="com.tansen.selecting.realms.ShiroRealm">
    	<property name="credentialsMatcher">
    		<bean class="org.apache.shiro.authc.credential.HashedCredentialsMatcher">
    			<property name="hashAlgorithmName" value="MD5"></property>
    			<property name="hashIterations" value="1024"></property>
    		</bean>
    	</property>
    </bean>

	<!-- 4. 配置lifecycleBeanPostProcessor,可以自定义来调用Spring IOC容器中shiro bean 的生命周期的方法 -->
    <bean id="lifecycleBeanPostProcessor" class="org.apache.shiro.spring.LifecycleBeanPostProcessor"/>

	<!-- 5. 启用IOC容器中使用shiro的注解,但必须在配置了LifecycleBeanPostProcessor之后才可以使用 -->
    <bean class="org.springframework.aop.framework.autoproxy.DefaultAdvisorAutoProxyCreator"
          depends-on="lifecycleBeanPostProcessor"/>
    <bean class="org.apache.shiro.spring.security.interceptor.AuthorizationAttributeSourceAdvisor">
        <property name="securityManager" ref="securityManager"/>
    </bean>

    <!-- 6. 配置shiroFilter,id必须和web.xml文件中配置的DelegatingFilterProxy的<filter-name>一致-->
    <bean id="shiroFilter" class="org.apache.shiro.spring.web.ShiroFilterFactoryBean">
    	<!-- Shiro的核心安全接口,这个属性是必须的 -->
        <property name="securityManager" ref="securityManager"/>
        <!-- 没有登陆验证的用户所跳转的页面 -->
        <property name="loginUrl" value="/index.jsp"/>
        <!-- 用户访问未对其授权的资源时,所显示的连接 -->
        <property name="unauthorizedUrl" value="/unauthorized.jsp"/>
        <!--
        	 哪些页面收到保护。以及访问这些页面需要的权限
        	 1). anon表示可以匿名访问,不用登陆就可以访问
        	 2). authc必须验证(即登陆才可以访问的页面,没有验证则跳转到上面配置的 property name="loginUrl"的页面)
         -->
        <property name="filterChainDefinitions">
            <value>
               /index.jsp = anon
               /register.jsp = anon
               /user/register = anon
               /user/login = anon
               /logout = logout
               /** = authc
            </value>
        </property>
    </bean>

</beans>
4.在spring的配置文件中(applicationContext.xml)引入spring-shiro.xml
<import resource="spring-shiro.xml"/>5.编写jsp页面
登陆页面
<%@ page language="java" contentType="text/html; charset=UTF-8"
    pageEncoding="UTF-8"%>
<!DOCTYPE html PUBLIC "-//W3C//DTD HTML 4.01 Transitional//EN" "http://www.w3.org/TR/html4/loose.dtd">
<html>
<head>
<meta http-equiv="Content-Type" content="text/html; charset=UTF-8">
<title>Insert title here</title>
</head>
<body>
<form action="${pageContext.request.contextPath}/user/login" method="post">
	用户名 :<input type="text" name="username">
	<br>
	密码:<input type="text" name="password">
	<br>

	<input type="submit" value="登陆"  >
	<input type="button" value="注册" onclick="location.href='register.jsp'">
</form>
</body>
</html>
注册页面
<%@ page language="java" contentType="text/html; charset=UTF-8"
    pageEncoding="UTF-8"%>
<!DOCTYPE html PUBLIC "-//W3C//DTD HTML 4.01 Transitional//EN" "http://www.w3.org/TR/html4/loose.dtd">
<html>
<head>
<meta http-equiv="Content-Type" content="text/html; charset=UTF-8">
<title>Insert title here</title>
</head>
<body>
<form action="${pageContext.request.contextPath}/user/register" method="post">
	用户名:<input type="text" name="uAccount">
	<br>
	密码:<input type="text" name="uPassword">
	<br>
	性别:
	<input type="radio" name="uGender" value="男">男
	<input type="radio" name="uGender" value="女">女
	<br>
	<input type="submit" value="注册">
</form>
</body>
</html>
6.以下为User的实体类
package com.tansen.selecting.entities;

import java.util.Date;

public class User {
	private Integer id;
	private String uAccount;
	private String uPassword;
	private String uGender;
	private Date uCreateTime;
	private Integer uState;

	public User() {
	}

	public User(String uAccount, String uPassword, String uGender, Integer uState) {
		super();
		this.uAccount = uAccount;
		this.uPassword = uPassword;
		this.uGender = uGender;
		this.uState = uState;
	}

	public User(String uAccount, String uPassword, String uGender, Date uCreateTime, Integer uState) {
		this.uAccount = uAccount;
		this.uPassword = uPassword;
		this.uGender = uGender;
		this.uCreateTime = uCreateTime;
		this.uState = uState;
	}

	public Integer getId() {
		return id;
	}

	public void setId(Integer id) {
		this.id = id;
	}

	public String getuAccount() {
		return uAccount;
	}

	public void setuAccount(String uAccount) {
		this.uAccount = uAccount;
	}

	public String getuPassword() {
		return uPassword;
	}

	public void setuPassword(String uPassword) {
		this.uPassword = uPassword;
	}

	public String getuGender() {
		return uGender;
	}

	public void setuGender(String uGender) {
		this.uGender = uGender;
	}

	public Date getuCreateTime() {
		return uCreateTime;
	}

	public void setuCreateTime(Date uCreateTime) {
		this.uCreateTime = uCreateTime;
	}

	public Integer getuState() {
		return uState;
	}

	public void setuState(Integer uState) {
		this.uState = uState;
	}

	@Override
	public String toString() {
		return "User [id=" + id + ", uAccount=" + uAccount + ", uPassword=" + uPassword + ", uGender=" + uGender
				+ ", uCreateTime=" + uCreateTime + ", uState=" + uState + "]";
	}

}
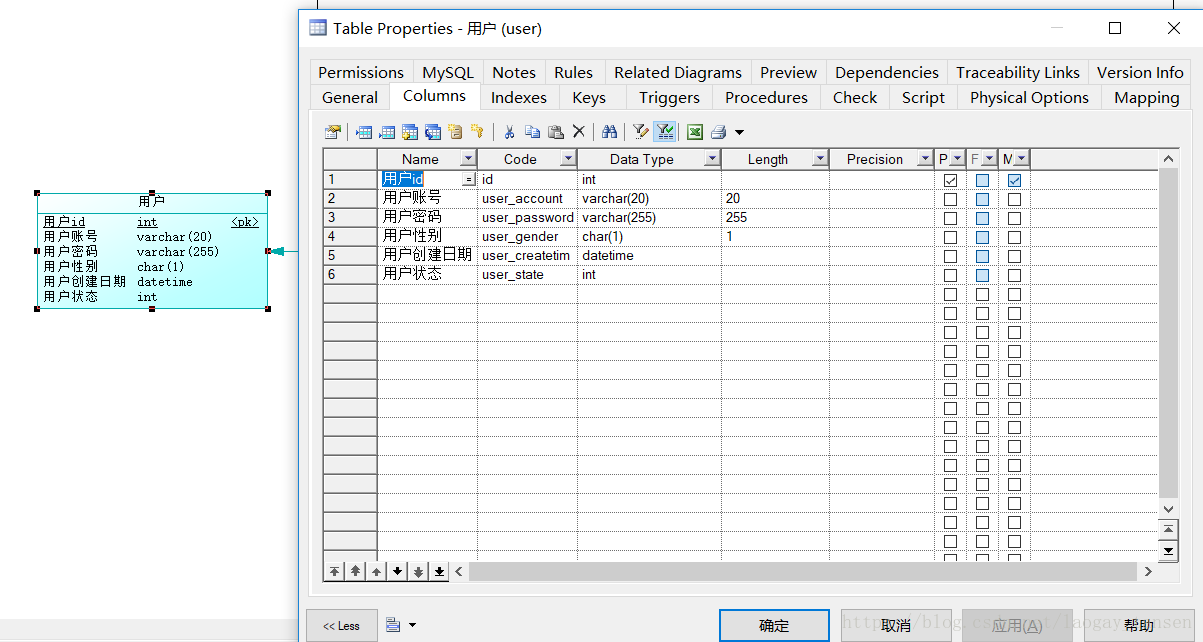
再看看数据库中字段
7.编写Controller,Service,Dao(Service就不写了)
Controller
@Controller
@RequestMapping("/user")
public class UserController {

	@Autowired
	private UserService userservice;

	@RequestMapping("/register")
	public String register(User user) {
		//user为前端获取的数据
		User user1 = userservice.getuserName(user);
		//user1为通过前端的用户名和密码查询的数据库的结果
		if(user1 == null) {
			String password1 = user.getuPassword();
			System.out.println("加密之前的密码为"+password1);
			//使用shiro的md5进行盐值加密
			String password = new SimpleHash("MD5", user.getuPassword(),user.getuAccount(),1024).toString();
	        System.out.println("加密后的密码为"+password);
	    	user.setuPassword(password);
			Date date = new Date();
			Timestamp timeStamp = new Timestamp(date.getTime());
			user.setuCreateTime(timeStamp);
			user.setuState(1);
	    	//添加用户
			userservice.addUser(user);
			System.out.println("注册成功");
			return "redirect:/index.jsp";
		}else {
			System.out.println("用户名存在");
			return "redirect:/register.jsp";
		}
	}

	@RequestMapping("/login")
	public String login(@RequestParam("username") String username, @RequestParam("password") String password,Map<String,Object> map) {
		Subject currentUser = SecurityUtils.getSubject();
		if (!currentUser.isAuthenticated()) {
			//把前端页面输入的账号和密码封装成 UsernamePasswordToken对象
            UsernamePasswordToken token = new UsernamePasswordToken(username,password);
            token.setRememberMe(true);
            try {
                currentUser.login(token);
            } catch(AuthenticationException ae) {
            	System.out.println("登陆失败"+ae.getMessage());
            }
        }
		return ""; //登陆成功后的页面
	}
}
Dao(Mapper)
package com.tansen.selecting.mapper;

import com.tansen.selecting.entities.User;

public interface UserMapper {
	//注册用户时查找用户是否存在
	User getuAccount(User user);
	//注册用户
	void adduAccount(User user);
}
DaoImpl(Mapper.xml)
<?xml version="1.0" encoding="UTF-8" ?>
<!DOCTYPE mapper
  PUBLIC "-//mybatis.org//DTD Mapper 3.0//EN"
  "http://mybatis.org/dtd/mybatis-3-mapper.dtd">
<mapper namespace="com.tansen.selecting.mapper.UserMapper">
	<resultMap id="UserResultMap"
		type="com.tansen.selecting.entities.User">
		<id column="id" property="id" />
		<result column="user_account" property="uAccount" />
		<result column="user_password" property="uPassword" />
		<result column="user_gender" property="uGender" />
		<result column="user_createtime" property="uCreateTime" />
		<result column="user_state" property="uState" />
	</resultMap>

	<!-- User getuAccount(User user); -->
	<select id="getuAccount" resultMap="UserResultMap">
		select * from user where
		user_account = #{uAccount}
	</select>

	<!-- void adduAccount(User user); -->
	<insert id="adduAccount">
		insert into user
		(user_account,user_password,user_gender,user_createtime,user_state)
		values
		(#{uAccount},#{uPassword},#{uGender},#{uCreateTime},#{uState})
	</insert>

</mapper>