【说在前面的话】
自己做实验,为减少麻烦,关闭防火墙和SElinux
在搭建邮箱服务器之前,要完成DNS服务和apache,请看我另外两篇博客,附链接
DNS: https://blog.csdn.net/ljh_laura_li/article/details/80709060
apache: https://blog.csdn.net/ljh_laura_li/article/details/80709570
启动named和httpd服务
#service named start
#service httpd start
首先,创建两个用户,进行收发
#useradd abc #passwd abc
#useradd ab #passwd ab
安装openwebmail
#cd /etc/yum.repos.d
# wget -q http://openwebmail.org/openwebmail/download/redhat/rpm/release/openwebmail.repo
#yum -y install openwebmail
可能会失败,要多装几次
安装dovecot
#yum -y install dovecot
修改/etc/dovecot/dovecot.conf配置文件
#vim /etc/dovecot/dovecot.conf
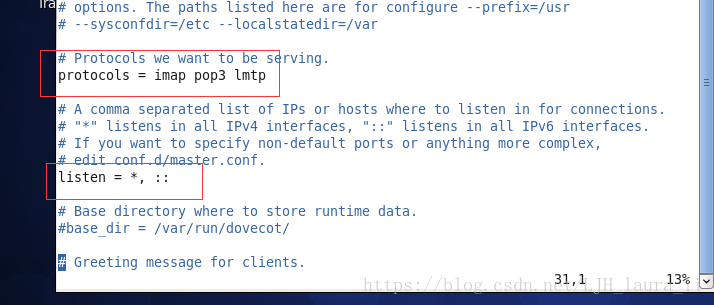
#service dovecot restart
安装cyrus-sasl
# yum -y install cyrus-sasl
# chkconfig saslauthd on
修改 /etc/sysconfig/saslauthd
# vim /etc/sysconfig/saslauthd

# service saslauthd restart
安装postfix
#yum -y install postfix
修改/etc/postfix/main.cf
#vim /etc/postfix/main.cf
myhostname = mail.li.com
mydomain = li.com
myorigin = $mydomain
inet_interfaces = all
inet_protocols = all
mydestination = $myhostname, localhost.$mydomain, localhost, $mydomain
mynetworks = 0.0.0.0/0
relay_domains = $mydestination
最后加上
smtpd_banner = $myhostname ESMTP $mail_name ($mail_version)
default_process_limit = 50
default_destination_concurrency_limit = 20
smtpd_sasl_auth_enable = yes
smtpd_sasl_local_domain = $myhostname
smtpd_sasl_application_name = smtpd
broken_sasl_auth_clients = yes
smtpd_recipient_restrictions = permit_mynetworks,permit_sasl_authenticated,reject_unauth_destination
smtpd_client_restrictions = permit_sasl_authenticated
#service postfix restart
# chkconfig postfix on
修改/var/www/cgi-bin/openwebmail/etc/openwebmail.conf
#vim /var/www/cgi-bin/openwebmail/etc/openwebmail.conf
domainnames li.com
default_timeoffset +0800
修改/var/www/cgi-bin/openwebmail/etc/defaults/openwebmail.conf
#vi /var/www/cgi-bin/openwebmail/etc/defaults/openwebmail.conf
domainnames li
smtpserver 192.168.3.33
authpop3_server 192.168.3.33
# cd /var/www/cgi-bin/openwebmail
# ./openwebmail-tool.pl --init
#service httpd restart
在浏览器中输入192.168.3.33/webmail
输入用户名密码,两个用户互相收发
