https://blog.csdn.net/yanyan19880509/article/details/78170233
前言
很多时候,为了应付DB的高并发读写,我们会采用读写分离技术。读写分离指的是利用数据库主从技术(把数据复制到多个节点中),分散读多个库以支持高并发的读,而写只在master库上。DB的主从技术只负责对数据进行复制和同步,而读写分离技术需要业务应用自身去实现。sharding-jdbc通过简单的开发,可以方便的实现读写分离技术。本篇主要介绍其实现的原理。
sharding-jdbc读写分离特性说明
sharding-jdbc官方对其支持的读写分离技术进行了说明:
支持项
提供了一主多从的读写分离配置,可独立使用,也可配合分库分表使用。
同个调用线程,执行多条语句,其中一旦发现有非读操作,后续所有读操作均从主库读取。
Spring命名空间。
基于Hint的强制主库路由。
不支持范围
主库和从库的数据同步。
主库和从库的数据同步延迟导致的数据不一致。
主库双写或多写。
简单说明
sharding-jdbc实现读写分离技术的思路比较简洁,不支持类似主库双写或多写这样的特性,但目前来看,已经可以满足一般的业务需求了。
读写分离实现demo
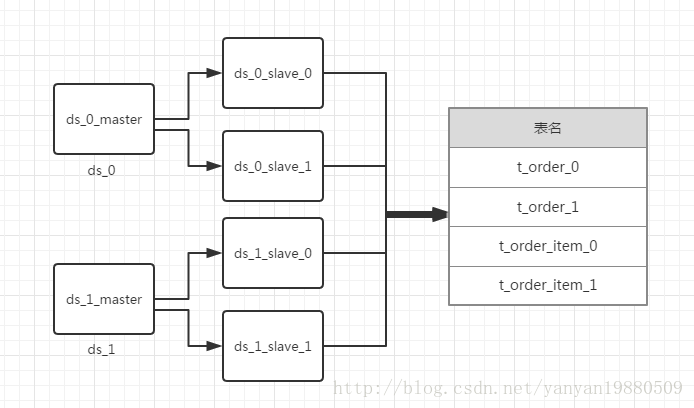
库和表的设计结构如下:
简单的java代码示例:
public final class MasterSlaveMain {
    public static void main(final String[] args) throws SQLException {
        DataSource dataSource = getShardingDataSource();
        printSimpleSelect(dataSource);
    }

    private static void printSimpleSelect(final DataSource dataSource) throws SQLException {
        String sql = "SELECT i.* FROM t_order o JOIN t_order_item i ON o.order_id=i.order_id WHERE o.user_id=? AND o.order_id=?";
        try (
                Connection conn = dataSource.getConnection();
                PreparedStatement preparedStatement = conn.prepareStatement(sql)) {
            preparedStatement.setInt(1, 10);
            preparedStatement.setInt(2, 1001);
            try (ResultSet rs = preparedStatement.executeQuery()) {
                while (rs.next()) {
                    System.out.println(rs.getInt(1));
                    System.out.println(rs.getInt(2));
                    System.out.println(rs.getInt(3));
                }
            }
        }
    }
    private static ShardingDataSource getShardingDataSource() throws SQLException {
        DataSourceRule dataSourceRule = new DataSourceRule(createDataSourceMap());
        TableRule orderTableRule = TableRule.builder("t_order").actualTables(Arrays.asList("t_order_0", "t_order_1")).dataSourceRule(dataSourceRule).build();
        TableRule orderItemTableRule = TableRule.builder("t_order_item").actualTables(Arrays.asList("t_order_item_0", "t_order_item_1")).dataSourceRule(dataSourceRule).build();
        ShardingRule shardingRule = ShardingRule.builder().dataSourceRule(dataSourceRule).tableRules(Arrays.asList(orderTableRule, orderItemTableRule))
                .databaseShardingStrategy(new DatabaseShardingStrategy("user_id", new ModuloDatabaseShardingAlgorithm()))
                .tableShardingStrategy(new TableShardingStrategy("order_id", new ModuloTableShardingAlgorithm())).build();
        return new ShardingDataSource(shardingRule);
    }

    private static Map<String, DataSource> createDataSourceMap() throws SQLException {
        Map<String, DataSource> result = new HashMap<>(2, 1);
        Map<String, DataSource> slaveDataSourceMap1 = new HashMap<>(2, 1);
        slaveDataSourceMap1.put("ds_0_slave_0", createDataSource("ds_0_slave_0"));
        slaveDataSourceMap1.put("ds_0_slave_1", createDataSource("ds_0_slave_1"));
        result.put("ds_0", MasterSlaveDataSourceFactory.createDataSource("ds_0", "ds_0_master", createDataSource("ds_0_master"), slaveDataSourceMap1));
        Map<String, DataSource> slaveDataSourceMap2 = new HashMap<>(2, 1);
        slaveDataSourceMap2.put("ds_1_slave_0", createDataSource("ds_1_slave_0"));
        slaveDataSourceMap2.put("ds_1_slave_1", createDataSource("ds_1_slave_1"));
        result.put("ds_1", MasterSlaveDataSourceFactory.createDataSource("ds_1", "ds_1_master", createDataSource("ds_1_master"), slaveDataSourceMap2));
        return result;
    }

    private static DataSource createDataSource(final String dataSourceName) {
        BasicDataSource result = new BasicDataSource();
        result.setDriverClassName(com.mysql.jdbc.Driver.class.getName());
        result.setUrl(String.format("jdbc:mysql://localhost:3306/%s", dataSourceName));
        result.setUsername("root");
        result.setPassword("123456");
        return result;
    }
}- 1
- 2
- 3
- 4
- 5
- 6
- 7
- 8
- 9
- 10
- 11
- 12
- 13
- 14
- 15
- 16
- 17
- 18
- 19
- 20
- 21
- 22
- 23
- 24
- 25
- 26
- 27
- 28
- 29
- 30
- 31
- 32
- 33
- 34
- 35
- 36
- 37
- 38
- 39
- 40
- 41
- 42
- 43
- 44
- 45
- 46
- 47
- 48
- 49
- 50
- 51
- 52
- 53
- 54
读写分离实现原理
一般我们是这样来执行sql语句的:
Connection conn = dataSource.getConnection();
PreparedStatement preparedStatement = conn.prepareStatement(sql);
preparedStatement.executeQuery();- 1
- 2
- 3
这是利用原生jdbc操作数据库查询语句的一般流程,获取一个连接,然后生成Statement,最后再执行查询。那么sharding-jdbc是在哪一块进行扩展从而实现读写分离的呢?
想一下,想要实现读写分离,必然会涉及到多个底层的Connection,从而构造出不同连接下的Statement语句,而很多第三方软件,如Spring,为了实现事务,调用dataSource.getConnection()之后,在一次请求过程中,可能就不会再次调用getConnection方法了,所以在dataSource.getConnection中做读写扩展是不可取的。为了更好的说明问题,看下面的例子:
Connection conn = getConnection();
PreparedStatement preparedStatement1 = conn.prepareStatement(sql1);
preparedStatement1.executeQuery();

Connection conn2 = getConnection();
PreparedStatement preparedStatement2 = conn2.prepareStatement(sql2);
preparedStatement2.executeUpdate();- 1
- 2
- 3
- 4
- 5
- 6
- 7
一次请求过程中,为了实现事务,一般的做法是当线程第一次调用getConnection方法时,获取一个底层连接,然后存储到ThreadLocal变量中去,下次就直接在ThreadLocal中获取了。为了实现一个事务中,针对一个数据源,既可能获取到主库连接,也可能获取到从库连接,还能够切换,sharding-jdbc在PreparedStatement(实际上为ShardingPreparedStatement)的executeXX层进行了主从库的连接处理。
下图为sharding-jdbc执行的部分流程:
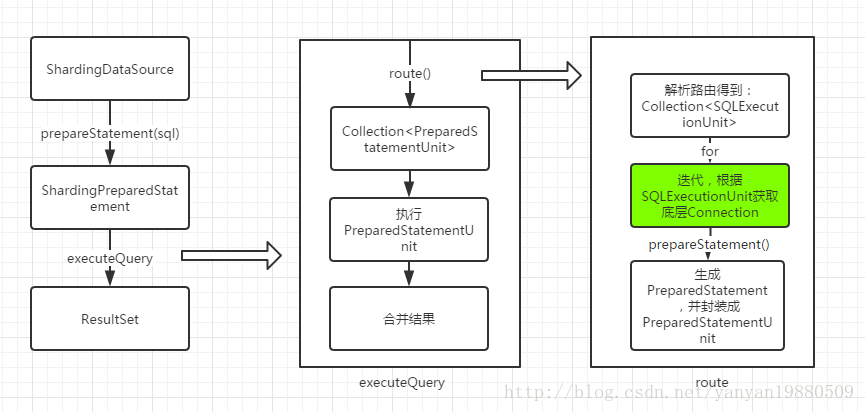
sharding-jdbc使用ShardingPreparedStatement来替代PreparedStatement,在执行ShardingPreparedStatement的executeXX方法时,通过路由计算,得到PreparedStatementUnit单元列表,然后执行后合并结果返回,而PreparedStatementUnit只不过封装了原生的PreparedStatement。读写分离最关键的地方在上图标绿色的地方,也就是生成PreparedStatement的地方。
在使用SQLEcecutionUnit转换为PreparedStatement的时候,有一个重要的步骤就是必须先获取Connection,源码如下:
public Connection getConnection(final String dataSourceName, final SQLType sqlType) throws SQLException {
        if (getCachedConnections().containsKey(dataSourceName)) {
            return getCachedConnections().get(dataSourceName);
        }
        DataSource dataSource = shardingContext.getShardingRule().getDataSourceRule().getDataSource(dataSourceName);
        Preconditions.checkState(null != dataSource, "Missing the rule of %s in DataSourceRule", dataSourceName);
        String realDataSourceName;
        if (dataSource instanceof MasterSlaveDataSource) {
            NamedDataSource namedDataSource = ((MasterSlaveDataSource) dataSource).getDataSource(sqlType);
            realDataSourceName = namedDataSource.getName();
            if (getCachedConnections().containsKey(realDataSourceName)) {
                return getCachedConnections().get(realDataSourceName);
            }
            dataSource = namedDataSource.getDataSource();
        } else {
            realDataSourceName = dataSourceName;
        }
        Connection result = dataSource.getConnection();
        getCachedConnections().put(realDataSourceName, result);
        replayMethodsInvocation(result);
        return result;
}- 1
- 2
- 3
- 4
- 5
- 6
- 7
- 8
- 9
- 10
- 11
- 12
- 13
- 14
- 15
- 16
- 17
- 18
- 19
- 20
- 21
- 22
如果发现数据源对象为MasterSlaveDataSource类型,则会使用如下方式获取真正的数据源:
public NamedDataSource getDataSource(final SQLType sqlType) {
    if (isMasterRoute(sqlType)) {
        DML_FLAG.set(true);
        return new NamedDataSource(masterDataSourceName, masterDataSource);
    }
    String selectedSourceName = masterSlaveLoadBalanceStrategy.getDataSource(name, masterDataSourceName, new ArrayList<>(slaveDataSources.keySet()));
    DataSource selectedSource = selectedSourceName.equals(masterDataSourceName) ? masterDataSource : slaveDataSources.get(selectedSourceName);
    Preconditions.checkNotNull(selectedSource, "");
    return new NamedDataSource(selectedSourceName, selectedSource);
}
private static boolean isMasterRoute(final SQLType sqlType) {
    return SQLType.DQL != sqlType || DML_FLAG.get() || HintManagerHolder.isMasterRouteOnly();
}- 1
- 2
- 3
- 4
- 5
- 6
- 7
- 8
- 9
- 10
- 11
- 12
- 13
有三种情况会认为一定要走主库:
1. 不是查询类型的语句,比如更新字段
2. DML_FLAG变量为true的时候
3. 强制Hint方式走主库
当执行了更新语句的时候,isMasterRoute()==true,这时候,Connection为主库的连接,并且引擎会强制设置DML_FLAG的值为true,这样一个请求后续的所有读操作都会走主库。
有些时候,我们想强制走主库,这时候在请求最开始执行Hint操作即可,如下所示:
HintManager hintManager = HintManager.getInstance();
hintManager.setMasterRouteOnly();- 1
- 2
在获取数据源的时候,如果走的是从库,会使用从库负载均衡算法类进行处理,该类的实现比较简单,如下所示:
public final class RoundRobinMasterSlaveLoadBalanceStrategy implements MasterSlaveLoadBalanceStrategy {

    private static final ConcurrentHashMap<String, AtomicInteger> COUNT_MAP = new ConcurrentHashMap<>();

    @Override
    public String getDataSource(final String name, final String masterDataSourceName, final List<String> slaveDataSourceNames) {
        AtomicInteger count = COUNT_MAP.containsKey(name) ? COUNT_MAP.get(name) : new AtomicInteger(0);
        COUNT_MAP.putIfAbsent(name, count);
        count.compareAndSet(slaveDataSourceNames.size(), 0);
        return slaveDataSourceNames.get(count.getAndIncrement() % slaveDataSourceNames.size());
    }
}- 1
- 2
- 3
- 4
- 5
- 6
- 7
- 8
- 9
- 10
- 11
- 12
其实就是一个简单的轮循机制进行从库的负载均衡。
总结
sharding-jdbc进行主从读写分离的特性实现比较简洁易懂,对spring这种上层框架而言是无感知的,而且由于它是在路由得到SQLExecutionUtil后再处理的,所以使用了读写分离特性,可以同时使用分库分表。