1、前言
最近简单看了下google推出的框架Jetpack,感觉此框架的内容可以对平时的开发有很大的帮助,也可以解决很多开发中的问题,对代码的数据逻辑和UI界面深层解耦,实现数据驱动型的ui。
Android Architecture组件是Android Jetpack的一部分,它们是一组库,旨在帮助开发者设计健壮、可测试和可维护的应用程序,包含一下组件:
- 带你领略Android Jetpack组件的魅力
- Android Jetpack 架构组件之 Lifecycle(使用篇)
- Android Jetpack 架构组件之 Lifecycle(源码篇)
- Android Jetpack 架构组件之 ViewModel (源码篇)
- Android Jetpack 架构组件之 LiveData(使用、源码篇)
- Android Jetpack架构组件之 Paging(使用、源码篇)
- Android Jetpack 架构组件之 Room(使用、源码篇)
- Android Jetpack 架构组件之Navigation
- Android Jetpack架构组件之WorkManger
上述时Android Architecture所提供的架构组件,本文主要从使用和源码的角度分析Paging组件
2、Paging简介
- 分页库概述
- Paging Library中DataSource,PagedList,PagedAdapter三者之间的关系以及数据加载到数据展示的流程
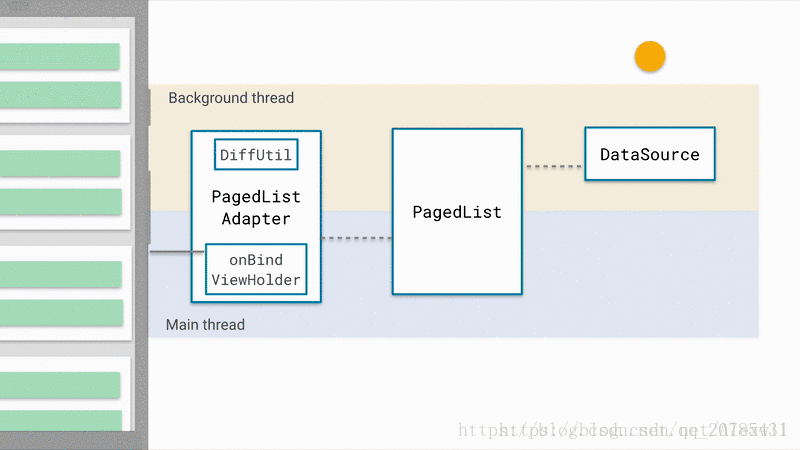
比如当一条新的item插入到数据库,DataSource会被初始化,LiveData后台线程就会创建一个新的PagedList。这个新的PagedList会被发送到UI线程的PagedListAdapter中,PagedListAdapter使用DiffUtil在对比现在的Item和新建Item的差异。当对比结束,PagedListAdapter通过调用RecycleView.Adapter.notifyItemInserted()将新的item插入到适当的位置
- PagedList:是Paging Library的关键组件,它是一个异步加载应用程序数据块或页面的集合
- Data
- 每个PagedList实例都会加载应用程序DataSource的最新快照
- 数据从应用程序的后端或数据库流入PagedList对象
- UI:PagedList类与 PagedListAdapter一起加载 数据到RecyclerView中
- Paging组件好处
- 分页库使您可以更轻松地在应用程序中的RecyclerView逐步和优雅地加载数据
- 数据请求消耗的网络带宽更少,系统资源更少
- 即使在数据更新和刷新期间,应用程序仍会继续快速响应用户输入
3、Paging组件的使用
3.1、添加依赖
def paging_version = "1.0.0"
implementation "android.arch.paging:runtime:$paging_version"
testImplementation "android.arch.paging:common:$paging_version"
implementation "android.arch.paging:rxjava2:1.0.0-rc1"
3.2、Paging使用步骤
- 定义分页配置
- Page size :页面大小即每次加载时加载的数量
- Prefetch distance:预取距离,给定UI中最后一个可见的Item,超过这个item应该预取一段数据
- UI占位符:setEnablePlaceholders()
val myPagingConfig = PagedList.Config.Builder()       // 分页设置
        .setPageSize(50)
        .setPrefetchDistance(150)
        .setEnablePlaceholders(true)
.build()- 使用分页配置创建LiveData<PagedList> ,传入DataSource.Factory,用于创建DataSource,从DataSource中加载数据到PagedList中
val concertList = LivePagedListBuilder(myConcertDataSource, myPagingConfig)
        .setFetchExecutor(myExecutor)
.build()- 观察LiveData<PagedList>,在数据改变时调用适配器刷新数据
viewModel.concertList.observe(this, { pagedList ->
                adapter.submitList(pagedList) })
3.3、Paging和Room的使用
- 在Room的@Dao中添加查询方法
@Dao
interface UserDao {
    @Query("SELECT * FROM user")
    fun getAll() : DataSource.Factory<Int,User>  // 返回DataSOurce.Factory配合PagingList使用
}- 在ViewModel中查询数据库并创建LiveData<PagedList>
class ViewModelUser(application: Application) : AndroidViewModel(application) {
      val dao = UserDataBase.getInstence(application)?.getDao()
////传入Room返回的DataSource.Factory
      var liveArray : LiveData<PagedList<User>> =
LivePagedListBuilder(dao!!.getAll(),PagedList.Config.Builder()
              .setPageSize(10)
              .setPrefetchDistance(10)
              .setEnablePlaceholders(true)
              .build()).build()
}- 创建PagedListAdapter的实现类,加载并显示数据
class Adapter : PagedListAdapter<User, Adapter.UserViewHolder>(diffCallback) {

    override fun onCreateViewHolder(parent: ViewGroup, viewType: Int): UserViewHolder {
        val layoutInflater = LayoutInflater.from(parent.context)
      return UserViewHolder(layoutInflater.inflate(R.layout.item,parent,false))
     }

    override fun onBindViewHolder(holder: UserViewHolder, position: Int) {
        val user = getItem(position)
        if (user != null){
            holder.bind(user)
        }else{
            holder.clear()
        }
      }

    companion object {
        val diffCallback = object : DiffUtil.ItemCallback<User>() {
            override fun areItemsTheSame(oldItem: User?, newItem: User?): Boolean {
              return  oldItem?.id == newItem?.id
            }
            override fun areContentsTheSame(oldItem: User?, newItem: User?): Boolean {
                return oldItem == newItem
               }
        }
    }
    class UserViewHolder(val view : View) :
            RecyclerView.ViewHolder(view){
        private val  tvId : TextView = view.findViewById(R.id.tvId)
        private val  tvName : TextView = view.findViewById(R.id.tvName)

        fun bind(user: User){
            tvId.text = user.id.toString()
            tvName.text = user.name
        }

        fun clear(){
            tvName.text = null
            tvId.text = null
        }
}
这里说一下传入的DiffUtil.ItemCallback<> 实例,当数据加载到PagedListAdapter时,会回调DiffUtil.ItemCallback中两个抽象方法,确认数据和之前是否发生了改变,如果改变则调用Adapter更新数据:
- areItemTheSame():是否为同一个Item
- areContentsTheSame():数据内容是否发生变化
- 添加LiveData<PagedList>观察者
 val viewModel = ViewModelProviders.of(this).get(ConcertViewModel::class.java!!)
        val recyclerView = findViewById(R.id.concert_list)
        val adapter = ConcertAdapter()
        viewModel.concertList.observe(this, { pagedList ->
               ... })
recyclerView.setAdapter(adapter)这里使用ViewModel中保存加载到的LivaData<PagedList>(关于ViewModel点击查看另一篇Android Jetpack架构组件之 ViewModel (源码篇)),为LiveData添加观察者,当数据发生改变时回调方法,将数据发送到PagedListAdapter中更新界面UI
- 将 LiveData<PagedList> 实例连接到 PagedListAdapter
adapter.submitList(pagedList)- oom和PagedList配合使用有点
- Room数据库查询数据作为PagedList的数据源,室现列表的自动加载和下拉加载更多数据
- 当数据库改变时会自动回调观察者从而刷新界面
3.4、使用RxJava2观察分页数据
Paging除了支持LiveData加载数据外,还支持RxJava2观察数据,通过创建一个Observable或Flowable实例,观察数据的改变并发送数据到Adapter,下面用Flowable代替LiveData:
var liveArray : Flowable<PagedList<User>> = RxPagedListBuilder(dao!!.getAll(),PagedList.Config.Builder()
              .setPageSize(10)
              .setPrefetchDistance(10)
              .setEnablePlaceholders(true)
              .build()).buildFlowable(BackpressureStrategy.LATEST)
和创建LiveData一样传入DataSource.Factory和PagedList.Config,并配置背压策略,创建Flowable后像RxJava正常使用一样订阅观察者即可获取数据:
viewModel.concertList.subscribe({
                flowableList -> adapter.submitList(flowableList)
3.5、Paging使用的注意事项
- 构建可观察者列表
- 观察对象的创建一般在ViewModel中,UI代码观察ViewModel中的LiveData<PagedList>对象,实现列表和内容的联系
- 向LivePagedListBuilder 或RxPagedListBuilder 传入DataSource.Factory的实例,创建可观察的PagedList对象
- 一个DataSource对象为一个PagedList加载页面
- 工厂类创建新实例 PagedList以响应内容更新
- 选择正确的数据类型
Paging组件除了自身创建的DataSource以及Room的配合使用外,还支持自定以实现DataSource,组件提供了一下三种模式的DataSource,我们在使用时只需根据自己的需求选择何时的实现子类:
- PageKeyedDataSource:如果页面需要实现上一页、下一页,需要将请求的Token传递到下一步
- ItemKeyedDataSource:程序需要根据上一条数据信息(ID)获取下一条数据时
- PositionalDataSource:需要从数据存储中选择的任何位置获取数据页;例如,请求可能返回以位置1200开头的20个数据项
- 数据无效时通知
- 在加载数据时,很多都会配合数据刷新和数据时效性,使用分页库时,数据层由表或行变得陈旧时通知应用程序的其他层,使用DataSource.invalidate()通知数据刷新
- 应用的UI可以使用滑动刷新模型触发此数据失效功能
- 内容更新
构建可观察 PagedList对象时,需要考虑内容的更新方式,按数据的来源分为本地加载和网络加载:
- 从Room数据库加载数据,在数据路内容发生改变时,则会自动将更新推送到您应用的UI
- 如果分页网络API数据,则通常会进行用户交互;例如:“滑动刷新”作为当前DataSource失效,并请求新数据的信号
4、Paging自定义DataSource
在开发过程中,除了查询本地数据库和Room配合使用不需要自定义DataSource外,其他加载网络数据时可能都需要自定义来控制数据的获取,下面以实现ItemKeyedDataSource为例分析使用自定义DataSource
- 实现ItemKeyedDataSource的子类
class ItemDataSource : ItemKeyedDataSource<Int,ArticleBean>() {

    override fun loadInitial(params: LoadInitialParams<Int>, callback: LoadInitialCallback<ArticleBean>) {
        TODO("not implemented") //To change body of created functions use File | Settings | File Templates.
    }

    override fun loadAfter(params: LoadParams<Int>, callback: LoadCallback<ArticleBean>) {
        TODO("not implemented") //To change body of created functions use File | Settings | File Templates.
    }

    override fun loadBefore(params: LoadParams<Int>, callback: LoadCallback<ArticleBean>) {
        TODO("not implemented") //To change body of created functions use File | Settings | File Templates.
    }

    override fun getKey(item: ArticleBean): Int {
        TODO("not implemented") //To change body of created functions use File | Settings | File Templates.
    }
}
实现ItemKeyedDataSource的子类,这里传入的两个泛型:Key表示每一个Item的标志,这里使用Int即每个Item的id,Value :加载的数据,这里传入数据类型Bean,然后重写四个方法:
- getKey:记录当前加载时最新的Item的Key
- loadInitial:执行每次进入界面的第一次加载,即数据刷新
- loadBefore:在指定LoadParams中Key之前加载列表数据
- loadAfter:在指定LoadParams中Key之后加载列表数据
实现方法中加载数据的逻辑:
override fun getKey(item: M) = item.id

   /**
     * 初始化时的加载
     */
override fun loadInitial(params: LoadInitialParams<T>, callback: LoadInitialCallback<M>) {
        api.getArticleList(0)  //初始化加载第一页
                .compose(RxHelper.rxSchedulerHelper())
                .subscribe({
                    callback.onResult(it?.data!!.datas!!)

                }, {
                    refreshFailed(it.message, params, callback)
                })
    }


    /**
     * 加载更多
     */
    override fun loadAfter(params: LoadParams<T>, callback: LoadCallback<M>) {
        api.getArticleList(page)  // 下拉加载更多数据
                .compose(RxHelper.rxSchedulerHelper())
                .subscribe({
                    callback.onResult(it.data!!.datas!!)
                }, {
                    networkFailed(it.message, params, callback)
                })
}- 创建具体DataSource.Factory实现类,用于创建自定义的DataSource
class ItemDataSourceFactory() :
        DataSource.Factory<Int, ArticleBean>() {
    val sourceLiveData = MutableLiveData<ConcertTimeDataSource>()

    override fun create(): DataSource<Date, Concert> {
        val source = ItemDataSource()
        sourceLiveData.postValue(source)
        return source
    }
}
实现了DataSource.Factory,重写onCreate()方法创建DataSource实例,这里使用了LiveData包装了DataSource的实例,这样做的好处就是可以对创建的DataSource的时效性进行控制,例如我们在刷新的时候只需调用
ItemDataSourceFactory.sourceLivaData.value?.invalidate()这里会通知DataSource的数据失效,就会重新初始化加载数据
- 使用自定义的DataSource和Factory
使用的方式和前面的一致,唯一的区别就是Factory的来源不同,前面Factory是从数据库Room中查询生成,这里直接传入实现的Factory的实例即可:
val concertList = LivePagedListBuilder(
ItemDataSourceFactory, 20).build()
到此Paging组件执行时会根据传递的Factory创建DataSource,然后调用DataSource中重写的方法初始化和加载数据到PagedList,然后使用数据刷新界面
- 总结
从上面的使用可以看出Paging的组件的成员的职责
- DataSource:数据的来源,需要设置初始化和加载更多的逻辑以及每次加载变化的Key
- DataSource。Factory:工厂类提供DataSource的实例
- PagedList.Config:PagedList的配置类,设置初始化数量和界面预取数量等
- PagedList:数据集散中心;根据需要向DataSource索取加载数据,并将得到的数据传递到PagedListAdapter
- PagedListAdapter:数据适配器,这里处了起到普通界面加载适配器的作用外,更重要的是根据滑动显示的坐标,起到了确定什么时候要求向PagedList加载数据(后面源码分析)
- DiffUtil.ItemCallback:判断数据是否发生改变以相应界面的更新
5、源码分析
无论是使用Room还是自定义Datasource,Paging组件的开始执行都是从创建LiveData<PagedList>开始的,所以我们源码的分析也从LiveData<PagedList>的创建开始
5.1、LiveData<PagingList<T>>
- 创建LiveData<PagingList<T>>

LiveData<PagingList<T>>的创建过程如上图,使用LivePagedListBuilder配置Factory和Config,然后调用build创建实例,在build方法中直接调用了create()方法创建LiveData
- create()
@AnyThread
    @NonNull
    private static <Key, Value> LiveData<PagedList<Value>> create(
            @Nullable final Key initialLoadKey,
            @NonNull final PagedList.Config config,
            @Nullable final PagedList.BoundaryCallback boundaryCallback,
            @NonNull final DataSource.Factory<Key, Value> dataSourceFactory,
            @NonNull final Executor notifyExecutor,
            @NonNull final Executor fetchExecutor) {
          // 创建ComputableLiveData类
        return new ComputableLiveData<PagedList<Value>>(fetchExecutor) {

            @Nullable
            private PagedList<Value> mList;
            @Nullable
            private DataSource<Key, Value> mDataSource;

            private final DataSource.InvalidatedCallback mCallback =
                    new DataSource.InvalidatedCallback() {
                        @Override
                        public void onInvalidated() {
                            invalidate();
                        }
                    };

            @Override
            protected PagedList<Value> compute() { // 重写compute方法
                @Nullable Key initializeKey = initialLoadKey;
                if (mList != null) {
                    //noinspection unchecked
                    initializeKey = (Key) mList.getLastKey();
                }

                do {
                    if (mDataSource != null) {
                        mDataSource.removeInvalidatedCallback(mCallback);
                    }
                   // 从Builder中传入的Factory中创建DataSource
                    mDataSource = dataSourceFactory.create();
                    mDataSource.addInvalidatedCallback(mCallback);
                   // 创建PagedList
                    mList = new PagedList.Builder<>(mDataSource, config)
                            .setNotifyExecutor(notifyExecutor)
                            .setFetchExecutor(fetchExecutor)
                            .setBoundaryCallback(boundaryCallback)
                            .setInitialKey(initializeKey)
                            .build();
                } while (mList.isDetached());
                return mList;
            }
        }.getLiveData();
    }
在create()中直接返回了ComputableLiveData的实例,在ComputableLiveData实例重写的compute中执行了一些主要操作:
- 创建DataSource的刷新回调
- 调用传入的Factory的create()创建DataSource实例
- 创建并返回PagedList实例
- PagedList.build() & PagedList.create()
先来看一下PagedList的创建过程,在PagedList.build()中调用了PagedList.create(),所以真正的创建是在create()中发生的,
 private static <K, T> PagedList<T> create(...) {
        if (dataSource.isContiguous() || !config.enablePlaceholders) {
            ......
            return new ContiguousPagedList<>(contigDataSource,
                    notifyExecutor,
                    fetchExecutor,
                    boundaryCallback,
                    config,
                    key,
                    lastLoad);
        } else {
            return new TiledPagedList<>((PositionalDataSource<T>) dataSource,
                    notifyExecutor,
                    fetchExecutor,
                    boundaryCallback,
                    config,
                    (key != null) ? (Integer) key : 0);
        }
    }
从代码中看出根据 条件(dataSource.isContiguous() || !config.enablePlaceholders)的不同分别创建ContiguousPagedList和TiledPagedList,其实这里就是区分上面的三个自定义DataSource的类型,如果是PositionalDataSource创建TiledPagedList,其他的返回ContiguousPagedList,我们依次查看三个DataSource中的isContiguous()方法:
- PositionalDataSource
@Override
    boolean isContiguous() {
        return false;
}- ItemKeyedDataSource和PageKeyedDataSource都继承与ContiguousDataSource,只查看ContiguousDataSource中
@Override
boolean isContiguous() {
    return true;
}- ComputableLiveData
public ComputableLiveData(@NonNull Executor executor) {
        mExecutor = executor;
        mLiveData = new LiveData<T>() {
            @Override
            protected void onActive() {
                mExecutor.execute(mRefreshRunnable);
            }
        };
}带着对ComputableLiveData作用和何时执行compute这两个疑问,查看ComputableLiveData源码,发现在ComputableLiveData的构造函数中创建LiveData实例,并在onActive()中执行了Runnable接口(关于onActive()请查看Android Jetpack架构组件之 LiveData),下面查看Runnable接口中执行了哪些逻辑:
 @VisibleForTesting
    final Runnable mRefreshRunnable = new Runnable() {
        @WorkerThread
        @Override
        public void run() {
            boolean computed;
            do {
                computed = false;
              others.
                if (mComputing.compareAndSet(false, true)) {

                    try {
                        T value = null;
                        while (mInvalid.compareAndSet(true, false)) {
                            computed = true;
                            value = compute(); // 调用了compuet创建了PagedList
                        }
                        if (computed) {
                            mLiveData.postValue(value); // 设置LiveData的值
                        }
                    } finally {

                        mComputing.set(false);
                    }
                }

            } while (computed && mInvalid.get());
        }
    };
在Runnable中调用了ComputableLiveData的compute()方法创建了PagedList,所以此处的Value就是PagedList,然后为mLiveData初始化赋值PagedList,细心的同学会留意到,在上面的create()方法最后一句调用了getLiveData()获取到的就是ComputableLiveData构造函数中创建的LIveData
  @SuppressWarnings("WeakerAccess")
    @NonNull
    public LiveData<T> getLiveData() {
        return mLiveData;
    }
到此LiveData<PagedList>的创建就完成了。
5.2、数据初始化加载
- ContiguousPagedList
从上面的执行过程中,我们知道当我们自定义实现ItemKeySource时,创建的PagedList实际为ContiguousPagedList,查看ContiguousPagedList构造函数源码:
 super(new PagedStorage<V>(), mainThreadExecutor, backgroundThreadExecutor,
                boundaryCallback, config);
        mDataSource = dataSource;
        mLastLoad = lastLoad;

        if (mDataSource.isInvalid()) {
            detach();
        } else {
            mDataSource.dispatchLoadInitial(key,
                    mConfig.initialLoadSizeHint,
                    mConfig.pageSize,
                    mConfig.enablePlaceholders,
                    mMainThreadExecutor,
                    mReceiver);
        }
在构造函数中执行一下逻辑:
- 创建PagedStore实例,主要根据滑动的位置显示是否要继续加载数据
- 调用DataSource.dispatchLoadInitial方法,此时使用的时ItermKeyDataSource的dispatchLoadInitial方法
  @Override
    final void dispatchLoadInitial(@Nullable Key key, int initialLoadSize, int pageSize,
            boolean enablePlaceholders, @NonNull Executor mainThreadExecutor,
            @NonNull PageResult.Receiver<Value> receiver) {
        LoadInitialCallbackImpl<Value> callback =
                new LoadInitialCallbackImpl<>(this, enablePlaceholders, receiver);
        loadInitial(new LoadInitialParams<>(key, initialLoadSize, enablePlaceholders), callback);
        callback.mCallbackHelper.setPostExecutor(mainThreadExecutor);
    }
在ItermKeyDataSource的dispatchLoadInitial()方法中调用了抽象函数loadInitial(),根据前面的学习我们知道在oadInitial()中设置了初始化的网络请求,到此实现了Paging组件初始化数据的加载;
5.3、数据的显示
在自定义ItemDataSource的loadInitial()中加载数据后,调用了callback.onResult(it?.data!!.datas!!)方法,此处的callback是LoadInitialCallback的实现类LoadInitialCallbackImpl,在onResult()方法中又调用了LoadCallbackHelper.dispatchResultToReceiver()
- LoadCallbackHelper.dispatchResultToReceiver()
void dispatchResultToReceiver(final @NonNull PageResult<T> result) {
            Executor executor;

            if (executor != null) {
                executor.execute(new Runnable() {
                    @Override
                    public void run() {
                        mReceiver.onPageResult(mResultType, result);
                    }
                });
            } else {
                mReceiver.onPageResult(mResultType, result);
            }
        }
在dispatchResultToReceiver()方法中,调用PageResult.Receiver.onPageResult()方法,这里的mReceiver是在调用 mDataSource.dispatchLoadInitial()时传入的最后一个参数,他的实现在ContiguousPagedList中:
  private PageResult.Receiver<V> mReceiver = new PageResult.Receiver<V>() {
        // Creation thread for initial synchronous load, otherwise main thread
        // Safe to access main thread only state - no other thread has reference during construction
        @AnyThread
        @Override
        public void onPageResult(@PageResult.ResultType int resultType,
                @NonNull PageResult<V> pageResult) {


            List<V> page = pageResult.page;
            if (resultType == PageResult.INIT) {
                mStorage.init(pageResult.leadingNulls, page, pageResult.trailingNulls,
                        pageResult.positionOffset, ContiguousPagedList.this);
                if (mLastLoad == LAST_LOAD_UNSPECIFIED) {
                    // Because the ContiguousPagedList wasn't initialized with a last load position,
                    // initialize it to the middle of the initial load
                    mLastLoad =
                            pageResult.leadingNulls + pageResult.positionOffset + page.size() / 2;
                }
            } else if (resultType == PageResult.APPEND) {
                mStorage.appendPage(page, ContiguousPagedList.this);
            } else if (resultType == PageResult.PREPEND) {
                mStorage.prependPage(page, ContiguousPagedList.this);
            } else {
                throw new IllegalArgumentException("unexpected resultType " + resultType);
            }


            }
        }
    };
在onPageResult()方法中根据resultType的类型执行操作,PageResult的三个数据类型分别对应者ItemKeyDataSource的三个方法:
- loadInitial:对应初始化状态PageResult.INIT
- loadBefore:对应初始化状态PageResult.PREPEND
- loadAfter:对应初始化状态PageResult.APPEND
此出分析初始化,回调的类型为PageResult.INIT,调用了PagedStorage的init()方法:
void init(int leadingNulls, @NonNull List<T> page, int trailingNulls, int positionOffset,
            @NonNull Callback callback) {
        init(leadingNulls, page, trailingNulls, positionOffset);
        callback.onInitialized(size());
    }
在init()方法中首先调用另一个init()方法记录加载的位置,并保存加载的数据,主要用于控制下拉加载,这部分我们稍后分析,然后调用callback.onInitialized(),在onInitialzed()方法中调用了notifyInserted(),在notifyInserted()中遍历mCallbacks回调callback的onInserted()
public void onInitialized(int count) {
        notifyInserted(0, count);
    }


 void notifyInserted(int position, int count) {
        if (count != 0) {
            for (int i = mCallbacks.size() - 1; i >= 0; i--) {
                Callback callback = mCallbacks.get(i).get();
                if (callback != null) {
                    callback.onInserted(position, count);
                }
            }
        }
    }
到此我们可以得出结论
- 加载的数据保存在PagedStorage中,并记录了加载的位置信息
- 加载完成后根据数据的变化,回调callback.onInserted()通知数据改变的数量和位置
那CallBack是从哪来的呢?应该是哪里需要哪里才会注册回调,想想数据位置的变化在哪个地方能用得着,哪个地方优惠根据position和count处理呢?答案就时Adapter
- PagedListAdapter
在前面的实例中,使用submitList()设置数据,而submiList()直接调用了mDiffer.submitList(pagedList)
 public void submitList(final PagedList<T> pagedList) {
        if (mPagedList == null && mSnapshot == null) {
            // fast simple first insert
            mPagedList = pagedList;
            pagedList.addWeakCallback(null, mPagedListCallback);
            return;
        }
    }
此处调用了addWeakCallback()添加Callback实例mPagedListCallback,
private PagedList.Callback mPagedListCallback = new PagedList.Callback() {
        @Override
        public void onInserted(int position, int count) {
            mUpdateCallback.onInserted(position, count);
        }

        @Override
        public void onRemoved(int position, int count) {
            mUpdateCallback.onRemoved(position, count);
        }

        @Override
        public void onChanged(int position, int count) {
            // NOTE: pass a null payload to convey null -> item
            mUpdateCallback.onChanged(position, count, null);
        }
    };
mPagedListCallback的onInserted()直接回调mUPdateCallback.onInserted(),在mUPdateCallback.onInserted()中直接调用Adapter的notifyItemRangeInserted(position, count)实现数据更新
5.4、数据下拉加载
Paging的好处之一就是自动帮我们实现了下拉加载的操作,其时他的实现是依靠adapter的滑动位置,根本的逻辑和平时自己写的滑动到底加载数据大致一致,都是根据可见position和数据量的比较触发加载,在PagingAdapter中的getItem()中直接调用mDiffer.getItem(position),
 public T getItem(int index) {
        mPagedList.loadAround(index); // 调用加载数据
        return mPagedList.get(index);
    }
在getItem()中处了获取到数据以外,还调用了mPagedList.loadAround(index)去加载数据,loadAround()方法中有调用了loadAroundInternal()
 @MainThread
    @Override
    protected void loadAroundInternal(int index) {
        int prependItems = mConfig.prefetchDistance - (index - mStorage.getLeadingNullCount());
        int appendItems = index + mConfig.prefetchDistance
                - (mStorage.getLeadingNullCount() + mStorage.getStorageCount());

        mPrependItemsRequested = Math.max(prependItems, mPrependItemsRequested);
        if (mPrependItemsRequested > 0) {
            schedulePrepend();
        }

        mAppendItemsRequested = Math.max(appendItems, mAppendItemsRequested);
        if (mAppendItemsRequested > 0) {
            scheduleAppend();
        }
    }
根据现在显示的index和设置的Config计算需要请求的数量,调用scheduleAppend()加载更多数据,
@MainThread
    private void scheduleAppend() {

        mBackgroundThreadExecutor.execute(new Runnable() {
            @Override
            public void run() {
                if (isDetached()) {
                    return;
                }
                if (mDataSource.isInvalid()) {
                    detach();
                } else {
               //调用DataSource的加载更多方法
                    mDataSource.dispatchLoadAfter(position, item, mConfig.pageSize,
                            mMainThreadExecutor, mReceiver);
                }
            }
        });
    }
是不是有发现了熟悉的身影,还记得初始化时调用的mDataSource.dispatchLoadInitial()吗?这里调用mDataSource.dispatchLoadAfter()方法,调用我们实现的loadAfter()加载更多数据,之后数据的显示都和初始化一致将PageResult.INIT换成PageResult.APPEND然后想Adapter中追加数据;
到此整个Paging的执行逻辑和原理都分析完了,从整体的流程看架构的设计还是有他独特的魅力的,架构的内涵读者自己体味,下面还有一点,我们知道DataSource的刷新是从调用Invalidate()开始的,有没有相过是如何实现的
- Invalidate()
@AnyThread
    public void invalidate() {
        if (mInvalid.compareAndSet(false, true)) {
            for (InvalidatedCallback callback : mOnInvalidatedCallbacks) {
                callback.onInvalidated();
            }
        }
    }
调用InvalidatedCallback 的onInvalidate(),这里的InvalidatedCallback其实在我们代码分析的第一步就添加了,还记得吗?在创建PageList时,调用了Factory.create(),之后就给DataSource添加了CallBack()
 // 创建CallBack
private final DataSource.InvalidatedCallback mCallback =
                    new DataSource.InvalidatedCallback() {
                        @Override
                        public void onInvalidated() {
                            invalidate();
                        }
                    };
// 添加CallBack
mDataSource.addInvalidatedCallback(mCallback);- invalidate()
public void invalidate() {
        ArchTaskExecutor.getInstance().executeOnMainThread(mInvalidationRunnable);
    }

 @VisibleForTesting
    final Runnable mInvalidationRunnable = new Runnable() {
        @MainThread
        @Override
        public void run() {
            boolean isActive = mLiveData.hasActiveObservers();
            if (mInvalid.compareAndSet(false, true)) {
                if (isActive) {
                    mExecutor.execute(mRefreshRunnable);
                }
            }
        }
    };
在invalidate()中执行了mInvalidationRunnable 中的run(),run()方法中有重新执行了mRefreshRunnable,还记的mRefreshRunnable执行了什么吗?对就是冲新创建了DataSource和PagedLIst,然后冲新加载数据,然后上面所有过程再来一次!!
本篇时整个组件的最后一篇其实也是最长的一篇(因为我最后写的),,因为Paging组件也是Jetpack组件中比较复杂的一个,使用频率也非常高,后期会针对自定义DataSource进行封装,好了这篇真的花了好长时间,感觉整个下午都在写这个,希望对自己对大家都有所帮助!