版权声明:本文为博主原创文章,未经博主允许不得转载。 https://blog.csdn.net/u010475041/article/details/78442603
CAS单点登录-多属性返回(十六)
再次强调,目前我们使用的cas版本为5.1.5
在业务系统的开发中往往少不了返回用户的一些属性,包括单属性以及多属性,例如用户的一些基本信息或者权限,部门角色等等,因为业务系统获取到这些信息可能需要做一些其他业务逻辑
本章目标
- 通过jdbc返回单属性,多属性
- 通过配置过滤策略,包括允许所有以及限制部分
- 介绍cas多属性策略
- 开放源码学习测试
实战
CAS多属性特性
首先先介绍一下cas能给我们做什么,因为在不同的部署环境数据隔离情况下,可能选型会稍微不一样
获取属性特性:
- LDAP(通过ldap查询属性)
- JDBC(直接查询数据库)
- JSON(静态文件配置属性)
- Groovy(通过脚本生成属性)
- REST(通过接口获取属性,若sso不能直接访问数据库考虑该策略)
其中最常用的为JDBC、REST这两种方法
限制属性返回:(由于接入服务端会有些不同要求,如A系统要求返回用户名B系统不允许返回用户名)
- Return All (所有配置返回的都返回)
- Deny All (配置拒绝的出现则报错)
- Return Allowed(只返回允许的主要属性)
- 自定义Filter(自定义过滤策略)
当然cas还支持其他多属性特性,这里不一一介绍,只把多用的简单列举,有兴趣自行到官网了解策略以及过滤
常用为Return All、Return Allowed
代码实战
本章只讲jdbc方式获取多属性
服务配置
{
  "@class": "org.apereo.cas.services.RegexRegisteredService",
  "serviceId" : "^(https|imaps|http)://localhost:8080/sample.*",
  "name": "CasClient-demo",
  "id": 10000001,
  "description": "CasClient-demo service",
  "evaluationOrder": 100,
  "theme":"apereo",
  "logoutUrl": "http://localhost:8080/sample/" ,
  "attributeReleasePolicy" : {
    "@class" : "org.apereo.cas.services.ReturnAllAttributeReleasePolicy"
  }
}
以上配置为允许所有属性返回,若是允许部分属性,则
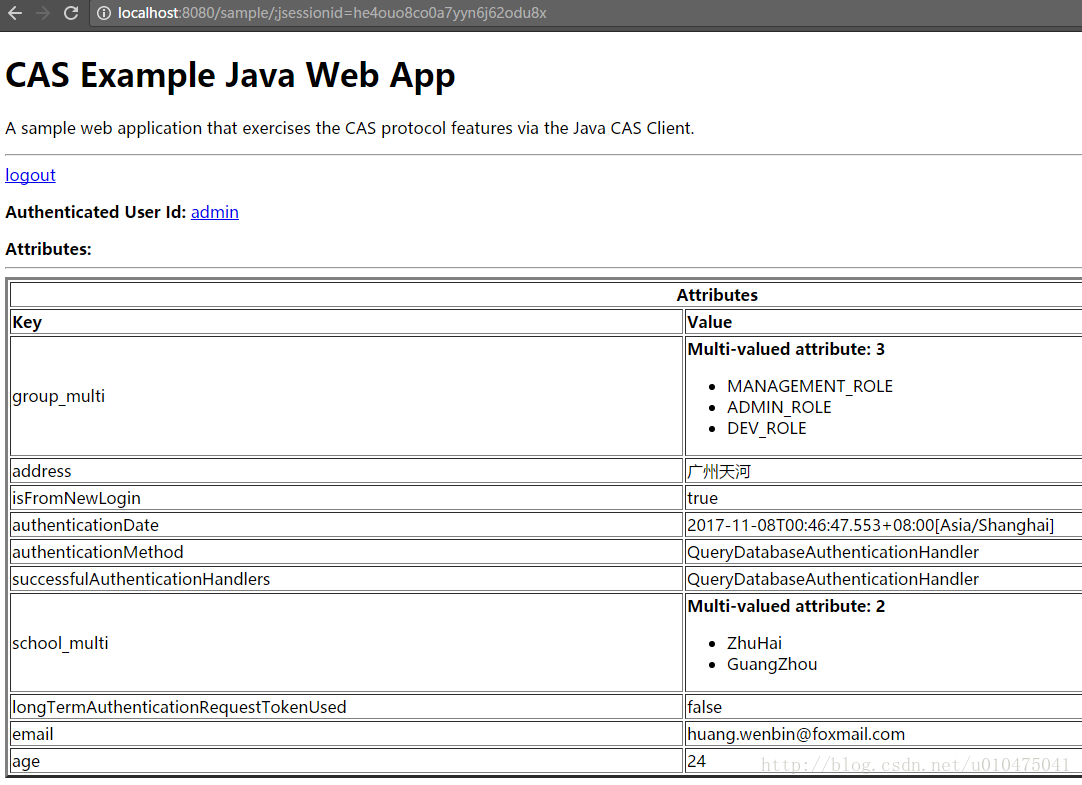
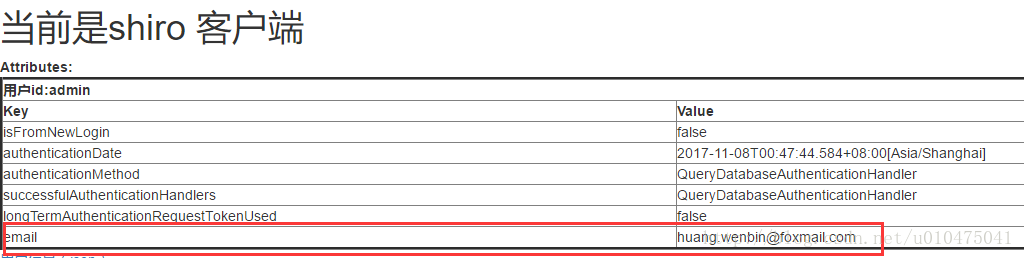
只允许school、email返回
"attributeReleasePolicy" : {
    "@class" : "org.apereo.cas.services.ReturnAllowedAttributeReleasePolicy",
    "allowedAttributes" : [ "java.util.ArrayList", [ "school", "email" ] ]
  }
属性查询配置
application.properties
## 多属性返回开始

###单行
# key为数据库的列,value为输出属性的key
cas.authn.attributeRepository.jdbc[0].attributes.email=email
cas.authn.attributeRepository.jdbc[0].attributes.address=address
cas.authn.attributeRepository.jdbc[0].attributes.age=age
cas.authn.attributeRepository.jdbc[0].singleRow=true
cas.authn.attributeRepository.jdbc[0].order=0
cas.authn.attributeRepository.jdbc[0].url=${cas.authn.jdbc.query[0].url}
# 以下属性为查询sql时,当为多个时逗号分隔,如填写username、email,sql会变成 select * from sys_user where username=${?} {and/or} email=${?}
cas.authn.attributeRepository.jdbc[0].username=username,email
cas.authn.attributeRepository.jdbc[0].queryType=OR
cas.authn.attributeRepository.jdbc[0].user=${cas.authn.jdbc.query[0].user}
cas.authn.attributeRepository.jdbc[0].password=${cas.authn.jdbc.query[0].password}
cas.authn.attributeRepository.jdbc[0].sql=select * from sys_user where {0}
cas.authn.attributeRepository.jdbc[0].dialect=${cas.authn.jdbc.query[0].dialect}
cas.authn.attributeRepository.jdbc[0].ddlAuto=none
cas.authn.attributeRepository.jdbc[0].driverClass=${cas.authn.jdbc.query[0].driverClass}
cas.authn.attributeRepository.jdbc[0].leakThreshold=10
cas.authn.attributeRepository.jdbc[0].propagationBehaviorName=PROPAGATION_REQUIRED
cas.authn.attributeRepository.jdbc[0].batchSize=1
cas.authn.attributeRepository.jdbc[0].failFast=true


#多行
cas.authn.attributeRepository.jdbc[1].attributes.group=group_multi
cas.authn.attributeRepository.jdbc[1].attributes.school=school_multi
#键值对
cas.authn.attributeRepository.jdbc[1].columnMappings.ATTR_KEY=ATTR_VAL
cas.authn.attributeRepository.jdbc[1].singleRow=false
cas.authn.attributeRepository.jdbc[1].order=1
cas.authn.attributeRepository.jdbc[1].url=${cas.authn.jdbc.query[0].url}
cas.authn.attributeRepository.jdbc[1].username=username
cas.authn.attributeRepository.jdbc[1].user=${cas.authn.jdbc.query[0].user}
cas.authn.attributeRepository.jdbc[1].password=${cas.authn.jdbc.query[0].password}
cas.authn.attributeRepository.jdbc[1].sql=select * from sys_attrs where {0}
cas.authn.attributeRepository.jdbc[1].dialect=${cas.authn.jdbc.query[0].dialect}
cas.authn.attributeRepository.jdbc[1].ddlAuto=none
cas.authn.attributeRepository.jdbc[1].driverClass=${cas.authn.jdbc.query[0].driverClass}
cas.authn.attributeRepository.jdbc[1].leakThreshold=10
cas.authn.attributeRepository.jdbc[1].propagationBehaviorName=PROPAGATION_REQUIRED
cas.authn.attributeRepository.jdbc[1].batchSize=1
cas.authn.attributeRepository.jdbc[1].failFast=true
## 多属性返回结束
数据
看看多行的数据如何列举
表结构:
/*
账号表
*/
CREATE TABLE SYS_USER (
  USERNAME VARCHAR(30) PRIMARY KEY,
  PASSWORD VARCHAR(64) NOT NULL,
  EMAIL    VARCHAR(50),
  ADDRESS  VARCHAR(100),
  AGE      INT,
  EXPIRED INT,
  DISABLE INT
);

/*
* 用户属性表
*/
CREATE TABLE SYS_ATTRS (
  USERNAME VARCHAR(30) NOT NULL,
  ATTR_KEY VARCHAR(50) NOT NULL,
  ATTR_VAL     VARCHAR(100) NOT NULL
);
数据:
---明文MD5数据

/*123*/
INSERT INTO SYS_USER VALUES ('admin', '202cb962ac59075b964b07152d234b70', '[email protected]', '广州天河', 27, 0, 0);


---用户属性表
INSERT INTO SYS_ATTRS VALUES ('admin', 'group', 'ADMIN_ROLE');
INSERT INTO SYS_ATTRS VALUES ('admin', 'group', 'MANAGEMENT_ROLE');
INSERT INTO SYS_ATTRS VALUES ('admin', 'group', 'DEV_ROLE');
INSERT INTO SYS_ATTRS VALUES ('admin', 'school', 'GuangZhou');
INSERT INTO SYS_ATTRS VALUES ('admin', 'school', 'ZhuHai');
INSERT INTO SYS_ATTRS VALUES ('zhangsan', 'group', 'DEV_ROLE');
测试结果
源码测试
测试步骤:
发现一些意外的事情可以考虑翻翻前面的博客进行学习哦
作者联系方式
如果技术的交流或者疑问可以联系或者提出issue。
QQ: 756884434 (请注明:SSO-CSDN)