该指南针的目标人群是已经知道如何建构简单的app,并且希望了解构建健壮的产品级app的最佳实践和推荐架构。
app开发者面临的难题
不同于大部分的传统桌面应用只有一个入口,并且作为一个整体的进程运行,Android app有更加复杂的结构。一个典型的app由多种组件构成,包括activity,fragment,service,content provider和broadcast receiver。
几乎所有的组件都在app清单里面进行声明,这样Android系统就能够决定如何将该app整合到整体的用户体验中来。一个优良的app需要在用户的工作流或者任务切换中应对自如。
当你想要在社交网络app中分享一张照片时会发生什么?app触发了一个照相机intent,然后系统启动相机app来响应。这个时候用户离开了社交网络app,然而体验没有被打断。相机app也可能触发其他的intent,比如打开了一个文件选择器。最终用户返回社交app完成了照片分享。当然分享的中途可能会进来一个电话打断了这个过程,然而在通话结束后还是继续。
Android中应用跳转是很常见的,因而你的app要能正确应对。始终要记住的是,移动设备是资源有限的,因而操作系统可能在任何时候杀死一些app以便给其他app挪位子。
这里的要点是app中的组件可能被单独启动并且没有固定顺序,还可能在任何时候被用户或者系统销毁。因为app组件是朝生暮死的,它们的生命周期不受你的控制,因此你不应该把数据或者状态存到app组件里面并且组件之间不应该相互依赖。
架构的一般原则
如果app组件不能用来存放数据和状态,那么app应该如何组织?
首要的一点就是要做到分离关注点(separation of concerns)。一个常见的错误做法是将所有的代码都写到Activity或者Fragment中。任何与UI无关的或者不与系统交互的代码都不应该放到这些类里面。尽量保持这一层代码很薄能避免很多跟生命周期相关的问题。请记住你并不拥有这些类,它们仅仅是系统和你的app沟通的胶水类(glue class)。系统根据用户交互或者低内存的情况在任意时刻销毁它们。因此坚实的用户体验绝不应该依赖于此。
其次你应该使用model来驱动UI,最好是持久化的model。首推持久化的原因有二,app在任何时候都不会丢失用户数据即便是在系统销毁app释放资源的时候,并且app在网络状况不佳的时候也能工作正常。model是app里面负责处理数据的组件,与app的view和其他组件独立,因而不受这些组件生命周期的影响。保持UI的代码简单并且不包含应用逻辑使得代码更加容易管理。基于定义良好的model来创建app,这样使得app更具有可测性和一致性。
推荐的app架构
接下来我们将通过一个用例来展示如何使用架构组件来组织一个app。
假设我们要创建一个UI用来展示用户信息,用户信息通过REST API从后台获取。
创建用户界面
UI由UserProfileFragment.java和布局文件user_profile.xml构成。
要驱动UI,我们的数据model要持有两个数据元素。
- 用户ID:用户的标识符。最好是使用fragment参数传递该信息。如果系统销毁了进程,该信息会被保留,当app重启后再次可用。
- 用户对象:一个持有用户数据的POJO。
我们将基于ViewModel类创建一个类UserProfileViewModel用于保持这些信息。
一个ViewModel用于给特定的UI组件提供数据,例如fragment或者activity,并且负责和数据处理的业务逻辑部分沟通,如通知其它组件加载数据或者转发用户修改。ViewModel并不知道特定的View并且也不受配置更改的影响,比如旋转设备引起的activity重启。
现在我们有三个文件。
- user_profile.xml
- UserProfileViewModel.java
- UserProfileFragment.java
public class UserProfileViewModel extends ViewModel {
    private String userId;
    private User user;

    public void init(String userId) {
        this.userId = userId;
    }
    public User getUser() {
        return user;
    }
}
public class UserProfileFragment extends LifecycleFragment {
private static final String UID_KEY = "uid";
private UserProfileViewModel viewModel;
@Override
public void onActivityCreated(@Nullable Bundle savedInstanceState) {
super.onActivityCreated(savedInstanceState);
String userId = getArguments().getString(UID_KEY);
viewModel = ViewModelProviders.of(this).get(UserProfileViewModel.class);
viewModel.init(userId);
}
@Override
public View onCreateView(LayoutInflater inflater,
@Nullable ViewGroup container, @Nullable Bundle savedInstanceState) {
return inflater.inflate(R.layout.user_profile, container, false);
}
}注意:上例中继承了LifecycleFragment而不是Fragment类,当架构组件中的lifecycle API稳定后,Android支持库中的Fragment将会实现LifecycleOwner。
如何连接三个代码模块呢?毕竟当ViewModel的user域的数据准备妥当后,我们需要一种方式来通知UI。这就轮到LiveData类上场了。
LiveData是可观测数据(observable data)的持有者。app中的组件订阅LiveData的状态变化,不需要显示的定义依赖。LiveData同样能应付app组件(activity,fragment,service)的生命周期从而避免内存泄漏。
注意:如果你已经使用了
RxJava或者Agera这样的库,可以继续作为LiveData的替代使用。如果使用这些替代库,请确保在相关LifecycleOwner停止的时候暂停数据流并且在LifecycleOwner被销毁时销毁数据流。你同样可以通过添加android.arch.lifecycle:reactivestreams依赖将LiveData和其他的响应式流库配合使用(如RxJava2)。
现在将UserProfileViewModel中的User域替换成LiveData,这样fragment就能在数据变化时收到通知。LiveData的好处是它能应对生命周期的变化,在引用不再使用时自动清理。
public class UserProfileViewModel extends ViewModel {
    ...
    private User user;
    private LiveData<User> user;
    public LiveData<User> getUser() {
        return user;
    }
}
然后修改UserProfileFragment以便订阅数据和更新UI
@Override
public void onActivityCreated(@Nullable Bundle savedInstanceState) {
    super.onActivityCreated(savedInstanceState);
    viewModel.getUser().observe(this, user -> {
      // update UI
    });
}
用户数据一旦变化,onChanged就会被回调,UI就能得到刷新。
如果你熟悉其他库中的可订阅式回调,你可能就会意识到我们没有在fragment的onStop方法中停止订阅数据。对于LiveData这是不需要的,因为它能处理生命周期,这意味着只有在fragment处于活动状态时(onStart和onStop之间)才会被回调。如果fragment被销毁(onDestroy),LiveData会自动将之从订阅列表中移除。
我们同样也不需要处理系统配置变化(例如旋转屏幕)。ViewModel会在配置变化后自动恢复,新的fragment会得到相同的一个ViewModel实例并且会通过回调得到现有的数据。这就是ViewModel不应该直接引用View的原因,它们不受View生命周期的影响。
获取数据
现在已经将ViewModel连接到了fragment,然后ViewModel从哪里获取数据呢?本例中,我们假设后台提供一个REST API,我们使用Retrofit库来访问后台。
下面是retrofit用来和后台沟通的Webservice接口:
public interface Webservice {

    @GET("/users/{user}")
    Call<User> getUser(@Path("user") String userId);
}
简单的做法就是ViewModel直接通过Webservice获取数据然后赋值给user对象。这样做虽说没错,然而app会变得不容易维护,因此这违反了单一职责原则。除此之外,ViewModel的作用域紧密联系到了activity或者fragment生命周期,生命周期结束后数据也扔掉毕竟不是好的用户体验。因此,我们的ViewModel会将这项工作委托给一个新的模块Repository。
Repository 模块负责处理数据操作。它向app提供了简洁的API。它们负责到各种数据源获取数据(持久化数据,web服务,缓存等)。
public class UserRepository {
    private Webservice webservice;
    // ...
    public LiveData<User> getUser(int userId) {
        // This is not an optimal implementation, we'll fix it below
        final MutableLiveData<User> data = new MutableLiveData<>();
        webservice.getUser(userId).enqueue(new Callback<User>() {
            @Override
            public void onResponse(Call<User> call, Response<User> response) {
                // error case is left out for brevity
                data.setValue(response.body());
            }
        });
        return data;
    }
}
repository模块看似没有必要,然而它给app提供了各种数据源的抽象层。现在ViewModel并不知道数据是来自Webservice,也就意味着这些实现在必要时可以替换。
管理各组件之间的依赖
UserRepository类需要一个Webservice实例来完成工作。可以直接创建,然而Webservice也有依赖。而且UserRepository可能不是唯一使用Webservice的类,如果每个类都创建一个Webservice,那么就造成了代码重复。
有两种方式可以解决这个问题:
- 依赖注入:依赖注入可以使得类声明而不创建依赖。在运行时,另外的一个类负责提供这些以来。我们推荐使用Dagger2来完成依赖注入。Dagger2在编译时审查依赖树从而自动创建依赖。
- 服务定位:服务定位提供了一个注册点,需要任何依赖都可以索取。实现起来比依赖注入简单,因而如果不熟悉DI,可以使用service locator替代。
这些模式都对代码的扩展提供了便利,既对依赖进行了清晰的管理又没有引入重复代码和额外的复杂度。还有另外一项好处就是便于测试。
在本例中,我们使用Dagger2进行依赖管理。
连接ViewModel和repository
public class UserProfileViewModel extends ViewModel {
    private LiveData<User> user;
    private UserRepository userRepo;

    @Inject // UserRepository parameter is provided by Dagger 2
    public UserProfileViewModel(UserRepository userRepo) {
        this.userRepo = userRepo;
    }

    public void init(String userId) {
        if (this.user != null) {
            // ViewModel is created per Fragment so
            // we know the userId won't change
            return;
        }
        user = userRepo.getUser(userId);
    }

    public LiveData<User> getUser() {
        return this.user;
    }
}
缓存数据
上面的repository实现仅仅抽象了web service的调用,依赖单一的数据源,因而不是很实用。
问题在于UserRepository获取了数据但是没有暂存起来,这样当用户离开UserProfileFragment再回到该界面时,app要重新获取数据。这样做有两个缺点:浪费了网络带宽和用户时间。为了解决这个问题,我们给UserRepository添加了另一个数据源用来在内存中缓存User对象。
@Singleton  // informs Dagger that this class should be constructed once
public class UserRepository {
    private Webservice webservice;
    // simple in memory cache, details omitted for brevity
    private UserCache userCache;
    public LiveData<User> getUser(String userId) {
        LiveData<User> cached = userCache.get(userId);
        if (cached != null) {
            return cached;
        }

        final MutableLiveData<User> data = new MutableLiveData<>();
        userCache.put(userId, data);
        // this is still suboptimal but better than before.
        // a complete implementation must also handle the error cases.
        webservice.getUser(userId).enqueue(new Callback<User>() {
            @Override
            public void onResponse(Call<User> call, Response<User> response) {
                data.setValue(response.body());
            }
        });
        return data;
    }
}
持久化数据
在当前的实现中,如果用户旋转了屏幕或者暂停并再次进入app,由于有缓存的存在,UI会立即渲染出数据。然而当用户离开app后几个小时系统杀死了该进程,这个时候用户返回到app会发生什么呢?
按照当前的实现,app会再次从网络上获取数据。这不仅仅是糟糕的用户体验,而且也浪费移动数据流量。最合适的做法就是持久化model。现在就轮到Room持久化库出场了。
Room是一个对象映射库,提供本地数据的持久化。可以在编译期检查sql语句。允许将数据库数据的变化通过LiveData对象的形式暴露出去,而且对数据库的访问做了线程限制(不能再主线程访问)。
要使用Room,首先定义schema。将User类通过@Entity注解成数据库中的表
@Entity
class User {
  @PrimaryKey
  private int id;
  private String name;
  private String lastName;
  // getters and setters for fields
}
然后创建一个数据库类
@Database(entities = {User.class}, version = 1)
public abstract class MyDatabase extends RoomDatabase {

}
请注意MyDatabase是抽象类,Room会自动提供实现。
现在我们要将用户数据插入到数据库。创建一个data acess object(DAO)。
@Dao
public interface UserDao {
    @Insert(onConflict = REPLACE)
    void save(User user);
    @Query("SELECT * FROM user WHERE id = :userId")
    LiveData<User> load(String userId);
}
然后在数据库类中引用DAO
@Database(entities = {User.class}, version = 1)
public abstract class MyDatabase extends RoomDatabase {
    public abstract UserDao userDao();
}
请注意,load方法返回了一个LiveData。在数据库有数据变化时Room会自动通知所有的活动订阅者。
现在修改UserRepository用于包含Room提供的数据源。
@Singleton
public class UserRepository {
    private final Webservice webservice;
    private final UserDao userDao;
    private final Executor executor;

    @Inject
    public UserRepository(Webservice webservice, UserDao userDao, Executor executor) {
        this.webservice = webservice;
        this.userDao = userDao;
        this.executor = executor;
    }

    public LiveData<User> getUser(String userId) {
        refreshUser(userId);
        // return a LiveData directly from the database.
        return userDao.load(userId);
    }

    private void refreshUser(final String userId) {
        executor.execute(() -> {
            // running in a background thread
            // check if user was fetched recently
            boolean userExists = userDao.hasUser(FRESH_TIMEOUT);
            if (!userExists) {
                // refresh the data
                Response response = webservice.getUser(userId).execute();
                // TODO check for error etc.
                // Update the database.The LiveData will automatically refresh so
                // we don't need to do anything else here besides updating the database
                userDao.save(response.body());
            }
        });
    }
}
注意,即便我们更改了UserRepository的数据源,UserProfileViewModel和UserProfileFragment却毫不知情,这就是抽象带来的好处。由于我们可以伪造UserRepository,对UserProfileViewModel的测试也更加方便。
现在我们的代码完成了。即便是用户几天后返回到同一个UI,用户信息也是即刻呈现的,因为我们已经做了持久化。与此同时,repository也会在后台更新数据。当然根据应用场景,太旧的数据你可能不会选择呈现。
在一些应用场景中,如下拉刷新,如果有网络操作正在进行,那么提示用户是很有必要的。将UI操作和实际的数据分开是有好处的,毕竟数据可能因为多种原因更新。
有两种方法处理这种状况:
- 更改getUser方法返回一个包含网络操作状态的LiveData,详情见附录。
- 在repository中提供一个公共方法返回User的刷新状态。如果仅仅只想在用户的显示动作(如下拉刷新)后显示状态,那么这种方式更好。
真理的唯一持有者(Single source of truth)
不同的REST API端点返回相同的数据是很常见的。例如,如果后台有另一个端点返回一个朋友列表,那么同一个用户对象可能来自两个不同的API端点,仅仅是粒度不同而已。如果UserRepository将Webservice的请求结果直接返回那么UI上呈现的数据可能没有一致性,毕竟来自后台的数据可能在前后两次请求时不同。这也就是为何在UserRepository的实现中,web service的回调仅仅将数据存到数据库中。然后数据库的变化会回调LiveData对象的活动订阅者。
在这个模型中,数据库充当了真理的唯一持有者,app的其他部分通过repository访问它。
测试
之前我们提过,分离关注点的一个好处就是可测性。让我们分别看看如何测试各个模块。
- 用户接口和交互:这是唯一需要Android UI Instrumentation test的地方。测试UI的最好方式就是创建一个Espresso测试。你可以创建一个fragment然后提供一个模拟的ViewModel。毕竟fragment仅仅与ViewModel交互,模拟ViewModel就能完整的测试该UI。
- ViewModel:ViewModel可以使用Junit。仅仅需要模拟UserRepository。
- UserRepository:同样使用JUnit进行测试。你需要模拟Webservice和DAO。你可以测试是否进行了正确的web service请求,然后将请求结果存入数据库并且在本地数据有缓存的情况下不进行多余的请求。因为Webservice和UserDao都是接口,你可以随意模拟它们进行更复杂的测试用例。
- UserDao:推荐使用instrumentation测试。因为这些instrumentation测试不需要UI,所有会运行得很快。对于每个测试你都可以创建一个内存中的数据库。
- Webservice:测试应该与外界独立,因此Webservice的测试也不应该请求实际的后台。例如,MockWebServer库可以用于模拟一个本地服务器以便进行测试。
- 测试套件:架构组件提供了两个JUnit规则(InstantTaskExecutorRule和CountingTaskExecutorRule),都包含在android.arch.core:core-testing这个maven artifact中。
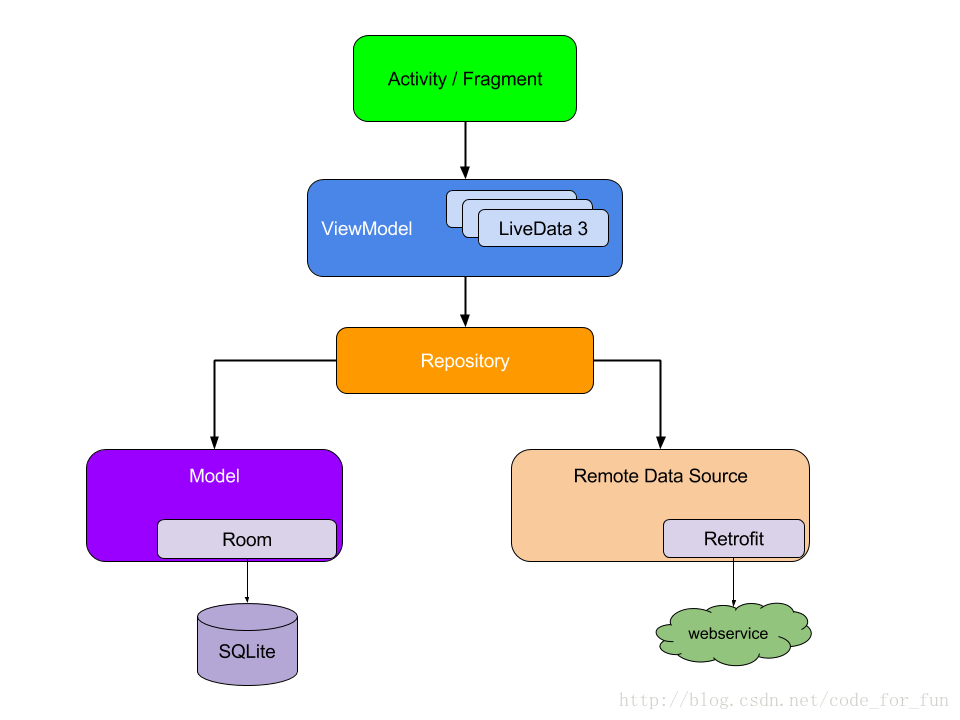
最终的架构图示
附录: 暴露网络状态
//a generic class that describes a data with a status
public class Resource<T> {
    @NonNull public final Status status;
    @Nullable public final T data;
    @Nullable public final String message;
    private Resource(@NonNull Status status, @Nullable T data, @Nullable String message) {
        this.status = status;
        this.data = data;
        this.message = message;
    }

    public static <T> Resource<T> success(@NonNull T data) {
        return new Resource<>(SUCCESS, data, null);
    }

    public static <T> Resource<T> error(String msg, @Nullable T data) {
        return new Resource<>(ERROR, data, msg);
    }

    public static <T> Resource<T> loading(@Nullable T data) {
        return new Resource<>(LOADING, data, null);
    }
}
// ResultType: Type for the Resource data
// RequestType: Type for the API response
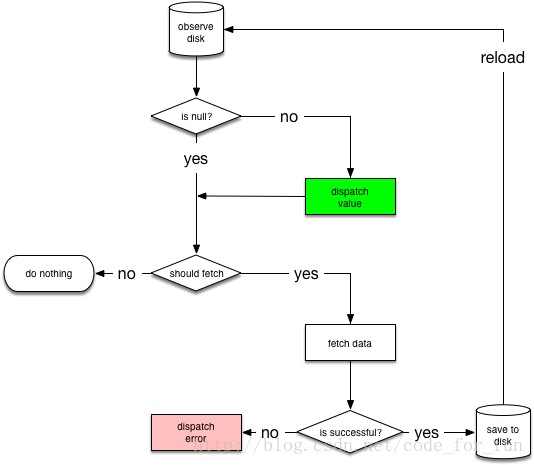
public abstract class NetworkBoundResource<ResultType, RequestType> {
private final MediatorLiveData<Resource<ResultType>> result = new MediatorLiveData<>();
@MainThread
NetworkBoundResource() {
result.setValue(Resource.loading(null));
LiveData<ResultType> dbSource = loadFromDb();
result.addSource(dbSource, data -> {
result.removeSource(dbSource);
if (shouldFetch(data)) {
fetchFromNetwork(dbSource);
} else {
result.addSource(dbSource,
newData -> result.setValue(Resource.success(newData)));
}
});
}
private void fetchFromNetwork(final LiveData<ResultType> dbSource) {
LiveData<ApiResponse<RequestType>> apiResponse = createCall();
// we re-attach dbSource as a new source,
// it will dispatch its latest value quickly
result.addSource(dbSource,
newData -> result.setValue(Resource.loading(newData)));
result.addSource(apiResponse, response -> {
result.removeSource(apiResponse);
result.removeSource(dbSource);
//noinspection ConstantConditions
if (response.isSuccessful()) {
saveResultAndReInit(response);
} else {
onFetchFailed();
result.addSource(dbSource,
newData -> result.setValue(
Resource.error(response.errorMessage, newData)));
}
});
}
@MainThread
private void saveResultAndReInit(ApiResponse<RequestType> response) {
new AsyncTask<Void, Void, Void>() {
@Override
protected Void doInBackground(Void... voids) {
saveCallResult(response.body);
return null;
}
@Override
protected void onPostExecute(Void aVoid) {
// we specially request a new live data,
// otherwise we will get immediately last cached value,
// which may not be updated with latest results received from network.
result.addSource(loadFromDb(),
newData -> result.setValue(Resource.success(newData)));
}
}.execute();
}
// Called to save the result of the API response into the database
@WorkerThread
protected abstract void saveCallResult(@NonNull RequestType item);
// Called with the data in the database to decide whether it should be
// fetched from the network.
@MainThread
protected abstract boolean shouldFetch(@Nullable ResultType data);
// Called to get the cached data from the database
@NonNull @MainThread
protected abstract LiveData<ResultType> loadFromDb();
// Called to create the API call.
@NonNull @MainThread
protected abstract LiveData<ApiResponse<RequestType>> createCall();
// Called when the fetch fails. The child class may want to reset components
// like rate limiter.
@MainThread
protected void onFetchFailed() {
}
// returns a LiveData that represents the resource
public final LiveData<Resource<ResultType>> getAsLiveData() {
return result;
}
}最终的UserRepository是这样的:
class UserRepository {
    Webservice webservice;
    UserDao userDao;

    public LiveData<Resource<User>> loadUser(final String userId) {
        return new NetworkBoundResource<User,User>() {
            @Override
            protected void saveCallResult(@NonNull User item) {
                userDao.insert(item);
            }

            @Override
            protected boolean shouldFetch(@Nullable User data) {
                return rateLimiter.canFetch(userId) && (data == null || !isFresh(data));
            }

            @NonNull @Override
            protected LiveData<User> loadFromDb() {
                return userDao.load(userId);
            }

            @NonNull @Override
            protected LiveData<ApiResponse<User>> createCall() {
                return webservice.getUser(userId);
            }
        }.getAsLiveData();
    }
}